Leaderboard


Popular Content
Showing content with the highest reputation on 07/25/2018 in all areas
-
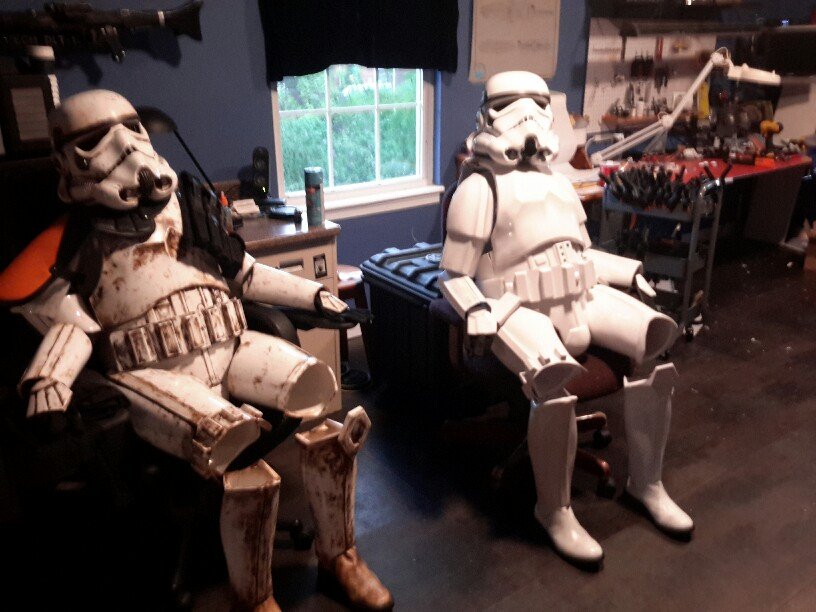
Thumpy~ thank you. Ukswrath, thank you, I will be contacting you at some point for an icom static burst setup. Darthcue, The side plate looks satin or semi-gloss but not glossy to me but, I am fine with reshooting mine to be glossy. What is with the side plate in the pic you posted? I have noticed it in a that pic and a few others. Looks like they are two parts and velcroed together. Oh well, Jim couldn’t get all the armor exactly as the screen used sets since his access to images was very limited at the time when he cast this armor set. Big Deal, yep you can cut them. I like how Yosh did his where he snaps them to the back plate and velcros them to the chest plate. I wish I had done that so I could detach them but I was not thinking when I hard mounted them to the back plate. No worries on your progress, I just wanted to prod you so that you can be the next approved ROTK. I also agree with all the detail in the kit, weathering will look great. Update, I realize that in my previous post I eluded to talking about the flexible fiberglass vs HIPS and I never got around to actually doing that so I will do that first. The flexible fiberglass that Jim uses is cool stuff but it has its issues. For that matter, any material uses to make costume armor has pros and cons. I have experience with HIPS since I molded and Vacuum Formed (VF) my Mandalorian armor. When I first considered doing a TK, the only kits I was aware of where HIPS kits. As several people have noted, the ROTK has more detail and getting that detail with VF is very difficult but not impossible. From working with this kit and not even performing a troop yet, I have noticed several cracks at stress points where I use Velcro to close parts. Consider the lower leg armor. If you permanently attach the two parts along the front seam and use the back seam to open and close the armor, you will most likely get cracks along the top of the armor closer to the front seam since you must open the armor enough to slide your leg into it. The thighs and biceps can be closed with Velcro as is required by the CRLs but you may never need to open them again since they can be slipped on over the limbs. So VF HIPS can crack as well but its way more flexible than this fiberglass in my opinion. Another issue with the fiberglass is that it must be painted and given the need for the armor to be flexible, the paint and clear coat needs to be somewhat flexible so it will not crack and flake off. This is why I chose to go with an automotive paint. Think about a door panel on a car. You can push on it and allow it to flex an inch or so. The paint will not crack unless you really bend it. Even serious dents will often not crack the paint. I just don’t think you can get that kind of resilience from spray paint. Alternatively, with VF HIPS, glossy white is widely available and would not need to be painted. Lastly, since fiberglass is rough on the inside, it needs to be coated with something to create a barrier between the undersuit or your body and the armor or it will wear holes in the undersiuit and be very itchy. VF HIPS does not require an interior coating. So the differences between the ROTK and the OTTKs seems to boil down to the helmet, Abdomen detail, and back plate detail (OII). Most of the other parts can be modified from a standard TK kit, at least enough to be within the CRLs for basic approval; albeit, lacking in the level of detail that you get from Jim’s kit. So considering these pro’s and cons, I think that each person needs to decide which route they are willing to go with building a ROTK. Like I said in my previous post, seeing what NaturalBornDT has done with his VF abdomen I am really intrigued with the idea of a VF ROTK possibility. And now back to the update. Last night I shot the black flex seal on the helmet opening trim. It came out nice. I do not know how resilient it will be but it looks good and should help to prevent scratching the bottom of the helmet. My only concern is that it will mark the shoulder straps where the helmet hits them when worn but I cannot determine this until I wear it and see how its does. Here are the shoulder straps after I sanded, primed and repainted them. This is before the clear was applied. And this is the bicep after painting and before clear coat. Lastly here is a good shot of the flat clear applied to the brow trim, tears, and temples, etc… I will reshoot the side plates with gloss tonight and get to work on reinstalling everything in the helmet. I am hoping for some updated pics of the full kit before this weekend with the corrections listed previously. Thanks for the interest.4 points
-
And to continue marching onward and upward... Was reviewing my submission photos and this cover strip was driving me crazy. It kinda worked out perfectly though. I remember glueing this in the first place and being frustrated by a slight curvature in the thigh armor. To fix, I just separated the upper two thirds of the coverstrip (yay E6000!), and reglued that portion to fit the bend. I’m very happy with it now. I have also added foam in the back of my left thigh (near knee crease) to help with the sniper plate issue. If you’ll notice, I already had some foam in the thighs due to a sizing issue (shimmed them and then lost weight). Foam is a lifesaver. I opted to glue velcro to my foam so it’ll be removable and replaceable if it gets permanently squished or nasty sweaty. I attempted wrapping the foam pieces in packing tape as I’d read somewhere on a thread, but then every time I moved I sounded like I was sitting down on my grandmother’s plastic covered couch. Didn’t think that sound was part of the CRL. I also added another small strapping to help keep the edge of my butt plate from wanting to flare. Sent from my iPhone using Tapatalk4 points
-
Hi Martijn, Tube stripes should be painted approx a pencil width from the cheek. Some recommend applying the template, then a light coat of white paint (to reduce paint bleed from the blue), then the top blue coat. Tube stripes can vary from 9 to 16 stripes per side. They don’t have to be even. Mine, for example, has one less on one side due to the positioning of the ears. Regarding how far forward to come, here’s a reference pic. This is the “Dave M” helmet. If you are concerned about the size of those templates, I’d highly recommend the TrooperBay “Dave M” style from TrooperBay. Here’s a thread I posted a while back about the Dave M templates: https://www.whitearmor.net/forum/topic/44755-tube-stripes-anh-stunt-dave-m/ This might help a little, too. This is TK4510, AKA TrooperBay, applying and painting the tube stripes. Best wishes Dan2 points
-
Thanks! Oops - was hard to tell in that one pic, but the tips are white. Here's a better view2 points
-
Devolver, Thanks and I am planning on going for EIB and possibly Cent. The helmet opening trim keeps getting scratched up even though it’s clear coated so I am considering masking it off and painting it with black flex seal. If this comes out nice I may do the same with the brow trim. Brain, Thanks brother. I have some thoughts about the flexible fiberglass vs HIPS that I will talk about later in the post. Darthcue, it looks to be about 7 but there may be some people who have built one and not reported their progress here in FISD. I was paging through several of the build threads and noticed several people (Big Deal) have started their builds but not finished them and Most of them started before me...So I think we should be hitting up these guys and pushing them to complete their ROTKs (ahem, Big Deal). Also, as I was looking at the build threads I found NaturalBornDT’s thread. This guy is scratch building the abdominal armor for his build. Reminds me of Yosh’s build and I am really impressed with his progress. Darthcue, thank you for the reply about the flat vs glossy. Are we sure the sides are glossy? I have already sprayed them with flat clear…… Update, Alright, so like I stated previously, the nuts in the shoulder straps keep coming loose. I removed them completely and filled in the holes with PC-7 and let it cure for 24 hours. I stopped at Ace hardware and spent an hour in the specialty hardware looking at various parts and thinking of ideas when I found these threaded inserts. I snagged a few of them and tested this out in a piece of wood. Once I was fairly confident this would work, I drilled ¼” holes all the way through the shoulder straps where they matched the holes of the back plate. I screwed-in the insert and then test fitted the whole thing on the back plate. The small crack you see next to the left hole is only a cosmetic crack in the paint. But this does bring up my only real concern about using this method. Given how the fiberglass has cracked in other areas I am hoping that it will be strong enough to hold the threaded inserts and no crack or break. Ok, so I used a ¼” hole punch on some painter tape and made some small ¼” circles that I placed insde the top of these holes to prevent anything from getting on the threads then filled the holes with Bondo. While the Bondo was curing, I need to add a metal D-ring to the end cap of my HFX E-11. I had a sling ring in my gun junk bin that closely matched the actual D-ring. Ok it’s not exactly oval but close enough and I needed something for EIB. I masked off all the stuff that needed to be sprayed with the flat clear and sprayed this stuff. I did this before seeing the post from darthcue telling me that the side plates are glossy. I can sand them and go back and reshoot them with clear. Once the Bondo was cured on the shoulder straps, I sanded them and applied a layer of glaze putty then sanded again. I mixed up a small amount of the white base coat and sprayed them. 45 minutes later I clear coated them. I did have a spot on one of the biceps where I removed some Velcro and it pulled the paint off the bicep. So I masked it, sanded the primer and reshot paint and clear on it as well. And that is it for the update. Thanks for the interest.2 points
-
The Staff has voted, and the winner of the STORMTROOPERS: Beyond the Armor book is Dave C. of the Empire Garrison! Vicky was a close second, and will receive the official 501st car decal. On behalf of Randy (magni) and myself, congrats to you both, and a big thank you to all who participated! I will PM the winners to get your shipping info.2 points
-
Name: Jenny Mehan TK Number: TK-21615 Forum Name: JenEcho Garrison: Capital City Garrison (Canada) Armor maker: AP Helmet maker: AP Cloth belt maker: AP Silicone hand guards: JustJoseph63 Neck seal maker: Geeky Pink Boot maker: TK Boots TK type: ANH Stunt Blaster: Brett Fulford Now that I've got a handful of troops under my belt, it's time to see if I've got the right stuff for EIB and Centurion. Thanks again for all your help here on these forums. This build can be overwhelming, but the advice and love from you guys kept me going. Link to my pre-approval submission: Front Left Back Right Close up left side Close up right side Pew pew Action shot Buttons Strapping Shoulder straps secured with elastic Belt Functional Drop Box TD with pan head screws Cod rivet Posterior snaps Functional snaps and rivet Male snap on right side Split rivets Ammo pack rivet Ammo pack rivet (interior view) Sniper knee Sniper knee Forearms with no return edge Squishy Helmet side Helmet front Other side Helmet back Green lenses S-trim Interior electronics Neck seal - Geeky Pink TK boots Blaster D-ring1 point
-
Congratulations Trooper and welcome to the Legion1 point
-
Huge congrats!!! You look amazing! Now to get going on a FOTK Battle Buddy build for the little one.1 point
-
I used 1/4” Chicago screws to attach plastic ammo pack to my canvas belt. (I personally put the screw side toward the armor in case I ever *needed* to remove it I could, since the other side has that button cover.) I thought about Velcro, but after reading several threads, I went with snaps (5/32” hole drilled in plastic, a loose solder iron hole in the canvas belt). Mostly to avoid Velcro wardrobe malfunctions and to keep the belt as flush to the armor as possible. Sent from my iPhone using Tapatalk1 point
-
One of the awesome parts about being in a small garrison? Besides essentially knowing all your fellow troopers?? Submitting your approval photos, getting GML approval, and 501st approval in the same day! TK-18131 reporting for duty! A pic with the other TK I built (now 9 months old) while building my armor. Sent from my iPhone using Tapatalk1 point
-
That would work, industrial strength would be the best option, or you could install snaps yourself1 point
-
Normally you would have two snaps or poppers to the front just behind the first box on each side of the plastic ammo belt. Like these photos, yes it is an anovos kit, but I added the snaps to both the belt and ab -------------1 point
-
I see what you mean. That can easily be sorted by sanding the tip area and exposing the resin, which is white. There are still a few details on the helmet I haven’t on worked yet. I also don’t like the brow position so I’ll try to take it a bit higher. Sent from my iPhone using Tapatalk1 point
-
Never heard of using those, but some single (or double) cap rivets work well and are fairly easy to apply.1 point
-
Alright. Now that I'm more secure on knowing how to use this paint and clear coat here's my most recent update: Finished up the Helmet. Letting it dry/cure and next Monday will enamel it (I'm giving it more than 3 days just because it's a real pain so I'm being more cautious with it.) I will also work on painting a few other parts so I can enamel them all next Monday. Oh so pretty. Can't wait to clear coat and get it smoother and prettier.1 point
-
Hahaha. I was wondering how long it would be before @CableGuy mentioned something. Anyway, I did the exact same thing! And for the TD clips, I just bought a pair of cheap tin snips (duct snips) and cut off the ends that butt up to the control panel. The control panel was still a little high, but this didn't cause any issues for approval - just one of those screen-accuracy things. Oh, Canadian Tire has the right size of pan head screws for your TD. I can send you the info for them later if you want.1 point
-
Yeah, the clips came with the kit. I actually tried to file them down a bit smaller, but quickly gave up on that because my lack of proper tools was causing extreme rage.1 point
-
You can cut them to fit bro... Sent from my iPhone using Tapatalk1 point
-
Speaking of the side plates, Is it okay to cut them back? I have enough to encircle me, but really only 5" or so are visible on each side.1 point
-
https://www.whitearmor.net/forum/topic/43940-what-is-detachment-affiliation-and-why-is-my-info-not-correct/1 point
-
Nice work, Jenny. You’ve fitted it really nicely to your frame. [emoji1303] All I’d mention (not said above) is that the thermal detonator is possibly a little small or the screws are rather large? And, something not clearance related but a possibly useful for other prospective troopers, the tube stripes appear to be on the opposite cheeks. This will not be noticed by joe public, just one of those finer details of the TK. (As I was dubbed “Tube Stripe Sheriff”, I couldn’t go without mentioning it). Best of luck with clearance. See you at EI soon. :-) Dan1 point
-
Not much progress at the moment unfortunately. I have decided how to put the ammo pouch on the thigh though. It will get less overlap on either sides so that I can line up the middle box with the coverstrip. It does look prettiest. I was hoping to move along with the bucket a bit, adding the stripes. I have this wonderful template, but it seems on the large side. So decided to first check here for tips. How fer should the stripes go? Mainly at the front, since at the back it will be part obscured by the ears of course1 point
-
Yum. That’s going to be a tasty trooper when it’s finished! ;-) Excellent progress, as always. :-)1 point
-
Thanks a lot for the hints! Next pictures will be uploaded there. @Sly11, once the blaster is done you can take the opportunity to upgrade yours with electronic:-)... Gesendet von iPhone mit Tapatalk1 point
-
Ron that's great you kept at it are nearing the finish line. I've watched the vids that are suggested and they are really good those guys all make it look easy.1 point
-
I am sure the side plates are gloss black bro Jeff... Sent from my iPhone using Tapatalk1 point
-
Thank you! ---------------------------- Tonight I started on the first forearm. Trimming for 15mm cover strips ended up being just right, just enough space to get my hand through and get the glove tucked back into the armor. I removed the return edge from the front as needed for Centurion approval but based on pictures from other AP build threads (mostly pre-trimmed kits) I also removed the return edge from the rear. I did try leaving a little bit at first to add some depth but it dug into my arm some, so away it went. Hopefully tomorrow I'll get to make some inner and outer cover strips and start gluing.1 point
-
More stable this way IMO. That tube is vulnerable and you'll be surprised how many times you bang things wearing pack. Anyway you put it on is up to you. Glad to see another Heavy coming along! Sent from my LGMS631 using Tapatalk1 point
-
Oh, I wasn't sure if linking to my pre-submission photos would be sufficient. I can definitely add them on here individually though1 point
-
Put on the first "coat" of abs paste on the back pack and as it dries/hardens I turned my attention to the belt. The rubber part of it was too wide so time to cut again…..used the fabric part that was included as guide (2") could just as easily used a ruler...the belt kit was a 2 part so I got the sponge (closed cell foam) from ebay. Started cutting and....hmmm...that smaller rubber band reminds me of something…. Liquorice!!!! After a well deserved treat it was time to cut the sponge and had it laid out for marking when it hit me Why not peel the adhesive and secure it, surely that`s gotta be easier and faster?! and---so I did, made a little rubber roll and placed it on the sponge and...well...rolled it on cut it and that`s that. And with all three layers (not cut to size yet though)1 point
-
Yea, I agree - I trimmed off more return so there'd be less outer pull. I'll decide whether i'll need to trim off more once the new elastic straps dry and I finish trimming the rear biceps.1 point
-
Just recently got started in the 501st. Never had the time to do this sort of thing, but always wanted to, since 1977. Decided I would have to make time. So far I have the TK approved. The TD is still under construction. I think they need more squad members.
 1 point
 -
Update time! So I stuck with the Rustoleum 2x for my paint to see if I could get it to work by better following the instructions on the cans. I had previously sprayed my hand plates and knee plates with two coats of the 2x gloss white. It covered really well even with lighter coatings of spray so I didn't really need more than two coats. From here I let this sit over the weekend (three days exactly) while I worked on filling spots on the rest of the armor components. Here's a visual representation of what you might be dealing with when filling spots. It seemed scary that I had that much to cover, but to be honest the spot filler is only going to make the parts smoother and more beautiful, so definitely use this as an opportunity to get very picky about what you are filling. I've found in some of my first runs filling spots I've actually missed some areas that I've gone back over and covered so I could have better outcomes. The best ways I've found to actually find where to cover are first, to use a well lit area or have a light close and nearby while you look from many angles. This will point out the little areas to cover. Next after you've filled, let sit for 24 hours, and then wet sanded back down with 600 grit. If you can't see anything, prime it again. This will either prove you've covered what you intended and are ready to paint, or that you have missed some spots. Again, take your time with this. It will prove worth it in the long run. Now from here I had let the previously painted pieces sit over the weekend and cure for a good 72 hours. I yesterday decided to take the risk again and use the enamel clear coat. And it worked out just fine. So I think I'm good to say that with Rustoleum 2x if you give yourself a good 72 hours before clear coat you shouldn't have the awful paint destruction like I had when I first did my helmet. Here's the results: Finally, I started the white paint on two more pieces that I had filled, primed and sanded. Their turn to cure for 72 hours. Forgive all the random messes. I'm using a lot of old plastic containers and all to rest the dried armor on just in case so I don't get it all over the house. I don't have very much room to store these in a garage or so at the moment. More to come!1 point
-
Not entirely related to armor building but my wife just gave me my own cleaning bucket so I made it ready to go we’ve had workers replacing all the Windows in our apartment so it’s about to be put to good use1 point
-
Imperial Attache Outstanding Achievement Award In order to recognize those who have gone above and beyond the call of duty as members of this program, the FISD would like to announce a new accolade: The Attached Outstanding Achievement Award ribbon, (as seen above) will be bestowed to those who consistently exemplify the meaning of Imperial Attaché, which will be added above their EIB or Centurion badge. This distinction will go to those who are not only consistently assisting present Troopers but helping future Troopers on their white armor journey as well. This includes greeting first-time posters, offering advice and guidance, assisting with EIB and Centurion levels and staying active on the FISD and/or their local boards***. Recipients are considered on the basis of a combination of those contributions and been an Attaché for at least one full year. These recipients are awarded based on going above and beyond their Imperial Attaché duties. This Thread will be Pinned and Locked to display the recipients of this award and serve as a reminder to us all of their dedication and unquestioned loyalty to the FISD and our mission. Thank You, Attaches. __________________________________________________________________________________________________________________________________ Joseph (justjoseph63) FLG Awarded May 2017 If anyone is deserving of this award the most it is him. A pioneer of the Attached program. Constantly on the FISD boards serving proudly on the Attaché Staff, FISD Staff and as a Deployment Officer. He offers a variety of items to help get your trooper to Centurion! One of the true Legends of this community. Glen (gmrhodes13) DSG Awarded May 2017 What can I say... the guy is truly a legend here on the FISD, so no explanation necessary. To be honest, if we could only give out one ribbon, it would go to him. Aaron (Pyrates) BG Awarded May 2017 With almost 3000 posts in 18 months (and 1800+ "likes") his record speaks for itself. His informative and helpful posts have been an enormous assistance to many, especially in the Badlands Garrison. Christoph (Ripper_L) GG Awarded May 2017 Our "main guy" in the German Garrison has also moved up to Admin. status, he continues to do us and the GG proud as Attaché A "Trooper's Trooper". Chris (themaninthesuitcase) UKG Awarded May 2017 Chris truly embodies the spirit of "Troopers helping Troopers". His participation and advice have helped hundreds, and both we and the UK Garrison are lucky to have him. Kyle (Zarlon) GLG Awarded May 2017 Kyle is constantly on the FISD, greeting new posters, offering advice, and encouraging everyone. In my opinion one of our best. Anthony (Redforce) ECG Awarded May 2017 A mainstay on the FISD, he always takes the time to greet new folks, has sage advice and is happy to share it. A definite PLUS for this program. Eric (Tolo) GFI Awarded May 2017 Another legend here in the FISD also serving dual roles as Attaché and Admin. A plethora of information, he is always willing to help out anyone who needs it. Christian (v7sg) PRG Awarded May 2017 Besides doing the I.A. patch run, he is a fountain of knowledge and is always there to help, especially for those going for FOTK. Gary (flashpoint0214) FLG Awarded May 2017 Gary is incredibly active on the FLG boards and very active in the Makaze Squad, also serving as the Charity Liaison. He (and his father, also a Centurion) hold frequent armor parties and have been responsible for countless basic, level 2 and 3 approvals for TKs in central FL. Steve (starsaber25) ECG Awarded May 2017 Although Steve has moved up to the Admin. staff, he also serves as one of our best Attaches and does an outstanding job in both roles. Tony (ukswrath) GGG Awarded June 2017 ... Really? Ok. It's Tony. Probably helped you with your TK if you were on these boards. How many tutorials did this guy make? I mean seriously.. What can I say. Tony has been an extraordinary asset to the FISD and troopers around the world. In addition to serving as one of our D.O.s and helping folks on a daily basis, Tony's build threads have been viewed over half a million times! With over 8,000 posts to his credit, his contributions to the FISD are legendary. Andrew (Sly11) RBG Awarded June 2017 The "Wonder from Down Under" is also one of our D.O.s, and his knowledge of armor is simply amazing. His white armor wisdom and sage advice have helped countless Troopers become members of the 501st and FISD as well as join the ranks of EIB and Centurion Allan (allan1313) ECG Awarded June 2017 Also a mainstay here and one of our best I.A.s by far, he exemplifies the "Troopers helping Troopers" motto. Randy (magni) NEG Awarded June 2017 Is always in the forefront of providing great information, greeting new folks and assisting future and approved TKs with advice and guidance. Kalani (kman) SoCal G Awarded September 2017 A member since January of 2016, Kalani has consistently been an exemplary team member of the I.A. program and has gone above and beyond in all aspects of the position, especially in the area of welcoming new folks. Christian (Novak Dimon) GG Awarded September 2017 As a member of our German Garrison, Christian has reached out to members of the FISD worldwide and used his knowledge to help them on their white-armor journey. Shane (Shanester) BAG Awarded February 2018 Shane continues to amaze me with the amount of time and effort he puts into sharing his knowledge and making new folks feel at home here, exemplifying the spirit of "Troopers helping Troopers" He sets a pace that I hope all others will follow, and see bigger things in his future here at the home of shiny white armor Sarah (Alay) CTG Awarded June 2018 She has been serving with the FISD as an Attaché for well over a year. The most notable service is for her tiring and relentless efforts in the most recent FISD racing shirt run. This is a true labor of love, and we feel that is well deserving of this prestigious award. Ben (Buttons) CG Awarded July 2018 Ben has been serving with the FISD as an Attaché for well over a year! Ben is recognized for his continued efforts in the Attaché program, but most recently hosting and re-opening popular FISD ID Badges for the community. We love the new designs! Daniel (TheSwede) NG Awarded August 2018 Daniel has been on the front lines giving troopers extremely detailed advice. He is on the boards almost every day if NOT every day! You can see the passion in his posts. More Attaches can look to him as an example! Luc (Lucnak) CCG Awarded October 2018 Luc has been an extraordinary part of the I.A. team and is currently at the forefront of assisting new FO TKs. His experience and loyalty to the FISD are unquestionable with his great advice. We are honored to have him part of the team. Christine (Cricket) GG Awarded October 2018 Christine has been an extraordinary part of the I.A. team! No doubt that you may have already seen her vertically challenged build threads that many troopers referenced. She is a valuable resource and we are very lucky to have her on the team. Brien (Harbinger) CCG Awarded November 2018 Brien has earned this award for his countless contributions for the FISD & Attaché Program. Most merch that you have purchased, may have been designed by this trooper. His continued efforts on his graphic skills are something that should be celebrated and recognized. Today we salute you Brien! Mario (TKSpartan) CRG Awarded March 2020 Mario has been a constant, positive presence here on the boards, and is doing an incredible job as an Attache, going above and beyond the call of duty Eric (Hoda) SGG Awarded Augst 2020 Eric has received his award for the work he has been doing with the FISD trading cards. Today we salute you Eric! Justin (TheRascalKing) SGG Awarded June 2021 Justin did such a great job stepping up and keeping the pin run organized and running smoothly. The staff has all seen a lot of great comments on social media on how well this went. Today we salute you Justin James (jsilvius) GT Awarded October 2021 As we have in the past, I would like to officially award James the Attaché outstanding achievement award for exceptional service to the detachment for undertaking a large scale merch run. He not only helmed the Anniversary coin run, but did it efficiently and shipped all coins out in record time. Brilliant job James, the staff are truly grateful, as I am sure the membership are also. You are a credit to FISD. Arthur (giskard8) HKG Awarded January 2024 A seasoned veteran of the Detachment, when Arthur is not trooping he can be found welcoming new members to the forum and congratulating our new and higher level approvals. His actions contribute to the long tradition of FISD being the friendliest forum in the Legion, and no doubt Arthur will continue to consistently be at his Attaché post! Today we salute your unquestioned loyalty, Arthur! Gerald (Doggydoc) CG Awarded January 2024 It's nearly impossible to sneak in a new member introduction or special approval post without Gerald jumping in and welcoming the aspiring builder or joining the celebration of the new approval. He is also known to provide valuable input and helpful feedback throughout the forum. Today we salute your unquestioned loyalty, Gerald! __________________________________________________________________________________________ ______________________1 point