Leaderboard


Popular Content
Showing content with the highest reputation on 07/23/2018 in all areas
-
TK-20980 reporting for duty. Approved and I got the shirt ordered last night!!!! My GML has been watching this build thread and echoed what you guys have said here for me to correct, but I am approved and a full-fledged member of the 501st now. Update, As I stated earlier, I have already adjusted the drop boxes so they hang just shy of ½” and I altered the straps that the shoulder bells hang from so that they are about ¼” from the shoulder straps. I held off on cutting down the ab plate until I get a second set of hands to mark them (most likely Thursday). As Big Deal had pointed out previously and darthcue stated here, the gloss over the painted parts on the helmet should not be glossy. I will grab a rattle can of flat or sating clear tonight and mask off the areas to be coated. So I need to know if the other areas that were painted need to be flat as well. Specifically the thermal detonator and the black side plates? Other than getting approval, reclaiming my workshop has been one of my primary motivators. I also redid the inside of my helmet. I used a combination of Army combat helmet pads and some floor foam to make the harness. It is way more comfortable and provides for better air flow. I went ahead and built my two fan system and installed it along with the power pack. I will continue to use tape to hold the vents in place until I come up with an effective method to mount them. I will not be apply flex seal to the inside of the bucket because I do not want to add anything that will help insulate the helmet and make it hotter than it already is. Flex seal application has gone well and mostly everything is coated and drying for the next 24 hours. So let’s discuss where I go from here. I will be building the Jedah patrol pack and a T-21 then weathering my TK to get TD approval. None of that will be finished until after DragonCon so I should get one or more troops under my belt before apply for TD approval. So for the T-21, I am considering two different approaches and wanted to get you guys input. The first option is to order a cast version of the parts from someone casting them either here on FISD or MEPD. This will include everything except the barrel which will be made from PVC. I think this kit sells for 100+ dollars. The second option is to order the completely disassembled 3D model from a guy on Etsy for 50.00. I can print the parts I need and still make the barrel from PVC. What do you guys think? I will be starting a build thread over on MEPD for these parts and I will link it here once I make that move. I will continue to update this thread until the TK is completely done. I wanted to thank you all for the support and assistance you guys have provided me here. FISD will always be my first home for my first 501st costume. Well that is it for the update. Thanks for the interest.3 points
-
Thank you so much!! Thanks! ------------------------ Today I finished the rough pre-trimming of the armor bits, it was nice to get that out of the way! At the beginning I sort of wished I had asked about buying a pre-trimmed kit, but my confidence level with this project has improved a LOT after just doing what I've done so far with the armor and helmet. Next I plan on starting with fitting the arms like most people do and then do the fine trimming & finishing as I work on each bit.3 points
-
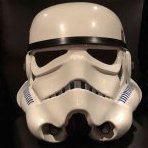
Ukswrath, Thank you and I am happy with the kit overall. I just hate the imperfections but I will fix them or learn to live with them. Update… Today has felt like a horrific Chevy Chase comedy. Well let me back up. Yesterday I finished masking off the helmet and then painted it. Masking those teeth was a real pain but I got it all done. After that I pulled all the masking off and went back in with a small brush and did the outline of the tears and the boxes above the eyes. I didn’t see score lines around the two boxes on the back so I guess they don’t get the outline. Next I put all the stuff that needed another layer of clear in the paint booth and took all the other parts out. Then I shot the clear on these parts. At this point I realized that I could go for GML approval on Saturday and I may actually make the 11pm Sunday racing shirt cut off. I would hold off on doing the flex seal on the inside of the parts until after approval. So, while the newly coated parts were curing I started to assemble the other parts and putting Velcro on them. So Saturday I got up and took my dog for a walk and got my Starbucks on. I came home expecting to finish the helmet and when I pulled the cured clear coated parts out I discovered that the clear coat did not like the black airbrush paint I used. Here you can see the side plates are heavily pitted. The brim on the helmet was just as bad. OK, Don’t panic… Just mask off the black areas, sand them with some 600 grit and recoat. Yes this will push your timetable back but you can do it. So I did just that and it did help somewhat but the pitting is still there so I had to run with what I had. Luckly, the clear coat is dry to the touch at 90 minutes and cured after 8 hours of air drying. So when the helmet was dry enough to handle, I put the screens inside and secured them with tape. I cut up a construction helmet and used the harness inside my helmet. I attached the Hovi mics and the lenses. Lastly, I superglued front pipes thing and the helmet was done “for approval”. Next, I emailed my GML and let him know to expect pictures by 9pm “ish”. I put on my kit and tried to take some pics but the damn reverse “selfie” camera kept washing all the detail out. Here is an example. Up close it works fine. So once again the universe was doing everything it could to prevent me from getting that damn racing shirt. I stopped working on this crap and got something to eat. Then I ask my wife to take the pics for me and they came our great. So I sent the pics to the GML and we will see if I get approval and a racing shirt tomorrow. As for the kit. I will re-think the inside of the helmet and start applying flex seal to the inside of everything. If I still have time before DragonCon, I will fix the back plate and possibly redo the black helmet brim and side plates. I wish I had time to build the T-21 and the Jedah pack but I just don’t thing I will have time to complete them. Well that is it for the update. As always, thanks for the interest.3 points
-
I'm doing an Anovos kit, but I found that TK1636 Mike had some great tutorials and information. Sent from my VK815 using Tapatalk2 points
-
If you like it then leave it, you are good to for approval on both counts2 points
-
Guys thanks for the input. Based on your suggestions, I have already fixed the shoulder bells and drop boxes, I can cut down the ab plate tonight. I have already started applying the flex seal to the inside fo the armor so I wont be able to put anything on for another 24-48 hours.2 points
-
Hey everyone, Pleasure to meet you all. Just a bit of an introduction. I am living in Prince Edward Island, Canada and have been a long time Starwars fan since a young age. I was introduced to the 501st by a current member who lives close to me and could not be more excited to get things together. I have recently purchased my untrimmed TK armour from AP (Helmet Trimmed) which was delivered last week and am very pleased with it so far. I have since started to trim everything and am having alot of fun doing so. Here it is unpacked.1 point
-
I’m really impressed with how much you’re looking into it. I’ve no doubt that you’ll end up with an epic TD. :-)1 point
-
Thank you for posting the different photos, Jose. Again, as you know Centurion is all about the details and looking sharp. Please take care of the following so that we may move your submission along: 1. I am glad to see that you got a new set of boots, but please remove the dirt from the soles (unless you are going for Sandie, lol). 2. Thank you for updating your hovi-mic tip details, but I see you have removed the tube stripe decals from your bucket and replaced them with painted ones. Unfortunately, you will need to clean up those stripes up before proceeding. The lines will need to be crisp and sharp as seen below in the reference image. Once this is done, please post the required left and right pics of your bucket. Reference image We also still need the a close-up photo showing that you have the correct flat "pan head" TD screws as required in the CRL. Clips shall be attached with slotted, pan head style screws These are the type you will need: As per the CRL, you will need to bring the clips in close to the end caps Thermal detonator belt clips are positioned with little to no gap between the clips and the end caps Reference image1 point
-
Nice work Greg!1 point
-
Thanks for the input. The other part that was brought up is these flat spots near the butt joints. Sent from my iPhone using Tapatalk1 point
-
Awesome, man! Congrats on approval and welcome to the 501st! The armor looks incredible and the helmet interior is great. I hope you decide to apply for EIB and Centurion.1 point
-
1 point
-
It doesen’t, that’s why I said optional And I wasen’t totally clear I meant the rear tab so I’ll edit that. @REAPERofDAISYS the more I think about it the more I feel that those flat sections may be a hard sell for L2/L3 but I think it’s best to let the DO:s chime in on that so you don’t have to work getting the coverstrips of and it wasen’t absolutely necessary (still think it will look much better though) so....calling @ukswrath and @justjoseph631 point
-
Thanks for the advice! That's what I had in mind, so it's good to know I'm on the right path.1 point
-
Good spot. Thank you, Daniel. :-)1 point
-
After thinking about it and looking at the CRL I have decided to cut the back plate making it butting up to the bottom piece and glue it with an inner strip, the pack in the CRL has no visible line at the bottom and mine has so as I´m going to fill that I might as well get that bottom seam seamless as well.1 point
-
Now the real fun begins I would suggest that you see how the parts work together (thighs to shins, shins to boots, thighs to cod/ab, bicep to forearms, being able to bend your arm putting on/removing the helmet) and how they look (size-wise) in relation to each other before any permanent cuts is made1 point
-
Came out great Keep it up your almost there One tiny little suggestion would be to straighten the corners on the ab button plates to match the original if you feel like it1 point
-
It has been added to EIB and so it also applies to Centurion And Dan is correct, yours are dome head so you`ll need to replace those for EIB and Centurion even though you had a hard time finding them I´m sorry to say. From CRL: OPTIONAL Level two certification (if applicable): Clips shall be attached with slotted, pan head style screws, and be black (two per clip). Thermal detonator belt clips are positioned with little to no gap between the clips and the end caps. That beeing said I have some more suggestions to improve the overall look and as you said yourself, trimming down the forearms is a good decision and I wouldn`t stop there, all your limbs look like they could benefit from coming down a size and it looks as you have the room to do it and as a bonus you would be able to reduce the amount of flat edge showing on the pieces, you want as little as possible showing on front of thighs, shins and forearms and basicly none on the biceps, back of thighs, forearms and shins...The ATA armor is made with those "extra" flat edges that really shouldn`t be there so one just have to work with what one got making the best of it. And as you mentioned the shoulders I would suggest not only shortening the strapping but also switch them right to left, the back has that nice ANH swoop that will make the front look better, from CRL: OPTIONAL Level three certification (if applicable): There should be a minimal gap between the shoulder armor and the chest/back plates. I would also remove that last big bump in the back of the shoulder bridges as they are non-existing on the movie suits. This might seem like alot but apart from the TD screws and the shoulder gap my recommended suggestions are optional Keep it up trooper1 point
-
Looking really good. Sent from my iPhone using Tapatalk1 point
-
Great work on replicating that chest pattern1 point
-
The suit is perfectly fine. Myself and many members have NE. I was just approved with my 2nd EIB award with it.1 point
-
So it begins ... haha Sent from my iPhone using Tapatalk1 point
-
This is the build guide from BSP:s FB page, a mix of trimmed/untrimmed parts so looked around a bit and found a pic showing most parts trimmed and basicly it looked like all you remove is the lip around each piece. So that`s what I started doing but first here`s the guide. Looks easy enough I will show the parts as untrimmed/trimmed After I had all the parts trimmed I started testing how they should go together and altough the guide says to start with the front pieces I ended ut starting with the back, to me that was the only piece that were set in how it should be so I taped it with the side pieces and one can see how the top part sticks out, looked really odd but after consulting the CRL all was good. Next up was the front parts and after some testing I removed a section from the top part, you can see were I removed in this pic but will show more clear below. They go together like this Taped them up as per CRL, lining those small tabs that goes across the top plate in line with the top part of the back piece. I coulden`t get it to fit properly with just overlapping so it became clear that more cutting is needed, atleast I had to, so I removed a section from the top piece, to the right of the pencil mark, a bit hard to see with all that tape but that did the trick. Bottom piece: this shape made me think it would overlapp the back piece No that didn`t seem right.... Perhaps the back should overlap the bottom, sure looks like it and then you would have a gap at the bottom as well as the top, some sort of filtration system perhaps….checking CRL to confirm. Nope no gap, which means the bottom overlaps the back as originally thought. More cutting was needed so marked the overlap traced the mark to section to get removed, X marks the spot only remove the lower lip. Still didn`t fit well….found the reason, the bottom piece has a lip so neded to remove a section from the back piece as well. Marked were the overlap ends Measured the lip, 6mm, also showing the section removed Drew a line 5mm in from the overlap to ensure I remove enough Then cut Checking I didn`t mess up - nope all good, tape can`t hold it together completely Ready to be glued but that`s for another day. The top cover is going to be functional with some sort of a hinge so that won`t be glued though, have to come up with a way to do that, has some ideas but some more thinking is needed. When compairing to the CRL the cover is closer to the bottom but the CRL cover is bigger overall so not much I can do but possibly lower it to even it out a bit.1 point
-
That’s my plan. To keep improving until I can get Centurion. We will be keeping our “workshop” set up while my husband finishes his R1 DeathTrooper, so I’ll keep making adjustments most nights! Sent from my iPhone using Tapatalk1 point
-
Hi Jesse, Sorry, I did not wanted to criticize the way of how you are building your blaster, you doing a very outstanding job here. Thanks for the hint with the speaker! I double checked it now and recognized that mine is a tinier one, without the metal around. I would like to pull the charge handle as well, so I thought about having a black little tube in between the coils, to get the wires through. Then you can compress the coils without damaging the wires. By the way, I am a daily visitor on your build… looking forward to the next pictures! Well done until now! Marko1 point
-
Hi Ron, Exciting to hear that your armour is coming on well. The helmet is really rewarding when it’s done so try to enjoy the journey. Q1. I am doing an ANH TK Stunt. From what I know, all of the markings need to be hand painted, correct? I have a stencil set already, but I thought I saw somewhere that the mouth can be cut every other piece with a black grill put in behind it - to allow for a little ventilation. Is this correct, or does the mouth have to be completely kept on and painted? Hand painted better suits the originals so it is generally the preferred method. The teeth are opened/cut - for ANH Stunt, this is 4 per side to comply with the CRL. (Some screen used helmets had more or less but most had 4 holes per side). I found that Mike from TrooperBay gave a superb set of painting tutorials. 2. I am looking for the best tutorials that even the dumbest, least skilled builder can follow... ok, this isn't a question - it's more of a plea for help! This is the tutorial that I personally followed. This is my armour maker, Ross of RWA), making one of his lids. I found this incredibly clear and helpful. *Be advised that this suits his helmet, so check out other builds of your armour maker if you can. 3. Who can put me on to the best place to buy the liner for fitting on the inside of the helmet? Don’t really have a liner for mine. Went for tactical helmet pads and blacked mine out with self adhesive sheets of EVA (craft foam). Feel free to post any more questions. :-) Dan1 point
-
Yesterday night i was able to work on the End Cap Clip and on the T-Racks of the Barrel. I like the T-Rack details of some Threads here in the forum, so i decided to give it a try to do the details as well. For the T-Racks i used the Dremel Metal Cutting Wheel, to remove the unneeded resin of the Racks. For the little holes of the racks itself i used a very tiny molding cutter. I am very pleased with the result. When i saw the results that can be achieved when working focused on the pieces, i decided to go on with the end clip as well. I used E6000 adhesive to glue the pieces together. After this was done Green Stuff was used to fill in the gaps. Now everything is smooth :-).
.JPG.97ebec192381d98094c1f119c231f818.JPG)
.JPG.cfc3ab0e81c93d1a9cd1c4ff81711f5b.JPG)
.JPG.41555785e20abc272e191dddf596f5ee.JPG) 1 point
1 point -
Very nice. Lovely, neat job. Can’t see any clearance issues of note. Just watch those pesky drop boxes! Lol (Don’t worry - mine do the same now and again). [emoji1303] All I might add is that you could extend the frown paint a little more, beyond the undrilled 5th hole for that extra bit of Stunt, if you wanted to. :-) Best wishes Dan1 point
-
So, I have requested pre-approval. I know this is a marathon, and I know I still have lots of small things that I need to tweak, but I am at the point in the journey where I need to sprint. After over a year of working, I'm itching to finally have a TK ID. So, any who follow me here, head on over to put in your two cents. PS-- I already know I need to figure out how to fix that sniper knee plate. It's wanting to tuck under my thigh. Suggestions?1 point
-
Hoping to have some “full kit” (yes, with pants on!) pics in the morning. I know you are all waiting with baited breath.. I did water bathe the shoulder straps. I think they look much better. Also, I attached my thigh ammo belt (sorry, no picture). But, due to a previous error, I only had 1 split rivet left. So I used one split rivet, and one double cap rivet... will this need to be corrected before L3? Sent from my iPhone using Tapatalk1 point
-
Assembled some more limbs! I am starting to see a hint of a stormtrooper.. Also made the elastic shin-closure hook thingymajigs: Hit the hooks with some white spraypaint Also went out and got the last part that I need, gloves! Would the knurling on the topside (on fingers) of the gloves be a problem?1 point
-
Thanks again to everyone for the advice. My application was approved. With some additional research, advice, and time permitting it's time to work towards the next level.1 point
-
I'd like to make a few points here. It's nice to offer help when you're a master builder here but take in consideration that this recruit is new and nervous and is dealing with a commissioned set. So his building expertise is limited. Your post came in kinda HOT and didn't end well with saying another Troopers idea is " Stupid" Remember, Troopers helping Troopers! My other point is I have a friend who commissioned a set from RS and I helped him with final fitting for approval and I had to restitch all the snaps for him. RS doesn't put much stitch to them. Really just enough to get it out the door. Learning to fix your armor will come in time. Good Luck with fixes and approval!1 point
-
It's the case of the Incredible Shrinking TK! This kit was sized to fit my 5'4" frame, but now I'm going to make it fit someone even smaller. She is five- yes, five inches- shorter than I am. My small garrison buddy came over yesterday for a few hours to get some serious sizing for the (what used to be my) TK. As we begin on this part of the build, here's a "weird but true" story for ya... A few months ago I bought a pair of black leather Chelsea boots on eBay for display on my mannequin. I didn't care that they happened to be a tiny size 5- they were only $10 shipped. I just needed something for display purposes. A few months later- when my garrison friend told me that she wanted to buy my TK- I found out that she had been having a really, really hard time finding approvable white TK boots in her size. Her size? Size 5! I had already airbrushed the boots with white leather paint, so they looked awesome, and are 100% approvable. When she came over yesterday, she tried them on, and it was a total Cinderella moment- they fit! The ab/kidney that I did not cut down was much too long on her. I ended up removing the butt plate and putting it back onto the kidney/ab that I had previously shortened. It fits her nicely! Hurdle one cleared. Next we test fit the chest and back plates with the rest of the armor. The photos are of the kidney/ab that was not shortened. I didn't get much time to stop and take progress pics as we worked. Hm. Again, ignore the longer kidney and cod (not that they are really visible anyhow) because they were swapped out. I thought the chest was riding too low on the ab, so I ended up raising the chest by trimming the neck (making a deeper scoop), and then following up by lowering the shoulder bridges further down the chest. I had to trim some of the ends of the chest under where the shoulder bridges are attached to allow some space between the chest and the back plate. The back plate is clearly not fitting properly on her in these pics. It's eye-opening to see how much larger the back looks on her than on me. That's me in the pic on the left with the same back plate! First thing was to bring in the sides of the back plate by dipping the lower corners into a hot water bath. We achieved a nice curve on both sides and eliminated that back flare. Next was to address the way that the back was overlapping the kidney. Swapping things out for the shorter kidney helped a little, but it still had too much overlap. I didn't want to trim any more from the bottom of that back plate. Instead, I trimmed the back plate only from the top, making the back plate neck scoop deeper and trimming at the shoulder connection areas. I trimmed about an inch from each side, as well about the same amount on the neck scoop. TLDR: By making your trims at the shoulder connection points and necklines of the chest and back plates, you can effectively bring both pieces up. This brings the entire kit into better proportion to fit a shorter trooper. I promise I will take more pics at our next fitting (shrink session)!1 point
-
1 point
-
1 point
-
Thanks Tony, I just wish certain carbonated beverages weren't so good So I got some paint: Finished cutting all of my strips. I'll start assembling my parts when my magnets arrive. Went to town on the sniper knee, and did a dry fit with clamps. Looks ok? Did some more hot water bathing on the shin. Before: After (much better!) Since I also have to shim my kidneyplate, I did a testfit and they flare out way too much. In with the hot water! Before: After: I'll clean up/line up the edges, and what little "flare" is left I think the webbing is going to take care of Also ordered more supplies, 100pcs refill of Prym 15mm Sport & Camping snaps, more elastic, and E6000. I went on eBay and picked one from a US seller, should be the real deal1 point
-
So things are still a bit hectic but I'm sneaking in work whenever I can, trimming the armor pieces and working on outfitting my helmet with all of the electronics. I was getting some whine in the Hearing Assist that I got from Ukswrath that I could not get to go away and I narrowed it down to the USB battery packs I was using, but Tony and I got to talking and I ended up upgrading my electronics to his newest version. So now the Hearing Assist is powered by the speaker amp (yay for one less battery pack in the helmet!) and there's no more whining (me or the hearing assist). I wrapped up the helmet tonight and I'm really happy with how it turned out. Everything is contained in the helmet, so I won't have to run any wires outside of it and my big ol' noggin still fits inside too. That's dual fans & battery pack, hovi-tip speakers, I-comm, amp, and the hearing assist. Plus padding. I obviously don't have to state how quickly room runs out but it was fun working out how to get everything in there. The helmet now only goes on one way, but once it's on it is comfortable and somehow nothing is rubbing on me. I only used 4 helmet pads: one at my forehead, one on each side at about a 45 degree angle, and one at the rear at the base of my skull. The placement worked out very well, the helmet moves with my head and I can look up, down, and side to side without it moving away on its own. The soft side Velcro at the very top is just to provide a little extra friction against the top of my head, it helps keep the helmet still. Helmet outside: Inside: I glued each component on some scrap ABS as a mounting bracket/surface and used the ear screws as main mounting points. For the brackets that go up, I backed them with industrial Velcro to support the weight and to keep them from flopping down. And for the front, I installed the frown mesh with glue and then hot glued some fine fabric over the mesh to keep people from seeing inside, I'm not sure if I'll use a balaclava or not yet. I painted the dried glue flat back to clean it up some and then I used Velcro to mount my microphone in place. And obviously the accurate S-trim is already in place, that actually went on a lot easier than I expected based on what others have posted. lol And that's about it for where I am now. Now it's on to finishing the trimming of the rest of the armor pieces (one shoulder, biceps, forearms, and a couple leg pieces) and then it will be time for fitting and gluing and all that other fun stuff. Parts list from this post: Ukswrath Cooling Fan Kit Ukswrath TK Hovi Audio System Ukswrath SHA (Hearing Assist) US Army ACH/MICH Helmet Pad Set ( Link ) - From this I only used the 3/4" Oblong Pads1 point
-
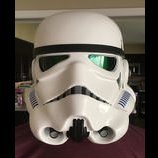
Slow but steady progress. Finished the paint on my helmet today: Obviously I need to go back and clean up the edges with thinner on the tube stripes, but I'm pleased with how it turned out. Trooperbay's stencils are quite good. I had a little trouble curving it to fit the shape of the helmet, but after cutting it in a few places along the bottom edge I got it to stick down more-or-less flat. You can see I also added a bit of gray for the 5th tooth on each side. I don't know if that was necessary but I noticed a number of AP ANH Stunt builders applying for Centurion with that part painted. I figure it can't hurt. I need to touch that up with some thinner also but it's not bad. I touched up the traps and tears since my last post too. Fiddly work, but having been a miniature painter for decades it wasn't very difficult. I also got the ab plates painted: I just free handed them. Hopefully they are good enough. Held at arms length they look fine to me. I don't think anyone is going to look at them as close as the above pic allows. : ) Oh, yeah! Lest I forget, you may notice I also did a little dry-brush with some white on the hovi mic tips. You can see it on the first pic if you zoom in. So, again, no questions really. Just checking in with my progress. Comments are welcome and encouraged. If you see any errors please don't hesitate to say so. I'm aiming for Centurion status so any helpful suggestions are most welcome.1 point
-
And a super cool nod to Phasma's history as a Scyre warrior (assuming that was intentional?) As noted, there are differences in some belt boxes it looks like, the gloves, and the greaves/spats. I got a PDF from Jim before ordering that had a side by side of some of the TFA/TLJ pieces. I'm hoping I can get time this weekend to go frame-by-frame through the bluray and try and pick out each detail. Comparing that to the TFA CRL should show differences. Best wishes with whatever you've decided. If you do go TLJ, may the Chrome be with you.1 point
-
Keep in mind that these parts are contoured pretty significantly. I'd recommend taking off from the bottom of the calf, and mounting it as low as you can on the boot (they sit pretty high on my wife's boots). For the thigh, that's a tough one. Taking off anything will remove the return edges. Will you be heat bending new returns? Perhaps you can just mount the thighs higher, which will end up with less of a gap between the cod and the thighs (not a bad thing).1 point
-
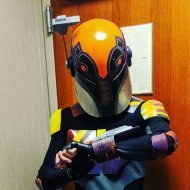
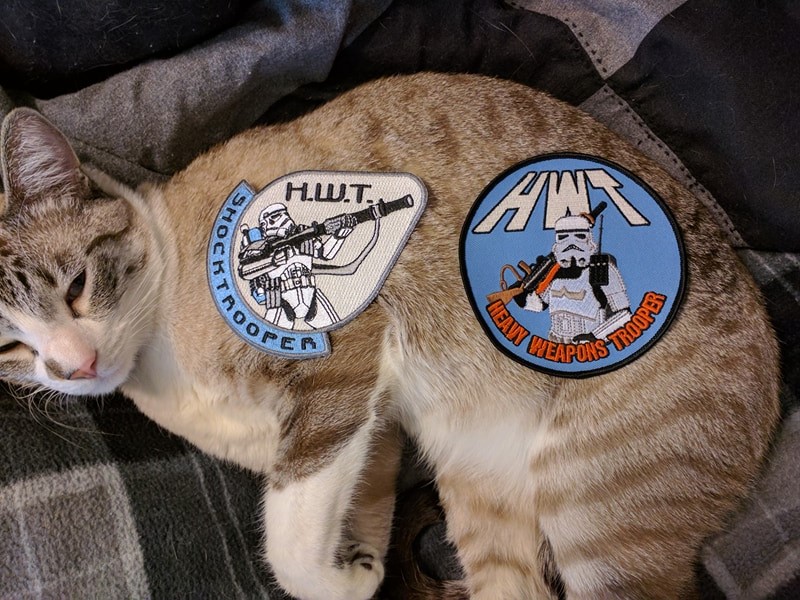
I've been keeping an eye out in the forums and patch trading groups and these are the only two I've been able to find and trade for. The one on the right is from justJoseph63. It's big. If anyone else sees any, post up.
 1 point
 -
Sent from my iPhone using Tapatalk1 point
-
Depending on how the armor is made I would say bottom. It would be much easier to trim the bottom than the top. I suffer from this issue only being 5'71 point