Leaderboard


Popular Content
Showing content with the highest reputation on 04/04/2018 in Posts
-
Ordered a FOTK from KB props and after some delay they made an annoncement that they entered a partnership and that they will supply different plastics at a much faster rate. I jumped on the Pet-G version and it will be pulled on a live stream on thursday - should be interesting Shared with permission: Hello all! My name is Hal and I own The Sandbox: A PixelArts Studio in Las Vegas. This is where Kevin moved at the beginning of the year and I will be partnering with KB for his Armor Builds going forward. I understand he is a little behind and after talking with him for a bit I have come up with some solutions and an update for all of you. -I will be handling fulfillment from now on. Messages will still go to the KB Props page, but payments will go to the Sandbox paypal and I will be giving shipping dates when payment is confirmed. -We will institute a “Runs” system here at the shop. We will spend a week pulling parts for a particular suit. Then move to the next style the next week and so on, on a month long rotating schedule. -We have access to a new, bigger, Vaccuform so there will be less waste, but ordering plastic will now come in bulk. Up till this point Plastic has been ordered on a needs basis and going forward it will have to be ordered a pallet at a time. This leads to the second part of my announcement. We will be offering a couple different tiers of suits. #1 ABS- This is the most common and unfortunately the most difficult plastic to get. Most bulk suppliers make smooth/haircell. We don’t want this as it leaves a rough texture to the plastic and requires a lot of sanding to make smooth. Smooth/Smooth (Virgin) is most commonly “Special order”. It requires me to order a pallet, the factory then resets to make the specialty plastic, and means I have to wait roughly 4 weeks for the factory to make it, then ship it to my local hub and me to pick it up from there. This is currently the longest wait, as I have to wait until I have a stockpile of plastic here to offer it for same day shipping. (Meaning I would order more plastic before I run out never effecting my ability to provide suits.) #2 Polystyrine- This is a little more “brittle” but comes with amazing detail. Detail I have a very hard time achieving with ABS. It does not like to flex as complex shapes, but in almost all cases if you take off the return edge it is as flexable and durable as ABS. This I can ship Vaccuformed in literally 1-3 days. #3 Pet-G- This is a newer form of plastic. The ABS Kevin has used up until this point has been .093 ABS and Pet-G will come in .060. It comes clear. And with a film on both surfaces. This is the plastic all major manufacturers are moving to as it is Food safe and Vaccuforms as cleanly as PolyStyrine with the durability of ABS and nearly 1/3rd lighter than ABS. This I can ship Vaccuformed in literally 1-3 days. With these new plastics and the new schedule what you will see is a much quicker turn-around for suits from order to shipment with the goal being no one orders a suit and then it is pulled. From now on the goal Kevin and I have set is that we will have a stock of suits and when one is ordered it will be pulled from inventory and sold and then stock being replenished when we get to its “Run” week. Kevin has worked hard to build his business and I am not interested in taking it over. Kevin and I will be working as a team. Kevin will no longer have to pull suits. With this new partnership he will be more able to focus on making new suit styles and will leave the production of your suits to The Sandbox. I will be making a list of all outstanding orders. Should anyone want to take their order right now in PolyStyrine or Pet-G I will happily pull the order and ship it immediately, for all those who wish to get their suit in ABS, The Sandbox will be placing a bulk order on Friday the 6th of April and 4 weeks after that should receive our shipment and begin filling your orders. If I find anyway to order this plastic faster I will. Thank you, everyone, for your patience in this transition. And I look forward to working with all of you!2 points
-
2 points
-
I’ m using 2 snaps with the elastic to connect the biceps with the bells external, and the hooks on the elastic on internal side-----------2 points
-
I finished up my pack. I am thinking about dyeing the alice pack to be a little darker though. Just like a Jedi to stab you in the back, pack.2 points
-
So, I'm starting another build - much to my wife's chagrin. I got another AP kit a while ago (untrimmed with belt and flexible handguards) and I'm finally starting the build. The difference this time is that I'm building a Sandtrooper. The build is very similar so I'm posting the build here at FISD and I will post the more TD-specific stuff over at MEPD. The only real differences between the TK and TD are: TD is dirty TD has a pauldron, pouches, and sometimes a pack TD does not have plastic shoulder bridges or large button panel on ab. They also don't have the 4 button panel - they have a three button panel (not painted) TD is dirty TD does not have the black lines on the traps or tears of the helmet Sniper knee plate if different shape. TD is dirty TD does not have holster or TD (or drop boxes) on the belt I think that is pretty much it. I thought a TD build here might be good for new troopers who are debating a TD build. And I know a lot of people here have completed a TD as well as a TK, so I'm sure I will get pointers on either site. The fun part about the TD build is that one is encouraged to build a specific onscreen trooper. There was no question for which trooper I wanted to build. This guy: The captain that talks to Garindan. The first shot above was one of the most memorable trooper scenes for me back in '78 (didn't get a chance to see the movie until '78 - longest year ever). The best part about this trooper is that the helmet is still around (it was recently at auction - I think it went for $250K, but don't quote me). Anyway, there are pictures of the helmet floating around. Starwarshelmets.com is a good place to see these images. Here is an example: MEPD has a bunch of additional reference. They have also broken down all the different sandtroopers and what equipment they have. This is an example of the graphics created for reference. There is one snag to the whole process. For basic approval in to the 501st as a TD, you need at least two pouches with one of those being a proper shoulder pouch. So I will need to add a shoulder pouch in addition to the belt pouches. For level 2 (PO), I need a backpack. This trooper does not have one - so If I want to advance to level 2 I need the pack (and from what I understand, I don't need said pack for level 3). To put together a proper pack takes some time - so I won't be doing that right away. My plan is to build the actual armour as close as possible to what would be expected at Level 3 (SWAT) and just go for basic approval for now. I'm still waiting for some more pouches to arrive, but I should have a variety of pouches so that I will be able to emulate other characters - most notably the Cantina Captain who wears the exact same armor as the Garinden captain. He also has a pack - so this might be a Plan B. I'll post some pictures of all my collected gear later.1 point
-
^^^ is my re-introduction. I am grateful for the warm welcome. I have to confess, the helmets are almost done after several weeks work. The next few posts will be some catch up but after that I will keep up as I work. I am making TWO helmets at the same time. One will be for the new TK and one will be for a future TD. I am soon at the juncture where I will need to pick one for TK and add the stripes in the traps and tears. First, I did the trimming:1 point
-
No... I think Parquette is talking about the 2 tabs under the back plate? behind the thermal detonator in the picture.1 point
-
No worries I was the OTTK (Hero) And trooperbay has the flat green lenses (thicker) and TM has the bubble kind Edit: I´m not a stalker, just remembered as it was your first troop as Kylo and you got to have a long interview on TV4 (they cut me out)1 point
-
Hey Erik, nice to see you found your way to us here at FISD (we met at the TLJ premiere in Sthlm) and...the lenses provided from RS is screen accurate for your helmet as it is a Stunt but if you want other lenses then trooperbay.com (US based) is a good source and for bubble lenses troopermaster (Uk based) and you can find him here or his FB page1 point
-
I know ISD used to do bubble lenses but the company changed hands and some stuff stayed with Clive when the rest went so I'd have to check. However as mentioned Stunt should be flat, so let me know and I can find out.1 point
-
Hi Erik, First of all, welcome! You can request 501st/TK access here: Next, as per the CRL, ANH Stunt lenses are flat, not bubble (you may be thinking of the hero). I believe the goggles for Rey are supposed to be from a TK helmet. Not sure where to procure the bubble lenses though. Others can chime in on that.1 point
-
Hi Johnson, please take a look at the overview thread for the list of info and photos for pre-approval. Your photo size is too small as it is. I suggest you use an image hosting site such as imgur.1 point
-
I paid $37.29 for my OT TK. FedEx ground. Sent from my SM-G900V using Tapatalk1 point
-
Looking good trooper! Best of luck!1 point
-
Should be interesting to hear feedback on working with these new materials! Plus finding out how durable they really are in real work conditions after some trooping.1 point
-
Are we talking about these?
 1 point
 -
Finally arms and legs are done and my silicone hand guards (thanks Joseph!!!) are glued. I`m just waiting for my split rivets, so that I can continue with the body parts1 point
-
Well, I jumped off the deep end.......and survived.... Very apprehensively I tried the hot water bath. Pretty much boiling water. Slid the pot off the burner. Dipped the armor piece in for 20 seconds.....nothing. 30 seconds.....hard to tell. 40 seconds.....I think it feels softer. Maybe a bit less "spring" to it when it's flexed. Less aggressiveness to return to it's former shape. 40 seconds, hold the armor piece flexed outward a bit, then under cold water. Bingo!!! I did this a couple of times to each piece. The shape looks slightly different, but not much, but the very harsh corner on the outer forearms definitely looks less abrupt. The piece on the left almost looks like it's got a bit of a "wave" to the left edge. It's subtle though and completely disappears once the pieces are taped together. Now from the photo things don't look much difference, but it feels quite different. Looking at the photo from yesterday there is less space now at the top of the arc. The top of the curved arc fits closer to my arm and the sides aren't as tight. WOOHOO!!!!! Thanks everyone!!! I was freaked out about melting the ABS in the pot of boiling water but for 30 or 45 seconds, it just seems to loosen the rigidity and make it a little less likely to return to it's former shape. I really appreciate everyone's help and encouragement. Mark1 point
-
I can help make an image for the Baton Holster on the belt.1 point
-
Well, Daniel... I for one will be watching. Interesting indeed.1 point
-
Do it. Give in to the dirty side.1 point
-
Loving this thread - we can definitely use some more Sandy’s in the Garrison... hmmm? ( pondering the idea ) Sent from my iPhone using Tapatalk Pro1 point
-
Hi Jeff, I think your referring to what armor is closest to screen accurate? If thats the case then start with this page here and after that I would direct my attention to this page that explains about taking any armor to that next level with EIB or our highest level Centurion. Any kit thats discussed on out getting started page that I linked above with proper fit & built to Centurion standard will get you as close to screen accurate as possible. As far as what armor to avoid, well we cover that pretty good as well on this page also. Hope that helps, any other questions feel free to ask.1 point
-
I'm using elastic with the bicep clips. Sent from my VK815 using Tapatalk1 point
-
Yup all of that and I need to do this still. The anovos kit isn't all that shiney anyways. Sent from my VK815 using Tapatalk1 point
-
I actually go a step farther than what Joseph explains. For my personal mishap where I had to fill with ABS paste a bit of chest that I managed to melt away (don't ask), I started with 220 grit sandpaper and worked my way up in grit levels. If memory serves, i went 220, 450, 600, 800, and so on. Around 800 I began to "wet sand." You can just wet the sandpaper, but I actually like doing it over the kitchen sink, with the water actually running on the part I am sanding. In addition to the gliding action the wet sandpaper will have (as opposed to dry), the running water will help flush the particles you're taking off the plastic so they aren't acting as an abrasive. It's just a little easier to control. I finished it off with 1200 before moving to polish. I'm sure you can find more detailed explanations of the physics and pros/cons of wetsanding on youtube haha.1 point
-
That moment when you see yourself as a Stormtrooper and say to yourself, "OMG! That's me!" (That's me on the far right in my RS Props kit.) I don't really look all that short out there, do I? This is currently on the Atlanta Braves website, promoting Star Wars night at the Stadium for May 4, 2018. The photo was taken at last year's Star Wars night, which happened to be my very first big troop. I was excited, nervous, and proud to represent the Empire! And here is what they told us just before we went out on the field... I had no idea that they expected us to levitate across the field. #troopergoals This will be my last update to this particular thread since I'm not building on it anymore (I'm over working on my WTF Hero Build right now, so I'm still around!). This kit is destined to become a Sandy in a few months. Building my RS Props TK was a great experience for me, and I really hope that I've helped other vertically challenged individuals along the way. Long live the FISD and long live the Empire!1 point
-
I second Cricket's tab idea. I have a similar set up in mine, and it keeps the ab and kidney lined up nicely. As for your second question, I'm not sure I 100% understand what you are asking, but there shouldn't be any overlap on the back parts.1 point
-
Thank you. At this point I was expecting 3 digit shipping from them...... I am looking forward to finally having it in hand and getting with my local garrison and finally getting this journey really started.1 point
-
I just priced out a RS helmet with shipping to Canada. The Canadian dollar is not very strong... apparently. another belt, holster, handguards, and blaster (I just ordered another ANH E-11!). This is like one of those cults where you give away all your money to the "cause" - but in this case, I'm sending it all to various stormtrooper-related vendors. At least here I end up with something tangible and totally cool and not just a paper cup of Kool-Aid. I sure hope my wife does not read this thread. Or look at my VISA statements.1 point
-
Haha Sorry about that - oops wait no I`m not1 point
-
Damn you, Daniel. Now you've got me thinking. And me "thinking" usually results in my wife getting annoyed.1 point
-
Think you could paint the teeth a little bit higher/lower on your bucket. Clean up between the tube stripes too to get rid of some of the smudging. Regarding the return edge, yes it's visible, but it's not a focus of attention. @Cricket seems to have mastered the reshaping of return edge here! Check out her current build here:1 point
-
Looking good and now you got me thinking to have the same approach with my Sandy-build (UPS says my RS will be delivered tomorrow *yeey*)1 point
-
To be clear, when we say support the overlap method, we mean only for those kits where the cover strip is molded in to the part. Overlap would not be acceptable for kits like ATA, etc. where they are shipped separately. I'd be OK allowing overlap even at L3, as that is how the renders look actually, *if* it's part of the mold. Sound OK?1 point
-
Nice build so far. The only thing i can suggest for the return edges if you want to get them really even and smooth is use some ABS paste and gradually build up the areas where it dips down from level, then once those areas are filled, use a very light sandpaper or a long flat file to slowly even them up, luckily the area is not an area than needs to be super shiny, however there are ways to return the shine to the paste....i think. If your using a file and it fills with dried paste dust, just wipe it down with acetone and it will soon clean up. I have done a similar thing with the bottom of my thighs, which when formed were more at an angle than at 90 degrees to the outer edge, i used a heat iron to bend them to the right shape, then filled the dents and folding with ABS paste and slowly filed until the edges began to flatten out to the same level, i could explain better with pictures, but typically i dont have any handy. Hope that makes sense1 point
-
So I started with my helmet I trimmed around the ears but used a drill to avoid a sharp corner (I get nervous with sharp corners as they invite tearing). Then I scored and snapped the extra off. And then with reference pics in hand I started to carefully shape the eyes to match the original. Sent from my iPhone using Tapatalk1 point
-
I got my number!!!!!!!! TK-42715 Sent from my SM-G950U using Tapatalk1 point
-
Do we want to add the 2 tabs on the kidney plate bottom that's supposed to go underneath the belt as level 2 or 3?1 point
-
Updated. We really need something of the holster though. FWIW, I had to tweak the wording a bit.1 point
-
Will do! Sorry, I've been incredibly lazy xD For Basic approval: -Is made up of 3 sections that extend outward when in use. When not in use, it appears as 1 cylinder. -Is black. -Hangs off of the left rear belt of the TK, on a black piece that acts as a holster. It will be attached at 2 points on the holster: one at the top, and one at the bottom. This avoids the baton swinging. -The holster can be made from any of the following: Leather, rubber, or leather-like material. Unfortunately there just isn't much to base the info off of. Only 2 shots in the film, and the batons in Battlefront 2 that we can assume comes from the same thing. Below is the pic I feel best represents the Battlefront 2 model, that can be used as the CRL pic unless better reference comes out in the future. Oddly enough, in Battlefront 2 on Gamers Little Playground Cutscenes video (updated), in the intro Iden Versio knocks out a rebel with one she pulls out of nowhere.1 point
-
But this is the crl for a *Rogue One TK* not a generic TK. If you don't see it on screen it shouldn't be in the crl that is the "canon thing"1 point
-
In regards to sitting, I think I have an idea on how that can be done more freely. The belt tends to stay stationary, so there's no room for movement when you articulate. So I think what can be done is if you cut some slots in the belt section of the abdomen, and slip some eleastic or nylon strapping through that and connect it to the belt from behind, it can move forward if you bend down. I have yet to try this, but if it helps you I'd say give it a go and let us now how it works1 point
-
Well Since I couldn't find Phasma's Baton I made one. I chose to do the collapsed version, its still a work in progress. But it should Be a screen accurate as you can get without casting the OG prop. Its 24.5 in in total length and a 3/4 in dia. If you find this is wrong, If you have better info please let me know So I can correct it. Happy printing. https://www.thingiverse.com/thing:2829420 Edit Updated the Baton it now 4 parts and will fit most printers, YAY. Have fun!1 point
-
Looks good. Is it meant to be built in parts? I can't quite tell, but it looks like the cut-outs should be more rounded on the edges?1 point
-
Hey guys, I have finished one of my helmets as a birthday present for a good friend of mine. He requested severe battle damage... so i went a little crazy... On closer inspection, the snout would have needed more sanding before painting it. But time was running out.1 point
-
Hi all, I received clearance for my ANH Stunt Stormtrooper from my Garrison today (UKG) but haven’t yet received my 501st TK ID (as I could only apply today). Can I make my EIB application now or do I have to wait? Many thanks in advance, Dan :-) Sent from my iPhone using Tapatalk1 point
-
That`s the spirit1 point
-
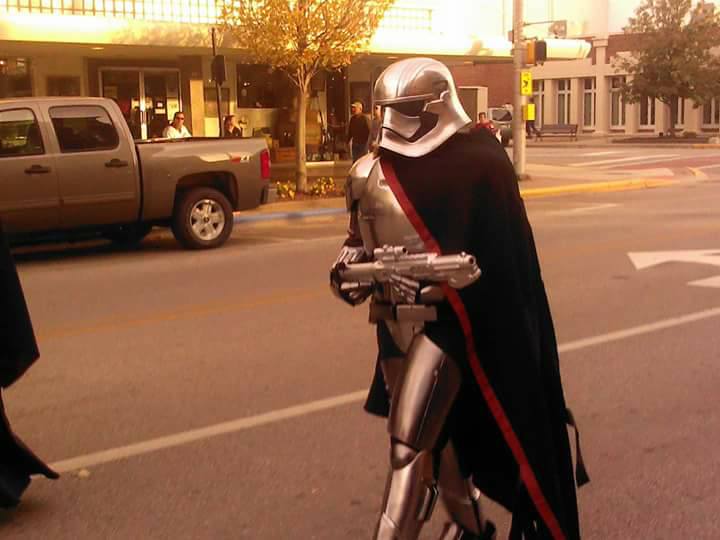
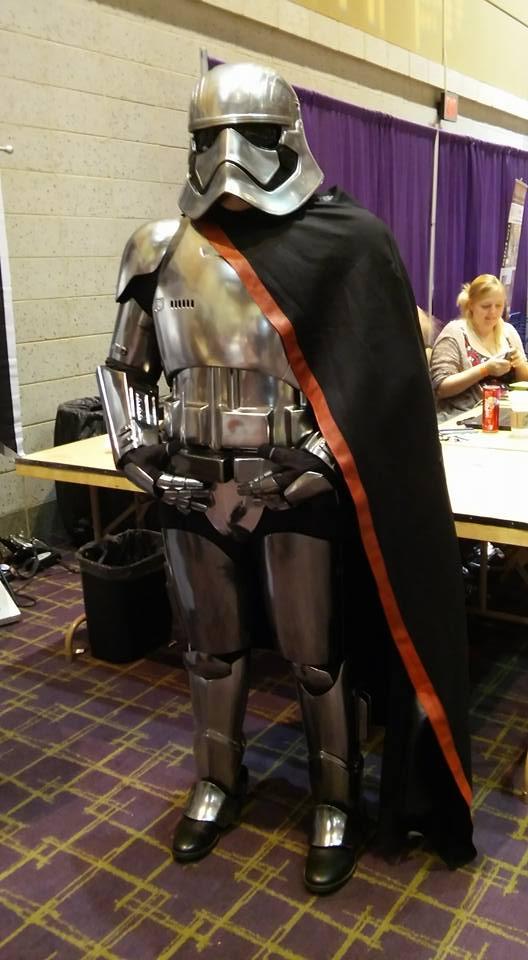
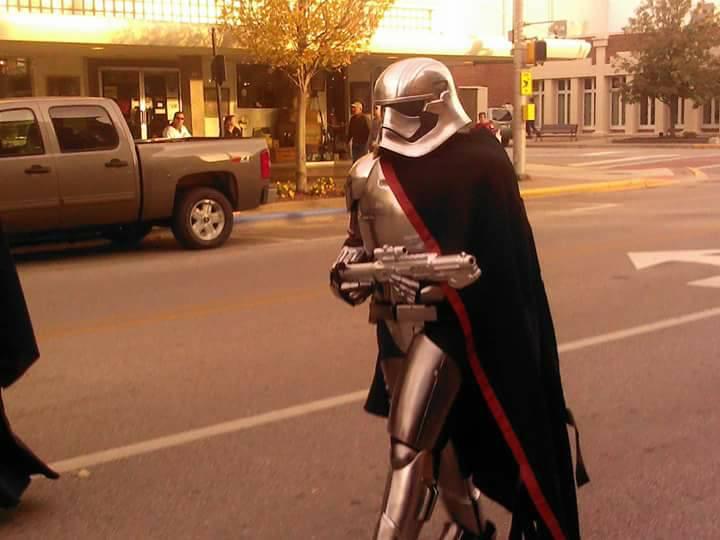
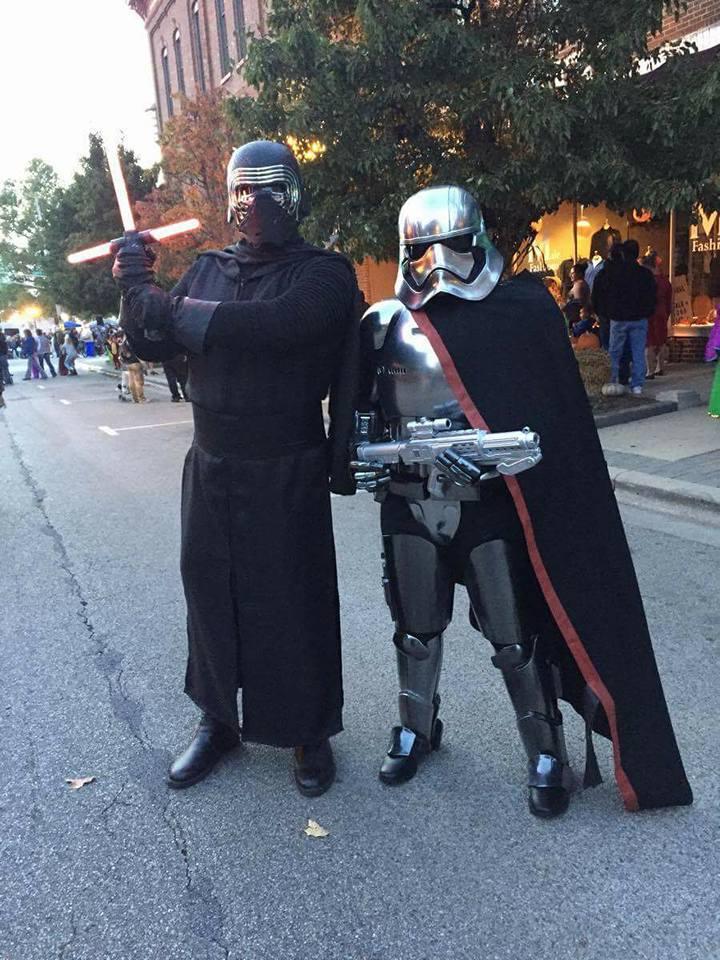
So I debuted my Captain Phasma this weekend. She's not quite finished-I have to add all of the detail work, finish the fingers and boot plates and tweak the rigging. I also had to do some major work on the thighs and cod piece-the bite was pretty bad and the paint got destroyed on the latter piece. I took about 2 inches out of the thighs and a quarter inch out of the cod yesterday and it fits a lot better. Will start the touch up paint this week. She was really successful with our local kids at the Halloween street festival I went to on Friday. I was also invited to a comic con by the local 501st Garrison-Northern Darkness. It was a lot of fun and a huge honor. I'm really proud of this costume-I've been working on it since April and it's been a great learning process. This is a Jimmi kit, painted with Alclad Chrome. Cape by Jessica Bowyer.
 1 point
 -
Looking very nice!! If I could convince my wife to wear a suit of armor I'd build her one of these sets in a heartbeat, instead she's opted to go the sith route wearing robes and a mask. Anyway, as far as the painting, is this spray based? Either way, serious kudos to painting a whole set of armor, I know how painful and tedious that is (I painted my whole TK to give it a showroom look). Good luck getting it all wrapped up!1 point