Leaderboard


Popular Content
Showing content with the highest reputation on 03/13/2018 in all areas
-
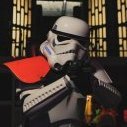
The original shoulder straps have a large tab at the front of them and a smaller one at the back. Most replicas have large tabs on both sides that is not accurate and looks better if removed. You will see on all the ANH suits that the straps have about a 5mm border on the sides but none on the front.3 points
-
Ask and ye shall receive. This is as at this morning for EIB and just now for Centurion. It includes people with multiple awards*, and all kinds inc TFA, TLJ etc. Bare this in mind for Anovos where it's not strictly OT but there's a few TFA/TLJs in there, often pulling double duty I am sure. Also remember this is all time data, which is why FX has such a strong showing. Also at 1.03% is MFX but below that everything less than 1%. * The current EIB number is 809 but thats 809 people with EIB. So people like Joseph, Tony and Glen only count once in the EIB number not many, many times each.3 points
-
Woo hoo got this a while ago but never posted it. My B grade Hyperfirm E-11 I have a doopys to build but in the mean time this will be a great addition and backup Reach out to slavefive if your interested in either a B grade or an A grade!3 points
-
I’d certainly agree with smaller at rear, if none at all. Sent from my iPhone using Tapatalk2 points
-
I did question Mark's mark-up for trimming the kit at first....he did manage to talk me into it when I pulled the trigger on it. I am so happy that he did....paying the extra is well worth it, especially for a new builder like myself.2 points
-
Nice, just add a "D" ring and you're set.2 points
-
Haha oh man. Idk now. I’m torn. I’m gonna sit on this for a bit and trust The Force to guide me lol.2 points
-
Some TLJ detail photos: Boxes separate on ab Could add binders as an option, second lip under chest plate very distinctive Rear of spats on right appears stepped. Hunchback troopers, it hurts my eyes. More cods Flash light mount Can just make out flash light mount on these two also so it seems a common addition, not for Phasma though. Looks like it's update time again for me Baton lights and details Forearm closure Thigh and arm overlaps and another nice cod photo with it folding under. Lights run up handles when charging laser ax's Gaskets still appear to be rubber Does this mean we can add weathering ;) More wreathing and blaster torch rail. Also forearm box lifted at front. (deleted scene) Nice side shot of teeth, also right forearm box barely attached, aluminium rail on blaster mount. Another side of helmet, also side of cod with fold under.2 points
-
Hello. Please consider my application for Centurion Status. Basic Information Name - Rui Fernandes Forum id: Danone32 TK: 32428 Portuguese Outpost EIB Application Link: Armor-RS Props Helmet-RS Props Blaster-E-11 RS Props Height- 1,87 m Weight- 88 kg Boots-RS Propmasters Canvas Belt-RS Propmasters Hand Plates-RS Propmasters Electronics-N/A Neck Seal-Leather/RS Propmasters Holster-RS Propmasters Thanks Rui Fernandes Front: Back: Left arm raised: Right arm raised: Kidney Left side: Kidney Right side: Body: Belt: Legs: Arms: Soft Parts: E-11 Blaster: Helmet:1 point
-
The last time we did this was February, 2014. It's time to get new data. What we want to know is, what armor / helmet are you wearing? EDIT: If you do *not* see your armor maker listed explicitly but think it should be, that is why we are having this poll. Do chime in via reply and let us know what you are wearing. This is the single best way to ensure we have valid numbers, and that the options support it. For instance FX will be listed separately as at the start it was like 90% of the responses, now it's much lower. Once it gets below a small % then we'll just remove it as a stand-alone, e.g. usually under 5%. Questions? Ask away! This poll will run for 3 weeks.1 point
-
If you look at the shoulder straps in the CRL, it says this: Shoulder Straps For 501st approval: These shall be securely mounted in front and may free float in back. They may be affixed with rivets, Velcro, or adhesive. For level two certification (if applicable): No visible rivets are allowed. For level three certification (if applicable): These shall free float in back. These shall be glued in front. The plastic shoulder straps need to be held down in the back via a white elastic band to the white fabric that connects/bridges the chest and back piece. Along with this picture When you get your kit, that front tab is present on both sides, and for years people just glue/velcro (or in the old days rivet) the fronts and let them free float in the back. Right? Well apparently people take a look at some screen shots like this: And say "hey, you can just chop the back tab off of the straps and you are good. In fact, some EI & Centurions get approved with this modification. Other GMLs are saying "wait, wait, but that's not per the CRL!". Who is right? Ugh, Captain Grey Area. Why? Older GMLs may not think about it since all kits come this way, and maybe in their garrison people leave it on and all is good. Why not? That's what we've been doing since 2005 at least, right? Others point out that it's not seen on screen, the CRL doesn't explicitly require them, and since there is this cool picture on screen, off they go! Also, the fact that Centurions are approved this way lends weight, right? Anyway, it's worth getting everyone on the same page. My question is: are there many TKs in ANH/ESB that have the tab in the back? I'm just trying to ascertain to what level we update the CRL, e.g. we can allow either on L1, but restrict L3 if the photo evidence is suggestive one way or the other.1 point
-
some screen caps. I can't speak for the length, but the larger back tab seems to missing more often than not.1 point
-
Amazing! The data deserves its own thread.1 point
-
It's an Anovos miracle!1 point
-
Yes, good call!1 point
-
They look really nice!1 point
-
AP adds the extra large bump incase it is needed (for larger troopers). Mark recommends trimming the big bump and one small one for screen accuracy. I don't believe there is a requirement to remove it at any level (but not positive). However, the less material you have at the back, the easier it will be to keep the bridges snug to the armor. Also, less of a chance of them snagging on something and breaking, IMO.1 point
-
Done I like the look of your mannequin, btw. (even though his head is a bit small...)1 point
-
Hi Ian, Firstly, what a fantastic work space you have!! :-) In all honesty, those gaps are in keeping with certain screen used helmets; However, if you did want to close them up a bit, you could possibly drop the ears a little and refine the shape lower down to suit. Of course, this would require more holes in the lid itself, however these would be covered by the ears anyway. It’s looking lovely though. :-)1 point
-
After some parts I learned that glueing is not as easy as I thought in the beginning. The parts are moving during glueing and some times it`s really tricky to fix them in a good position! But with the help of tape and magnets I glued biceps, forearms and shins (front parts) last weekend: I`m looking forward to try on the first parts of my trooper1 point
-
PLEASSSSEEE!!!1 point
-
Congrats SIR..... I’m getting there..... I’m going to BE THERE AS WELL... Sent from my iPhone using Tapatalk1 point
-
And here is the even bigger issue, TK Boots shuts down that will open the door for these Cheap boot makers to jack up their prices, without the competition of something better for my money, we wont really have a choice. I have been begging them to stay, they have a big Facebook page following, and im hoping to get their armor very soon, but its just hear breaking that people have gotten so cheap. I understand this is an extremely expensive hobby, but its just tough to see a company that, in my experience, has been hands down one of the greatest Customer service type companies to deal with. They keep constant contact and really appreciate our business. but at the end of the day, if people aren't buying, the demand isn't there and we are asking them to take food off their own table.1 point
-
After consulting with some local Garrison members, I am most definitely NOT going to use caulk. I'll be sanding the top and bottom of the ears so that they fit more snugly. Also just ordered Humbrol paint and a frown mesh screen from TrooperBay.1 point
-
So your speaker is actually in the ab and not the chest? How high volume do you set yours? I always seem to get feedback on mine if I'm about 3/4 volume. I wonder if moving it to the ab will reduce feedback1 point
-
I have a little problem with how the back connects to the kidney on the right side. It’s either overlapping in an off center way or wanting to tuck behind. I might try to use boiling water to gently reshape the bottom of the back. What do you think? Sent from my iPad using Tapatalk1 point
-
Good work, you'll have your TK number in no time! This won't impact your approval, and this is the perfectionist in me talking, but why does the right helmet trap extend so far down? It looks a little weird peeking out from the rubber strip. i would think about removing the paint to the left of the strip.1 point
-
Not bad, not bad...1 point
-
So, after some more research, I've officially begun. After mulling it over, I decided to start on my bucket. I used a pair of tin snips to cut off what I didn't need from my faceplate and cap and back. Next, I used a dremel to get the eye holes all nice and clean before cleaning up the teeth a bit more. After that, I marked off drill holes with a pencil and cut out and sanded the ears. Then I put the whole thing together. http:// http:// http:// At this point I realized that I had riveted on my left ear a little too close to the left tear indent (Picture 2), so I set to work on correcting my mistake and moving it back a bit. After all that was said and done, I trimmed and fitted the helmet trim. Hooray! On to the decals! With my reference photos and YouTube videos close by, I began applying my Dave M. ANH decals from TrooperBay. After several anxiety-saturated minutes, I had the air filter decals on! http:// On to the sides. Using the same soapy water method shown by TrooperBay, I applied the decals to the side, but ran into a snag. The traps were too big, resulting in overhang. Not to worry! Using a ruler to draw a line (and a towel to dab at the decal backs), I cut off a portion and stuck it where it needed to go. Next the tear traps, which were a pain in the butt! http:// http:// Now on to painting the frown, vocoder, and ears, as well as installing the lens. I think I'm going to ditch my foam star that came with the kit and go for some nice helmet padding from Amazon. All in all, not too shabby!1 point
-
And here I was going to find a Jedi to bend me a fancy curved pencil.... Thanks for the input!1 point
-
#2 pencil, roughly 1/4" lol1 point
-
That's trooper teamwork!1 point
-
Here you go1 point
-
Thank you Tony. I really appreciate the time you and Andrew put into judging these. I have learned a lot by looking at other people’s eib and centurion threads. When I came home today the family had made me a stormtrooper mud cake to celebrate.1 point
-
Nice work should be an easy pass1 point
-
Looking good Jared Some suggestions: Remove the rear big bump on the bridges for screen accuracy and it looks like your rear shin cover strips goes over the raised egde, which they shoulden`t. Other than that great work and good luck1 point
-
Doh! Me too I was looking at the awesome and missed it.1 point
-
Nice progress1 point
-
Materials would cost quite about the same honestly, unless if you buy from leather scraps usually sold at leather supply stores, and even then you may be able to just come in under the price. I don't think you'd save too much. The ones Joseph is linking to is pretty easy to mod, and a very good price. Also Blaster 8266 sells very very high quality handmade pouches that pass SWAT levels at MEPD. They are a bit more expensive, but very durable and very high quality. http://forum.mepd.net/index.php?/topic/10805-fs-6-styles-of-swat-grade-leather-and-canvas-ammo-pouches-ongoing-run/1 point
-
Hi Team. As RWA is a vetted vendor, (and very popular here in the UK (and abroad)), would it be possible at this stage to update the list? Best wishes, Dan1 point
-
Still in the works guys - as you can see we've got a lot of $$$$ tied up with racing shirts, FOTK coin, Phasma coin, Silver coin, etc, none of which are cheap. Plus, having to re-order attache patches which no one is buying. So, we need to let a few runs conclude first but this is next on the list for patches & shirts, for sure.1 point
-
Wooohooo thank you so much!!!! I‘m very happy about that! Special thanks goes to Christian (Novak Dimon) for his help! See you soon for centurion!!! Best regards! - Mark1 point
-
Congrats Mark nice work and welcome to EIB1 point
-
Hi Mark, welcome and thank you for your EIB application. Let's take a look. CRL and EIB Application Requirements: All the required submission photos have been posted., your armour displays all necessary element as set out in the level 2 CRL, Congratulations. Other-Armor Fit/Assembly: In this section we review observations made by your fellow troopers and ourselves. Some observations may lead to suggestions to improve the overall look of your armor. If any suggestion affects any application, it will be listed separately in the above or below sections. Very sharp indeed Mark, great build and it fits you so well. Hard to find much wrong here at all, so only some tiny little tweaks to speak of. The shoulder bells could still come in at the tops sp they are virtually if not touching the plastic shoulder bridge. one sits a touch closer than the other, so some small top strap adjustment will sort that out. reference The only other item is a nice to have for accuracy thing The screw used on a Thermal Det were slotted pan head as opposed to the dome head type. reference Centurion Suggestions: In this section we prepare you the best we can for Centurion. If there are any areas of concern they will be discussed here. We can only again see one very slight adjustment to be made, this one is required to meet the level 3 CRL Your drop boxes out of alignment with the emds of the plastic ammo portion of the belt For level three certification (if applicable): Drop boxes are vertically aligned with the end of the ammo belt with minimal gap between belt and box. We find ourselves at the end of a great application, a wonderful and tidy build, and another successful Expert Infantry applicant. Congratulations Mark, Tony and i hope to see you in Centurion review soon.1 point
-
A big con for BSP is that the BSP helmet doesn't seem to be accurate. This comparison thread points out the issues with the BSP helmet: https://www.whitearmor.net/forum/topic/42616-tlj-helmet-comparison/ That same thread also shows the Phoenix Props helmet which also seems to be a bit off. In terms of accuracy, it seems that Anovos, Jimmiroqaui, and KB Props are the closest to the screen used helmet.1 point
-
Following for reference. Sent from my iPhone using Tapatalk1 point
-
End caps are now on the cylinders. I got some red cord and some small resisters for the detailing at the back. Filling. sanding, filling. Dremel time for the flashing. I made the rail from some steel rail (Bunnings) 2.5mm thick and 20 mm wide. With the angle grinder, using a cutting disk, i scored along the front bend to give a nice sharp bend.1 point
-
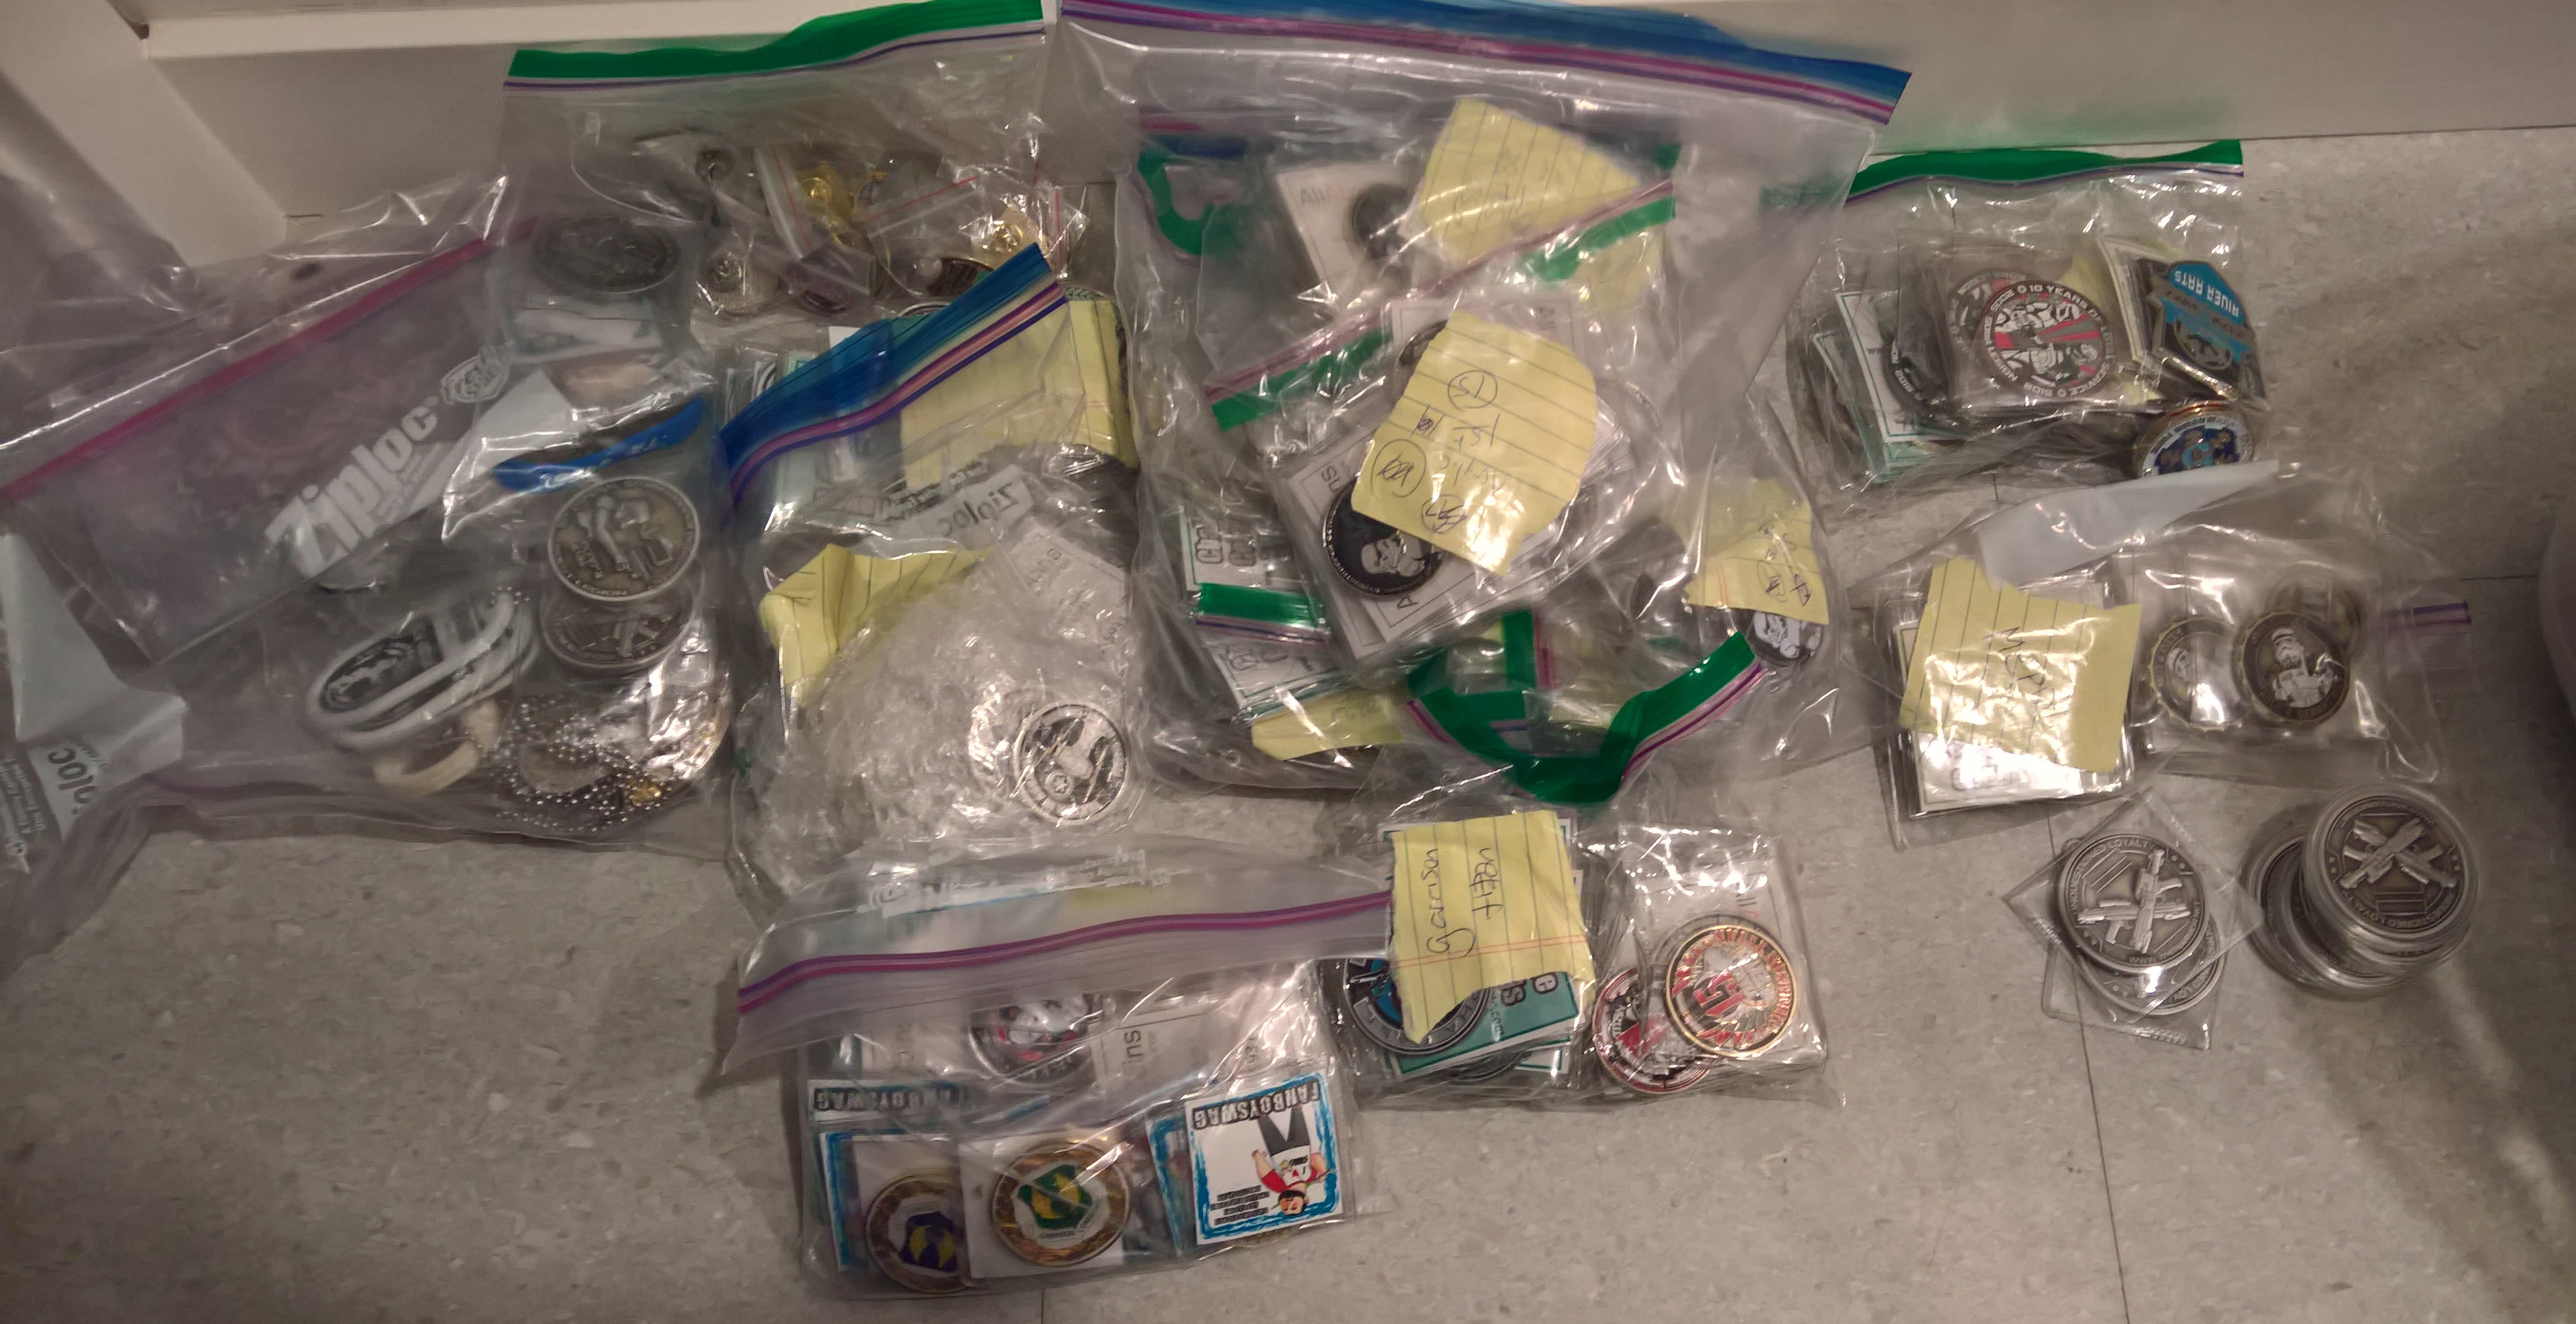
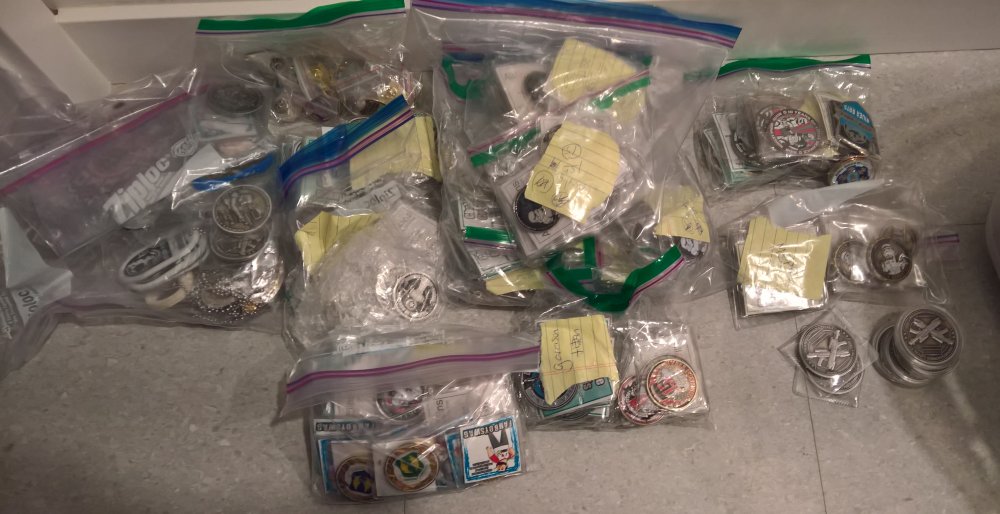
30% of my coin collection. Close to 600 coins. 1.5yrs In the Legion. No chance of stopping.
 1 point
 -
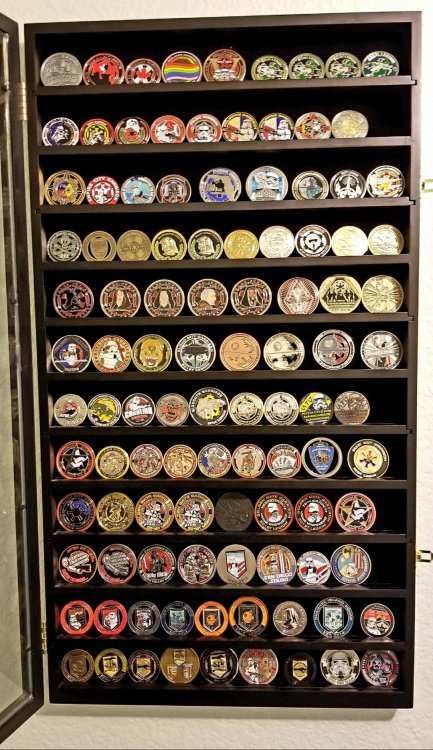
Hahahahahahahahahahahahahahahahahaha You don't know my wife. She's take my lovely Centurion suit, my ATA #1 helmet, my double-signature Paradise edition TE2 TD helmet, every coin, every patch, and throw it all in the rubbish bin if she could. No way that stuff will ever get displayed anywhere in the house. Not even in my man cave. I have the Celebration Orlando poster on my office wall, and that's pushing things.1 point
-
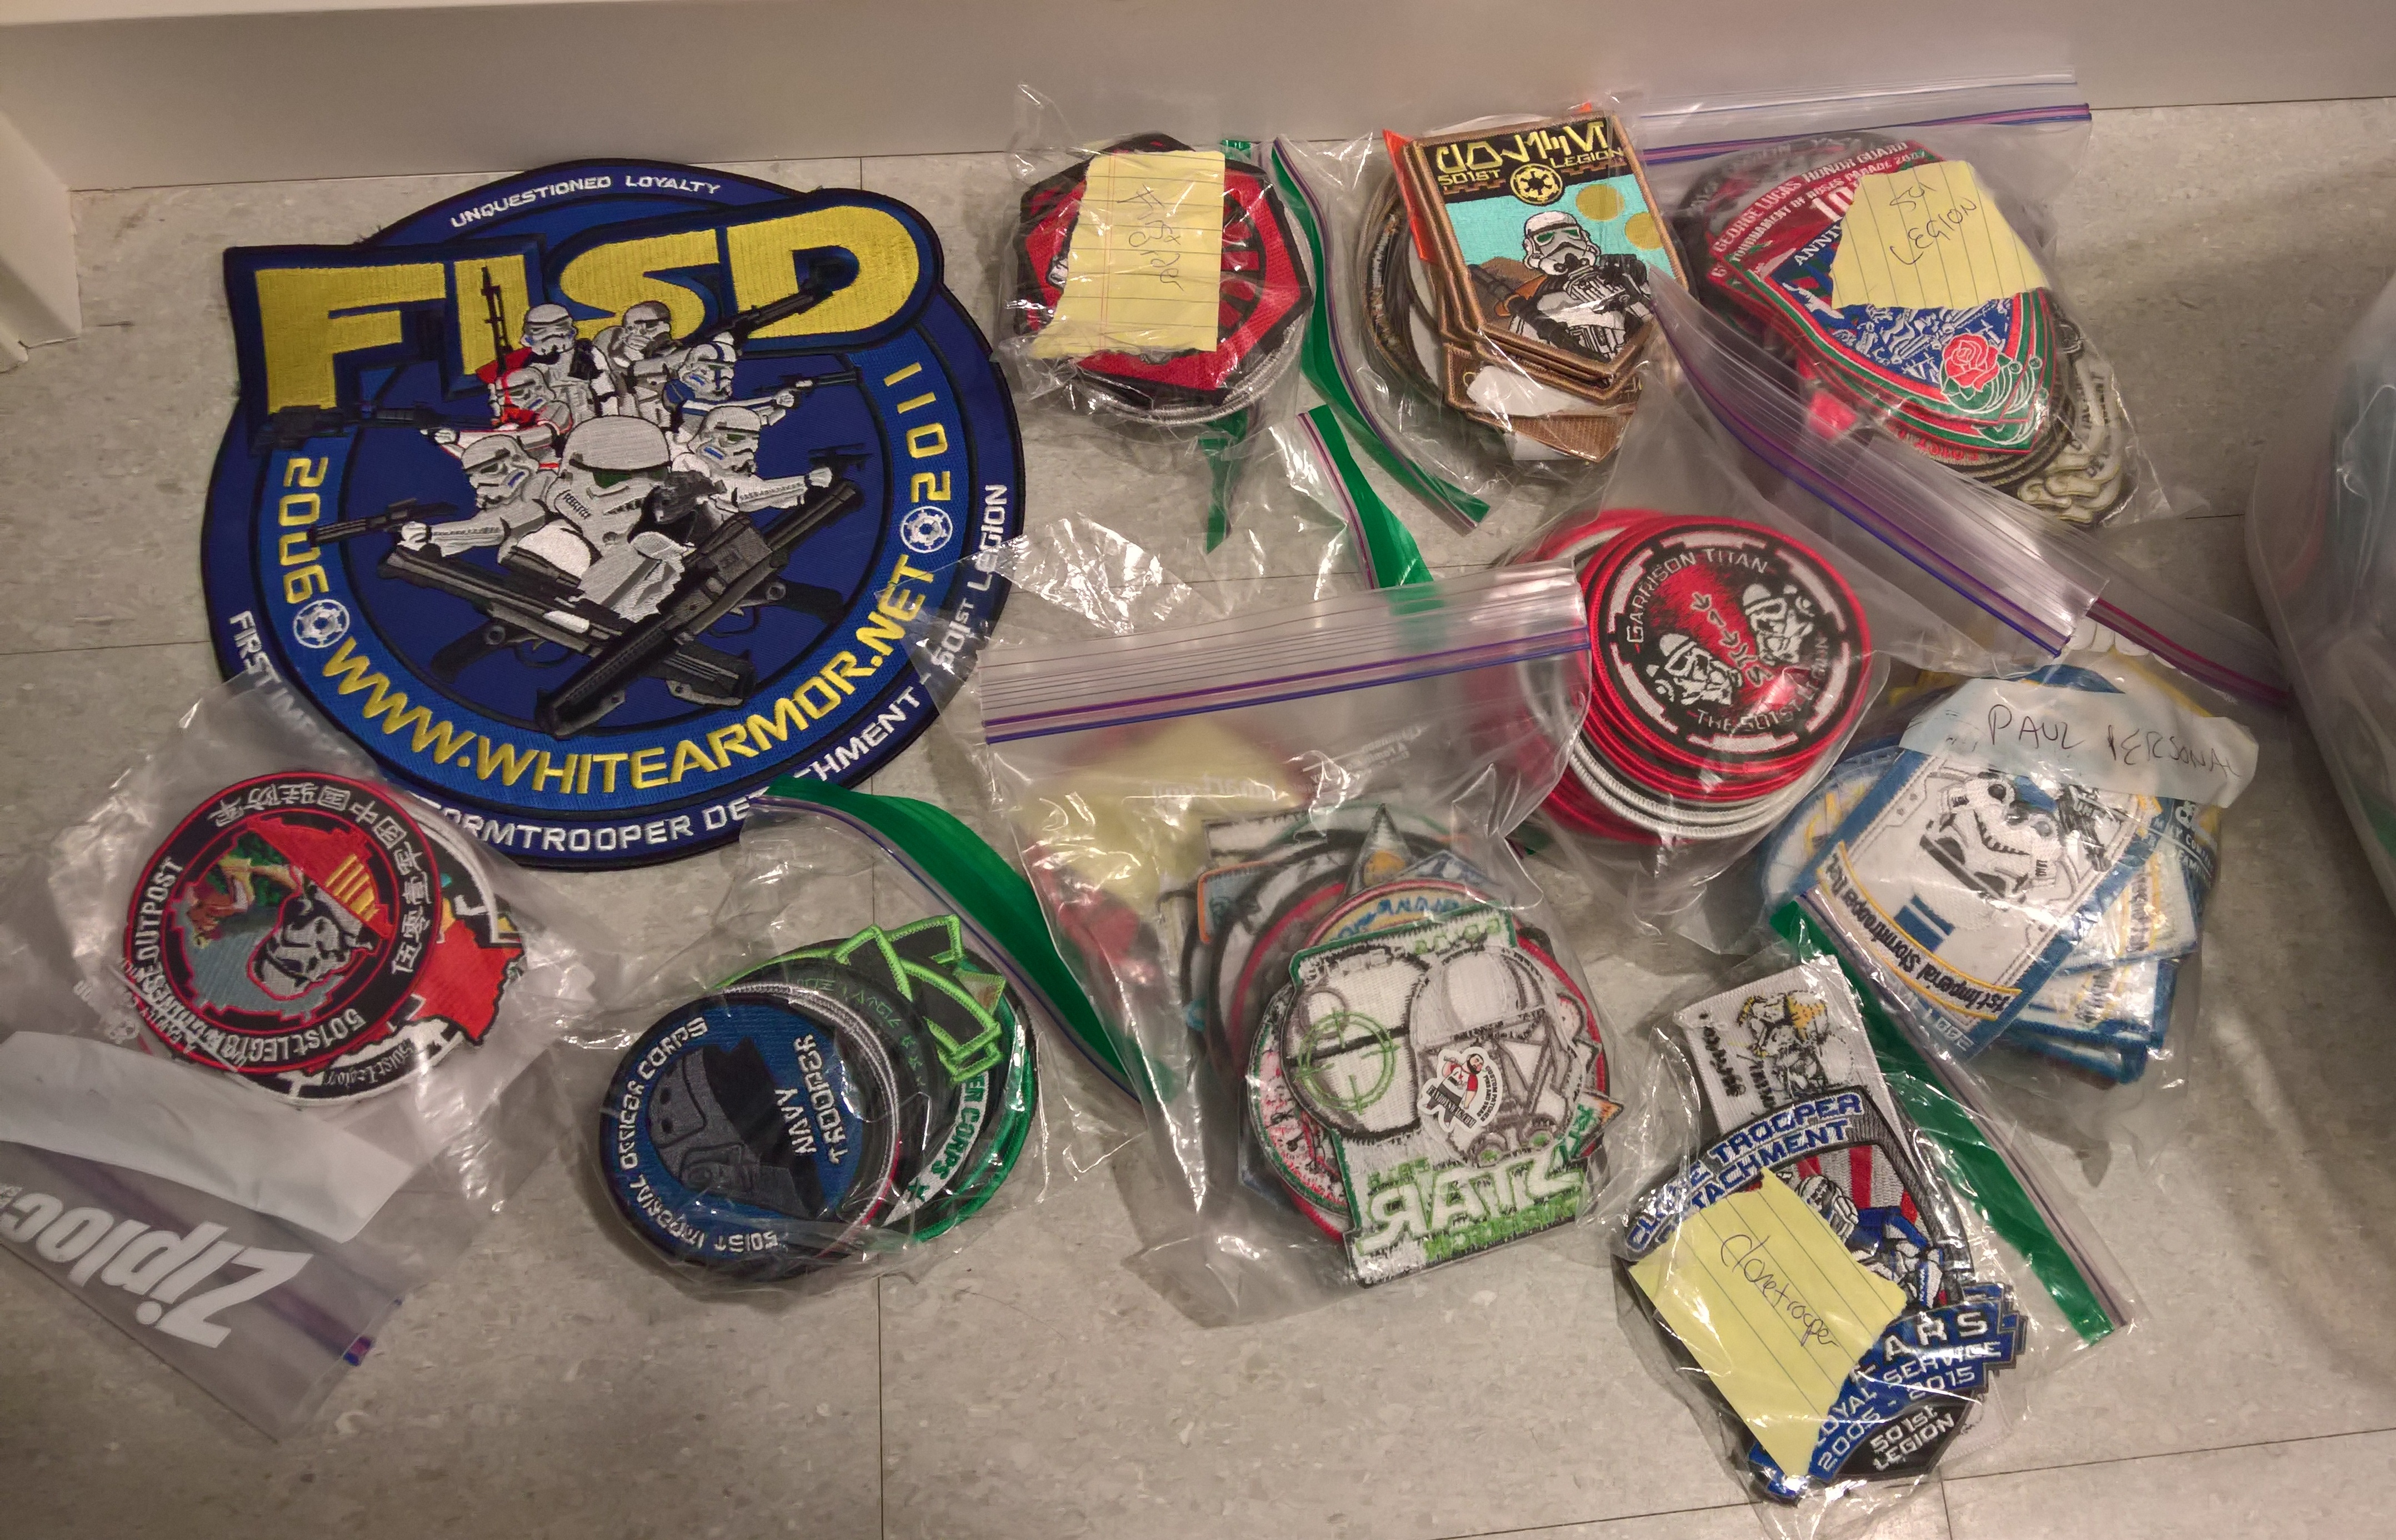
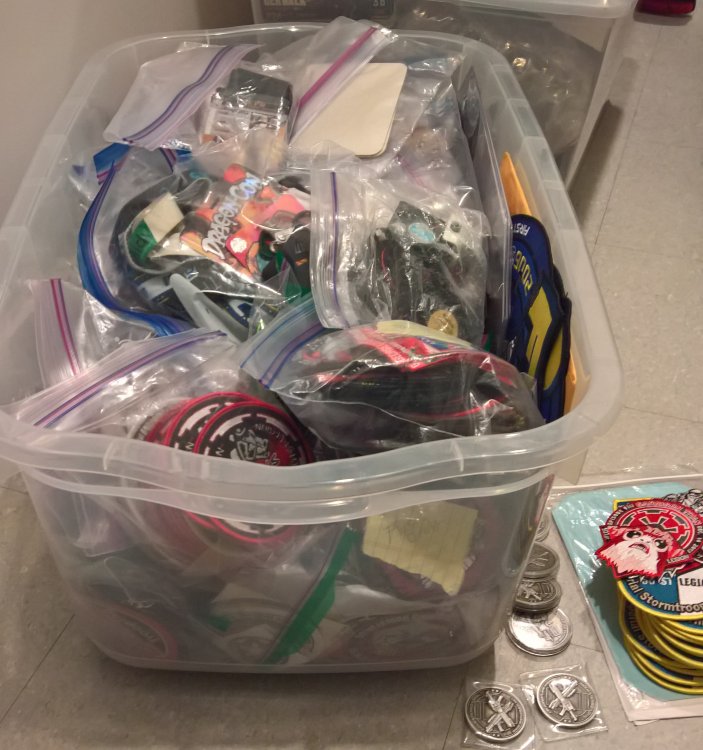
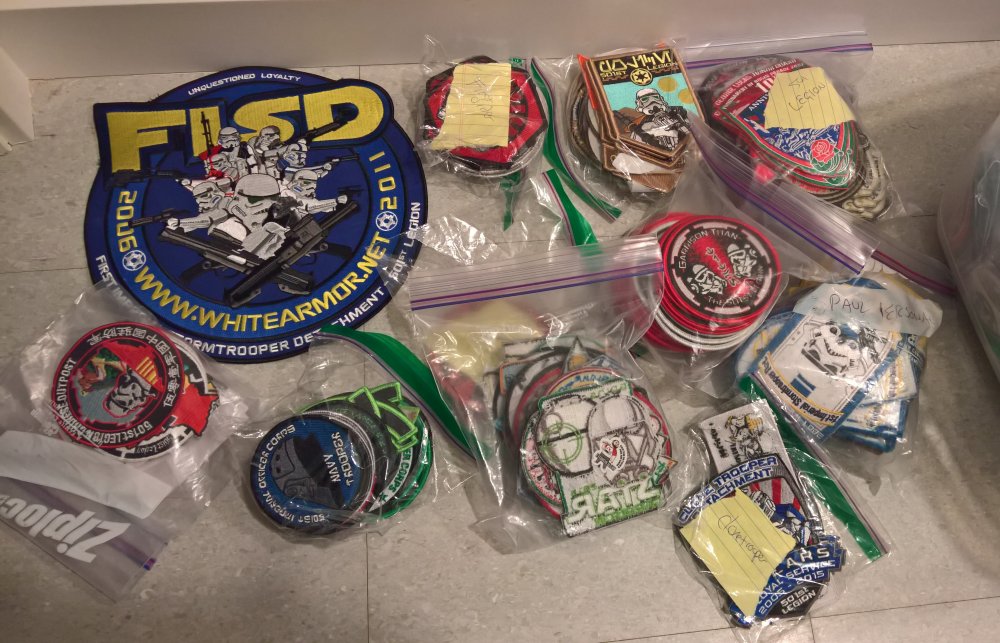
Here is what 10 years of coin collecting looks like. Realize that for FISD coins at least, I usually have 4. Two for me, 2 for the archives. I also tend to buy a lot of FISD coins as I mail them out as "thank-yous" and "atta-boys", being the founder and what-not. Plus coins from other detachments I used to be heavily involved with in the past (MEPD, IOC, CTN) and coins people just send me. Then your patch collection starts looking like this: For the same reason. Sooner or later your wife makes you put it all in a bin under the stairs.
 1 point


.thumb.png.a4d2a6d16ce4c0ce138707572ba1bfe7.png)