Leaderboard


Popular Content
Showing content with the highest reputation on 02/27/2018 in Posts
-
I didn't know where else to put this, but I just wanted to show off my newest wall decoration! I liked my Centurion certificate so much, I engraved it into wood so it would look like a plaque. Its so awesome!5 points
-
You will look great, I have tons of customers your height it will fits nicely! remember not all 6.1" have the same proportions, some have a longer neck some shorter legs, long torso ect... BTW you were not suppose to get 2 sets of hand guards LOL! Again thank you for choosing AP! Mark (AP)3 points
-
General Info: Name: Eric Ho FISD Forum Name: TK77520 501st Member Page: https://www.501st.com/members/displaymemberdetails.php?userID=27157 Legion ID: TK-77520 Garrison: Star Garrison Mandatory Information: Armor = Troopermaster Helmet= Troopermaster Blaster= Hyperfirm Optional Information: Height = 5'8" Weight = 190 lbs Canvas belt = Troopermaster Hand Plates = Troopermaster Holster = Troopermaster Neck Seal = Darman Boots = StormtrooperStoreUS (Etsy) Electronics= iComm, VoiceBooster, Ukswrath Hearing Assist, Henry's Helmet Fans, TrooperTalk Armor Photos: Full Body Front Full Body Back Full Right Full Left Right Side Detail Left Side Detail Helmet Photos: Front Side Back Hovi Tip Detail Lens Color Accessory Photos: Ammo Belt Neckseal Blaster Left Side Blaster Right Side Thermal Detonator Back Action Shot Optional Photos: Interior Strapping Abdomen Detail2 points
-
Name: Greg Bell Height: 5’10” Weight: 165 lbs FISD Forum Name: Wook1138 Legion ID #: 34575 Garrison: Badlands 501st Member Page: https://www.501st.com/members/displaymemberdetails.php?userID=27237 EIB Application: https://www.whitearmor.net/forum/topic/44175-tk34575-requesting-anh-stunt-eib-status-ap-806/ Armor: AP Helmet: AP Blaster: E-11 (3D printed kit from Blaster Master) Boots: TK Boots Canvas Belt: AP Hand Plates: Rubber (AP) Electronics: Trooper Talk w Aker 1505 amp. Dual fans from TK421 Propstop and USB power source Neck Seal: Geeky Pink’s Phantastic Gaskets Holster: AP Extra Blaster: DLT-19 (3D printed kit from TK421 Propstop) Build Thread: https://www.whitearmor.net/forum/topic/43437-wooks-first-build-anh-stunt-tk-ap/ Pictures: Front Back Left Right Ab Detail - buttons Hand Plates Hand Plates (Flexible) Shoulder Bridge Back Shoulder Bridge Back Detail Shoulder Bridge Front Back/Chest Connection Thigh Pack Attachment - from right Thigh Pack Attachment - from left Knee Plate - right Knee Plate - left Drop Box Back Cod and Butt Plate Attachment (outside) Cod and Butt Plate Attachment (inside) Interior Strapping Strapping - arms Ab/Kidney Detail Right (snap and kidney notch) Ab/Kidney Detail left (Kidney notch) Wrist side of forearms Helmet Front Helmet right Helmet Left Helmet Back Hovi Mic Tip Detail Lens Color S-Trim E-11 Blaster Right E-11 Blaster Left E-11 Blaster D-ring detail Neck Seal Thermal Detonator (haven't put those slotted pan head screws in yet ) Holster Attachment - front Holster Attachment - back DLT-19 - right DLT-19 - left And again, thank you for your consideration.2 points
-
I hear you. My garage is -5°C. I do all my spray painting in the summer. Time for a heated garage. Stupid Saskatchewan. Anyhoo... I would recommend trying the following: on a new scrap piece, spray on a very light coat Wait about 15 min (you might want to take it inside but you should be okay at 14 degrees) spray on another light coat wait about 15 to 20 min then spray on a heavier coat. You want to watch where the spray is hitting the surface. you want to see the paint coating the surface and looking wet and smooth. There is a fine line here before it will run, so it may take a few tries to get a feel for it. Keep the can fairly close to the piece (whatever it says on the can) and use quicker strokes if need be. I found with the hammered paint that it needs to be a bit thicker (at least with the stuff I had). The light coats will help the heavy coat bond to the surface better. You can add another coat if you like - I would take it inside and let it dry for about an half hour or more before doing so. When I did my hammered paint, it was about 14°C (or less) as well. I kept the piece and paint inside whenever possible. Not sure if it really helped but worth a shot. Hopefully this helps.2 points
-
Update! Managed to get some work done today as revision went really well this morning so I could treat myself to a bit of blaster building! Yesterday I had a read through T-Jay's Lucky#Eleven build for some inspiration, and thus I went on to highlight the writing engraved on the back of the scope with a white crayon: Went on to polish the white paint of that wasn't meant to stay, and I was pretty happy with the result. Furthermore, I spray painted the D-ring (but forgot to take a picture) and also worked on the front sight. Just like everyone who wants some details on the blaster, I used some green stuff from Tino's blaster kit to add some nice details, and my beloved file helped me with that: I'm gonna have to take another study break for the next couple of days sadly, but might be back with an update this weekend. However, if anyone has any feedback, of course I am going to follow this website closely2 points
-
I wouldn't get too excited CableGuy lol.. The blue and yellow strips mixed together make green..D'oh!...yep I've got some... I'm sure am losing it lol Sent from my Moto G (5) using Tapatalk2 points
-
Hi everyone.... after months of waiting my missing magazine finally arrived from doopydoos and a T-jays kit arrived in record time (thank you Tino...well impressed)...Need some green stuff next... where's best place to acquire some? [emoji16] Sent from my Moto G (5) using Tapatalk2 points
-
Great updates, Mark. Have done model building at this age too, but luckily never experienced something like this. However, your paint summary will be very helpfull for many readers. As long as you are unsure if this really works, I would simply not risk anything and skip this step. Reasons: - the paint will also be fine without a layer of clear coat - no point to risk your paint job in one of the last build steps - you can add the clear coat anytime later, even after doing the weathering and seal this too2 points
-
Here goes nothing... Centurion application submitted.2 points
-
Lets Talk About Paint (Story Time) When I was about 10 years old I had a Stormtrooper blaster. This was in the late 70's. At some point my 10-year-old self decided that the blaster would look better white. So I got some of my dad's spray paint out of the shed and painted it white on our back lawn. Weeks or months later, I realized the error in my thinking and spray painted it black again. But this time, the paint crinkled and wouldn't cover. It separated leaving cracks of white showing, like a dried out lake bed. The blaster was ruined and ever since then, I've been afraid of layering paint. After starting on my current build, I did a bunch of reading in scale model forums and they seem to be no strangers to this effect. That's when someone mentioned LEA.....not LEIA, like the Princess, but an acronym. LEA = Lacquer , Enamel, Acrylic. If you are layering different types of paints, this is the order you are supposed to follow for the greatest chance of success. Apparently all spray paints use a base which is a sort of solvent, some will react poorly with others. The worst (strongest solvent) seems to be lacquer and the weakest (solvent) seems to be Acrylic (almost water). Most lacquer paints will dissolve Enamel and Acrylic and many Enamels will dissolve Acrylic, but Acrylic won't dissolve anything. Hence the order to layering. However, not all paint manufacturers tell you what the base is. Home Depot will sell a Clear Coat without mentioning that it's Lacquer. I found that in the material safety sheet on a different web site. Then you see that the paint has three 1-star reviews. People say the clear coat is horrible, don't buy it, it destroyed my beautiful paint job. Hmmm, yes, that's because it's lacquer and you probably sprayed it over Enamel or Acrylic But there seem to be many exceptions too. Tamiya uses "synthetic lacquer" which behaves differently and some people get away with normal lacquer clear coats over Acrylic if they are applied as several, very thin, coats. It's all incredibly confusing. So, back to my paint job. Humbrol sprays are Acrylic. Acrylic is safe over pretty much everything. I wanted to use Humbrol Spray paint but you can't get Humbrol Sprays in Canada. You can get Tamiya (another scale model paint) in Canada, but Tamiya is Synthetic Lacquer. Warning Flag. So right now my plan is : - Start with the Tamiya Gray Primer - Mask off the gun and paint the grip a Tamiya Gloss Black and maybe follow up with a Tamiya Gloss Clear-Coat (these should all behave together) - Unmask the gun and mask off the grip then paint gun and stock Rust-oleum Hammered Silver (no info on base Rust-oleum uses but probably lacquer) - Paint over the hammered silver with Testors Enamel Matte Black - Weather - Follow up with Matte Clear Coat (this is the dangerous part as most clear coats are lacquer) I'd love to hear experiences (both good and bad) that people have had layering paints... Mark2 points
-
Thanks again, guys. I'm excited to see it painted but not excited to wait for paint to dry. Update - Assembly / Primer Slowly things are coming together. When I order the other 3D Printed parts from Shapeways (Suitcase Props) I also picked up the flash guard / ejection port guard. The Doopydoo's version is kind of thick. I sanded them down a little to remove some of the 3D print texture, hit them with grey primer and sanded them again. They were then glued on using CA glue and later I went around the outside with green stuff to further fill in the seams. I started doing a bit of weathering on the spring and end of the bolt. I need to complete the painting before I permanently install this as once it is glued, it's not coming out. But here's an "in-progress" shot... Next I hit the handle with some primer and got it attached. I was going to completely paint the handle first before attaching, but we seem to have quite an issue in my area with getting descent spray paint. Humbrol Spray Paint is completely out of the question. After weeks of searching I decided there is no Humbrol Spray in Canada. None. I would have liked to stick with Humbrol because I know it has worked with other builds. Tamiya spray paints are readily available which is what I use for Primer and the black of the power cylinders and Hengstler Counter. I'd like to use a different black for the matte black of the gun itself so I'm trying to track down some Testors Matte Black. It's also enamel so they should play well together. Anyway, after striking out with the Testors I decided I would just attach the handle and mask it off later. I'll try some other stores for the Testors spray later in the week. The front and rear scopes were attached. The end cap clip was attached. Seams that didn't look completely tight were filled in with green stuff and sanded after they dried. Then, finally, the whole gun was hit with Tamiya grey primer. (I shoved a few paper towels into the receiver tube so that the inside wouldn't get any over-spray) And here's the close-up I promised of the bolt/ejection port.... I've also been doing a ton of reading about paints. Very interesting. I'll do a separate post just for paint. Mark2 points
-
Hey everyone, as most of you have probably noticed the boards were upgraded last year, and now some of the old assets look outdated (or outright broken). We also can't find the source files for a lot of them, so long story short, I've been tasked by Paul (Daetrin) with doing a refresh on the various icons/awards/etcetera peppering the boards. This thread is to serve as a PSA as well as for gathering feedback from the membership. I have two goals in mind with this refresh : 1. Hi-Res assets - with the explosion of super-high PPI displays we want to future-proof by creating any new art at higher resolution (this also opens the door to potential print and other uses down the road). 2. Streamlining/Consistency - All of the art has been made over the course of several years by multiple people, so what exists right now isn't as consistent as it could be. I'll do my best to get everything to 'gel' together better. Where possible, I will show the new images in regular and 2X (hi-res) versions. Before I dive in, a brief detour into some of the consistency stuff, namely color... there has been an attempt to clean up the "color coding" going on with user ranks and the various awards and other art that tie into them. Here's a brief run-down of the colors I'm using and where they come from: (I may eventually go through the effort of converting these over to Pantone colors, but it's a lot of work so this will suffice for now.) User Rank Images These are the first thing I will be tackling, and the new (proposed) art addresses a few issues. The "classic" FISD logo has been replaced with a (revised) beret flash, AKA the simplified shield logo. This has the benefit of looking better at smaller resolutions as well as being more OT/FO TK agnostic (no helmet!) - a goal of the detachment this year is to make FO TK's feel more at home so I'll be doing my best to help where possible. I am also switching to the same font used in the forum header (logo) for consistency. These are the proposed user title graphics - there is now a "Guest" title which we may or may not use, but completes the set of user groups in current use: Updated Red 7/1/2021 Added 8/1/2021 -- Updated 9/1/2021 -- Service/Achievement Ribbons (Part I) Much like the user titles, we can't find the original files and they had to be re-drawn. The current ones are ever-so-slightly off-center, which I will be fixing: First off, I'm proposing some slight color tweaks to the ribbon colors themselves in the interest of consistency: The Achievement Award Ribbon's center blue strip has been adjusted to match the "official" FISD blue (it also stands out better on the dark gray forum background): The Service Award Ribbon's center lilac strip has been changed to the staff "burple", this way both Admins (Red) and Staff ("Burple") are represented: The ribbons have been redrawn at high res, and the stars have been redone to match the new user titles: Next up will be tackling the other two ribbons (Master Armorer and Attaché Achievement)... stay tuned.


 1 point
 -
Hello fellow Troopers. The original post of How to use Magnets in your costume was affected by the recent stunt that Photobucket pulled and now the pictures and video are unavailable to use. TK4205 from Garrison Titan did a great job showing everyone how to get suited up with less hassle. It has helped me a great deal with my build and I figured that I would post another HOWTO with a video and pictures so that TK4205's method might help some one in the future as it did me. I used this method on the Abdomen and Posterior part of my armor but the concept can be applied to pretty much the whole suit if desired. Abdomen: Here is a video link to how the method works: [/url] I was able to get the Abdomen Section of my armor on in about 12 seconds without any help. My Plug and Sockets aren't as clean as TK4205's build, but if you are new to this hobby like me, hopefully you can get jest of how its done from the pictures below. Step 1: I ordered some Styrene Sheet from Amazon. In hindsight I wish I would have ordered Styrene that was a bit thicker but I used what I bought. Link below https://www.amazon.com/gp/product/B00ICMZ7PQ/ref=oh_aui_detailpage_o02_s00?ie=UTF8&psc=1 Magnets: TK4205 suggested going Super Magnets at Home Depot so that is what I went with. If you don't have a Home Depot Neodymium Rare Earth Magnets should work as well. https://www.amazon.com/Super-Magnet-Neodymium-Permanent-Magnets/dp/B01LWPHF2E/ref=sr_1_1?s=industrial&ie=UTF8&qid=1500301280&sr=1-1-spons&keywords=neodymium+magnets&psc=1 I took one sheet of Styrene and cut some squares. I had to cut 4 squares and glued them together since my styrene sheet was so thin (hence the reason I wish I would have went with a thicker size). Then, I cut out a space the magnet to fit inside. After I knew the bottom magnet fit properly, I removed it in order to glue it to the armor. After that, I glued a magnet to the top side of the Styrene Sheet. Next, I marked the spots where I wanted to place the magnets on the back of the Abdomen. I put a dab of glue (E6000) on the Magnet and grabbed some tape I had laying around and tapped the magnet to the appropriate spot: I also used Magnets on the outside of the armor that I later removed to further secure the glue and magnets to the armor while the glue was curing. I let it cure for 24 hours: Step 2: Now that I had magnets attached to the armor, I place the styrene squares I had cut out on the back armor and traced where they would need to line up in order for the armor to close properly. Next I prepped the squares with tape, placed glue on the armor, placed squares on glue. I wanted to make sure the styrene sheets really got a good bond so I got some wood and weights to press it down further. Let cure for 24 hours: Done Put on armor and feel accomplished Attaching Posterior Get Webbing, Glue, Magnets. Glue the magnets to an 8" long piece of webbing. Let glue fully cure to webbing and magnet. Take the Posterior plate and measure the spots you want to place the magnets and mark them. Apply glue to magnets and posterior. Let Cure Attach webbing magnets to posterior magnets and lay on to the inside of your armor and tape the webbing down to the inside of your armor and test fit to make sure that the posterior hangs to just below the bottom of the back of the armor. Once you get it where you want it, trace around where the webbing needs to go and glue it down1 point
-
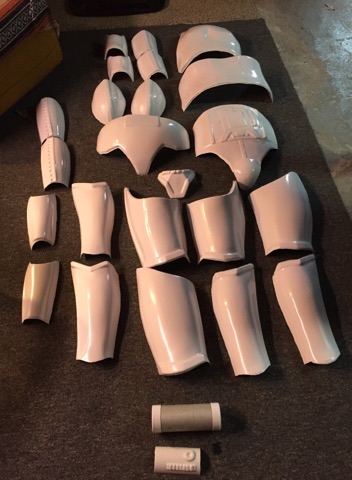
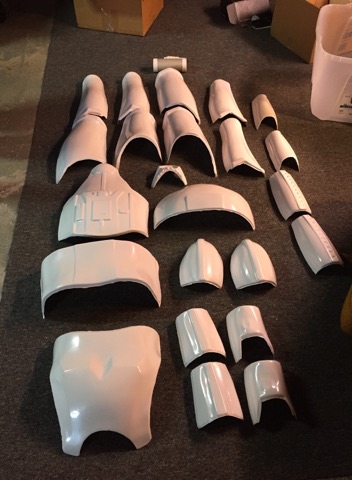
Hey all, I recently finished (roughly) trimming up my first ANH armor (besides the helmet, belt, and some other misc pieces) and I'm now working on smoothing out the edges. I'm starting on the chest and back pieces first, using an electric sander, a file, and sandpaper. Let me know what you think of what I've done for the back piece so far, I know it looks a little uneven now and I didn't completely finish sanding it yet incase I'm told I need to remove more first. Just looking for some help since I've never really done anything like this before. Cheers, Quinn EDIT: Hm I'm trying to add more pictures of the back piece that I have but it's saying I can't upload anymore, even if I try to add it in a new reply. Is there a way around this? Should I just upload to photobucket or some other website and share a link?
 1 point
 -
Thanks Dracotrooper! This was my first ever build made with pvc pipe, styrene, and sheet metal. I learned a lot never having worked with metal before. I am getting ready to build another and fix some of the things I don’t like about the first.1 point
-
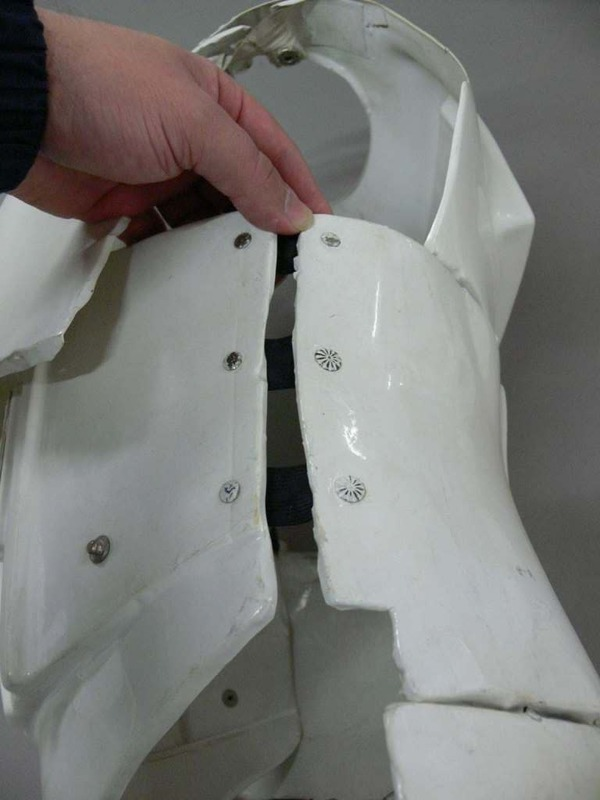
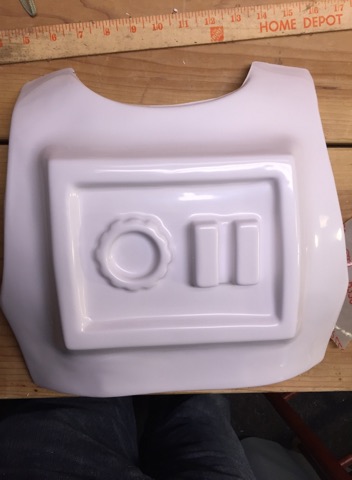
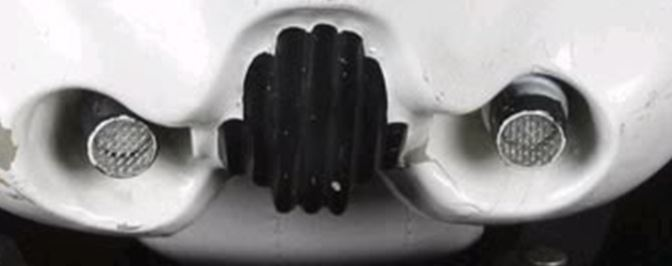
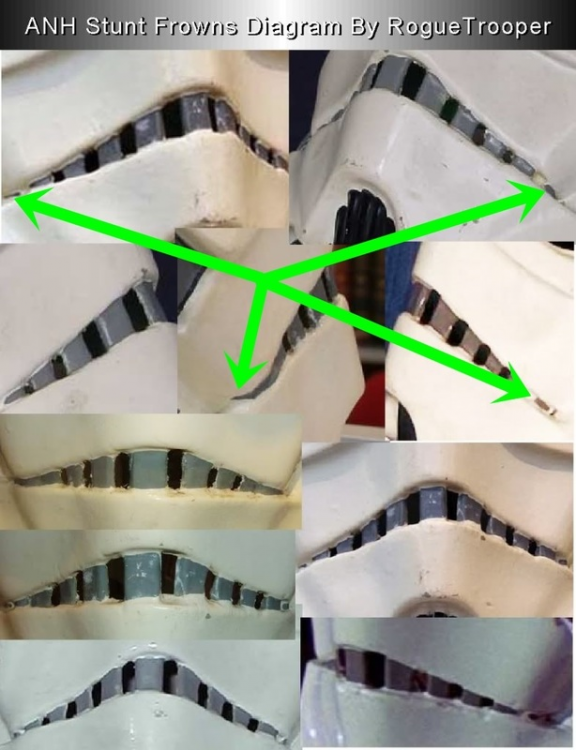
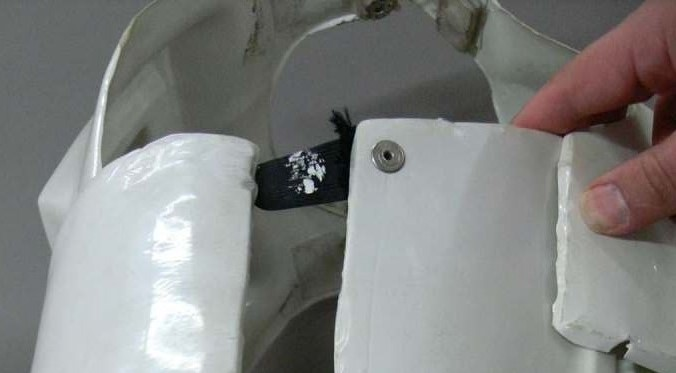
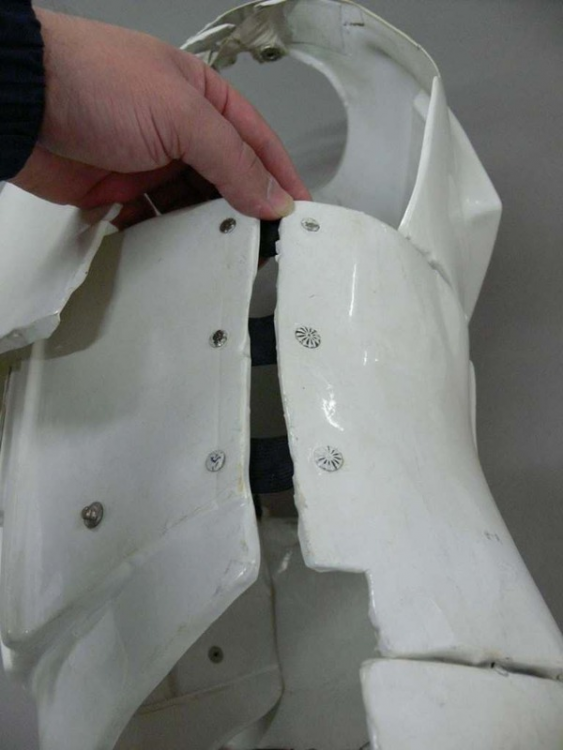
Hey Justin, thank you for your EIB application and your patience. Let's get cracking. CRL and EIB Application Requirements: All the required submission photos have been posted, and your armour meets all the necessary requirements for level 2. With that Tony and myself would like to welcome you to Expert Infantry, congratulations Other-Armor Fit/Assembly: In this section we review observations made by your fellow troopers and ourselves. Some observations may lead to suggestions to improve the overall look of your armor. If any suggestion affects any application, it will be listed separately in the above or below sections. We have some suggestions to get you looking the best you can. Most are dressing issues but there are a few mods we like to see done on the Anovos helmets if you are intending on applying for Centurion. The shoulder Bells should basically touch the plastic shoulder bridge, so shortening those top black connecting straps will bring them in. Next is only a dressing issue, but make sure your fore arms sit evenly spaced from the biceps and the wrist end to the hand plates. It also appears yours are twisted inwards slightly. Align the front cover strips from bicep to fore arm and you are good. Reference Image If you can adjust the Velcro strapping between the back and kidney plate so they sit right on top of each other, it will look perfect. May we suggest replacing the Anovos supplied Velcro system with elastic and snaps as it generally is better for movement and also can last much loner. You will find loads of examples in the internal strapping photos of other EI applications. Also keep an eye on the alignment of your calf enclosure to keep them level. Reference Image Ok now to the helmet mods we will want to see in your Centurion application. The frown really stands out on the Anovos bucket as it finishes too short and very square on the ends. This needs to continue to taper out to a point, and the paint shouldn't go onto the gum line. We see you have replaced the hovi tips in the extra images you added in the application, so thank you, I don't need to talk about those although they are circled., and lastly, if you can sharpen up the edges of the Vocoder so it is more defined on each ridge, its also going to look much better. Reference Images Centurion Suggestions: In this section we prepare you for Centurion. More photos are requested that allow us to make better decisions on possible adjustment etc. If there are any areas of concern they will be discussed here. You are already aware of the extra rivets required for the Abb plate and they are a must as per the level 3 CRL as is the male snap for the upper corner on the opposite side. For level three certification (if applicable) Three rivets, approximately 5/16"(8mm) diameter, are present on the left side of the abdomen armor. Note: The original rivets used for the TK armor were bifurcated rivets or split rivets. Rivets are equally spaced along the depth of the armor and about 10mm from the edge. The heads are rounded or domed. Note: Paperclip brads are not considered to have a domed head. Rivets are painted white. A single male snap on the top right corner of the ab plate is present. Well here we are at the end of your EI approval, well done sir on a successful application. Make your adjustments and modifications and we hope to see you in Centurion review soon Congratulations
 1 point
 -
Lol. Surgeon hands at the ready!!! As a trooping blaster, I think this approach will be best for now. I’m not planning to remove the mag at any point, other than in transit. Glad and to see my proposed lines look good. I’ve been looking at similar mags for reference but really appreciate your eye over it. Hopefully get get some more done over the next few days.1 point
-
Hi Jesse, Many thanks. Yes, it needs work but should be worth it in the end, I hope. Lol It’s a solid piece rather than hollow. I’ve seen others (Tino I think) drill right the way through to mod the top plate release button. If I’m honest, I’m not going to pursue that mod at this stage. Just a simple replacement for the Doopy’s. I’ll be working on the well with it attached. I don’t think I’m going to hollow out too much of the mag well, partly for stability/strength of the well, and also to utilise the existing magnets in the well. As such, I will likely do this: Remove part beyond red line - green line shows where magazine will intersect with the mag well. I’ll have a better look once the weather improves and I can get out to my shed. Currently -4 degrees outside. Whilst the Dremel works in those conditions, I’m not sure that my hands would!! Sent from my iPhone using Tapatalk1 point
-
Hi guys, Just following your paint talk. If I did mine again, I’d be tempted to spray my hammered effect black a little thicker. It looked fine on its own, however when I coated with the top coat of Matt black, a lot of the hammered detail was lost. Definitely worth experimenting with whatever you end up with, but also with a top coat. Dan :-)1 point
-
Howdi folks, So, a little package arrived today. Time to make another mod. ;-) I’ve had a few bits now from UK based Imperial Warfighters. When I saw that a new mag was available, either rubber or resin, I couldn’t resist. It is not an overly expensive piece so I am not disappointed with the slight issues that I’m correcting. Being resin, it is easy to work with. The size is much better than the Doopy’s and, with a little bit of work, should look much nicer as an overall blaster when finished. The green stuff will undergo a lot of fine tuning once it has dried, including refining the shape of the top cap and its “lip” overlap. The following shows my holding the new mag behind the mag housing. The housing and the mag will require some re-sizing to get it fitted nicely. Also, as a side note, I’ve now made transporting my blaster a lot easier, safely housed in the lid of my battle box. More to come. :-) Sent from my iPhone using Tapatalk1 point
-
I too am on the Canadian West Coast - I too looked into the hammer paints and have only, like you have, come across Rust-oleum, Tremclad Hammered (purple can right?) and that VHT Wrinkle Plus (from Lordco Auto parts). Think that's all the options available here. I checked also: Slegg Lumber, Home Hardware, Walmart, Cloverdale paint, Lowes .... same three cans. I too was impressed with Tennatlim's paint job; mind you he did it in Indonesia during the summer, where temperature is upwards of 26 degrees Celsius - Greg presents an interesting technique for us in the arctic cold! I think I will wait until Summer!1 point
-
Definitely don't feel like you are hijacking my thread. I want to open this discussion about paint. I'm also less than happy with most of the hammered spray paints available at hardware stores. Even when I purchase the exact same hammered/wrinkle paint as someone else, my results are quite different. I imagine that has to do with the thickness of the spray (how thin the layers are sprayed) as well as temp and humidity. Most of the time I'm spraying inside my closed garage. It's a bit drafty so the smell dissipates reasonably quickly. But because it's winter, I have a hard time getting the garage above 14 degrees right now (57 Fahrenheit) so that's not an ideal situation either. It's dry right now, humidity around 30%. Sometimes I'll spray and then bring the part inside to dry but I haven't really seen any difference when I do that. Mark1 point
-
Lol. Tube Stripe Sheriff, at your service. ;-) Joking aside, you’ve done all of the hard work, mate. Can’t wait to see your sandie progress, too. :-) Sent from my iPhone using Tapatalk1 point
-
I can't shed much light on this but... if you have no choice but to paint indoors or in a confined space (and you really shouldn't, but, we all want kick-butt looking helmets and blasters) I would highly recommend acrylics. I use Vallejo acrylics (model air and model color). I believe they have some additives in them (versus traditional artist's acrylics) that give a mild smell, but not bad. Of course, if you are using an airbrush (and you pretty much have to as I do not believe this comes in a spray can) you will get more of the paint atomized or airborne and therefore more stinky, but sometimes painting by brush is just not feasible. Regardless of brand, keep in mind when spraying paint that some colors contain more toxins than other colors (i.e. Cadmium-based colors). Personally, in my limited experience, I have not come across anything out of a spray can that doesn't stink (I assume this is due to the propellant that is used). Especially any lacquer or enamel as most of these stink even when painting by brush. I feel like I'm hijacking your thread, Mark. Sorry.1 point
-
Hi Lauren, you will see lots of members approved in Anovos kits. It is considered accurate enough for approval though most make some modifications such as cutting out some of the flashing in the eyes, painting the inside black, etc. Take a look in the Centurion applications subforum to see some of the best built Anovos kits!1 point
-
Oooooh, very cool. Looks like you have a wider than normal trigger guard to compensate for the skinniness of It - a very pragmatic approach, genius work!1 point
-
Hey Mark, I like your paint summary. I too started painting models when I was around 10 years old. When I got older I picked up an airbrush and painted with mainly enamels on small scale models. I did a lot of painting with acrylics (not models) as an adult. I started getting back into the model paints last year and I was pretty confused by what is now available and how one should go about painting props (well, so far it has been restricted to SW blasters ) What you outlined above, lacquer - enamel - acrylic, is pretty much my mantra when painting. But like you mentioned, it doesn't always need to happen that way. For example, I have had luck with coating enamel and acrylic with lacquer (clear coat). For me, it really comes down to timing and how you apply the paint (which is another can of worms). Some paints dry quickly but can degas or otherwise take much longer to truly cure. I find that by using thin coats applied well after the undercoat has had a chance to cure, lacquer can cover enamel and acrylic with no adverse effect (as an example). The timing between the thin coats and the environment (humidity and temp) can also play a part, but I don't really have a system for dealing with that. I just avoid extremes and hope for the best. I treat the Tamiya TS spray paints like a whole separate paint group - between lacquer and enamel - because it just confuses me . I assumed the rustoleum was an enamel. I used rustoleum universal hammered paint and primer (silver) for a base on part of my E-11. It didn't really add a lot of "hammered" detail, but it did make the parts of what would have been the original sterling stand out from the add-on parts (cylinders and counter). At the end of the day, I find that painting a 1:1 model gun with weathering does provide some freedom - it doesn't need to be a perfect paint surface. Also, testing on scrap pieces is a great idea because there are many factors that go into how paints are going to behave - not everybody will get the same result using the same paints. By the way, this build is truly impressive. Nice work! I can't wait to see the finished product.1 point
-
Made some tweaks to the armorer awards to closer match the originals: Also made some tweaks to the Centurion type so it feels more like the old one: One last suggestion I would like to make, would be to change the ordering of awards in the sidebar so that EIB and Centurion awards go last, with all ribbon-style awards before. This basically amounts to making the Armorer awards appear before the EI awards; this way they are split up by art style/award type, with the EIB space where the stars reside acting as a break. Using Tony again to illustrate - compare to the previous post: ukswrath Deployment Officer Deployment Officer[Staff] X,XXX posts Location:CA I could even argue you don't need the text under the Attache Achievement Award, and use some mouseover text to do the same job. Everyone (staff included) please feel free to leave your feedback/constructive criticism. I don't foresee any more tweaks on my end, so it's up to you guys.1 point
-
Curtains! hey, you're already taking out the beer? I guess no better way to start Hurray, everything has arrived! Let the fun begin!1 point
-
Thanks, Dan! And again, thanks for your help along the way.1 point
-
Cranking it out and looking good1 point
-
Much better...the beers are out lol[emoji481] Sent from my Moto G (5) using Tapatalk1 point
-
Ah, feeling better now. Looking forward to your build progress...1 point
-
Seeing how you have approached your excellent blaster build, I have no doubt that you'll knock this one out of the park. Looking forward to seeing your progress... Dan1 point
-
You're really cranking along with this - excellent work!1 point
-
Magnetic Closure of Ab/Kidney: Mirroring the method from Jayben Kenobi I will be closing my Ab/Kidney piece with magnets. I opted for six 1.26" x 1/8" magnets, which are on the larger side. Others have gone smaller and done 4 sets of closures. Hard to say which is best so go with what works for you. I won't go into too great detail and will just refer you to the link above and Ruthar's build yet again but will reiterate some pointers that helped me. 1) Mark your polarity - put an X on the positive sides of each magnet so that you don't accidentally glue them in and they don't connect. That would be the worst! 2) You may need a little extra height to make each side sit flush. Mine ended up looking this this when all was said and done. Check and double check fitment before glueing! 3) Mark each connection when you trace them out so that you don't lose track of what goes where. I used numbers. 4) Be sure to marvel at the awesomeness of your completed work! Its...so...beautiful!1 point
-
Awesome photo! You should get this in the newsletter.1 point
-
Centurion Award Proposed changes from existing: Font switch to match everything else Merged laurels and border into single shape/gradient to clean up design (and help with scaling) Slightly larger text, to help with smaller sizes Proposed NEW Centurion art:1 point
-
Drop Shadows Here's a quick comparison of a toned-down stroke/drop shadow: vs. older version:1 point
-
Looks good Sent from my iPhone using Tapatalk1 point
-
Woo hoo. EIB approved!! Still over at MEPD these days trying to figure out this dirt thing. Did my detail pics for Centurion and I hope to have that posted in the next couple of days. I'm still picking away at the electronics but I think I have things figured out. I have my first chance to wear my armor in public on Wednesday - so I'm sure a number of changes will be on the to do list after that.1 point
-
I think I may need to warm the return edge on the right forearm to flatten it a little, but arms are complete. Sent from my VK815 using Tapatalk1 point
-
Since a lot of the forum skin has rounded corners, I made a couple options for rounded (and more rounded) corners, thoughts? A.) Square: B.) Slightly Round: C.) Very Round:1 point
-
Looking forward to Centurion feedback too! I know I need more rivets on my left side, and the random male snap on the ab... I have new mic tips with better detailing and mesh ready to install soon... Interested to hear what else you guys spot!1 point
-
As many of you know, the 501st elections have come to a close. The FISD membership has spoken. Congratulations to our 2018 FISD Detachment Leader Paul (Daetrin)!!!!1 point
-
It’s not every day that we get to celebrate a century, but today is that day. Matthew (Mworm1974) TK-11874 is our 800th Legion member to achieve Expert Infantryman status. Please join me in congratulating the 100 troopers who put in the extra effort and time to take their costumes to a higher bar of accuracy and excellence. Well done you! :pint1:1 point
-
Great work troopers, another 200 to reach that goal1 point
-
Hahaha! It's the nerves and terror. Never really been so excited for something and yet terrified of it. Parenthood doesn't count. Sent from my VK815 using Tapatalk1 point
-
Great thread. Thanks to all for the info and upkeep. This helped me a lot.1 point