Leaderboard


Popular Content
Showing content with the highest reputation on 10/02/2017 in all areas
-
Hi Brian, That is PERFECT!! I couldn't get my head around this before, but those videos clear it all up. I wrongly assumed that the end clip 'held' the end cap in place; however, I now understand that it simply stops the end cap from being able to disengage. I'll certainly look at replicating this. Thanks again (to you, and to usaeatt2 and Tino)!! :-) Dan3 points
-
Right, made quite a bit of progress this evening. Started with the scope. For those that haven't used spade bits before (like me before this evening), they look a bit like this; (Image from google - don't know if this is the right size) I measured up and drilled a Pilot hole. Then started with the spade bit, varying the speed to get a steady result. I stopped at this depth as I don't have any smaller sizes. Off to borrow more from my dad. ;-) Separated the sight and sight pin(?) Then back to using my favourite Dremel disc to work on the stock and t-tracks. And here's some pics to show the t-tracks. Really pleased with the appearance of separate parts. Before and after: As always, more to come. :-) Sent from my iPhone using Tapatalk2 points
-
No problem, those guys are the hero’s for posting their videos. Glad it helps. Yeah, it was really cool when they posted the videos to show how it works. Fun detail to replicate for sure.2 points
-
Always happy to help And yes, I can only agree to what Brian said about the spade bits for hollowing your scope. I tried different bits earlier and nothing worked as good as this. Just make sure to grab a set with the correct size to install the big end of your monocular into the scope (in case you go for this mod).2 points
-
End cap clip release compliments of usaeatt2 and Tino: https://youtu.be/CYVmP_k9rIw https://youtu.be/l72kvNbmnac2 points
-
I learned the hard way about the "double snap" system. During my very first troop, my shoulder bells became unattached, as did my ab/kidney connections. A fellow Trooper showed me how he dealt with this. I literally removed all the single snap connections and replaced them with 2 snaps, and haven't had a problem since, even carrying a HWT pack.1 point
-
Cheers, Jesse. I'm in the same boat - this is my first time working with resin and I bought the Dremel purely for building my armour. I'm certainly learning as I go. I really appreciate your enthusiasm and support though. And the tips from across the board from yourself and others. :-) Sent from my iPhone using Tapatalk1 point
-
Taylor your Awesome!! Ive used your info and found the LS2 Helmet Liner for a FF370 Helmet. Cant confirm ATM but might offer the Ear caps as youve previously saw. thanks a Mill!! Now just to figure out what size i need ;01 point
-
Helmet - 10/01/2017 Over the Weekend i shot 2 more coats of Primer on the helmet then dried overnight, next day Saturday morning, i wet sanded the primer with 1500 and allowed to dry. Sat evening i shot it with 1 coat of White Base. Sat Night i wet sanded the Base paint with 2000. Sunday morning i added 2 more coats of White Base. Sunday Night i layed down 3 coats of Gloss. Here are the Results: Tonight ill mask out for the black and hopefully lay the Satin down.1 point
-
Next time we troop let me know if you need anything...I got a bunch of stuff you might need to put your stormy together, from frown screen to tandy snaps, and more1 point
-
Thanks. Going forward I'll post troop reports in that thread.1 point
-
Ears are fine and there is no need to countersink the screws in the ear caps. Brow gap is bad. You want the brow to be tight against the forehead of the face plate. This will mean repositioning the face plate and re-drilling the ear caps, but the old holes will not be seen so no problem1 point
-
I have completed the painting, it took 3 layers before I was happy with the coverage. The lines were pretty simple. I just used some reference pictures to get the approximate size and number. Then used a pencil to mark where I wanted the lines starting in the center. Added tape for the traps to make the lines level easier. The tears I just penciled and then eyeballed. For the Tube stripes I used the template provided by PandaTrooper. I used the "Ideal" one since I cut them out by hand it has the hand painted look. I then taped the template over some clear craft adhesive (cheap stuff from Walmart) then used a sharp razor to cut it out. Taped off the rest of the helmet and spray painted it using Humbrol French Blue. Worked well and the adhesive came off easy without letting the paint bleed. So here she is, all completed for the most part. Little adjusting to do with the padding on the inside but otherwise ready to wear.1 point
-
Got to finish the main body and trigger frame ,,, soon ill keep posting progress pics1 point
-
there great to display but holding them all day would be tough,,, plus if you have one with real vintage parts and scope the chance of damage and thief,,,,,,,,,,,,,,,,,,,,,,,,,1 point
-
Fantastically done, Alberto - best of luck!1 point
-
oh and you should also go here and request 501st status:1 point
-
Looking good so far Joe. You said you were concerned about the gap in the ears. All I can tell from the photo above is the gaps look fine. The mic placement looks good as well. Can you show a better picture of the frown? I think you may need to go a little more. My first ANH helmet was built by troopermaster and I have used his as a guide since I've gotten it. I have always trusted his work because well he is the master. PS my brow is low because that is the way I wanted it at the time. Your brow is perfect.1 point
-
Amazing work trooper! Looks great! This should indeed be an easy app to go through. Your fellow troopers should be proud to troop by your side. Sent from my iPhone using Tapatalk1 point
-
Simply amazing Alberto! This one should be easy. I hope that new members in our garrison will always look to your set of armor as an example of what every set should look like in the future. We would be one of the sharpest garrisons in the world. Good luck!1 point
-
Looking great! Keep up the good work! That undersuit will be fine.1 point
-
Belt and Drop Boxes I wasn't looking forward to the belt because it seemed really tedious, but I actually had a lot of fun with it. Since I'd cut the cod and ab, I didn't feel as though I could trust the measurements in Ukswrath's build for the ab/belt snap placement, so I ended up basically eyeballing it. I didn't have the proper type of snaps so I used Tandy Line 24 snaps which are super solid, but really quite hard to snap on, especially once I'm wearing the ab. Here is the belt with the snaps attached. I have the ab buttons taped into place just for reference, and eagle-eye readers will notice that I've actually installed the belt too low. This will come to bite me later. For the drop boxes, I'd read that the thickness should be around 10mm, so I trimmed both the inner an outer boxes to that size. Again I decided to try to use them for storage, so I glued a bit of nylon webbing at the bottom to act as a hinge, and installed a tab of velcro inside to keep it closed. I tried for a bit to shape a piece of ABS to hold the velcro securely pressed together, but it turns out industrial velcro is pretty solid, so I basically just let them vaguely stick together. It's not somewhere I'd store anything important like my ID or credit cards, but I might put trading cards or something similar inside. Like the TD, I can always just glue them together if it turns out this doesn't hold up. This was also my first time using a rivet gun and pop rivets and I thought it was quite fun. For the ABS belt itself, I used Bill Hag's measurements: I used a soldering iron to make the holes in the canvas belt since the punch that I bought didn't seem to work, or maybe I just didn't know how to use it. I also realized after the fact that I'd trimmed the 45-degree corners such that the width of the tapered ends of the ABS belt didn't match the width of the canvas belt, so I ended up trimming a hair off the ends, but I don't think it looks off. Otherwise, the assembly of the belt was pretty straightforward - pop rivets to attach the ABS belt to the canvas belt, and a loop of elastic around the canvas belt for the drop boxes. I did end up gluing the drop box elastic in place to keep them aligned with the ends of the belt. One issue I ran into that may affect other smaller troopers is that my belt is so small (I ordered the 36" size) that one of my holster Chicago screws ended up on the velcro of the belt, so when I am wearing the belt, one of the holster tabs is actually under where the belt overlaps. There wasn't really much I could do about it given the recommended holster placement: A little while later when I tried all the body armor on for the first time, I posted a few pics in the A Little Short for a Trooper Facebook group, and Cricket pointed out that my belt was sitting too low: I did my best to try to force it over the bottom edge of the ab buttons, but the snaps held it too tightly in place, and it was impossible. I'd have to disassemble the belt. I wanted to be sure that I put the new snaps in exactly the right place, so I colored the edge of male snaps on the ab plate with marker, positioned the belt where I wanted it, and pressed down on the snaps so that they left a faint marker circle on the canvas, indicating where the new snap placement should be. If the new snaps were sufficiently far away I could have left the old snaps in, but they were close enough to the old snaps that I had to remove the old ones. So it was with a not insignificant amount of sadness that I drilled out the snaps and the end rivets. Drilling out the rivets was necessary because I needed to be able to hammer in the snaps, and having the canvas and ABS belt riveted together would have made that impossible. Having to pry off the button covers gave me the opportunity to fix the button covers to sit flat. The pop rivets were just tall enough that the button covers were a little wonky, which annoyed me. So I used a large drill bit to make a small divot in the underside of the cover to give the rivet just enough room that the button covers would sit flat: With the snaps in the new position, the belt position was much better: Just today when I was trying on the torso armor to make some adjustments, I was trying to snap the belt on when the rivet pulled through the canvas belt! So it was yet another round of belt disassembly. This time I cut small pieces of ABS to put under the head of the rivet to hopefully keep it from pulling through: Here is a view of the entire assembled belt (prior to this latest disassembly/reassembly):1 point
-
Thermal Detonator I decided to try to make my own TD clips using 1" wide, 1/8" thick aluminum bar that I bought at Home Depot. Keeping with the theme of this build, I didn't take progress photos, but there are a number of tutorials around FISD and the web. I will say that it wasn't as easy as some of the tutorials made it seem; it was difficult to get the curve of the clips tight around the PVC tube, and I ended up breaking my first clip because I bent it too quickly and it broke. But eventually I got something reasonable looking: I did end up bending the ends of the clips to be more straight later so they would fit over the belt better. Since the CRL doesn't specify a particular grey for the tube, I just used a few coats of Rustoleum flat grey primer. It looked okay but has already scratched off in a few places. I should have probably used some sort of clear coat after applying the primer. WTF kits thankfully now come with TD end caps that actually slip on easily. For some reason I only got 1 big one, so I heated the other with the heat gun and pressed it onto the pipe to make it fit. The rest of the construction was fairly straightforward, but I decided to make removable end caps so I can use the tube for storage. I figured attaching the end caps with taut elastic would be enough to keep the caps on, and I racked my brain trying to think of ways to rivet elastic on without having the rivets show, but I wasn't able to come up with anything, so I ended up just gluing the elastic on with E6000. After it was dry I glued a small piece of ABS over the elastic to hopefully keep everything in place. We'll have to see if this ends up holding up. I figure if it doesn't I can always just forget it and glue the end caps on. I originally used incorrect rounded head slot screws because it turns out I didn't actually understand what pan head screws are, but since I won the 'why Centurion?' contest (thanks @justjoseph63!) I got a set of correct pan head screws so I swapped them out. They're painted black using gloss black paint I bought for the helmet. You will also probably notice that I drilled the holes for the right clip slightly crooked. I don't think it will matter, but it drives me bonkers every time I look at it.1 point
-
I've followed along as you've done a great job all the way through. Congratulations guy's!1 point
-
Gents, congrats and I have been using your posts to help build my own TK Kit. You guys have been more than helpful! r/ MIke1 point
-
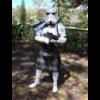
Hi all, I'm proud to say that I completed my first unofficial troop today in aid of Macmillan Cancer Support. My work held a Macmillan Coffee Morning, raising money through bakes, coffees, games and a little surprise visit from a nearly finished TK. Suit is not 100% yet, (note the missing thigh ammo pack), and my shins suffered the two flights of stairs I had to navigate. Will definitely be adding Velcro to the inside front of the shins. :-) Self dressed, two flights of stairs and only appeared to suffer twisted shins. Really pleased to have helped raise some money for an incredibly worthy cause and bring some great reactions from my colleagues. :-) Sent from my iPhone using Tapatalk1 point
-
Any forecast as to when these will be ready to order?1 point
-
This E-11 just gets better and better. Amazing work1 point
-
Yes, That's the plan. This kit will be designed to install electronics inside for lights and sound. Oh yes, these will be so much lighter than a real steel Sterling with a vintage brass Honeywell telescope, and vintage Hengstler counter. Yet they will be metal and incredibly accurate to the real thing right down to the last dimension.1 point
-
.....and it will be much lighter than a real demilled Sterling. Just finally got to hold a real one this past weekend and at well over 9 pounds (4kg) I decided that a real one isn’t as attractive as I had once thought. Sent from my iPhone using Tapatalk1 point
-
Looking Great Sha Sha! Love the progress & mods.1 point
-
Great work, keep it up1 point
-
I've really enjoyed watching your build progress. I love your attention to detail. I hope I have helped a little.1 point
-
You are well on your way and have done your research. Keep up the great work. I think you will be able to get to E.I.B. and Centurion. You are prepared. Very inspiring for new builders.1 point
-
I'm interested in one with an optional assault stock and the pistol?!1 point
-
Update #15 - the grip The grip caused me some headaches as of what to paint 1st, 2nd and so on. Started with the silver on the trigger area (sorry, no photo) and then precisely covered it with tape. Next was the gloss black from can #7. It took a lot more than 24 hrs to dry. Now also the gloss black grip got covered to add the hammered paint and the matt black on the sides. Removed the tape and found some problems. Paint was under the masking and some silver paint was taken away by the covering tape. Better dab the tape on some textiles (to reduce adhesion) before applying it on a painted surface. Ja, ja, ja ... These details got fixed within a few minutes, so no big issue and the inner section received a different colour (gun metal grey). Please feel free to leave any comments and critics (steady Germain ) while I work on the next update...1 point