Leaderboard


Popular Content
Showing content with the highest reputation on 09/28/2017 in all areas
-
Thought this might be useful for some. I apologize for showing my face briefly >.<3 points
-
Thanks brother. I'm figuring things out as I go along and I'm grateful for all the guidance I have received.2 points
-
Amazing work on the blaster. Robert's parts really make a huge difference. I recently broke out my old DVH kit and the amount of cleanup and fixing is almost unthinkable. Might have to abandon those parts and start the long expensive process to buy Robert's parts. Love this build. Great work!!!!!2 points
-
Hi everybody, Ah, the fun continues and quite happy about some results this latest go. In this latest round, I've cut out the latch on the inner rod of the folding stock and installed the latch itself. Hinge bolts also installed; folding stock now swivels and extends to the full back position. Although not pictured, it locks into place when pushed against the end cap, which was really exciting for me to see that functionality. I know I needed to be pretty picky about the screw used for making the latch piece. It was a screw with a width just over 4mm so there was minimal back and forth when placed through and against the vent hole notch. The screw was wood in type so that it will have maximum grab when screwed into the pencil. It's length was measured out carefully as well so that there's minimal gap between the folding stock and receiver tube. Here is a close-up of the latch cut-out. Haven't done much since the rough cut-out of it. I used my Dremel with Diamond Cutter to shorten the screw. Pliers were used to hold the screw during cutting; the screw gets really hot! 5mm black heat shrink tubing placed and heated with heat gun to shrink the tubing onto the bolt thread. Latch piece screwed into pencil. Seeing the latch piece installed was a moment of pride as I prepared a long way to get here. It is functional and able to slide up and down the inner rod =) I was initially pretty confused on how to use carriage bolts for this part of the installation. The folding stock hinges installed nice and flush, with a bit of tightness when swiveling the folding stock, which I like. Here are some pictures of the folding stock attached. Finally, I confirmed that my latch piece dimensions are correct as it is able to bring the folding stock fairly flush against the receiver tube with showing minimal gap. Thanks for reading!2 points
-
Having had my Jimmiroquai FOTK approved in June this year I am looking to modify the kit with spares so that I can alternate between the FOTK and FOJE for future troops. Having been researching and sharing information extensively for some time I have started to acquire the necessary parts for the upgrade. Jimmi was quick to respond to my call for new parts and within a week I received new shoulder bells and yoke... And I"ve been toying with sizing for a new TD end cap using the lid of a spray oil can - yet to be painted black!... Not much more work will take place for a week or so owing to a large Con here in Sydney and a few other FOTK commitments. Hope to share more soon1 point
-
You guys were right, it needed some dirt! Look sooooo much better. Though you could barely tell in the photo, it is quite dirty! The photo below is "before" the dirt bath! AFTER: BEFORE:1 point
-
Blackened the inside of my bucket. Hopefully won't need this for very long. Mimic is being kind to throw in a tlj bucket for the early adopters as a thank you. Great guy first pieces from what I heard will be shipping soon Sent from my SM-G950U using Tapatalk1 point
-
Ok guys! Here are some of my submission pics. Please give constructive input so I can get this thing to EI and Centurion. More pics to follow with specifics. Sent from my iPhone using Tapatalk1 point
-
You can find measures for the torso and kidney rivets here. https://www.whitearmor.net/forum/index.php?/topic/41016-Billgrams---the-one-stop-shop And I think it was first rivet 20mm from the top, second rivet 52 mms from the first and third 53mm from second. As for the rivet covers on the belt , I made mine about 3mm wider than the round part, on every side. So roughly 26 mm across [emoji4] Skickat från min SM-G930F via Tapatalk1 point
-
Well, you never know [emoji2][emoji6] Skickat från min SM-G930F via Tapatalk1 point
-
Well..some pieces move along in relative speed and others, like the helmet, is taking forever...took several hours and to many drillholes to line it up than I would like to admit but thanks and who knows, we might just be TK:s roughly the same time1 point
-
lower legs are getting a thin bondo coat after a couple of layers of sludge and a lot of sanding. But in the meantime... Drop boxes and remade straps. Drop boxes are a piece of prime pine that was planed down to remove about 1/4" off the overall width. This delivers the right sharpness of corners that I was looking for. I hit the wood with a few layers of primer, followed by 0000 steel wool, followed by 2 more layers of primer, followed by more steel wool, followed by more primer until the wood grain all but disappears. straps are pieces of HIPS scrap that Walt sent with the legs. These were heated with a heat gun and bent around a gallon can of paint to get them in position. I also used some sandpaper to bevel the outside edges a bit to grab some detail shown on the references. IMHO, Jim's were too long and too thick against the references. On these, I'll be able to pencil in the details and get them to end and begin at the correct positions on the back and chest armors.1 point
-
Thanks so much for this Joseph...lifesaver1 point
-
Feels like having a déjà-vous Glad to see your latest progress. This blaster is getting better and better...1 point
-
Thanks for checking in, Nate! I'm glad my build is still being used to help other's on the path to a TK. The path is long, but the rewards are out of this world! When I did my strapping, I wasn't convinced that E6000 would really hold nylon to elastic when the elastic stretches so much, so I sandwiched them together as you mentioned and Bryce confirmed. Here's a better shot of the assembly process BTW, I would love to be back in Miami this weekend to Troop at the Marlins game. But since I drove down last week to bring my mom back after evacuating, I won't be able to get away this weekend. I will be down sometime to Troop with Everglades Squad!1 point
-
Interesting find, I will see to incorporate this on my build, thanks for sharing - as others have said, your build has been a great ride, very quality build, excellent work [emoji106]1 point
-
Thanks!1 point
-
I have these on my build1 point
-
Robert's parts + Bulldog44's scope = Awesome1 point
-
This is simply AMAZING. Unbelievably spectacular. Mind blowing. great great work1 point
-
Well, thank you very much Zac. It wasn't meant to come that far a mod... it just happened this way. Sometimes once you start you cannot put things down. I'm really happy with how it came out, much better than my initial expectations, and it wasn't as difficult as you may think, tough it also has been more time consuming than what I thought it would be. Glad you guys like it and thanks for the kind words!1 point
-
Thanks for the vote of confidence brother.1 point
-
So I was looking through some reference photos of back caps, I found another boo-boo: there are holes in the receiver ring that I overlooked.1 point
-
That's looks superb! Excellent job. :-) Sent from my iPhone using Tapatalk1 point
-
Awesome. Daetrin, are we still including the optional weathering section? I ask because my trooper is in the painting process, and I'd like to lightly add some black weathering to resemble a more cleaner version of the trooper on the mining colony. I need this so I can hide some mistakes I don't want to repaint.1 point
-
We got approved!! Don't know what was more exciting - BBB day or 501 TK email day!!! So psyched for our first troop this Saturday at the Marlins game and grateful for everyone who helped us throughout our journey! I've already started tweaks and adjustments though (pictures to post later), and so begins the never ending saga of armor maintenance and modifications. Obviously, first stop is EIB, then Centurion, but definitely looking into possibly transforming into a HWT. One step at a time though... Long live the Empire!1 point
-
Incredible job man! Honestly, I think this is probably the best Rubies conversion I've seen. That hard work paid off for sure.1 point
-
Here is Pandatroopers how too thread on using heat irons, could be of use https://www.whitearmor.net/forum/topic/12972-howto-make-a-return-edge-on-armor-using-a-heat-sealing-iron/ Good luck1 point
-
Thanks mate Hahahaha... I hear you. It's very hard to go slow. I've been following your build, and when I take a small step, you seem to go forth in giant leaps But I must say, that it's looking extremely good.1 point
-
Well Done Brittany! You should be proud!1 point
-
Yes, That's the plan. This kit will be designed to install electronics inside for lights and sound. Oh yes, these will be so much lighter than a real steel Sterling with a vintage brass Honeywell telescope, and vintage Hengstler counter. Yet they will be metal and incredibly accurate to the real thing right down to the last dimension.1 point
-
Electronics With the rebel alliance spy and traitor. Sent from my iPhone using Tapatalk1 point
-
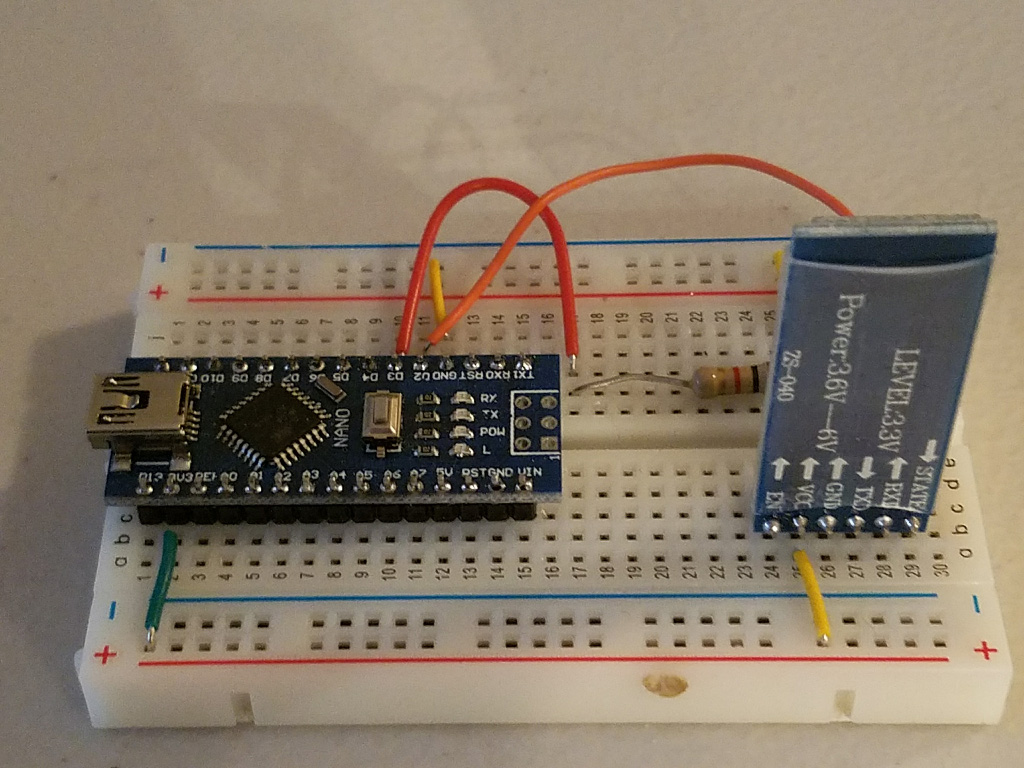
This is the setup I use to program the BLE. I don't have a diagram but these pics should show you exactly how to set it up. I'll also post the Arduino sketch I use. Just connect at 9600 using the serial monitor and enter the commands. To set the name: AT+NAMEYourNameHere [Enter] Some BLE modules "may" use AT+NAME=YourNameHere. It will depend on the manufacturer and how well they stick to the spec. Most real HM-10's will use the full AT command set but a lot of the CC2541's use a reduced or modified set. You can check that it set correctly by just typing AT+NAME and it should display the programmed name. // Basic Bluetooth sketch HC-05BLE_02_9600+ECHO // Connect the BLE module and communicate using the serial monitor // // The BLE defaults to commincation mode when first powered on. // The default baud rate for communication mode is 9600. Your module may have a different speed. // #include <SoftwareSerial.h> SoftwareSerial BTserial(2, 3); // RX | TX // Connect the HC-05 TX to Arduino pin 2 RX. // Connect the HC-05 RX to Arduino pin 3 TX through a voltage divider. char c = ' '; void setup() { Serial.begin(9600); Serial.println("Arduino is ready"); // HC-05 default serial speed for communication mode is 9600 BTserial.begin(9600); Serial.println("BTserial started at 9600"); } void loop() { // Keep reading from HC-05 and send to Arduino Serial Monitor if (BTserial.available()) { c = BTserial.read(); Serial.write(c); } // Keep reading from Arduino Serial Monitor and send to HC-05 if (Serial.available()) { c = Serial.read(); // Copy the serial data back to to the serial monitor. // This makes it easy to follow the commands and replies Serial.write(c); BTserial.write(c); } }

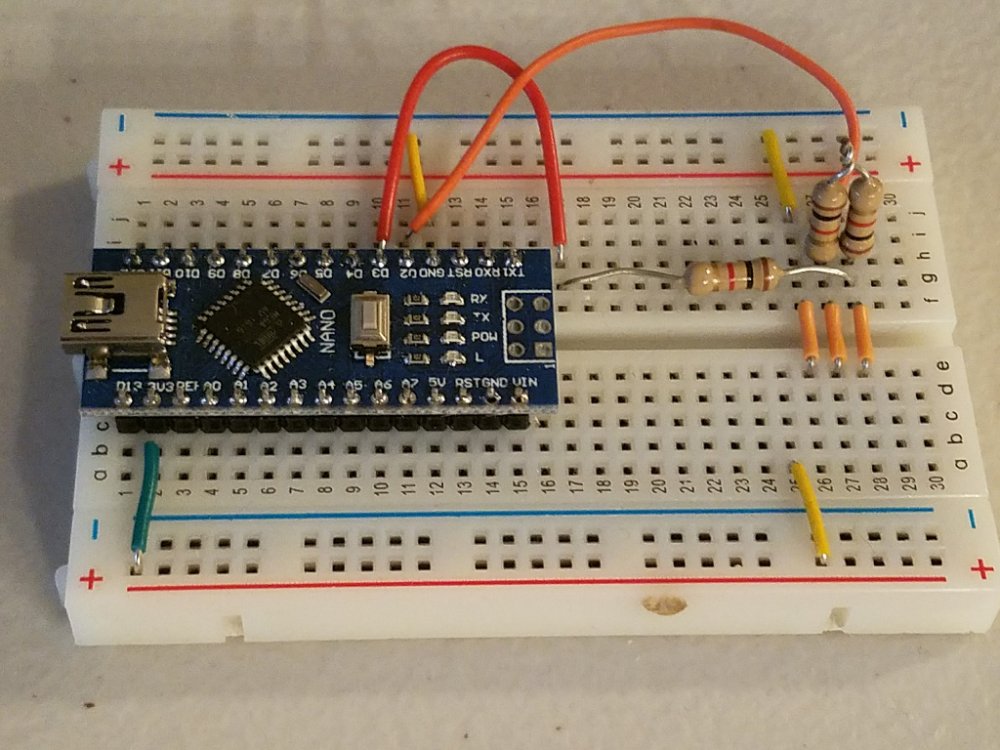
 1 point
 -
Many thanks all ! Will need more room soon ;-)1 point
-
I'm banking on them being cloth or cloth like material. God help us if they were rubber, again.1 point