Leaderboard


Popular Content
Showing content with the highest reputation on 07/24/2017 in Posts
-
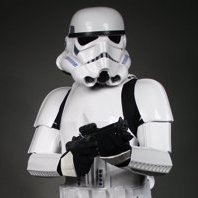
Hey, just wanted to review my blaster and spread the word on these. The details are crazy good, weight is great, and overall a great piece to have. Look them up if you can. Great product. Sent from my iPhone using Tapatalk2 points
-
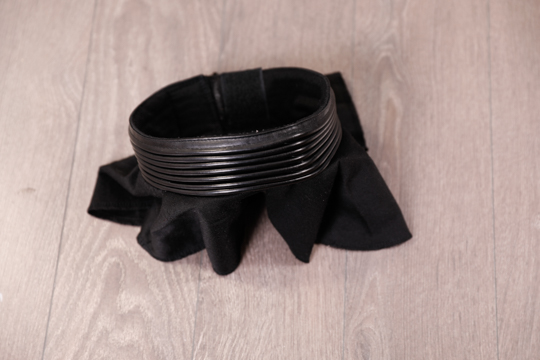
Thank you everyone for the help. I seemed to have resolved the problem. I cut off almost all of the return edge on the bells, which cut passed the cracks. The cracks are gone with no more repair required. This also fixes my bending problem, as the bells are much more flexible with out the return edge I'll post pictures later2 points
-
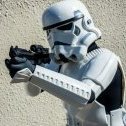
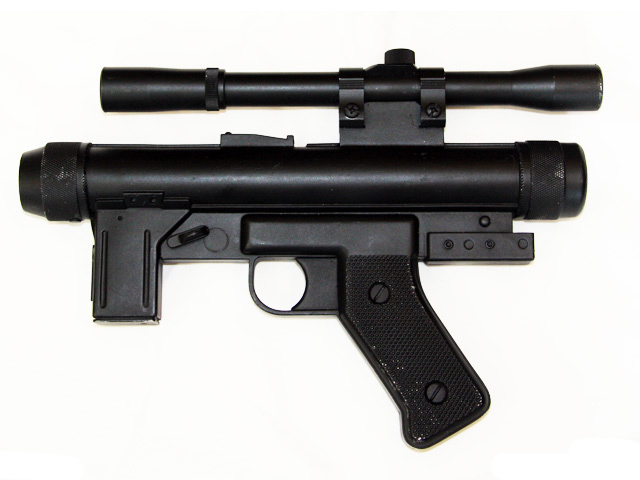
Since you noticed the blaster, here is a full pic of it. I have aspiration of making a shore trooper one day. The parts are all 3D printed and there is a PVC core that keeps it all together.2 points
-
Name: Frederic Lavoie FISD name: fredphoto 501st ID: 69969 Garrison: Forteresse Impériale Armour: Authentic Props (AP) Helmet: AP Blaster: HAsbro Height: 5'9" Weight: 200 lb Neck Seal: unknnow Electronics: yes - voice amplifier microphone 10wice Amplifier Microphone Pictures:


 1 point
 -
Name: Ross Walmsley 501st ID: TK5509 501st Profile: https://www.501st.com/forum/memberlist.php?mode=viewprofile&u=5659 FISD Forum Name: Ross8008 Garrison: UK Garrison Armour: RWA Helmet: RWA Blaster: Sheartech rubber Height: 5' 10" Weight: 12 stone 6 lb Boots: ISD Canvas Belt: RWA Hand Plates: ISD rubber Gloves: ISD Latex hand guards Neck Seal: RWA Holster: ISD Undersuit: Extreme 2 part Electronics: trAMP Hi. its about time i got round to getting myself sorted with you guys please see the following pics of my 1mm ABS RWA ANH Stunt TK. The kit has had a bit of a battering as im always on the deck or sat in vehicles etc. Please advise on any extra pictures needed or any mods you require. This is the Standard i require kits to be built to for basic clearance on the UKG so will be interesting to see your system and standards . Hoping to get Centurion after i have sorted the EIB. cheers Ross, RWA.1 point
-
No chance of custom on this? Just curious.1 point
-
I made support strips for the inside joints out of spare trimmed ABS and they were all fairly similar in width and length to my exterior strips. I'd try that before buying more because color could be an issue. Do make sure to remove the protective film. I made that mistake once...1 point
-
Check some of that scrap ABS from trimming out your parts. You can probably cut down/trim to the length/width of the cover strip you need for the bicep. Did you use E6000 or CA glue? I'd guess that you used the latter based on this post and needing a spare. If you used E6000 you will be able to separate it still and clean the glue off the spot.1 point
-
I think Mike at TrooperBay sells abs for coverstrips. The color should be close enough for those small strips.1 point
-
The cover strips for both the forearms and biceps are the same width (~15mm), so it shouldn't matter either way.1 point
-
Congrats on BBB Day Jennifer! You can definitely build off a non-WTF thread! A lot of the kits are similar, but every maker has their own set of unique features and fitment challenges. If you find a good WTF build thread and Centurion application, run with it, If not , pick another Centurion build to follow and start out. Photobucket recently changed their services, so a lot of pictures might be missing in the threads as people find other providers. Be patient, we are all here to support you, and there are tons of troopers, threads, pictures etc to guide you along the way.1 point
-
Don't feel bad, A buddy of mine ordered a TK. waited a year and a few months, when it finally arrived, it was a Shadow trooper kit. Needless to say, he was NOT a happy camper. Michael Tangen, I have seen the Anovos kits. Some pulls are ok, others were lets say, could be a lot better. My personal opinion, I do not like ANOVOS pulls. There are makers out there who have higher quality, thicker ABS pulls with greater detail that are far less in price. I am not going to knock ANOVOS as it is what it is. Just make sure you research as much as possible before buying. and EXPECT a LONG WAIT TIME!!!!.1 point
-
Looking good trooper!1 point
-
Good luck Ross Mate. No worries1 point
-
There is one on ebay its climbing pretty good....1 point
-
FWIW, I use the same logic to unpin stuff too. Like all living organisms, stickies on this forum have to be pruned from time to time.1 point
-
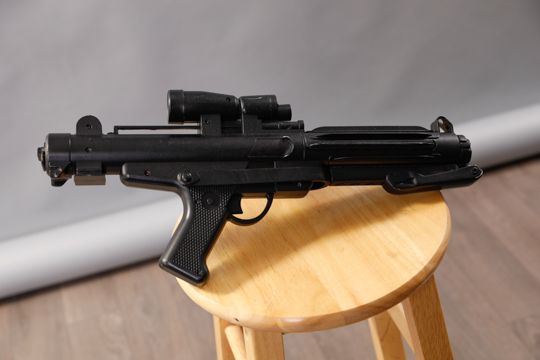
I'm thinking of converting my ANH Stunt to ANH Hero and quite fancy an SE-14 blaster instead of my E11. It was mainly used in the promotional shots for ANH and is down on the Hero CRL as an optional extra so I'm guessing there shouldn't be any issues with swapping my E11 to SE-14? Thanks!
 1 point
 -
1 point
-
Thanks for clearing that up Chris. A few people of mentioned that the R1 Deathtrooper version is different to the Promo trooper for ANH. Can anyone advise on what the differences are? I'd like to get one 3D printed but needs to be the correct version! Thanks1 point
-
Your first priority is fixing the cracks. Use ABS paste or the superglue and t-shirt method, then trim the return edges to a minimum. To make your bells wider, you need to heat them up with a heat gun. I would wedge something inside to open them up (wooden stick or similar) and gently heat them up until they stay the shape you want them. This may take a while to do so be patient and take your time. Wedging a stick longer than you need inside the bells will make it easier to get them the size you need, since the plastic will want to go back to it's original shape when you remove the stick. If all else fails, my bells are much wider than the RS bells and my ABS is a good match too, but try and work with your bells first.1 point
-
Nice work1 point
-
that looks totally awesome1 point
-
Tom is right on point. Wait until you have the rest of the arm complete before wanting to trim anything.1 point
-
Yes, they are not a requriment for approval, I removed all on my shoulders...although I would recommend keeping the return edges as much as possible on other armor pieces as it gives the armor a sence of thickness...and while on the subject, return edges are NOT allowed on the wrist if you go for Centurion and it`s not very comfortable so I´d say remove them anyways1 point
-
My preferred configuration is the SE-14R + Hero. FWIW, this really only counts for getting your EI or Centurion. How you troop is up to you and the person running the event, so no reason why you couldn't troop with an ANH Stunt and an SE-14R. Heck, look at TIE Pilots. No screen used reference for any of them wearing a side arm, but they sure do like to do so when trooping.1 point
-
Great job on the painting. Traps and tears (black pinstripe) can be a pain in the you-know-where - however yours looks great. :-)1 point
-
coming along great there. the handguards look good, love your blaster. can't wait to see the finished helmet.1 point
-
Great progress, Bryce! I am more than willing to offer suggestions and helpful advice to those that ask. I'm glad you came up to me at LibCon and asked so many questions. Soon, we will be trooping together! For the shin velcro, the secret to separating it is to start at one end and work your finger all the way down. Trying from the middle will be very tough. Don't change it out until you troop in it. I think you will appreciate the heavy duty velcro. After a couple more texts about the thighs, I'll say it one more time... Put the thighs down! Back away slowly! Move on to the bucket and straps! Fitting of all the puzzle pieces will be done when wearing the under armor and with all the strapping done. Moving snap plates, lengthening elastic and straps and any necessary trimming, will be done later. Move along, Trooper!1 point
-
Since I ordered the "unfinished" kit, I have about 40 + hours into this bad-boy. This includes sanding, filling, dremeling gluing painting, etc. As you can see I took an"artistic license" with a few of the pieces to say the least, lol. Since the insides (cannister/vertical tube inserts) cannot be seen unless removed, I figured what the heck. All that's left to do at this point is to do some touch-up painting, attach a hose to the "mouthpiece" and secure the back on. http://i.imgur.com/BJrb7GH.jpg?1 ---------1 point
-
Resin doopy builds are fun and give you lots to experiment with. Converting to make an operational resin folding stock is possible but very hard to replicate with just the doopy parts. There is someone who casts resin folding stocks part for part so it assembles like the real thing and folds and extends. Hollowing out the scope is also something I did at first. But after doing it I decided to cast scopes already hollow for builders to add lenses and other things like display boards. Check out my M38 scope project if you get a chance. Pics are all down I think but I can send you some photos if you want. trigger operational is possible and not that hard. Lots of nice hengstler replicas being offered these days. Real ones harder to find. Fieldmarshall is making replicas that are pretty much the real deal. Ask away if you have more questions. Check out the blaster reference for some amazing resin blaster mods. Should be linked in my signature. Hoping to have the photos back up in action at some point. Great stuff there.1 point
-
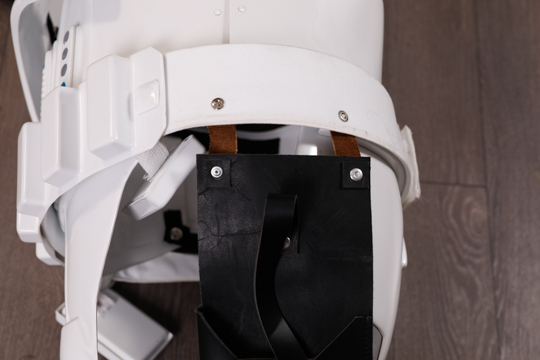
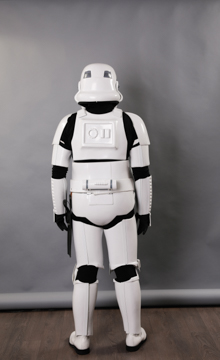
About that kidney/ab thing.... Make sure the kidney and ab are lined up at the top. Don't worry about how the kidney notch is lining up with the bottom of the ab. The top alignment is what matters for Centurion. The bottom is all covered by the belt. On my kit, you can see how the tops are aligned, but the bottoms are not. That's okay for Centurion.1 point
-
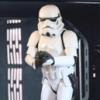
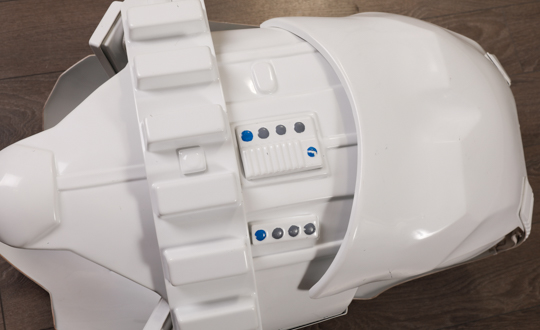
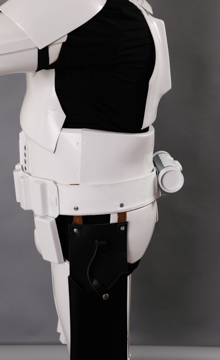
More info on the Ammo belt on the TK. On the belt boxes second to last, they have a miniature ramp on top of them that is angled towards the abdomen. The belt boxes appear to be separate pieces from the actual belt itself. In addition to, the plastic belt is actually comprised of 2 halves, which connect at the sides of the wearer. The one of the halves will overlap the other, though none specifically. I've seen 2 versions of this overlap, with one being the rear half almost overlapping, or the front. This is result to the velcro fabric belt being worn underneath the ammo belt, which connects it together. However, I think that the fabric belt could be optional for higher levels, seeing as how it's barely seen (you can see it in the EW pic closeup up above), and one could easily make the ammo belt connect through a snap on one of the halves so the other can overlap it.1 point
-
Yeah. I saw that one. The frown is definitely more narrow. Not sure how much I like that.1 point
-
Update #04 - Measurements As promised, here is a little drawing from this rack. All measurements are provided in “cm” (1 cm = 0,3937 inch). Shape and dimensions are totally up to the builder. The only important thing is, the distance between the centers of two E-11 should be a minimum of 15 cm. One single blaster requires a width of 13 cm on the magazine side plus 7 cm on the other side. Each additional blaster adds 15 cm to the total width. The edges on the side panels were cut at 45 degrees, a-edges are 2 x 2 cm, b-edges are 4 x 4 cm.1 point
-
Progress on 2 fronts: Front 1 - Fan brackets. I've not completed my basic bracket and fans which work quite well, there is one issue, well 2, though which I will come back to. The bracket is basically 2 1.5" wide strips with a kink at the end and a 5cm square to mount the fan to. They are joined in the middle by 2 M4 screws, and the fans are mounted with M3 screws. The fans are individually switchable via the switches which are just hot glued on. These are easily accessible from the back so a spotter could access these reasonably subtly to switch as needed. Who doesn't love lime green gaff tape? The wiring is all hidden along the back and secured with gaff tape because it's what I had. It's all hard soldered, no plugs to come loose. There's also lots of heat shrink to cover the joins and make things stronger. The power lead is a USB cable cut from one of those dual USB type A cables for high draw devices. I cut of the power only cable to use for this. The whole thing works really well and blows air up to the eyes and keeps the bucket from warming up. The battery fits nicely at the front of the bucket and doesn't really need any further securing there. Also being at the front means I can see it. Whilst Anker makes good stuff I'm still wary of having a battery so close to my head. I mentioned issues: 1 - The battery needs a button pushing to turn it on. This was not mentioned in the Amazon listing which is super annoying or I'd have got a different one. Whilst not a complete disaster it does mean if I turn off both fans after about 30s I can't turn them back on again with out taking off the bucket which means a trip back to the changing room. 2 - This is a bigger issue. The fans vibrate against the bucket and make a right racket. If I hold them to stop the vibration its FAR quieter. I'll need to add some craft foam or something to the back to stop the vibration transfer but that will gave to wait for now as the budget has been blown. So I have a nice fan set up I can't use yet, which makes me sad Front 2 - Hovi tips: I've discovered Tamiya paint is pretty decent, thin, but decent so I ordered their XF-2 matt white for the tips. As it's quite thin it's taking a few coats to get good coverage. Before paint After 1 coat After 2 coats. I'm hoping 3 coats should do the job which will be done this evening and mean I can get on with adding the mesh from a sieve. You can also see where I'm painting the insides of the "tube" white to better match the original items. Not needed but a nice touch.1 point
-
Pre-clearance went straight through. A few minor advisories I'll address but nothing major. Just put in for my 501st ID and UKG clearance.1 point
-
Wow! Thanks Andrew and Tony for all your hard work in reviewing and scrutinizing these applications. The level of detail that you consider makes me realize that approved Centurion TK's are as close to screen accurate perfection as can be. I am thrilled to be included in this level! My approval is another examples of Troopers Helping Troopers. From all the surfing through build threads, the EIB and Centurion applications and all the suggestions, instructions and advice provided by other Troopers, it is possible to aim high and reach those goals. I want to say `Thanks' to those that have provided personal guidance along my path from a desert roaming Tusken to TK, EIB and now, Centurion - Thanks Ukswrath, Sly11, justjoseph63, PiettLives, Airborne Trooper, jr1203, Pencap510, Comfy Turtle, Khazid, 68Brick, mkjava, illusionz_09, jr1203, Bugman57. Ukswrath (Tony) and Sly11 (Andrew) were always ready to answer my PM questions. I've recently had a chance to work with mkjava on his path to TK and am willing to help anyone else I can! I also want to thank Ken (PiettLives) my squad's Imperial Attaché for the time spent critiquing my mostly-complete-but-not-quite-finish TK. I highly recommend using your Attaché as a resource of one who has been there and already built a TK and knows how they should look and fit. Thanks, Ken! And Thanks Joseph (jj63) for taking on the reigns of overseeing all the FISD Attachés so that everyone has this resource available! With this accomplishment, I can take a break and enjoy an Imperial beverage. After all, it is a "Star" bucks!1 point
-
After last nights "not a tantrum" this morning I ended up routing through our bins in a state of paranoia. Obviously this was stupid and once my wife got involved this evening the Hovi tips showed up. Inside the armour bin, neatly tucked inside the chest......idiot. Note the nice thick zip lock bag chosen to keep them safe. Formerly home to my Namisu Nova Fountain pen. A bargain of a pen that one. So now on with the 2 day progress update. First I finished of the main armour by making the last elastics I needed which were to join the shoulder bell to the bicep. These were done pretty fast. Apparently I've gotten pretty adept on the sewing machine and punch pliers now. This gave me 1 fully completed set of armour ready for it's first proper fitting. Hurray! I've not done a full suit up yet as I wanted the bucket to be done first. When I was fitting the elastics I noted I bought my left elbow when bending it. I trimmed ~2mm from the forearm return which seems to fixed it. I also trimmed about the same from the shoulder bells to reduce the flex needed to get them on the bicep. Once that was done I started getting the bucket together. After adding the ears started to work on fixing in the visor. The supplied visor is nice and wide and goes over the ear screw area. With this being the case I decided to use these to hold it in. I initially tried to measure the centre of the visor but found it quite off from the curve cut into it. So from here on accurate measurements where mostly abandoned for positioning and eyeballing it all took over. I only used my vernier to measure the centre distance for the holes. After a bit of positioning and checking I was done. There is a small gap to the face which should help with some ventilation into the bucket. Looks good though. This was also the point I discovered I'd misplaced the hovi tips so spent the rest of the evening turning the house upside down. This evening, once the wife found the tips, I carried on building the bucket back up. I started by adding the S trim. When this came off there was a small (say 2mm) gap at the join. For whatever reason I had about the same in excess. This suits me just fine as it forces the trim back in and means no glue is needed to hold it in. You also can't see the glue left that was holding it on before which is certainly a bonus. I also added some padding. I ordered some helmet pads from China a while ago which all fit with velcro. Of course this isn't an ideal fit despite the adjustable nature of them. They are all 3/4" thick and I need a thicker one at the front and a thiner one at the rear. So after some minor surgery where I cut one pad in half and glued it to another to make an pad about 1 1/4" thick and one about 1/2". I used some of the velcro tape from the Anovos kit to add the loop to the back of the cut pad. This gives me a pretty decent fit and I can move my head with out much wobble. I can also swap out the thin pad for a regular one to get a more snug fit if needed. I also have the start of a chin strap which I will finish another day. Currently it goes bucket - washer - nut - visor - washer - nut. I think I'll probably remove the nut between the bucket and the visor and put the chin strap there instead. This will mean the strap elastic can't stretch over the nut and come off. And I'll sign off for the night with my finished bucket: Next job: Belt1 point
-
Just pulled off the masking template whilst the girls had lunch. Pretty happy with the result. The gloss did it's job for the most part. There's 1 place where I did a lousy job burnishing down the template, the rest are all where the template creased. There's only so much you can do when that happens so pretty happy with how small the bleeds are. I've cleaned up most the tape reside now with some masking tape, just dabbing the sticky side pulls away the glue that's stuck. For the bleeds I'll use a tooth pick dipped in thinners to clean up.1 point
-
How to paint your traps: 1: Using some masking tape I taped the bottom of the trap off to get a half decent straight line. Depending on how well you do this you may need to clean up after with a spot of thinners on a cotton bud. 2: Paint the area with #5 Dark Admiralty Grey. I should have penciled out the line I wanted. I didn't so had to clean up later with thinners. 3: Let the paint dry over night. Your bucket will now look something like this: 4: Carefully remove the tape. If the lines aren't 100% perfect it's not the end of the world, the next steps will cover over an amount of this. If you have gone too far, I did, use some masking tape to protect the bit you want to keep use the thinners on a cotton bud. The idea here is to use the tape for a straight line as well as protection from the thinners. 5: Using a thin brush, I used a #1 Humbrol, carefully outline with the black (#85 satin coal black). Ensure the brush has a good load of paint, but isn't dripping. This should give a good flow off the bristles as you do your line. If you screw up use the thinners on a cotton bud to wipe up and try again. You will probably do this a few times when you first try. Because the grey is nice and dry so long as your gentle the wet black paint will wipe off easily and not damage the grey layer. 6: Another overnight wait to let the paint dry. 7: With some masking tape mask off the top and bottom of where the stripes will stop. I used Tamiya brand masking tape, it's decent stuff. Make sure you rub the tape down well to burnish into place and reduce risk of bleeds. 8: Using a pen mark out the where the first and last strip will go. This will be roughly 4mm in as above. 9: For all 4 bits of tape do the following: Measure between the 2 ends Divide this by 11. 12 stripes need 11 gaps! Measure out this gap and mark out on the tape. Be careful here, compound error can add up. I used a cheap digital vernier calliper for this. It really made it far easier than if I'd had to use a rule. 10: Join the dots! I used the end of a loyalty card key tag as it's small, flexible and wasn't going to damage the paint. 11: (Optional) "steady hand medicine". 12: Carefully, 1 at a time paint over the lines. Reload the brush before each line to ensure you get a good clean plaint job. I found if you did 2 in one go then you'd get a small gap next to the tape. 13: Remove the tape. You don't need to wait for it to be bone dry this time. 14: Great success! 15: Finish steady hand medicine.1 point
-
I'll start this update with an elaboration on todays earlier post. At lunch I was sat looking at the calendar thinking if I pulled my finger out over the weekend and rethought my plan for my blaster I probably could be cleared and ready in time to troop the Star Wars days at Legoland. Then I got home and saw the announcement that the UKG have had to pull out. Somewhat disappointing but I trust the garrison knows what it's doing and as a former Merlin group employee I can but speculate at the reasons. I hope the differences can be worked out in time for next year as whilst it wasn't my first meeting with the UKG it is one I remember well. Ironically my first 501st encounter was at a Merlin Group party. BUT the silver lining is I no longer have to bust my bum all weekend when I should be being a good dad Right back to the regular drivel: Last night I spent a fair bit of time to mark out for the stripes on the tears and the rear traps. For the tears I counted 7 stripes on the reference. Using a fine point permanent pen I put dots where I wanted each stripe t start and end. As always based on my reference and rough eye balling. Excuse the white corner, I touched this up after I did the black as I needed to do a 3rd coat on a couple of the frown teeth as well. I then used a #1 Humbrol brush to join the dots with some #85 satin coal black. Next I did the ears. I applied the outline with the same #1 brush and then did the 2nd from rear rank bump with a 3mm flat tip brush. The ear plastic is a bit dull finish wise and will need a buff. To do this I'll have to carefully tape over the grey areas with masking tape now but such is life. I've picked up a new compound so will hopefully get better results with that. For the rear traps I'll do a post of their own as I feel it's worth a tutorial style post. Though for the purposes of the WIP boom: This means all thats left paint wise is the tube strips. And thanks to my UKG Armourer I now have these to play with: Plan for the rest of today is to do the 2nd post then try buff out the tubes on the face. Depending on this I may or may not start applying the templates but I think that might be a tomorrow problem.1 point
-
You Americans have it so easy. Went to buy some acetone and you can't get it in bottles larger than 50ml and I was asked what I wanted it for. Fortuately, despite some confused looks, I managed to get 2 bottles. I am probably now on a government list though, as the reason you can't buy it in large amounts (easily) is it's used in bomb making.1 point