Leaderboard


Popular Content
Showing content with the highest reputation on 08/19/2022 in all areas
-
You could add a plate on top of the one already there so it matches the kidney, unfortunately RS don't always make their armor to match the CRL's but this seamless requirement is nothing new and many have had to make the modification to obtain L3 centurion. You may be ok for L2 EIB but that's entirely up to the @Deployment Officer Team as it is stepped the way it is.3 points
-
As Glen pointed , we have 2 sceneries here. This side looks like just a little Trim needed like your other Belt. This one is the toughest one because the Canvas needs a relocations and then make a little trimming. Can it be done, absolutely but depending on the glue or do it with careful. (Personally I have done something similar to a Anovos AB Belt that uses a hard Glue to the Belt rivets . I had to rip out the rivets and glue a piece of abs to cover the hole so I could install the new fabric Belt .2 points
-
I adjusted the thermal detonator so now I should cover the "little" in "little to no" right?2 points
-
2 points
-
Ok, had a little snafu with my last sniper plate that I over stressed it and it cracked severely. I had to order one and got it today and it is trimmed and ready for attachment. Here are a few pictures with it clamped on and just want to see if any of you have any recommendations or opinions.1 point
-
Looking Nice, keep it up.1 point
-
Yeah nice, the left side seems ok to cut as you say! I'm thinking of maybe trying that cut you suggest here on the right side (as you wear) just to see how it looks, I could sneakily trim the bottom of the belt a little bit along with doing a small cut on the edge, just to get it small enough so that it can pass!1 point
-
@gmrhodes13 Thanks! Here is the completed E11 then!1 point
-
Looks great, nice work1 point
-
Ok this should do it!1 point
-
Looking better, I would probably take off a couple more coils to match the reference,, but you should be ok1 point
-
If you get close to the image provided you should be ok. I would say No2 as you don't see the bump on the scope in these references Wire reference1 point
-
I just noticed my boo boo when you replied. Promise I'm not an idiot. Thank you!1 point
-
Make sure you keep some of these trimmings, they are great for support pieces in case of any cracks and also great for ABS paste. I found using the ABS paste firstly on join seams was a lot stronger than using a bondo or fiberglass filler as some areas will bend with use.1 point
-
Geoffrey, So you've decided to 3D print a TK... I've said this a couple dozen times since 2020 and as much as it sounds like a good idea, you really have to know what you're getting into, especially since I recognize the files you're using. Immediately let me start by saying that if it sounds like I'm trying to talk you out of this, I'm not. That would make me ultra-hypocritical, seeing how I've got 4 approved 3D printed costumes and am currently working on my second 3DTK. Additionally, with people like @ChrisThePropGuy out there making 3d kits and using them as forms for his molded costumes, what you're proposing is viable; you just have to start with an accurate base. So, let me start off by reiterating some advice I was given when I did this 2 years ago, "take any feedback not as criticism, but as everyone trying to help you look your best!" This statement is absolutely true and has been proven to me countless times by individuals in the FISD. Also, this is the second time I've put it up here in the forum is as many days, so you know I believe it. With that said, if it starts to sound like I or others are saying your stuff is way off, it's because we're trying to help. Additionally, with the ROTK/ New Generation armor being set as the standard bearer for current and future SW productions, we're beginning to have countless high definition references to draw from. With so many references available, if a person starts going "off script" with their build, it's obvious almost immediately and those of us that take pride in the costume are likely going to attempt to steer you straight. Before I begin, I do want to let you know that the current CRL has the following requirement: The armor parts shall be made from one of these types of materials or like materials: White fiberglass, ABS (Acrylonitrile Butadiene Styrene), HIPS (High Impact Polystyrene), or Polyvinyl chloride (PVC). Yes, many of the new costume pieces seen in production are created using flexible materials, but outside of Boba Fett's armor and a couple butt and cod armor pictures, we are still waiting for definitive evidence supporting its usage elsewhere. I've seen people post pictures of what they believe is "rubber armor," but more often than not, it ends up being the angle of the shot or a distorted picture. Not saying that it's not happening, just saying that there's nothing definitive with respect to the ROTK armor. Let's get started: Your abdominal armor is Akira Yuning's design and I believe the helmet face is DavidOs's V1 design. Here's my references: The helmet on the right was printed by another member. If you scanned these yourself and then started modeling in Blender, good on you, I stand corrected, but my first piece of advice would be to please contact the modelers before you start recasting their work; many of them don't want their work recast even for personal use. Personally, I have given away 3D designs and seen others "take them and run." I recently saw that one of our more notorious recasters stole my belt box design and started selling them as part of his recast Jimmiroquai kit. Additionally, several other vendors have copied my Din Djarin abdominal tasset research and work and are selling them off as their own. Am I going to pitch a fit? No, but it's one of those things that make me want to stop giving stuff away. I strongly believe in community over competition, so I do enjoy seeing work emulated, but you need to make sure you go about it the right way. Again, please don't take this wrong. If you designed this stuff yourself, I applaud you, but I would caution you that the other designers might not take it the same way because it's eerily close, even in how stuff mounts to their bases. Regardless of the case, let's fix the mistakes everyone's making and get you a great set of armor. I worked closely with Akira while I was building my first 3DTK and the abdominal armor was one of those pieces that he just stopped adjusting because it was going to be too much work. By the time I started seeing accurate screen used pieces and making requests to satisfy the requirements, he had already made approximately 30 changes to the set. Let me post a picture of Akira's work next to an accurate 3D model: So it's a lot different. First and foremost is the size of the files. In the next picture I've offset the Z axis to show you the difference when the belt lines are matched up and they're still insanely different. Besides the size of the abdominal armor, we also see distinct differences in the overall shape. Notice the gently sloping lines I highlighted in black on the accurate file. The Akira file consists of solely straight, flat lines that don't give any dimensional accuracy to the costume. I say that knowing fully that every maker out there is making their abdominal similar to Akira's in shape; this is what I refer to as the "tube abdominal." I really don't have any problem with the tube shaped abdominal section, but where it's missing the mark is with the overall dimensions of the details. Things like the vertical ribs and 70 degree side ribs are just much smaller/ narrower than an accurate design, which throws off the appearance of the greeblies which are not pictured. This also gives a very odd appearance that can't really be explained without comparing it to reference photos. Most GMLs won't notice it, but something just looks off. However, I will say that Akira's greeblies are excellent and something I'll likely use in future builds. However, if you follow his lead in your design, you may want to correct the shape of the front buttons which are significantly deeper than any references show. This picture might not do it justice, but they're deep. While it's on my mind, I've said a lot of times now that I made a ton of changes to my kit that I neglected to cover in my build thread. This was one of them that I corrected by lowering the edges in Fusion 360. Additionally, the tiny belt backer on the bottom of the abdominal is a huge discrepancy that doesn't seem like a big deal until you attempt to mount your front belt. The lack of any significant backer makes the belt tip forward and not line up at the top. Also, if this in fact Akira's file, don't even consider making his belt. I walked him through the entire thing, but in the end I ended up making my own out of HIPS. For the helmet face, I almost hate to say it, but you might want to consider scrapping this design. What kind of gives the face away as DavidOs's older bucket is the flat bridge of the "nose," the shallow "eye bags," the narrow cheeks, small overhang on the brow extending between the eyes, tall sockets, large flattened eye corners, and pointy cheek tubes. Also again, if you designed this yourself, you have my apology, but if this is the case, then you and David scanned the exact same reference. None of the above elements make the helmet bad, it just throws off the overall appearance of the helmet as a whole. Another helmet that has similar characteristics is the 850 Armor Works design pictured below side-by-side with a screen used helmet: The thing that's most prominent in the 850 helmet that throws off the overall design is the narrow cheeks which yours possesses as well. This in turn affects the ear placement and gives the helmet a thin face/ tall appearance that isn't present in the screen used version. Also, take note of the eye bags that are very shallow on the 850 kit which is similar to yours. The next thing I'd like to see you make changes to is the chest armor. There's another new member who is currently working on an 850 kit that uses a similar design and he's documented a lot of the frustrations he's had with the appearance of the armor. The big thing about this piece when compared to a screen used chest is that the accurate chest piece is actually very small. A lot of the new designs we're seeing, with the exception of the Jimmiroquai kit, have chests that more closely resemble OT armor rather than the ROTK appearance. Here's a SBS of a ROTK and an OT: So quick analyses of yours: The overall height appears to be too tall which causes the "pectoral details" to sit very low. This also shifts the sternum section down way too far. Also, the shape of the sternum is way off; it's too wide and the angles are far too sharp. Even when you set your molds, this won't be alleviated. This was one of the changes I asked Akira to make, but again, it was a lot of work. Next, the neck line is way too high which is one of the main issues with 850's kit. When you look at the New Generation kit straight on, even while wearing a helmet, you can see the neck seal. When the neck line is raised as it is in your print, your chin ends up overhanging the entire top of the chest piece which causes a sever "squatting" appearance. For my 3d kit, I cut all of this out. Next, and this is one that people keep overlooking, is the bell at the bottom of the chest piece. If you look at the screen used armor, this is very pronounced and has multiple curves, not just the one you see directly in front. In the following picture, look at the TK on the far left and note how his chest "swoops" from the apex of the pectoral detail down to the bell bottom. Also, note how much of a "swoop" there is from the far side all the way to the front. This isn't a gentle curve, but rather a very distinct, sharp rising curve. Here's another picture of a Remnant. Look at how narrow the chest is at the armpits and how high the pecks are as well as the bottom curve: Pay no attention to the helmet in this picture, the Remnant TKs had OT buckets. So, since you're early in the design phase, and while you're making changes in Blender, I would implore you to consider these known issues. Will they pass basic approval? Maybe... probably, but you said you wanted everything to be "squared away." Ultimately, several of these things may be overlooked by a GML or others, but the basic requirement for approval requires us to "consider both text and pictures (CRL and Reference) when reviewing the costume." Please continue posting updates. There's a lot of people who will likely take interest in your work.1 point
-
@NairyYou nailed it!!!1 point
-
This is the other one1 point
-
Yes, it looks good to me. @justjoseph63 @Chemi Thoughts?1 point
-
Technically not Legion merch, more of "personal" merch from Albin, so really no need to follow all these rules.1 point
-
1 point
-
Hi Jonatan . As Glen suggested you could trim a little the ends of the plastic belt to match better the cloth one.1 point
-
Thanks Glen, we'll be giving the support to Jonathan.1 point
-
Here is an update on my Thermal Detonator Edit: Finished them up a bit more1 point
-
Thanks for the reminder guys. Lol. I don't know why I keep doing this to myself, but at this point it's just become part of my costume building world. Even my 3 fiberglass kits get the treatment. Honestly, I don't even know what I'd do if I had a vacuum formed ABS kit.1 point
-
Once the glue dries, if you could take a few side pics and post them up it will be much easier to give you a more precise answer, but from what I can see it looks great!1 point
-
Thanks gentleman, great nominations and feedback. These will now come under staff review. Thanks again.1 point
-
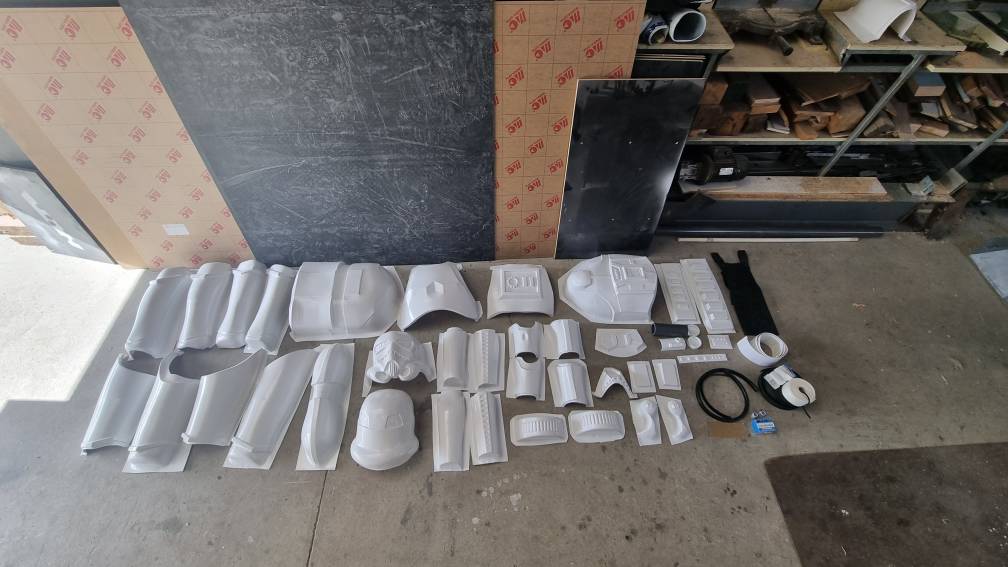
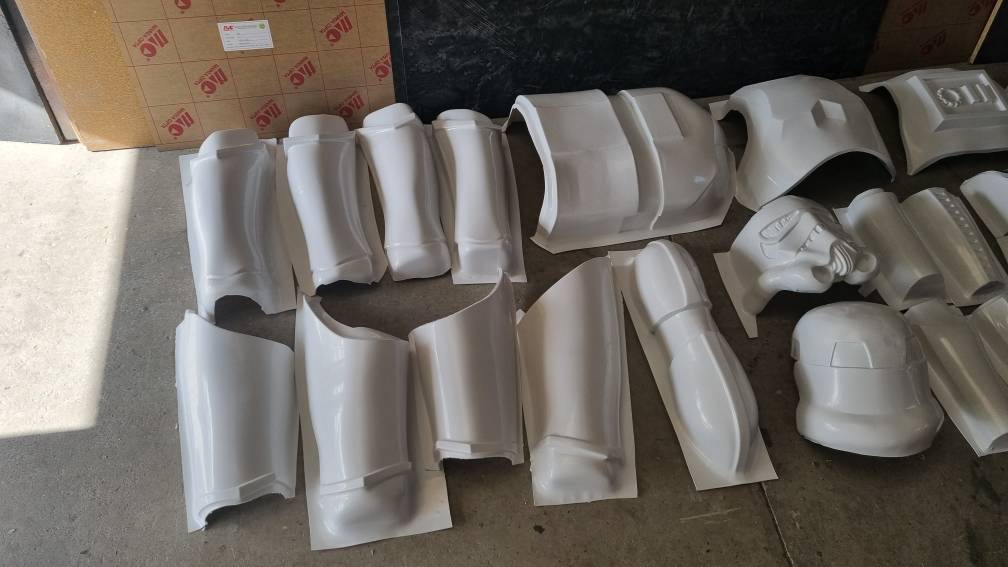
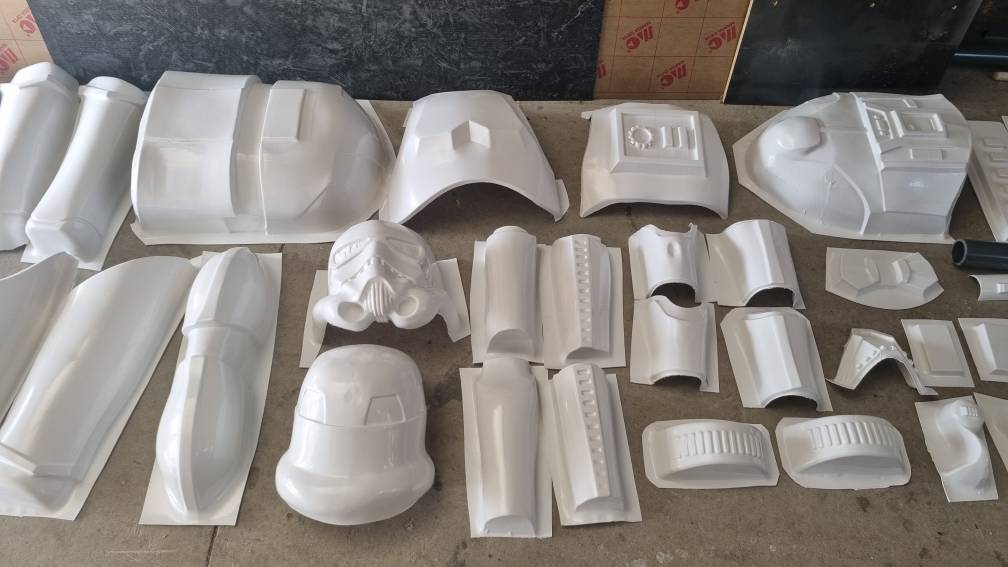
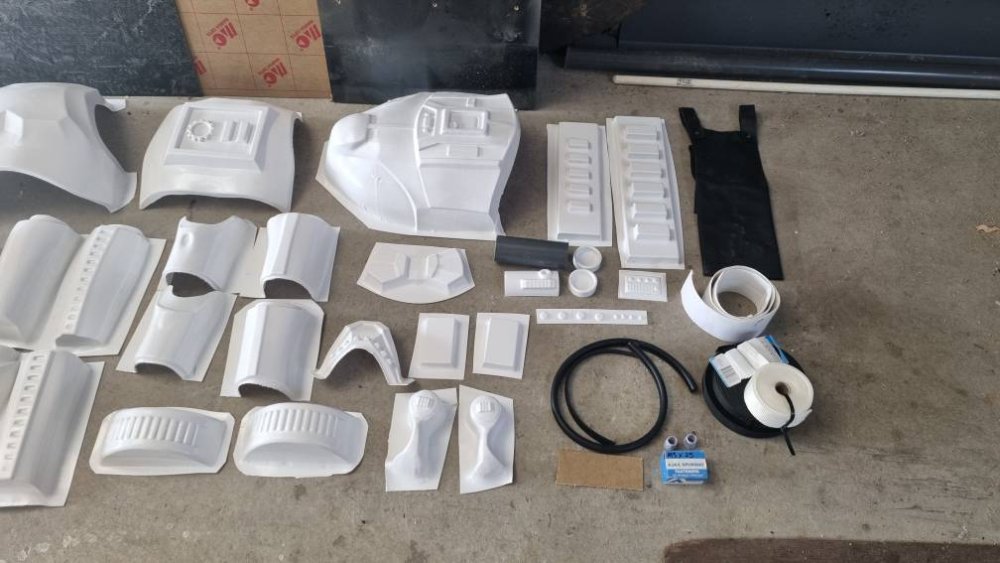
Today's the day! Last mould done and dusted. I knolled all the parts out to get a look and I'm excited to put one together. Will do that this week if I get time. Sent from my SM-G991B using Tapatalk


 1 point
 -
Thanks! I think my progress will slow from here as I move to the sanding, filling assembly stages.1 point
-
Hey, this is me! :-) As a 6'2" person, over time I figured out how high the thigh armor has to be and the shins so it is better balanced.1 point
-
For sure - I feel like 5 min after I made this comment, I saw a thread noting that connecting the shoulders may be necessary for some approvals.1 point
-
Motoring along Daryl, nice work1 point
-
Have a look at this post , yes the design is a little different in places, originally this was supposed to be TFA armor but now more matches the TLJ, some adjustments will be required. Also check with your GML as some are a little stricter than others.1 point
-
Have a look at the first post in this thread, you must add a link to your membership profile1 point
-
Extremely kind and well-written words. Thank you, brother. Just our small contribution towards accessible accuracy and I'll pass your post on to mrpoopie as well. I'll also add a second to the nomination for Chris while I'm here. Very exciting work being done and the end product is already better quality than a lot of older/sketchier armor I've seen around! Whether or not his files are made public for free, he's put incredible work into pushing this subset of the hobby forward and documented so much of it for our collective benefit. Definitely a 3D Contribution by definition and worthy of recognition in my opinion!1 point
-
Good morning everyone, 3D printing is something I have enjoyed both personally and professionally; it's now become a big hobby of mine. Ever since joining the FISD, and subsequently learning about this, the 3D contributor program is something I've been incredibly interested in. Needless to say, I was overjoyed to be nominated by @TheRascalKing a few months ago and would now like to repay the gesture by nominating a few of my own. First is @ChrisThePropGuy for his incredible OTTK file set. My understanding is that Chris initially created these files to serve as molds for his vacuum formed kit. However, Chris has continued to refine his set and recently released an update kit that appears to be incredibly accurate and ready to be built by someone aiming for legion approval. What I find especially admirable about Chris' work has been his willingness to refine his work based off community feedback and essentially rework items that I know he spent a great deal of time creating. The accuracy and availability of his work as well as his willingness to work with the greater community highlights his contributions. See his thread here: Next is @TheRascalKing for the awesome FOTK greeblie set he just made available to the community. Similar to what I had to say about Chris, Justin did an incredible job documenting the design journey he took with Mr. Poopie from the Pathfinder's Detachment. Constantly changing the design based off community feedback seemed to be a consistent theme, but ultimately, the final design was made available to members for free a few days ago and they're fantastic. The level of detail and care Justin took in designing these files is incredible. Any time you see someone making design changes and adjusting files that are measured in fractional milometers, the 3D community takes notice, as should anyone aiming at creating the most accurate version of a costume imaginable. Here's the finished product: But equally important is highlighting the design thread which can be found here: Ultimately, for both of these guys, when you read the criterion for nomination, I feel that they've far exceeded the requirements. Both made their designs/ files accessible, they've freely offered advice and have created an excellent end-item. Additionally, both have done an incredible job at creating detailed build threads showcasing their work and willingness to accept feedback as well as make changes to their designs based off resident expertise. Not only would I like to see these nominations solidified, but I would also suggest possibly adding a fifth nomination bullet that requires designers to show a willingness to adjust their work based off community feedback and be open/ receptive to said feedback. This is one of the reasons I admire the FISD above all other detachments. Additionally, I was offered the following advice a few years ago when I started my TK journey and have valued it ever since: "take any feedback not as criticism, but as everyone trying to help you look your best!" These 3d contributors appear to have made this their mantra and I personally feel that it should be expected from all who aim to contribute to the FISD community.1 point
-
Thanks guys. Had my first kit up today. There’s a few dressing issues. Left bicep, right thigh and knees, but I’m nearly there. Sent from my iPhone using Tapatalk1 point


.thumb.png.69856e02550a2e6d07e44a2b1bda020c.png)