Leaderboard


Popular Content
Showing content with the highest reputation on 06/15/2022 in all areas
-
5 points
-
Moving away from the new TKs... Whilst watching the newest episode, I caught what looked like ANH TKs with ESB holsters. Due to me not having access to high resolution, I first played it off. Then I paused the movie and looked more thoroughly. ANH brow trims, shoulder bells (with elastics), broader TDs and a few other details became noticeable. Therefore I took a closer look at the credits and found a "thank you" to the 501st Legion, California Garrisons. Anyone want to share with the class?3 points
-
I think we have all been there... Or the other - velcro first, troop a bit, adjust, then when done glue.2 points
-
If you don't know what I'm talking about, you're missing out and should head over to any post by Revlimiter. Him not being at his post is always a highlight. (Where even is your post, @revlimiter?)2 points
-
On the shot showing the right ear and the front frown shot, it looks like two of the larger teeth have paint going into the lower gum. It's very subtle but maybe worth cleaning up. The left ear shot doesn't seem to have any teeth with that problem. Fantastic work on the vocoder paint. I have the same bucket and really had to guess at my paint. The pull on my own was very faint there. Yours looks similar in terms of pull definition. Also, nice Mr No Stripes.2 points
-
I too noticed quite a few ANH-TK in episode 5. Cloth belts, no raised TD-holding panel in the mid back, no side stripe. Very cool. Someone spill some beans!2 points
-
Thanks Glen. On the rounded edge front that is how it came from RS unfortunately so not much I can do on that front :/ Hopefully it passes inspection Thanks, M2 points
-
Just an observation not a requirement to modify, wait see what the DO's say The CRL wording says approximate so you should be right for the length. Again this is the same with the endcaps The total length is approximately 7.50" (190.5mm). End caps are approximately .78" (20mm)in width. For EIB, but again entirely up to the DO's Thermal detonator belt clips are positioned with little to no gap between the clips and the end caps And one more, the clips should not be rounded on the control panel side, but again not a requirement and once again entirely up to the DO's2 points
-
looking good! looking like a stormtrooper despite being mostly clone parts is the really interesting thing about it. It really screams Empire which is fitting given that they are Imperial clones. It s why I love them so much! The buttons being hidden is a given due to the longer ROTS style chest reaching the belt so maybe it doesn't need altering. As for colour of buttons, on screen the game ones seem to be dark grey and concept art has them as grey. I would go dark grey.2 points
-
Another rough concept for a "(prequel)movie accurate" version. This looks so much like a Stormtrooper now despite it being "written" in the Clone Trooper format. Especially with those shoulders. Stomach armor needs a proportional edit that I will have to do later on to make the fancy bits more visible. What color should the buttons be? Black or dark blue?2 points
-
So 2 will be the plan then! Also @DoggydocI actually have your build thread bookmarked from when I was looking at reference builds, so thanks in advance!2 points
-
A few months ago, I got a set of Electrobinocs from @justjoseph63 and have been extremely pleased with them. But... well... I wanted them to DO something. I got the idea to turn them into Bluetooth speakers so they could play the TK Chatter or some music during non-blaster troops. And, fair warning, this is now a finished project. This won't be an ongoing build. I've wasn't even sure I could make this work, so I didn't post up a build thread for the binocs. I didn't wanna be defeated by this little hunk of plastic. This was my first step - hacking open the binocs. I sliced it at the rear intersection as it seemed like the most logical place. I then cut off the lens and drilled a hole in the (extremely thick) resin. Joseph doesn't mess around in the creation of these guys. The resin is VERY thick front and rear. Walls have some decent thickness too. It can face some serious action without being damaged. You know, aside from being hacked up. The front 3/4 is attached to the back eyepieces with 3 screws and a thick layer of glue all around. I used a dremel cutoff wheel to saw it free. I wanted to use the top knob as the volume control, so off it came. It was held in place by a small screw. I bought this little bluetooth amp off amazon... and destroyed it trying to modify the buttons to be remote. I would not suggest anyone get this amp if you want to modify it. I'm pretty good with electronics and regularly solder gauge clusters back together for my day job. Relocating knobs and switches bricked this little guy bad. Recovery wasn't possible. Then I happened across this Bluetooth speaker KIT on Parts Express. It was mentioned offhandedly in a youtube vid that didn't really have anything to do with the project. At the time of this writing, the kit is about $44USD. Check it out on Parts Express. I didn't need all of the parts, expecially the 2.5" speakers, but the kit was much cheaper than buying the parts individually. Separately, the board and wires are more expensive than the whole kit. I also bought the optional battery board and batteries to allow the board to play without being plugged in. A total of about $66USD. I used two of these tiny 1.5" speaker drivers (coincidentally also Dayton) as they juuuust fit into the binocs. If anyone out there decides to use these parts for their own project, I'd highly suggest buying an extra or two of the 2.1mm DC barrel jack. They're quite delicate and I had to buy a spare. One hole wasn't gonna cut it, so I printed a new sensor array in ABS and sliced off the molded one. Not a bad fit! And not a bad finish after a bit of extra sanding. The volume knob board required a very very thin wall to be installed into. So much grinding! And the speaker fit pretty well in the far left of the binoc housing, but not so well toward the right. More grinding. My dremel extension handle got some action. The tiny speakers needed to be stood away from the front holes to allow them to work well. My local Ace Hardware hand 1/4" spacers and associated tiny screws to enable mounting. I believe each of the speakers uses 3 screws to mount. Drilling tiny holes in a deep housing isn't the easiest thing. This extension made it possible. And let me just apologize right here for the severe lack of build progress photos I took. I had roadblocks at like every step of this project. The drill bit extension for example. Every time I hit a dead end and had to wait another week for more parts from amazon, I was uncertain if this thing would ever get finished... so I didn't take many in-progress photos. I think this pic was of the nose and sensor being glued on for the first time in about 2 months. I also placed speaker cloth in each with hot glue. One of the very few pix I took showing the inner parts placement. It's TIGHT in there. Speakers at the very front and just a tiny bit of space between the back of them and the front edge of those huge batteries. The batteries are screwed on in the very front and have some 50lb double sided mounting tape holding them in place in the back. The extra speaker wire and wire bundle for that volume knob are zip tied and stowed to the right side. The main Bluetooth board has barely enough space to be flipped and live right above the batteries. I used the top center button between the viewports as the power switch. The bottom two hide some screws. The bluetooth blue LED indicators light up the viewports. And the wires are indeed everywhere. I tried to tidy them before screwing the two halves together, but was only medium successful. All of the parts hide behind a printed acrylic panel. And here we are! That's a finished and re-assembled Electrobinoculars!!! It doesn't have the front lens anymore, but the opened up sensor array sorta makes up for that lack of magic. I really like the look of that sensor array. Non-cannon LED pilot light are pretty easy to overlook. The little green one comes on when the unit is charging. Red is power. The two things above the power & green LED are my original attempt at power and line in. They didn't go well. They're basically tiny speaker ports now. Power on and blue Bluetooth lights lit. Note the top button - it sticks out slightly and is a latching SPST push button switch. I found a 6mm switch that would fit inside the little button housing. The only downside of this button is that it can spin a bit when pressed. That's just the nature of the switch I used. It's installed tightly, just the button itself that can spin a little. This is VERY hard to see IRL, but it looks pretty cool in the photo. I did a holofoil desert scene with a little sandcrawler. At least it hides the wiring. And here it is!! A working demo vid. I can't wait to troop with it.1 point
-
As Adam rightly says, I would fix these two. Very nice work!!!
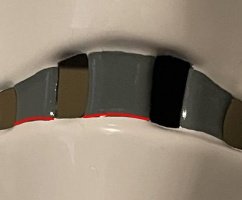 1 point
 -
My post is classified.1 point
-
Geez 92 inches Dan?! Now I know where to have my next SW marathon next time I'm in Europe. Haha. Looking forward to seeing these OTTKs for myself tonight after work.1 point
-
Very freaking cool!1 point
-
So fast Matt, thank you . I'll be with you soon.1 point
-
Hey Caleb, As Justin said it is! It took a little bit to get it, but boy was it worth the wait!! M1 point
-
Hey Mario, Sorry about that! Please see below the additional pictures. 1- Left side of your Ab/kidney section to see the 3 rivets location (no need to suit up). 2- Complete Ab belt 3- Thermal Detonator showing the clips both screws 4- Interior side of your thigh ammo pack to see the correct rivet type. both sides Thanks, M1 point
-
Yep, basically repack it and send it using the shipping label they send you. Now the question will be how long will you have to wait for a replacement to go out once they receive your current pauldron back... Definitely a frustrating reply regarding the leather though, it's not that difficult to get the right material smooth at the time of production and prevent it from happening, unless they're shipping it basically rolled up.1 point
-
Thanks, but I think I’m pretty happy with the current position of the ears. I don’t wanna touch those blasted things ever again lol1 point
-
I just see it as an E-11 but because it's an old low poly game it's oversized. I chuck it as a game limitation/oversight/graphical issue for that period of game development. Considering how the Phase 3 is vastly Clone inspired as is, it leans in towards the Stormtrooper aspect more if you go with the E-11 and balances out more. "It's like poetry, it rhymes".1 point
-
Hi Matt, In order to continue with your review, I would need you to do me a favor. Please add the following additional photos. 1- Left side of your Ab/kidney section to see the 3 rivets location (no need to suit up). 2- Complete Ab belt 3- Thermal Detonator showing the clips both screws 4- Interior side of your thigh ammo pack to see the correct rivet type. both sides - Something like bellow examples with better resolution of course. . Thank you sir.1 point
-
Nice work so far, ATA ears are a lot thicker than other makers ears so you can fine tune and trim more than others. Can't quite tell if you have a step at the top of your ears where it meets the backplate, you will find this will help with the gaps quite a lot as the top section will sit flatter1 point
-
Nice work, looking good1 point
-
As for the eventual 1:6 figure (when I can finally 3D print again... some day) I am still thinking about what blaster I would use. If going by what looks good and is correct for the very early Empire, I think standard clone DC15S would look good or the ROTS DC15-X (the DC15 A/S hybrid from the 501st temple march during order 66) but obviously neither blaster was used by the Phase 3 clones in TFU so it would not be accurate. Inaccurate but cool. If going by game devs intention then ANH style E-11 is likely accurate to what they intended but doesn't match the in game look since the game model blasters were HUGE. That leads me to the 3rd and most game accurate option: An oversized E-11 (call it early Empire proto-E11) in which case I could probably just use the oversized E-11 blasters from my old 90's Kenner 12 inch figures since they were suitably massive. It would give them new life: instead of obsolete oversized "parts box" filler they would be TFU proto E-11's. What are the opinions of all ye?1 point
-
Well I did mention this forum to him on Discord. Thank you guys for all the parts and resources. These bois are epic. Love sharing in the fandom here.1 point
-
Looks great Luca!!!1 point
-
It is indeed! It's been slow going, but E-11s should be all caught up or darn near it. Happy to see these out in the wild again, and paired with some BEAUTIFUL armor no less! Great work Matt, and this should be a slam dunk!1 point
-
Lookin' good, Matt! Gotta ask, is that one of the newest Hellhounds blasters from this year?1 point
-
Hi Matt, great to see your EIB submission. I'm the DO that will be doing your review. I'm working on it from now.1 point
-
1 point