
Leaderboard


Popular Content
Showing content with the highest reputation on 08/24/2021 in Posts
-
Random stuff done today2 points
-
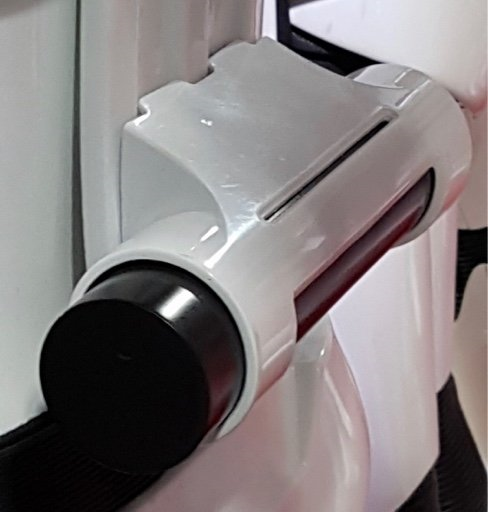
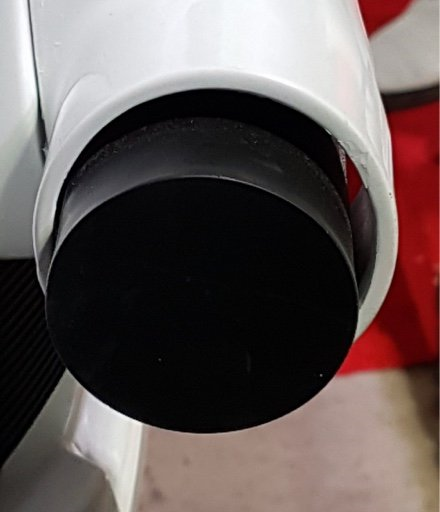
Working on the TD, going to make it so that the cylinder can slide out Back plate has a curve, in this pick it is upside down (curve is at top) Hard to find the cut lines, and of course I missed it... Going to paint the armor so looks like it is putty time. Dammit With the back plate. While I can have a seam, this is too large so I will make it seamless. Look at that curve, anyone know why it changed from flat? Since I had fixes, decided to switch to making it functional and more accurate. So pull everything apart Found a poly tube at mcmaster carr, so need to remove the indents and graft the body onto the tube. Some cutting and sanding later. Still need to cut out the tube and glue the body, then fill and work on the actual TD canister.2 points
-
The other big component if not previously mentioned is that, there is no one right answer - there are LOTS of right answers, and plenty of wrong ones. It drives me up a wall to see (mostly on non-FISD Facebook pages), someone ask "What armor should I buy...?" with no further context, then a dozen people throwing out makers (usually RS) without any further context. It's silly! That's like joining a car group and asking, "What car should I buy?" and everyone just going "BUY A VAUXHALL ASTRA". What are you going to be using it for? How often do you drive? What country do you live in? (We don't get Vauxhalls in the US)... What is your budget? Do you prefer performance or luxury? etc. These type of questions MATTER when buying a car, and it's a similar process to buying armor... And it's why research is key and why I avoid just straight up telling people what armor to buy and where - you want the armor that's right for YOU, and that requires some work to know. The more you research, the happier you'll be with your purchase in both cases. But you're in the right place to start building that knowledge. Good luck! (Another component is also that many makers do not have websites, since at least in the US, it opens you up to legal liability/receiving a Cease-and-Desist order from the Mouse for profiting off of their unlicensed intellectual property, which they don't take kindly to. UK laws must be different or RS for example must not care, but that's why a lot of the best makers and their contact info are here on the forums, where you at least have to sign in and be actively looking for armor - buying on a whim off a website (or EBAY) is asking to trouble for many different reasons...)2 points
-
I've not seen issues with the popper colors before, normally they are silver although the CRL image shows them darker. Both versions of the pouches have been approved at centurion, although the second pouches do match the CRL images. https://www.whitearmor.net/forum/topic/49428-tk-61490-requesting-hwt-centurion-status-anovos-approved-2nd/ https://www.whitearmor.net/forum/topic/42345-tk-20466-requesting-heavy-weapon-trooper-centurion-status-ap-approved-2nd/ If you go off the references the first type should be find (and are easier to assemble ) Hopefully one of our DO's will chime in @TKSpartan @justjoseph63 @Chemi1 point
-
TLJ and TROS do inf fact have a gap between the housing and back plate. The endcap is a full tube which goes into the housing and the top slot and back panel are cut out showing the tube insided. A coupe of references
 1 point
 -
So I am finally continuing this thread after my move. I'm just figuring out the best electronics installation method. I just did a trial fit of the barrel into the barrel shroud. It is a good snug fit, all the way from the flash suppressor at the front, the sight block in the middle, and the receiver attachment point. It makes the entire front half of the blaster solid. However, I now have noticed the BlastFX LED light strip does not slide between the barrel and barrel shroud. Looks like I have to cut a long slot into the barrel in order to have the pew pew lighting effects. Will upload pics soon.1 point
-
Thanks a ton for the kind words!1 point
-
Well just the shins to go oh and the buttons it's been fun and scary lol still got to do tube stripes tryed and failed twice lol I blame my kids can't concentrate lol1 point
-
WOW, Colin! Brilliant job on dealing with those issues, brother. A couple of things jumped out at me, and while they may not be huge deals, they would improve your overall look. It appears that you may have used CA (super) glue and it has come undone. I would suggest trying E-6000 or something similar that has some flexibility. I noticed that your bucket seems to ride pretty high. Ideally, it should sit much lower, and I believe it is the interior padding in the top that is causing this. Removing that would not only bring it down, but will also vastly increase your visibility. (I had to do the same thing, and it works... trust me) and help hide the neck seal in the back I would keep the padding on the sides, though (blue arrows). Reference images Reference images1 point
-
With the TD If you wanted to reduce the gap and but still have it separate you can do what I did for my ab boxes. Put some mold release / wax on the back plate. Get some body filler / bondo / p38 on the TD Push it in in place so the filler squishes out abs fills the gap Wait for it to go off Pull of the TD as the wax should have stopped the filler attaching Sand and tidy up the TD Boo.1 point
-
I think it's safe to say, we will be replacing all photos in this CRL with a new model at the top included. As to the fore arms, this may be a little more difficult. Currently we have no maker that supplies them accurately. If this mod is not reasonably easy to make, then we are basically stopping many from reaching Centurion based on this item alone. My take on updates is simple. If it's generally an easy mod, then make the change. If it is not, then work towards making it easy, like I have done with the Thermal Detonator. (commissioned someone to make a 3D file so the changes that should be present are present and make it accessible for any that want to achieve that accuracy). If we want to make a change like this, then I would suggest we need more imagery and clear shots from several angles to make sure we have enough information and at least attempt to get someone onboard to make it available so anyone can achieve it, not just a few that are well practiced or skilled. Glen will state most things are easy but he has built more costumes and armour than anyone I know lol, so that doesn't count .1 point
-
UK is a special case. RS can stay in the open since LucasFilm goofed up on copyright back in 1977. they forgot to register the stormtrooper design correctly. Result was that it was "industrial design" only and copyright expired 15 years after creation. Shepperton was the first one and Lucasfilm wanted to sue that one into oblivion. topic ended on supreme court which told Lucasfilm a firm "NO". thats why there is a safe harbor there.1 point
-
Thanks for the vid going to try a throat mic out.1 point
-
It’s honestly awesome seeing what you’ve done with eva foam! One of the things that really stuck out to me was the fact that all the skills you learned from foamsmithing really does apply to working with hard kits as well! I’m still terrible at using bondo and sanding lol. Not only that, but you strive for accuracy as well! This is what the 501st is all about and I hope to see you get a plastic kit some day, but no rush! I am super glad that you are sharing your journey with us here! I look forward to your future posts!1 point
-
We need to pin this thread - excellent information here that I will certainly be taking advantage of.1 point
-
Going to follow as interested in how you get on with this [emoji106]1 point
-
Doing a new run of E11 painted blasters1 point
-
Trimming the ears is pretty much everyone's fear on their first armour build, but dont stress. The ears should have trim lines on them. Trim short of those leaving some room for fine tuning and further trimming and adjustment. Once you have some of the excess removed and you hold them against the sides of the helmet you will get a better idea of how much more you need to remove. There are a few other tricks to employ when you start getting closer to those trim lines but just take it slow, trim carefully and keep testing against the helmet for high and low points. Here is a great tutorial on Ears for you. https://www.whitearmor.net/forum/topic/29238-my-helmet-ear-tutorial/1 point
-
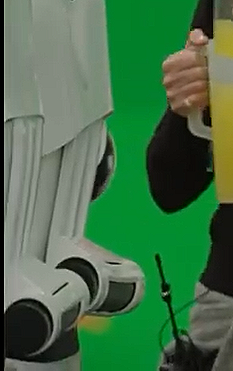
Hey troopers, A little look at the original suits and how the bicep and forearms were attached and aligned. Plus, a look at shoulder trimming. Check out the short video for more discussion on this. :-) As per the below video, the common misconception is that the bicep and forearm coverstrips align at the front. This video shows how the original bicep and forearms were attached and how this affected the position of the two pieces. Here’s some supporting images; *armour accuracy dependant. **as always, all screen used suits were slightly different as they were hand made1 point


