Leaderboard


Popular Content
Showing content with the highest reputation on 06/21/2021 in all areas
-
Nice score. Correct the mesh is too fine, you want to paint white on the inside and also the rims of the hovis too. You may want to clean up the paint on the frown too as Anovos helmets usually have some paint on the gums.3 points
-
Thank you all for the kind words. Great to see so many friendly people. Thanks for all your tips, I am sure I'll have many more questions in the future. Got a reply from Dave C at [email protected] (armor masters), lots of helpful info about the kits with time frames and costs. The excitement is building :)3 points
-
I'll have to check the gums. I know I want to clean up the eyes, and the padding and some of the other stuff inside needs to be redone, as the heat made the glues start to weaken or fail. one Hovi fell off as well. need to find the proper size mesh...2 points
-
1. First, I would try to re-bend the belt clips. This may be easier than you think Jacob. 2. Personally, I think it's easier(and less "risky" ) to put some abs paste, or a small piece of plastic... 2 minutes and you're done. 3. Perfect!!! One less!!! I'm sure someone else can give you more suggestions. I am very glad that you are thinking about applying for Centurion.2 points
-
Correct, our DL posted how to add an external battery for ease of change as we can't get the battery locally2 points
-
Awesome!! Thank you all so much! I can’t say enough how much I appreciate the help getting here. I definitely will make these changes and for the eventual centurion application! Just a couple questions I have regarding the changes for Centurion. 1. Will the TD need to be replaced if I move the O ring higher? The clips, as I understand it, need to be butted against the it on the bottom. 2. The gaps in the back of the thighs, can those be eliminated and be approved by removing more for mobility? It’s along the ridge by my estimation. 3. Not a question but an observation on the shoulder elastic straps. They are there, just my helper getting me suited up didn’t put them on correctly. smh lol I’ll be getting on these fixes right away! Again thank you everyone for everything!2 points
-
Fixed the issue - the microphones that come with the SHA works great once I added foam padding between the mic and helmet walls to prevent excessive vibration. I also created some baffles to isolate the microphones from the rest of the cavity, so there's minimal pressure loss/increase from ports other than the three I drill in the ears. So I have Helmet | Velcro (for internal speakers) | ( Rubber Grommet) | Foam | microphone enclosure | Foam around the enclosure | ears | 3x 1mm holes drilled I think after added the extra padding, the taper around the ears are no longer satisfactory, I ordered some new ears from trooper bay which I will install - I'll take some pictures of what I've done when I do that. Keep an eye out2 points
-
I had the same thing... it was the battery. Yes, easy to replace.2 points
-
Welcome, Crystal! I'm 5' 3" and an approved Stormtrooper so it can definitely be done. Glen already linked to my build thread above, but feel free to PM me if you have any questions. There's also a Facebook group called A Little Short for a Trooper for Legion and aspiring Legion members who are vertically challenged.2 points
-
Congratulations Jacob, welcome to EIB trooper2 points
-
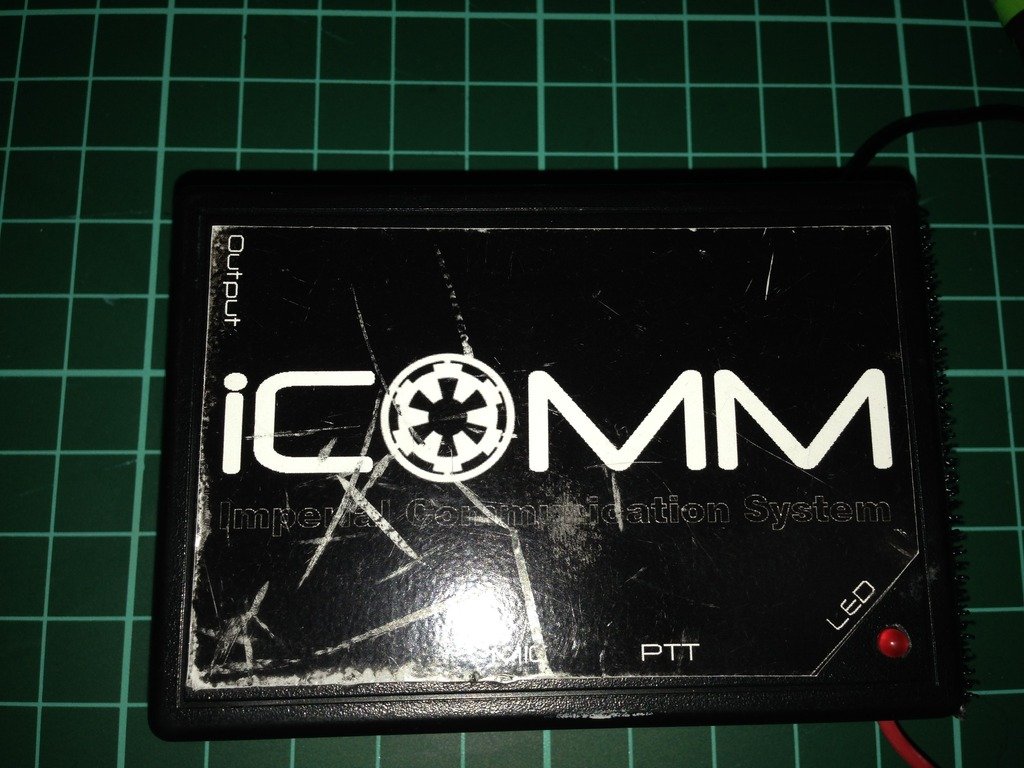
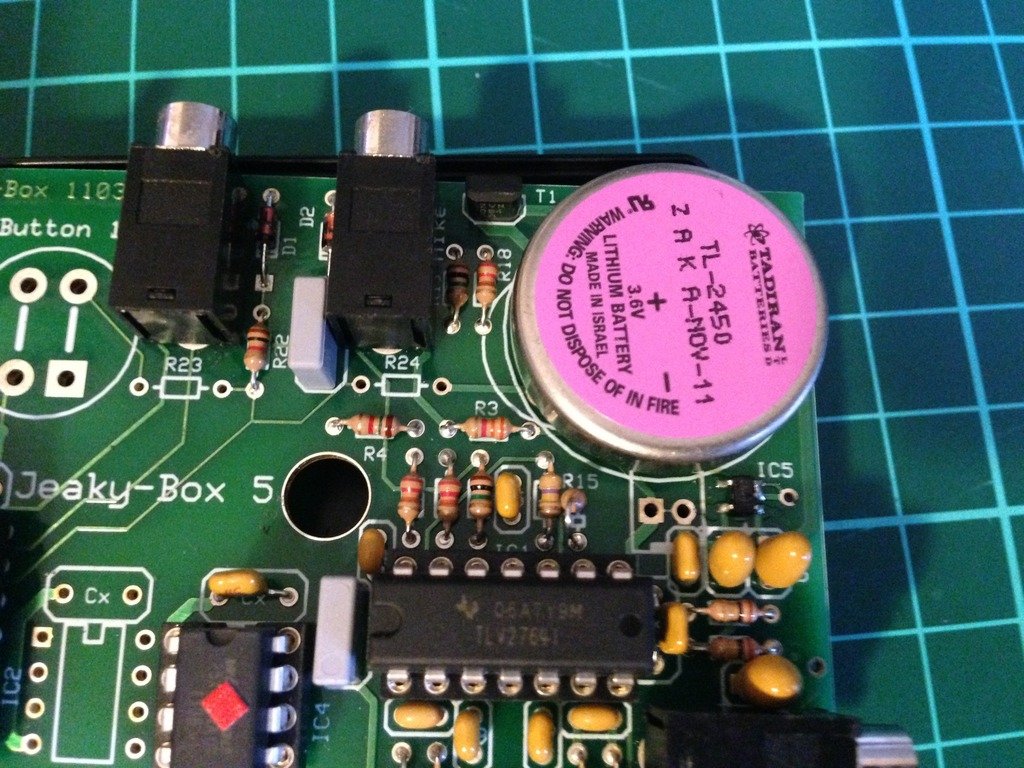
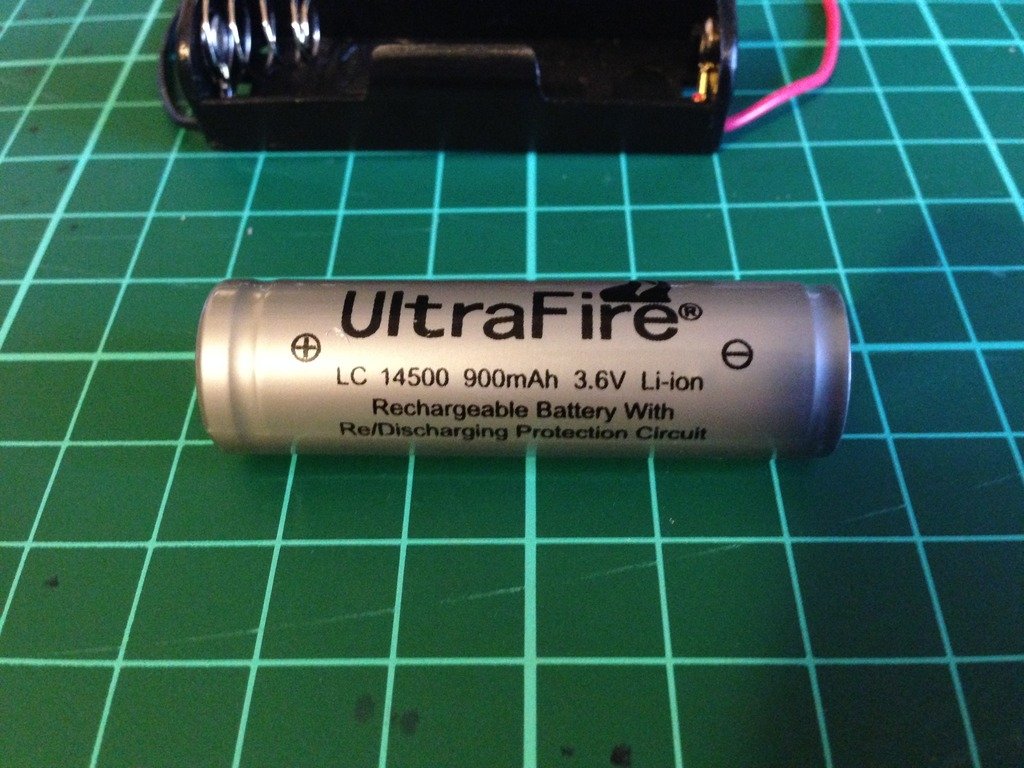
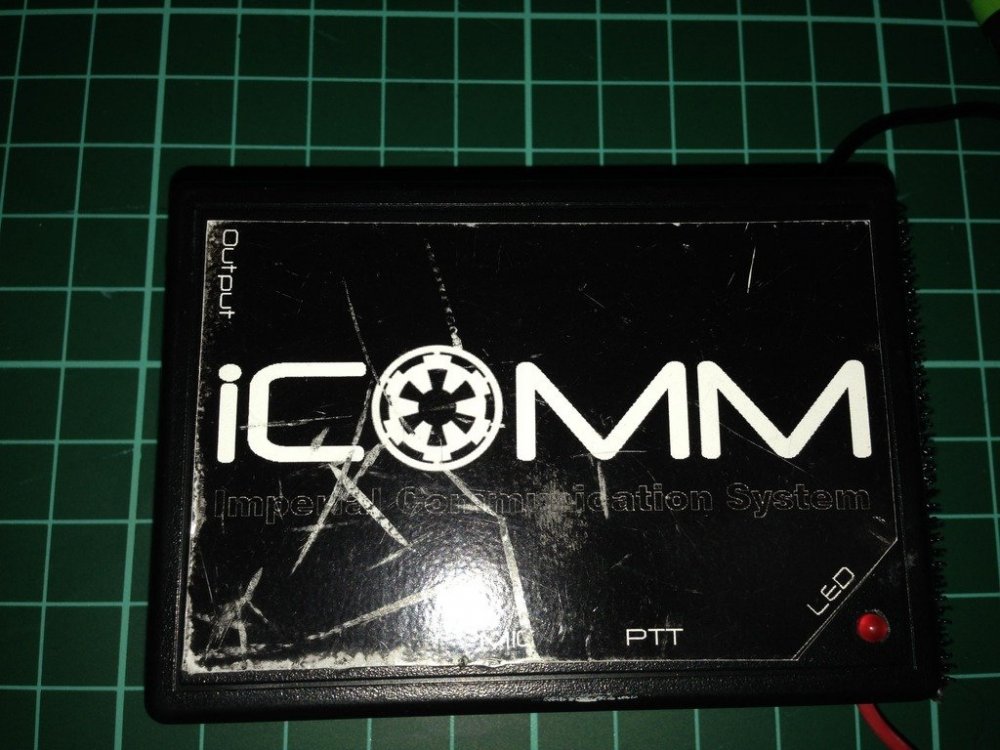
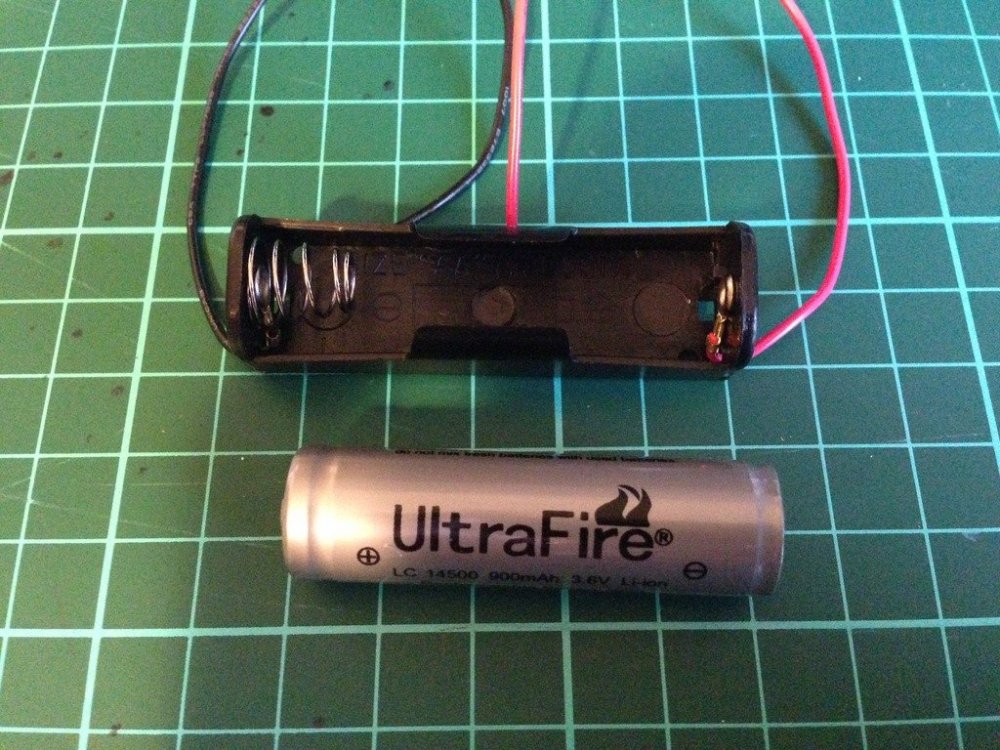
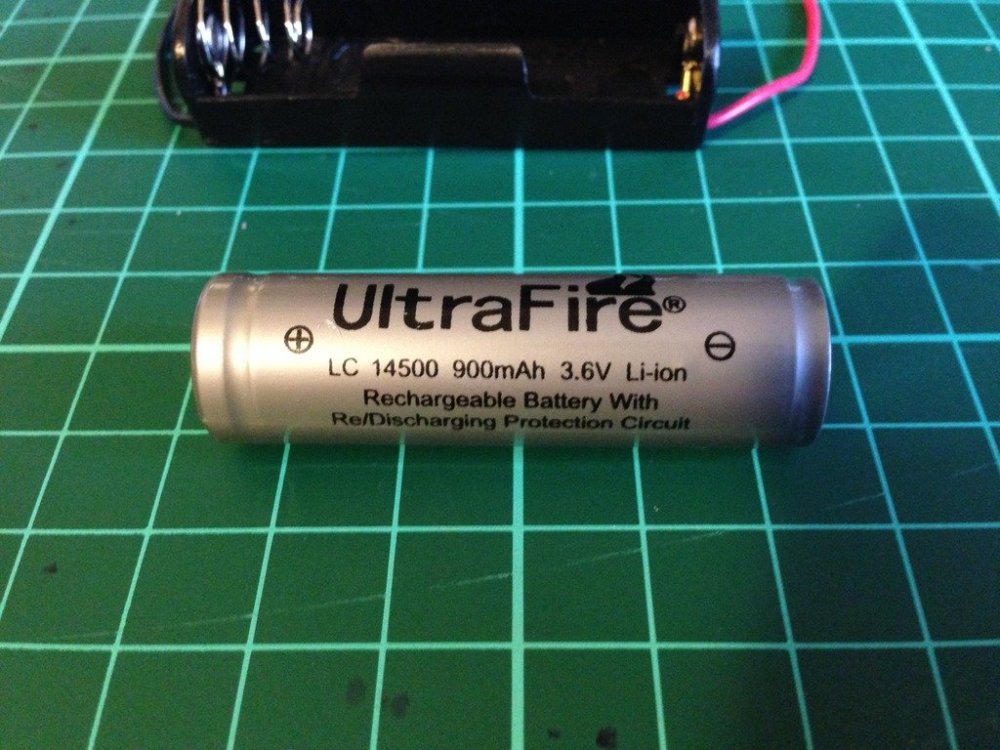
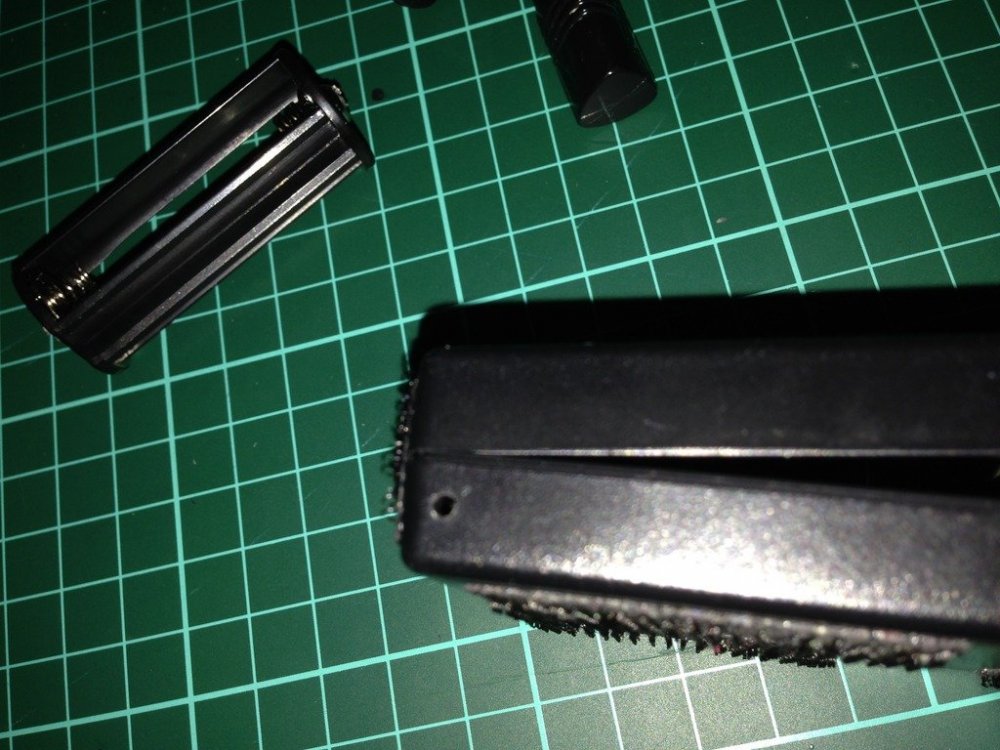
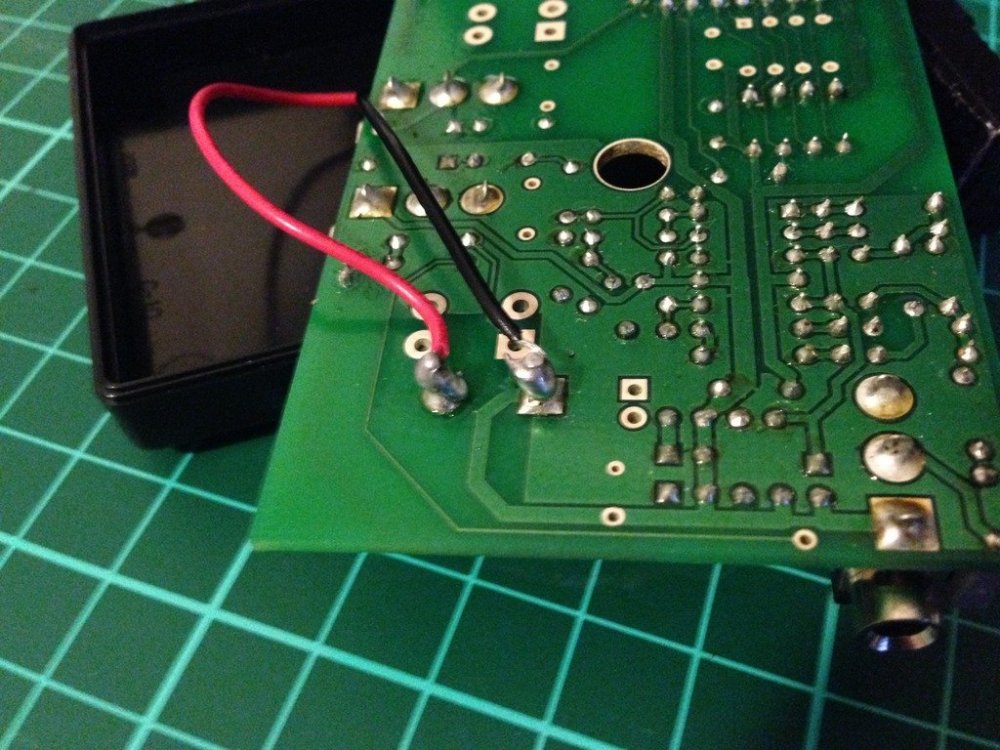
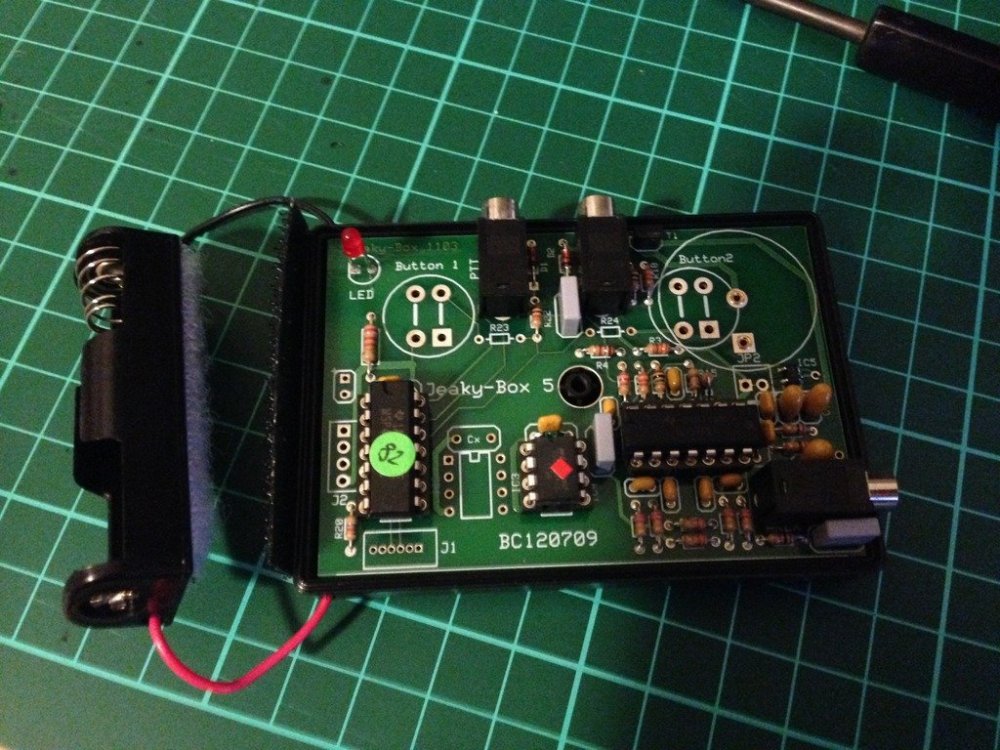
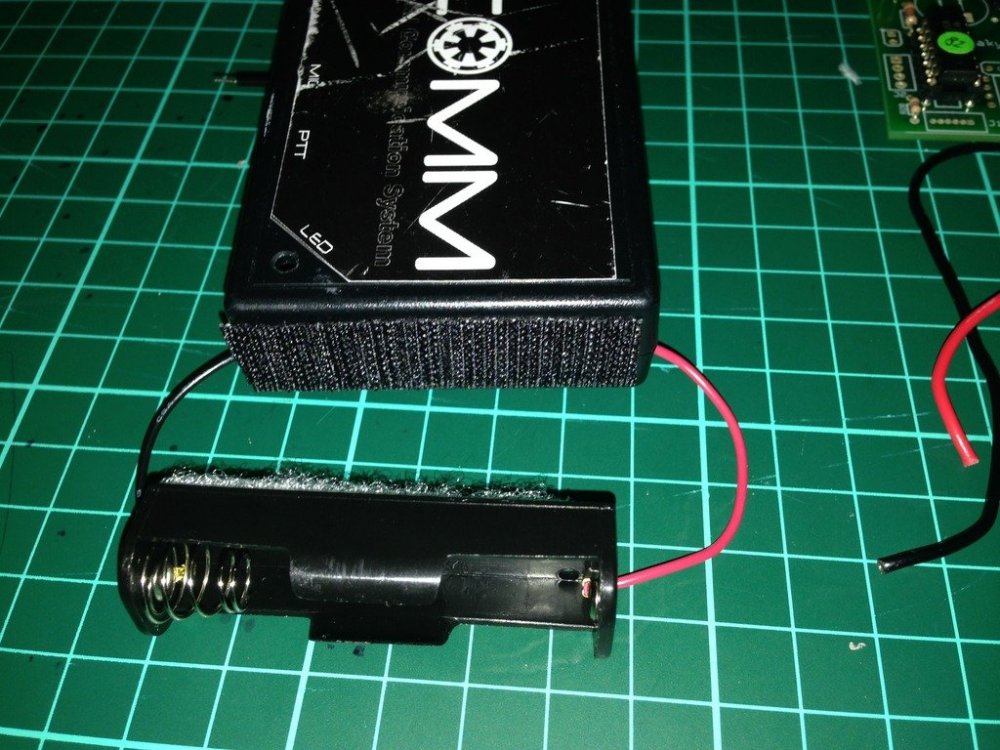
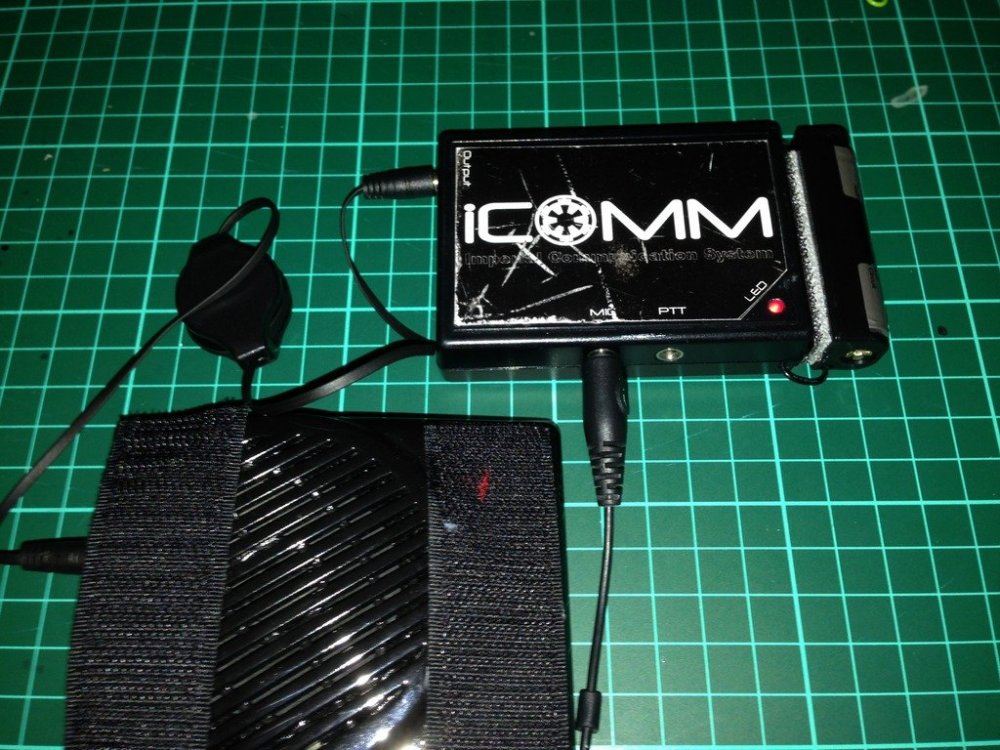
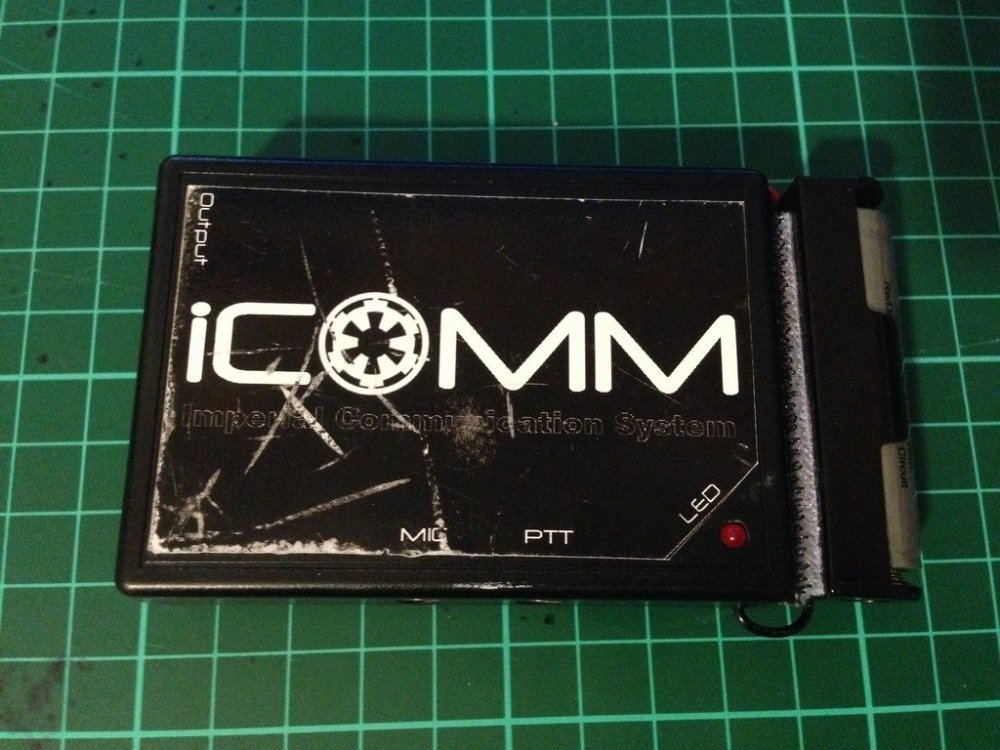
The humble iCOMM, works well while the internal battery is good, but after a year or so..........they stop working. How to tell, its the iCOMM battery. If the little red light no longer comes on and the static burst is not sounding, there is a good chance it is just a flat battery. Image has been scaled down 42% (600x450). Click this bar to view original image (1024x768). Click image to open in new window. Internal iCOMM battery Image has been scaled down 42% (600x450). Click this bar to view original image (1024x768). Click image to open in new window. Freight is expensive to get the very specific battery that is inside. Genuine replacement batt $5 US, freight, $25 US. Whattt!!! $30 US.... for a battery.....at least that's what I said. (approx $38.40 AUS) So I decided to do a little research, and come up with a reasonably simple and inexpensive mod, approx $12-$15 Aus. A simple AA battery holder and a rechargeable Lithium ion battery. Image has been scaled down 42% (600x450). Click this bar to view original image (1024x768). Click image to open in new window. Not just any kind of rechargeable battery can be used. The iCOMM is sensitive to voltage, so a 3.6 volt battery is required. The milliamp hour rating, or how much draw per hour on the battery, is only 560mAh, not bad for its small size, but I have replaced it with a 900mAh, so almost twice the capacity, and rechargeable. Approximate lifespan......Years and years. I chose to go with a battery with an internal protection circuit, as Li-ion batteries are finicky with charging. (have been known to EXPLODE). A digital battery charger, designed to suit 3.6-3.7 volts is perfect. Available on evilbay for as cheap as $5 shipped from China Image has been scaled down 42% (600x450). Click this bar to view original image (1024x768). Click image to open in new window. As I discovered during the research phase, the internal battery is easily removed. Image has been scaled down 42% (600x800). Click this bar to view original image (1024x1365). Click image to open in new window. First I added some adhesive Velcro to the back of the battery holder. Image has been scaled down 42% (600x450). Click this bar to view original image (1024x768). Click image to open in new window. Then I drilled a couple of small holes, one in either side of the bottom half of the iCOMM casing. Image has been scaled down 42% (600x450). Click this bar to view original image (1024x768). Click image to open in new window. Thread the red +, and black - ,wires through the holes of the casing.(From outside through to inside) When you flip the circuit board of the iCOMM over you can solder the wires to the corresponding posts. The outer most post is the positive (+) and the inner post the negative(-). Image has been scaled down 42% (600x450). Click this bar to view original image (1024x768). Click image to open in new window. Flip the circuit board back over and fit back into the case. Please note, you will actually have to fit the circuit board back into the top part of the case as it is the half that has all the plug holes and LED hole. Image has been scaled down 42% (600x450). Click this bar to view original image (1024x768). Click image to open in new window. Place the two halves together, put the screw back in, and add the opposite half of the adhesive Velcro to the end of the iCOMM. Feed the wires in through the holes to keep the excess out of the way. Image has been scaled down 42% (600x450). Click this bar to view original image (1024x768). Click image to open in new window. Tested for success, my iCOMM is again fully operational. Image has been scaled down 42% (600x450). Click this bar to view original image (1024x768). Click image to open in new window. As you can see, the overall size hasn't changed too much. iCOMM 8cm long, iCOMM with external battery adaption, 10cm long. The weight has increased by only 20 grams. Image has been scaled down 42% (600x450). Click this bar to view original image (1024x768). Click image to open in new window. Parts List and cost Battery Holder AA size $1.00 UltraFire Li-ion battery $6.00 (Protected circuit) Digital battery charger $5.00 miscellaneous bits $3.00 Battery holder from Jaycar, all other parts from ebay. Please note: These prices were in Australian $, so would be cheaper again in US$


 1 point
 -
First time build here! I will be updating this thread with pics and I'm sure plenty of questions as I progress! Ordered Armor AP Stunt, Pretrimmed Gloves AP Stunt Belt AP Stunt Thermal AP Stunt Neck Seal Darman Undersuit Shirt Amazon Undersuit Pants Amazon Balaclava Amazon Boots Imperial Boots Magnets for assembly TotalElement E-6000 x2 Lexan Scissors Debating Blaster voice mod Still need to source1 point
-
Greetings from Australia, I have been lurking for a week or so now and thought I would register and say hello! New to the whole 501st world, already introduced myself to my local garrison on their forums. Love watching troop videos on the web, looks like a lot of fun. Already reached out to Armor Masters for an ESB Stormtrooper setup rough costing as they are seemingly one of the best for the taller aspiring trooper. Looking forward to one day getting out there. Regards Steve1 point
-
Hello there, Yiyo from the Spanish Garrison here. Been actively reading and researching, and thanks to some of you folk, found the right place to open my build thread. Been a while since I opened one on the FISD, so it's great to be back. Following a couple of other builds, some seem to be new, some are older but haven't been updated in a while, so just wondering who will be modelling and presenting the new CRL, I would be happy to help whoever needs anything. Down to business: ABS armor & Resin Helmet Rogue 1 kit: Ordered 22/05/2021 from 850 Armor Works. Boots: IB. Gloves: Ordered Endor Finders 24/05/2021. Undersuit or 2 pieces: Ordered DarkSide Closet 24/05/2021. Backpack and flamethrower: Files received 22/05/20121 from Marko Makaj. Strapping and similar: all sourced locally. Paint: Montana White & most likely the same red I used for the Shocktrooper - still want to talk to other builders about this and get some advice. Rogue One style Pauldron: Ordered 24/05/2021 from Artneo. As soon as things start arriving, I will start sharing - both my printers are currently busy spitting out pieces for my T21 Heavy Blaster for the shocktrooper, so as soon as they free up, I have to print the chest and backpiece for my ICAT build, and then I will start with this build. Thanks for chipping in along the way, all advice, as always is very welcome, this will be costume 17 I think1 point
-
hello all im jody been a life long dream to have a place in the 501st started a build of tk trooper and it was torn from me along with most of my collectables devistated i gave up , now that i moved and i am now able to start again i hope i can bring my dream a reality im married 21 yearts 3 children 1 disabled and seeing what the 501st does for children like my daughter is why i want to join and do my part im ready to go to build partys meet the troops and give all i can to help anyone ........1 point
-
These threads could be of help Frown references1 point
-
Congratulations trooper and welcome to the EI ranks1 point
-
Been a couple years, but Trooped with my TK recently. Charged up the iCOMM system and a inital test seemed fine. But after about 5 minutes, with it on voice activate, the iCOMM red light comes on and the speakers just start clicking repeatedly. I think it might be the iCOMM tl-2450 3.6v battery dying. Looks pretty easy to replace. Am I on the right track? Sent from my SM-G986U1 using Tapatalk1 point
-
Yes, I have had the same issue.1 point
-
Congratulations Trooper !! Welcome to EIB and just a few adjustments and we'll see you at Centurion Ranks1 point
-
Great job James and thanks for updating us with this information. Troopers Helping Troopers1 point
-
Sent from my iPhone using Tapatalk1 point
-
Off the UKG selling page. Sent from my iPhone using Tapatalk1 point
-
Also looking at 3D printed replacements for a few parts, to get a more refined sharp edge look. like the hand plates.1 point
-
Thanks! I cut a larger section of the lens like your helmet. It was a lot closer to sitting right, but still not QUITE right. I eventually came across this build https://www.whitearmor.net/forum/topic/45479-bigcaras-anh-tk-ap-build/page/8/#comments and cut my rectangular lens down a bit. Finally got it setting right (i think) with sugru in the middle between the eyes, and on each end of the lens. Now I'm just waiting on the black paint I ordered so I can finish the vocoder and the ears. Where do people source the S trim from? I looked a bit around my local big box stores but couldn't find the right stuff. Thanks!1 point
-
Hi Jacob, and thank you for your EIB application! CRL and EIB Application Requirements: All required photos have been submitted, and on behalf of the entire D.O. staff we are pleased to welcome you to the rank of Expert Infantry. Congratulations! Other-Armor Fit/Assembly; In this area we review observations made by your fellow troopers and the DO team. Some observations may lead to suggestions to improve the overall look of your armour. Note that we consider both text (CRL) and pictures (screen caps/reference images) when reviewing submissions. Overall a spectacular build!!! Just a few items in this area, so let's get to it! - The paint details on the vocoder could use some definition with a few touch-ups. You can use the same method that you used with the teeth (some non-acetone paint remover, some toothpicks and a few cotton swabs). Reference images -Just a dressing issue. Your right shoulder bell aligns perfectly with the chest armor but the left needs to be lowered a bit. Reference images -Another dressing issue here. We suggest to move the right forearm down. The hand guard is quite far away from the forearm opening. I think the glove is bunched at the wrist, so, for this reason, the forearm is not in place. Reference images - A very small detail but one that can really make a difference. Aligning your thigh and shin pieces. It's small details like these that really elevate your look. Reference images *************************************************** Centurion Requirements; In this section we prepare you for Centurion. Because Centurion photos show more detail than EIB, items pertaining to Centurion might be seen there and not here and additional photos may be required. We try to point out all that we can from what we see, but the final accuracy is the responsibility of the trooper. -L3: The plastic shoulder straps need to be held down in the back via a white elastic band to the white fabric that connects/bridges the chest and back piece. In the published photos, I can't see clearly if the elastic is there or not. But the position of the shoulder straps suggests me that it's not. Adding the white elastic will also help the shoulder straps to be well positioned. Reference image - Although not specifically mentioned in the CRL, the O ring should not be facing toward the back and should be more toward the top so it will need to be raised for L3. Reference images - Your butt plate is riding out and should be brought in to where it aligns with the kidney plate. I would suggest doing a strapping adjustment to get it closer. You can also add a pair of "V tabs" to the end of the plate and this should make the fix. Reference images -Moving on to your thighs back, You have a small gap in the ridges. You could fill that gap with ABS paste, or, you can also just put a small square(very small in this case ) of ABS in, so the black doesn't show through. Very easy fix... Reference image -The front of the left thigh has the same case as in the previous point. 5 minutes and you're done! Reference images -The cover strips of your calves should close right in the center with an equal amount of space on each side of the strip itself, so it seems that they would have to be detached and placed correctly. Reference images -Sniper knee plate must be aligned with the ridges on the shin. As you can see , the sniper knee is a bit lower (discontinuous lines) and should go aligned with the shin (continuous lines). To fix that, It would be necessary to take it off and re-glue it higher to match the ridges correctly. We have a challenge here but we are confident that you can do it ,and here in the FISD you can find all the support and guidance you need to achieve this. remember, we are here to help. Reference images *************************************************** And that's it, trooper. Thanks for your patience. You have a great armor, and we have complete faith that you can address the above issues. After that, I look forward to seeing your submission for Centurion!!!1 point
-
Hi Alikh. In my case it has worked well , but I have used a non glue system. I used the Anovos system thatt simply use Velcro to attach the lens and have no problems1 point
-
Last week I added a Raspberry Pi to the electronics for soundboard options. Main cable stem is still a mess, but I guess I'll worry about that after I do an actual troop.1 point
-
1 point
-
They can be a fun build, good luck
 1 point
 -
Hi Steve, Esb stormtrooper, great choice! Recently had my esb tk (my first build) approved, and waiting on my first troop. I'm a taller guy too (6'4" / 193cm), and I got my armour from RWA, a UK based armour maker. Wherever you get your armour from, have a good chat with the supplier first to make sure you get the best size parts for your frame. I made some mistakes meaning I had to replace some parts or work a bit harder to make them fit. Plenty of folks on here that can advise as well (ask lots first before ordering!). All the best with your outfit mate [emoji106] Sent from my SM-A715F using Tapatalk1 point
-
On to the painting. I used a primer first, making sure to get in all the small crevices and small bits. I did a couple coats to ensure it was completely primed. Next, came the black. I used a matte black spray for the entire thing. The grip should have been gloss, but it's not going to be seen much and I was being cheap lol. It's finally starting to look like the real deal.1 point
-
I love Guille's pauldron, fabulous work at an excellent price - highly recommended I have 1 file left from the gun, to have finished the print, so 36h more..... back pack is well on the way as well.1 point
-
Hi everyone, Now that I’m approved and officially in the 501st at entry level, I’d be interested to know if I’d be eligible for EI status or even Centurion. Based on my pictures, can I get recommendations on what I would need to change (if anything) and images I need to provide. May as well occupy my time doing something while I wait for my induction event Thanks, Tim1 point
-
Hello Crystal, you are getting GREAT ADVICE from everyone …. important thing is RESEARCH, RESEARCH, and more RESEARCH ( & possible CENTURION ???) …. It’s through this research YOU will gain knowledge WE ARE HERE FOT U !!! Sent from my iPhone using Tapatalk1 point
-
Hello Crystal, welcome to FISD!!! I look forward to your BBB And remember, we are here to help you.1 point
-
Welcome to the TRUE home of shiny white armor, Crystal! While you wait, I would advise getting all your build supplies in order. That way, you can dive right in when BBB day arrives! I would also strongly suggest starting a build thread in the ANH Build Thread forum (link here). To echo what others have already mentioned, some big things to keep in mind are these: 1. Take......... your......... time. I can't stress that enough. Rushing leads to mistakes. Consider your build a marathon and not a sprint. 2. Stay organized. 3. Ask as many questions as you want to, no matter how small you may think they are. We are here to help! 4. Post up LOTS of photos. Doing this is especially important when you have an issue. 5. If you are (hopefully) aiming for Expert Infantry and Centurion levels (hint hint, lol), doing this is easier during your build rather than after, and is easier than you think! I have several tutorials under my signature below that will help, and know that we will be here for you every step of the way!1 point
-
Hi Crystal and welcome to FISD! Great to hear you have taken your first step into the world of becoming an Imperial Stormtrooper. Wont be long before your BBB )Big Brown Box) arrives and your excitement levels increase even more. I look forward to your build thread.1 point
-
Sha Sha is a legend here on the FISD, so you have some big boots to fill! I have every faith that you will do her proud, sir!1 point
-
Hi Crystal, welcome to FISD. Great to know you're on the way of becoming an Imperial Stormtrooper of the 501st Legion.!! Looking forward for your BBB (Big Brown Box) day and feel free to ask any question you have and post tons of photos. Most here use Imgur to post photos and you can open your own Building Thread here to receive some tips and feedback. Good Luck, We are here to Help !!1 point
-
Hello and welcome aboard. Your terminology is spot on. CRL can be found here https://databank.501st.com/databank/Costuming:TK_anh_stunt Some great build threads for those of shorter height Looking forward to seeing your build, good luck1 point
-
Thanks Sha Sha... I am inspired by your example...You did an excellent job. Editing and checking photos, talking with the other D.O.´s all days...And the most important thing, using your accumulated experience to make FISD shine (in terms of quality)... Thanks again!!!1 point
-
Trimming and rough fitting Sent from my iPhone using Tapatalk1 point
-
Where did you find the mesh?1 point