Leaderboard


Popular Content
Showing content with the highest reputation on 03/31/2021 in all areas
-
This may be a little too abstract for most people (I know a lot of people usually want to see pics of helmets, characters, weapons and whatnot), but I liked how it turned out, so I figured I'd at least sub it. The first side takes some elements and colors from the FISD logo(s) as well as the back plate of the TK's. The second side has all the info. All using the colors and typefaces from the OP.9 points
-
Thanks. I took some of your ideas and came up with this multi-plated metal design. I’m also playing around with a 3D design for the front... sort of. And yes, thank you @starsaber25, let’s see some other designs.8 points
-
Something like this?6 points
-
Hey troopers Myself and my good friend Rough Dimon, and some other friends along the way, will be gaming and live-streaming from 12pm til 12am on Good Friday, April 2nd, to raise money and awareness for this disease and the MND charity. So, why are we doing this... A trooper friend of mine is bravely working his way through the challenges brought to him through motor neurone disease. Despite the changes that this has made to his day to day life, he still manages to support others with positivity and kindness and is a true inspiration to myself and others. He knows who he is. If you would like to watch the stream, or donate any amount, large or small, we’d appreciate your support. I will stream on my personal Facebook account: https://www.facebook.com/daniel.branton.186 My friend will stream to YouTube: https://youtube.com/c/RoughDimon https://www.justgiving.com/fundraising/cableguydan2 points
-
I LOVE the idea of getting the Troopers Helping Troopers theme in there. And your mock-up is AWESOME, Greg. It’s going to be impossible for Command to choose. Sent from my iPhone using Tapatalk2 points
-
I am loving the back of this coin. Did he hear me say in staff area that I think we should put tube stripes somewhere on the coin? Pretty much looks like there are on the sides lol. Very nice job.2 points
-
No, mine is also an ANH and has those two barrels (power cylinders) I just haven’t attached them yet. Sent from my iPhone using Tapatalk2 points
-
I have black satin acrylic spray in mine, doesn't stop approval at any level, it does help reduce any light reflection and makes the inside a lot darker so you can't be seen through the lenses.2 points
-
It’s a very good design... I prefer that Roman Empire style, but this design for the annual coin run or for the EIB would be fantastic... You are making real art works. It's going to be hard to choose with this level of masterpieces.1 point
-
LOL! Well, there is no "O" roman numeral, so that's a plus, right? LOL!1 point
-
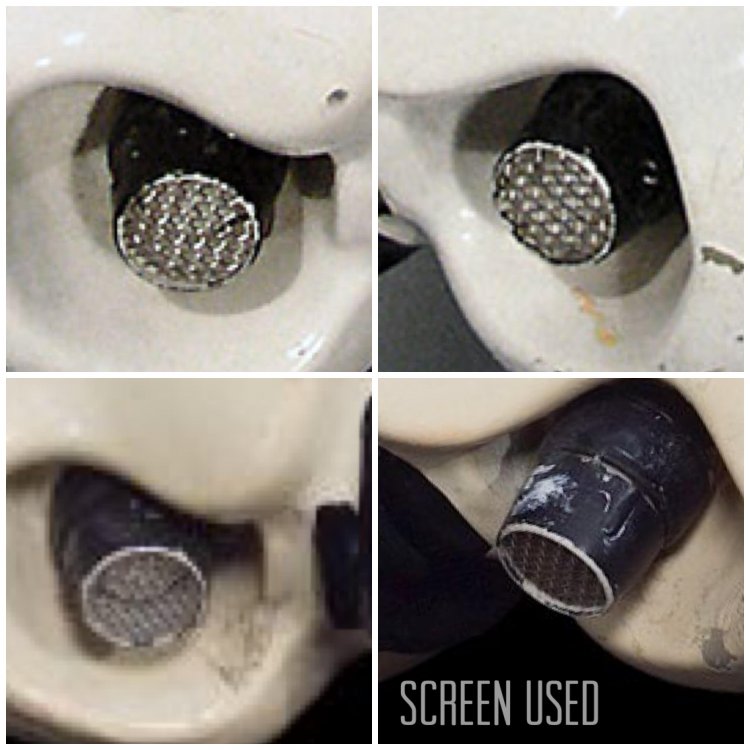
That’s the Hengstler counter. I believe it should be mounted to the underside of the scope rail using two L shaped brackets: You can see it runs parallel to the barrel and scope rail Sent from my iPhone using Tapatalk1 point
-
Just received Hellhounds E-11 which looks great but got damaged in transit. Daniel from Hellounds said to use CA glue to put the piece back on. Is this the right position to put it back on? Does it need to be vertical compared to the handle? What is the correct pitch in comparison to the barrel? Any guidance on how to do this right without screwing up the blaster? Thanks in advance!1 point
-
Ou yea...this last version is the best...[emoji7] Wonderful job1 point
-
I just want to say thank you to everyone! I shortened straps and cut around the thighs... It already looks (and feels) better! Pictures soon.1 point
-
I like that type of paint honestly, kind of gives it that rustic look1 point
-
Ah thanks heaps, yeah wow, they have many differences....now that’s a hard decision lol1 point
-
That looks good Dan. Wouldn't worry about the gloss, you can always dull it down with black spray paint.1 point
-
Had a little time today. So far have the whole front and back are finished trimmed & sanded to my liking and also the shoulder bells are completely done also. Onto biceps next.1 point
-
Hey folks, A little bit of progress on the painting front. After a couple of different sources confirming the presence of crinkle paint on the original weapons, and thus likely the props in ANH, I went ahead with applying Hammerite Hammered Black spray paint. First coat was very glossy and had a lot of separation. The paint in the below photo was still wet, so extra glossy. However, upon drying, the paint looked a little pitted. The second cost went on much nicer, filling those “pitted” gaps and making for a much better finish. And here is where we are up to. I have test fitted a couple of metallic parts, just for contrast.1 point
-
Greg thank you for jumping in on the competition right away and showing us your amazing ideas. There are some other great ideas that have been suggested so far. However, instead of attempting to change Greg's design how about taking some of the ideas mentioned and submitting new designs? I'm sure Greg could play around with his designs if he so chooses based upon recommendations but for the purposes of a competition it would be nice to see other submitted designs as well.1 point
-
Yup! I helped Max with a bunch of corrections this weekend, including: - pulling his forearms apart and tapering them down at the wrist, while still trying to keep them in shape - trimming his ammo belt and moving the rivet covers out towards the edge slightly - trimming his back armor plate lower corners - adding material to the back of his thigh armor to close the lower gap between halves - removing his knee ammo belt and recentering it. A little salty on this one - the AM belt is very clearly intentionally pre-curved to have the center ammo box centered on the cover strip, as it was originally applied. Trying to shift it required heat bath bending it, which started causing the thick ABS to crack slightly at the box. I've said it before and I'll say it again, if mods like this are going to be called out and required at Centurion, they should be stated clearly in the CRL. Nowhere does it say it needs to be centered/even/etc. on any certain point. Fixing this after the fact and having to fill the hole with ABS slurry is pretty frustrating and could have been avoided with a clear CRL, especially as the piece itself does not lend itself to be mounted this way easily for troopers with larger thighs. - starting the process of adding clips to the posterior to prevent it from seperating/flaring Anyways, he's on his way and we'll retake his approval photos with the updates in the next week or so... Still 3 spots left and we hope to ensure he's one of them!1 point
-
Thanks. That's a very nice coin. I was avoiding the 3D finish as I assumed it would bump up costs, but it is very nice. The buckets are negotiable - I have options I can switch out - with the concept trooper I was just going for something not commonly seen but yet visually distinct. Yes, I'm an OTTK as well, but the difference between a ANH stunt and Hero / ROTJ / ROTK or even HWT would be lost at that scale in the final production - so it would be a repeat of the front, more or less. I wouldn't mix the two tone metal (bringing in gold) with the coloured paints (unless you meant gold-coloured paint) - you would lose the effect of the different metals and the paints might look funny - I could change the front XV to gold but I would probably do the whole coin in black metal and gold or... nickel and gold/bronze with some black accent paint. If I got away from the EIB DLT-19 I would probably drop the Centurion laurels as well on the back. Here is an earlier version I did with the larger XV in two-tone metal (raised and recessed antique bronze with raised and recessed antique nickel and black paint). This is inspired by the ten year FISD coin but no large TK bucket.1 point
-
Ok, I guess I'll go first. Something I had laying around... Black - raised black metal Dark grey - recessed black or matte black Light grey - recessed metal or metal paint EIB blue Centurion Red1 point
-
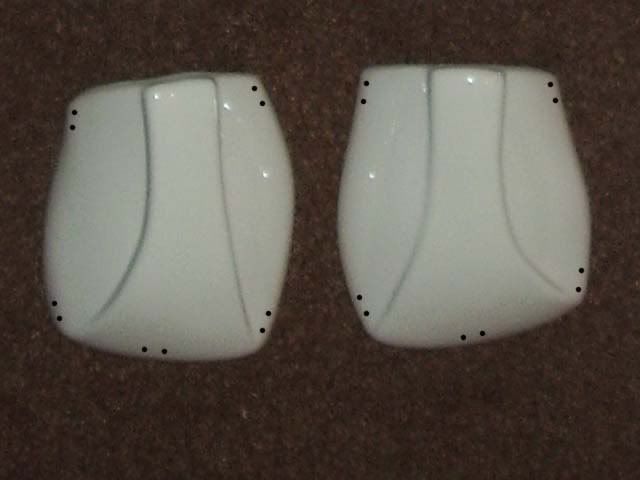
One of the last things I did before my hiatus was to work on the backs of the shins to get them to line up. So I taped them all up to hold them in place while with the intention of giving them the hot water treatment. Well, I got the taping done but never got around to the bath part. And then they sat for 4 years like this. Well, it seems like holding them in that position for so long worked just as well as the bath. I took the tape off and they are almost perfect! I do have a question on the next step that I am hoping another Anovos builder can help with. I am planning to use the velcro for the rear closure of the shins and I am wondering what a good overlap is for the cover strip. The velcro provided is quite wide so I don't think it can be use as is. The cover strip is 25mm wide. The hook side of the velcro is 20mm wide and the loop side is 25mm wide. So obviously some trimming of the velcro is needed to prevent it from being seen once installed. So what is a good overlap? Should I center the cover strip on the back seam of teh shins and trim the velco to suit or is it better to have a bit more overhang of the cover strip to allow for more velcro material? I tried looking up other build but did not find anything definitive. Any suggestions are welcome.1 point
-
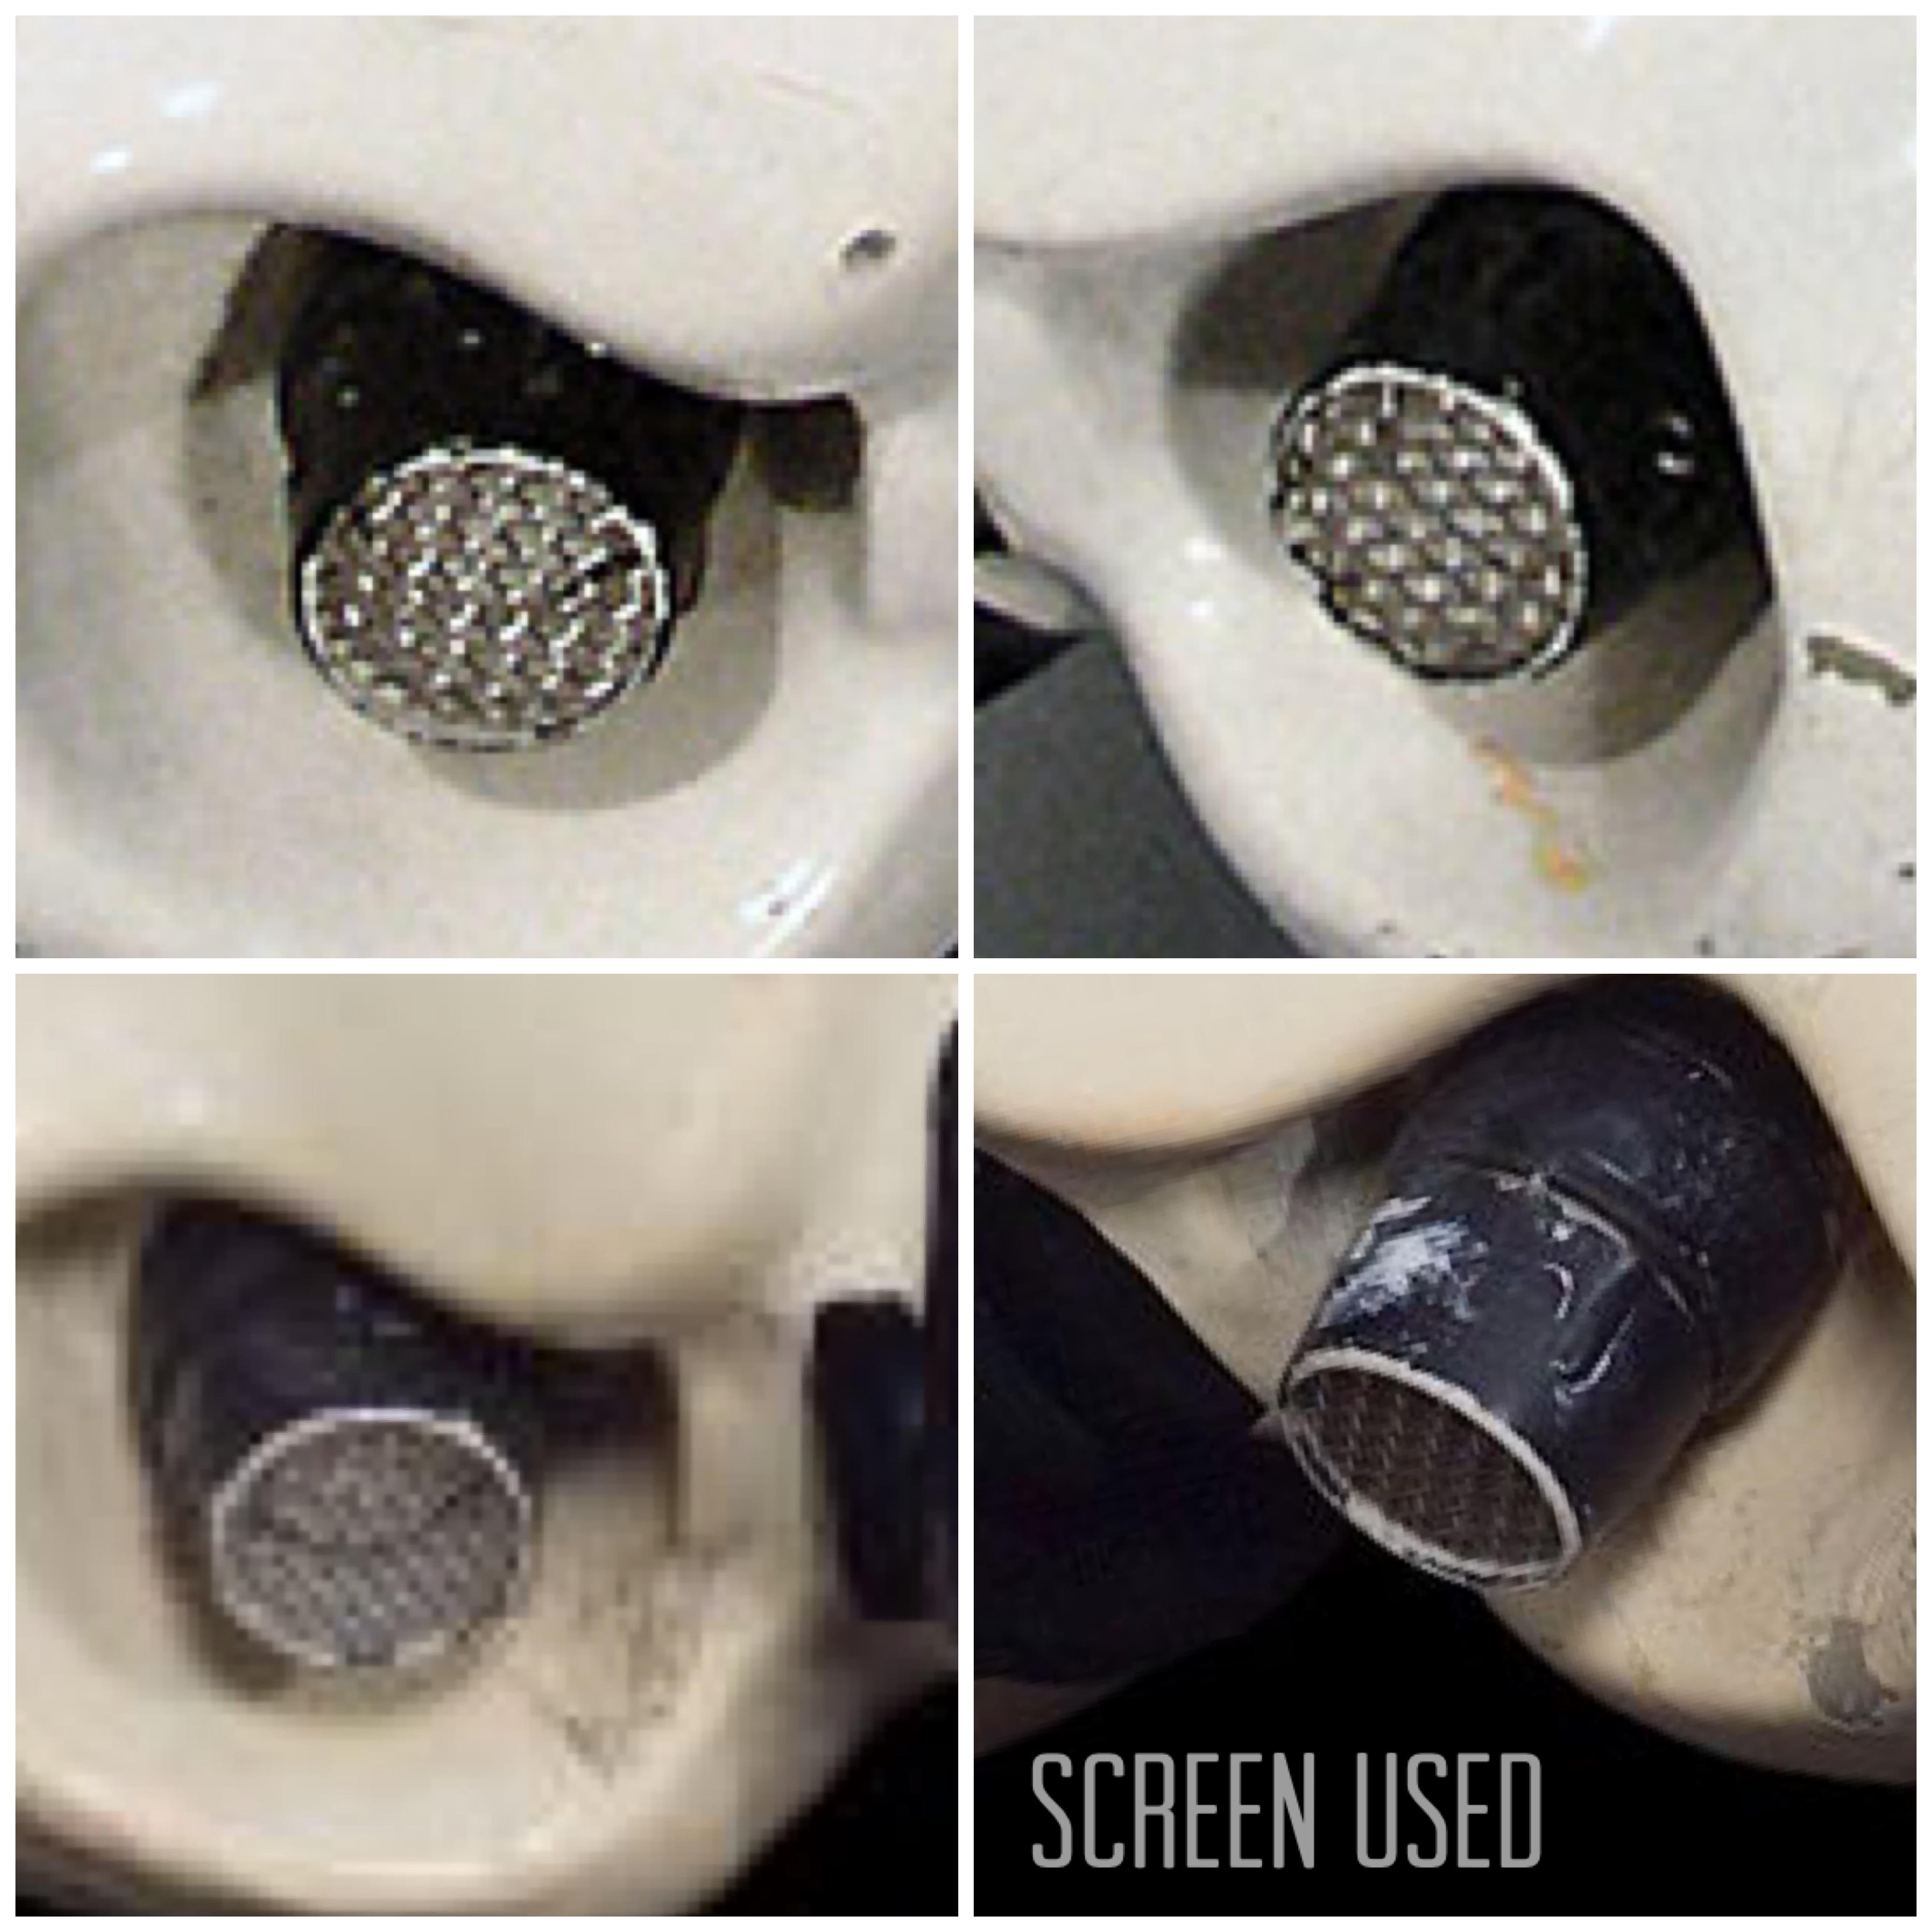
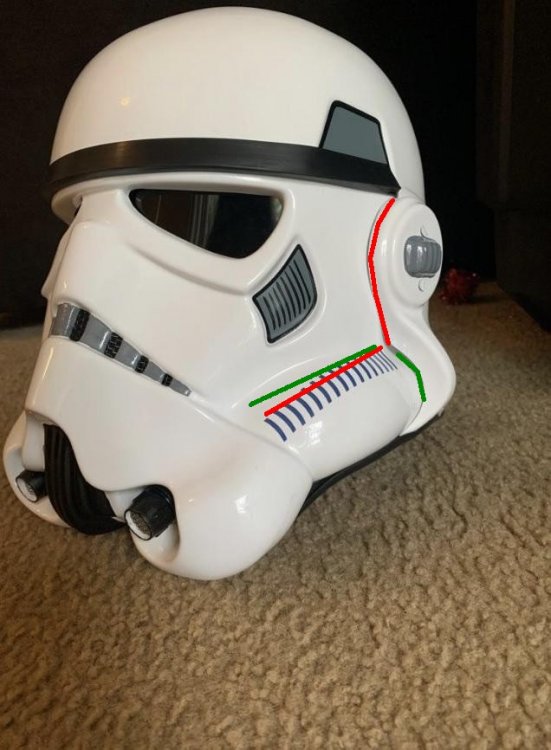
Nice work, just on the helmet there are a couple of things, your tube stripes ideally should be a pencil width away from the cheek, yours are angling and have a large gap on the front. Make sure there is no paint on the gums, little hard to see in the photo Frown is painted gray and does not leave the teeth area.. Mic tip rims could be white. Could also remove a little paint from the top of the vocoder, some appears to be outside the curves. Trimming a little more of the top portion of the ears (they are a little thick) should reduce the gaps on the lower section of the ears.
.jpg.b1053d0b38ed6460bc9e2224e3fb4262.jpg)
 1 point
 -
Here is a build converting an Anovos to ESB full of helpful info Looking at the thread apparently trooperbay sell Anovos specific ESB decals so you could contact him to confirm A lot of AM kits come with ESB clamshell handguards which many don't use, may be worth putting up a wanted add in the sales sections. You can use rubber gloves or silk/material. Gloves must be either black silk, satin, or silk-like material, or gloves must be rubber or rubber-like chemical gloves, in black I found fabric gloves at a local store. Diagram of the sewing pattern
 1 point