Leaderboard


Popular Content
Showing content with the highest reputation on 02/28/2021 in all areas
-
I just upgraded my belt for centurion level, so thanks for the new info. Sent from my iPhone using Tapatalk2 points
-
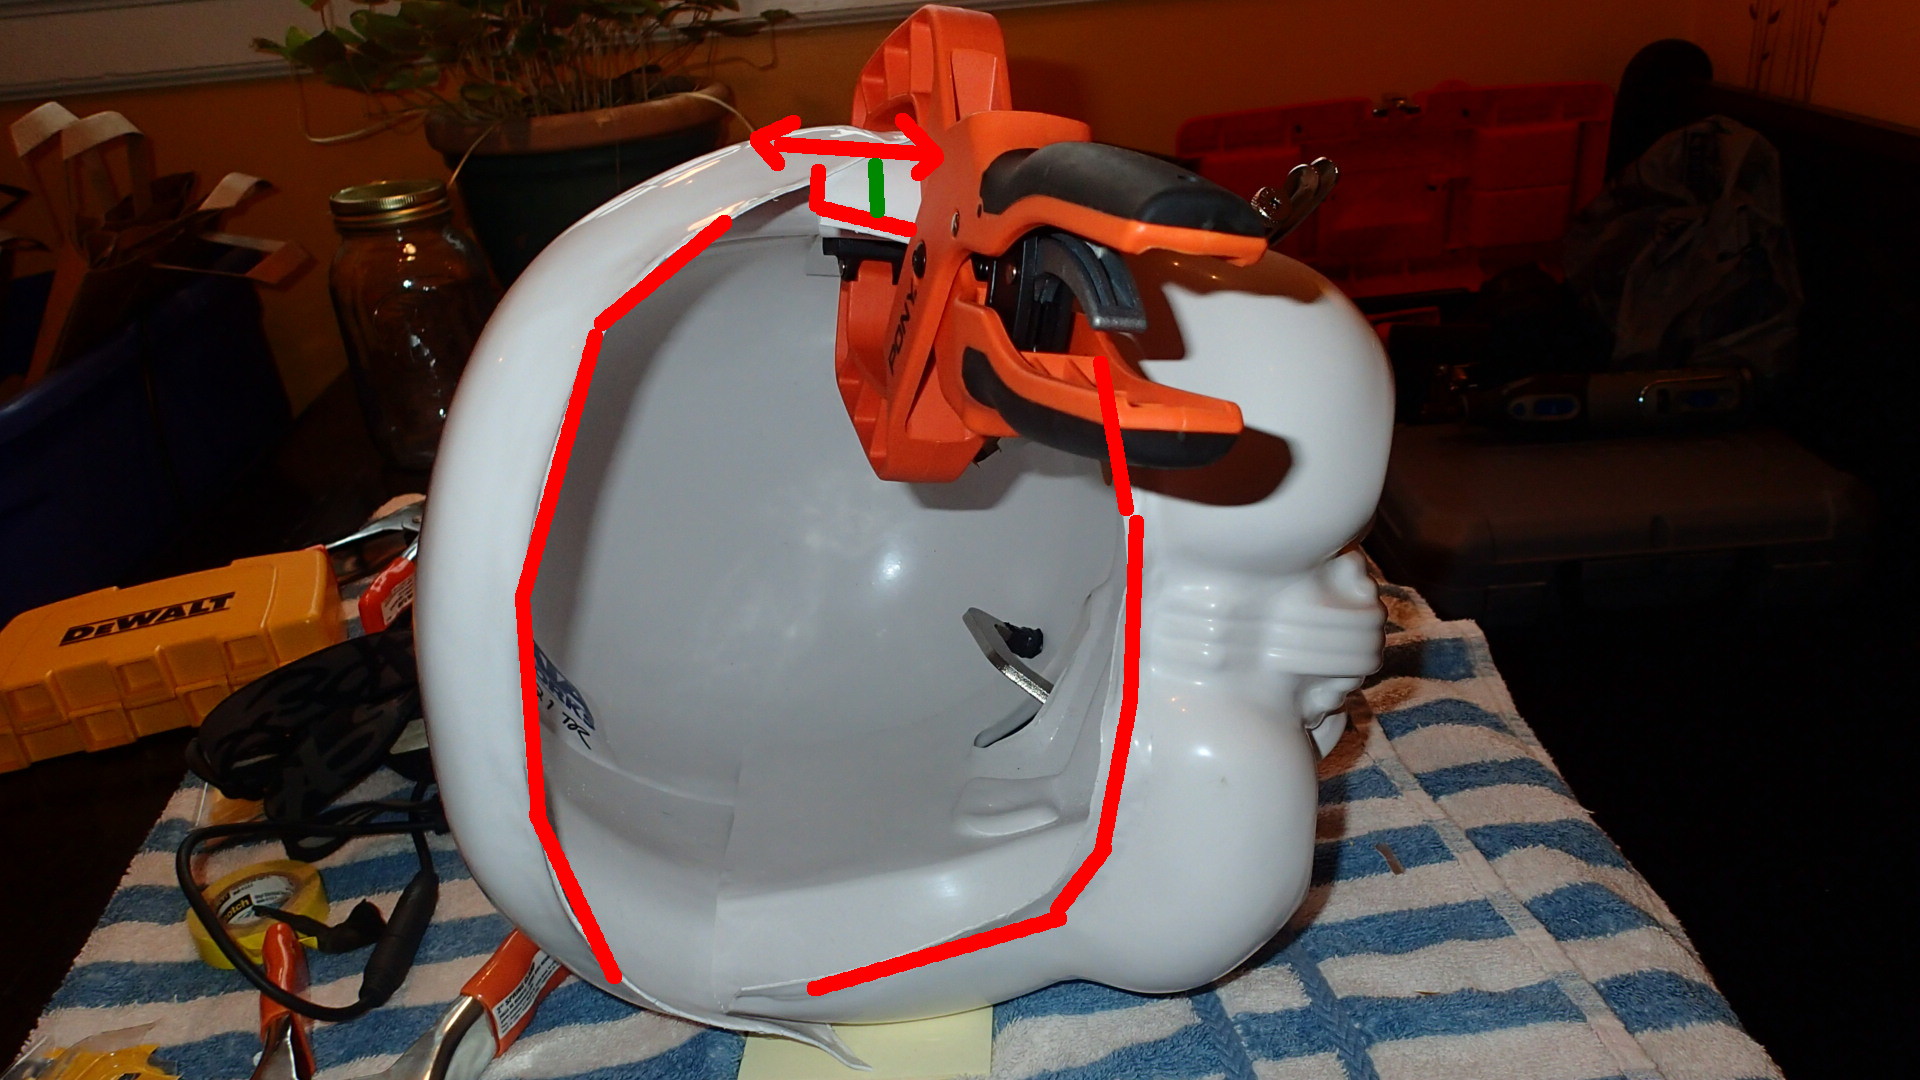
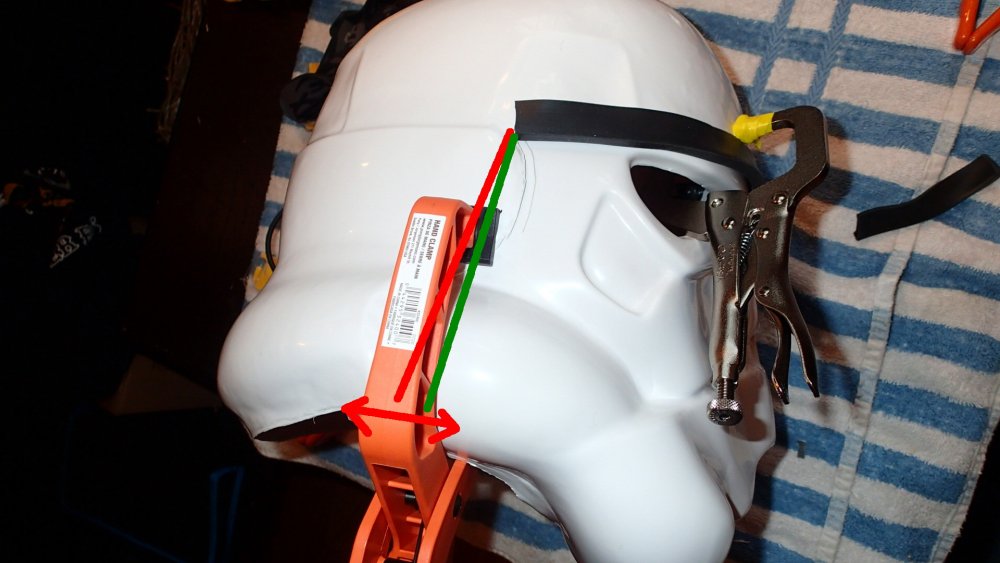
Hi folks! I've had lots of people ask about various details regarding how I did my helmet interior. So, I thought it may be wise to just summarize it all so others may learn things or try to replicate some/all aspects of what I did. My goal was to have all my electronics systems embedded inside my helmet, with individually switchable systems, whilst all being very clean and hidden along with a blacked out look. No problem right? For reference, this is what the interior looks like. Note that inside there I have 3 battery banks, four fans, a powered condensed microphone, the iComm unit and an Aker amplifier, all attached to a switchbox: Ok so I quickly found out that it would take quite a wall of text to summarize how to do this build, so I decided to throw a video together to summarize it all instead! https://youtu.be/eYeUpAHOSHM The basic gist is this: 1) Black out your bucket as you desire, I used 1/4" thick neoprene to line it. 2) Create a junction box by leveraging your hovi bolts onto a custom backplate which your switch box also get screwed into. 3) Refine your project box so it has the right size and number of switches for your application (I have 3 subsystems, others may have more or less). 4) For every one of your systems make a custom harness where the electronics run through your switch to its power source, ensure that the switch is the only mechanism to turn it on (so if the electronics had their own switch keep it stuck in the on position and let the switch you use at the project box be the one that controls it). 5) Using high quality velcro, mount all your electronics up at the top, and/or your fans at the bottom. 6) Route all of your wires that need to run from your electronics down to the switchbox in a clean loop, and everything else tied down neatly at the top. Use tubing to wrap the wiring with the least amount of wire and tubing required. 7) Add velcro to the bottoms of your electronics at top and add black padding to hide it all and make a comfortable fit. 8) Use any extra helmet padding as necessary to ensure you have a solid and snug fit. 9) Optional step: You may want to do this at the start but have your eye lenses done up in a manner that will work well with the clean look of your interior (see my other howto to check out how I did mine). Here are some helpful detail shots that highlight some of what I was referring to within the video. One shows all the bare electronics before any lining or hiding was performed at the top. Another shows a detail of the swicthbox at the bottom to show how the hovi bolts and the project switch box mount into the backplate. Here are some links to the more unique or non common materials I used: Project box: https://www.amazon.com/gp/product/B0002BBQNM Flip switches: https://www.amazon.com/gp/product/B001JT7D0G Neoprene lining: https://www.amazon.com/gp/product/B00488DB10 Helmet padding: https://www.amazon.com/gp/product/B00A4TNQ8A 12V fans: https://www.amazon.com/gp/product/B015S5XFJE 12V battery box: https://www.amazon.com/gp/product/B00VE7HBMS All right folks, enjoy and I hope this helps you with your own helmet builds. Post any questions or your own interiors!1 point
-
Name: Jonathan Curtis ID: TK-89054 Username: Lord_Potato Garrison: Tyranus Squad: Sienar Fleet Squad Armor maker: Walt’s Trooper Factory Helmet maker: Walt’s Trooper Factory Blaster maker: RS Propmasters Height/weight: 5 foot 7”/153 pounds Boot maker: Imperial Boots Canvas belt supplier: Imperial Issue Hand guard: Bailybuilddesigns Holster maker: Darman props1 point
-
Trooper Info Name: Ken Schafer TK: TK-88667 FISD Name: TK88667 Garrison: Southern California Garrision Height: 6'-1" Weight: 210 Armour: Anovos Helmet: Anovos Cloth Belt: Dave Kettle Neck Seal: TheCostumeBase Boots: Imperial Boots Blaster: HellHounds - ESB Holster: Darman Props Hand guards: Rubber gloves and ESB curved guards (with elastic strap) Photos: Front: Back: Left Side: Right Side: Left Side Detail: Right Side Detail: Action Shot: Abdomen Button Plates: Cod/Posterior Connection: Interior Strapping: Wrist Openings: Helmet - Front: Helmet - L Side: Helmet - R Side: Helmet - Back: Helmet - Lit (lenses): Helmet - Hovi Tips: Neck Seal: TD: Glen I hope you like the placement of those screws on the revamped TD. Holster Attachment: ABS/Canvas Belt: Boots: Rubber Gloves: Blaster - L Blaster - R Blaster - Top Blaster - D-ring Thank you in advance for your consideration.1 point
-
I used Paul's idea to use screws to hold it together so I can work on the ears. Once I've got the ears done, I'll go back and finish the faceplate, reattach it and start on the inside. Big thanks to all who have helped and keep it coming. Let me know your thoughts on my bucket. Keep in mind I still have to clean up the teeth. I'm thinking the eyes are done unless something pops out to you.1 point
-
Thanks it took a couple days. I took some tips from @equuspolo Ardeshir's helmet is on point.1 point
-
Nice and neat, well done fitting that lot in1 point
-
Very hard to do it by yourself, overall looking good. You may want to drop your thighs a little, appears you butt plate is getting hit and knocked backwards when walking, tighter elastic between the cod and butt plate can help, also right thigh needs rotating inwards. There is a large gap between the top of your shoulder bell and the shoulder straps on the right side, perhaps some tighter strapping, doubled over elastic normally helps. You could add some side shims to close that gap then remove later once you loose the weight. A couple of threads to look over1 point
-
Only way I could do a photo shoot is with a spotter and photographer, so I'mma need someone else to shoot the application photos when I actually apply. Tried doing this by myself - a big NOPE! Video was the best way to display the first full fitting attempt.1 point
-
Changing the angle of the faceplate will make the opening larger. You can have a small gap at the base between the front and backplates, this will be covered by the ears. Also looks like you can remove some more excess material Just make sure also you are putting the helmet on sideways, they don't go on straight.

 1 point
 -
So in about 2002-2003 I got my Stormtrooper armor kit and built it up. I did’t join the 501st at the time but figure it’s about time I did. As I’m looking at the requirements now I see several things that are asked for which my armor doesn’t follow. A couple of easy fixes. The ribs on my helmet and the buttons on the abdomen are all black. Now I see blue is needed in these locations. Is there a trooper that has spare parts of these or some for sale? The other upgrade which I’m hoping I don’t have to do is the thermal detonator shows that clips are to be used. Mine is attached to the belt itself. Do I need to buy a whole new belt and thermal detonator to follow that guideline? Thanks for any insight!1 point
-
thanks! I used velcro hand-sewn by me to elastic straps. pretty sturdy, although the cod to butt plat strap came off once. other than that, it works.1 point
-
*the torso/back pieces1 point
-
Whoa definitely coming together. I see you. Have you started a strapping system yet to hold it all together nice and tight? Good job on attention to detail on those little pieces on ab and back plate by the way.1 point
-
test fit of all armor pieces!1 point
-
Coming along! Although I’m really nervous about starting all of the “two-parter” pieces. I have no idea where to start with biceps, gauntlets, thighs, shins, and cover strips. Are there some good comprehensive guides to getting those done?1 point
-
Here's my submission to EIB.1 point
-
Hi Ken! I will be starting on this first thing tomorrow... thanks for your patience, sir!1 point
-
1 point
-
Thank you Glen, missed that one. Will have them fix right-away.1 point
-
Wow Jonathon, just wow. Beautiful clean presentation. Good luck but I don't think you will need it.1 point
-
So glad to see this post! I am starting on a build soon. This is great reference material. Thank you!1 point
-
BBB is always and exciting day. It will be even more exciting for you as you don't have to build still! I can't wait to see your kit and your approval! Welcome to the FISD!1 point
-
Really good advice once again. I only placed my order yesterday so I’m sure I have time to update my measurements. Sent from The Empire1 point
-
Christopher’s stuff is unreal... I’m seriously considering saving the money for the 1699.00 version. Closest I’ll ever get to a real sterling in the US. That’s what I’m saying about wishing all the old prop makers were still around. I heard Hyperfirm was the best until they closed. Praetorian was right there with them. Some even speculate that they were some of the people from hyperfirm. But they’re having issues with deliveries. I heard Shear tech is fantastic too but the owner has been down and out with some health issues. Doopy doo has been out of stock for forever. Not really sure where to go. I did email Quest and they said they are still making E11s. I just don’t know anyone who has received one and evaluated the quality. They are also resin ones and I’d much rather have a rubber one for trooping. Maybe I should contact Hellhounds. Especially if they have metal parts and can do the full ANH. Does he make the Bapty version too? Or the Move Along E11? How good does yours look?1 point
-
SO. I worked some more on the bucket, installed the lenses, messed with the ears a little (Although I think I’m through trying to get them perfect at this point) fixed the aerator screens, made the eyes sharper, and cut a bit more out of a few teeth. Then I trimmed the chest some more, the ab plate, butt plate, and kidney plate and did a (very) sloppy test fit. I’m very happy to report I very likely won’t need shims thanks to quarantine weight loss and with a test fit of one of the thighs I likely won’t need them there either! Very happy. (Excuse the mess, I just moved!)1 point
-
OP (MV) Post #41: Testors Enamel Paint Finish Test, Vocoder Practice, & Teeth Sanding Question While painting the black trap outlines mentioned in my previous post, I couldn't help but notice the stark difference in the finish of the semi-gloss enamel paint and the gloss I used in my gray test pieces when attempting to color match my thermal detonator. A while back I expressed interest in painting my vocoder and mix tips with a matte black to add some contrast to the helmet, like Dan (CableGuy) has done on occasion. However, since I've been seeking L3 approval, I decided against it. As mentioned in Joseph's OTTK Quick Reference Guide and per screen-references, the vocoder should have a gloss or satin (semi-gloss) finish. Perhaps my discovery of the stark difference between the gloss and semi-gloss Testors 1139 paint will enable me to maintain a not-so-shiny vocoder after all, by using the semi. For your consideration and my own experience (practice) in painting curves, I painted three test vocoders onto some spare ABS from ATA. (Don't worry, I cut out all my exterior cover strips and still had about 70% of my spare sheets left; although I did consider painting onto the hidden insides of my rear drop boxes). First I took measurements of my actual vocoder on my helmet then drew scale (within 2mm) outlines on ABS scrap that was perfectly sized when scored and snapped into thirds. I then used a medium filbert (rounded edges for rounded paint lines) brush and stepped up through the paint finishes, starting with flat and ending in gloss. From left to right (or top to bottom) below they are shown in the order of flat, semi-gloss (satin), and then gloss. Do you vocoder veterans (haha) think the semi-gloss will pass L3 muster? I mean, it should, since it's the recommended paint and finish, but I'd rather be safe than sorry. Additionally, almost immediately after starting to paint I noticed that the more paint I applied, the smoother the surface would be, since the enamel would essentially "pool" together. So for the purpose of testing the paint finish, I took advantage of this and went heavy with my application, knowing that such a strategy would likely be impossible on the actual three-dimensional vocoder on my helmet. I figured, too, that I would still gain at least some experience in painting the tight, smooth, consistent curves of the vocoder, even if only testing on a 2D plane sheet. It does appear that I lost some of the crisp corners between the ridges on the full gloss iteration. I'm not sure if that's due to haste/sloppiness on my part, or any extra "pooling" qualities of the glossy enamel. The semi-gloss vocoder has some oily-looking textures on the surface, which I'm going to attribute to the mineral spirits that I cleaned my brush with and quickly reused after the flat paint. The 2nd and 6th ridges of my vocoder match the form of the actual ridges on my ATA helmet, and their heights are perhaps more similar to Hero lids than Stunt lids. I'm sure it would be mentioned, but would maintaining this height hold me back from L3 approval? With a successful paint test on a flat plane, I thought it'd be prudent to also practice on a sloped surface. For these next tests I used only the Testors 1139 semi-gloss black, and I implemented two techniques. First, I used the same thick paint method as before, and then I tried a thinner application, with the goal of seeing if any running would occur. Buried in my scrap ABS collection I found the two quarter spheres that were trimmed from my thermal detonator and I drew vocoder-like ridges in two different directions in order to test the pull of gravity on multiple axes. Nerd alert. As you can see, my thick paint application was very susceptible to running, and though not as discernable in the photos, even my thinner application had some "pooling," though it all remained within the overall bounds of the paint lines. I love the nearly perfect smooth surface that I was able to achieve with the thick gloss in my first flat test, but I've come to the conclusion that those same results will be unobtainable on my actual vocoder. I've even contemplated going heavy and only painting parts of the vocoder at a time, but the sacrifice would be seams between the paint stages, and that will be equally bothersome to me. Do any of you have any tips for getting a smooth, consistent surface finish on your vocoder? I also have another question regarding the very bottom of the vocoder that extends to the head opening. The first image of each set below shows my tentative paint outline pencil marks, and I'm wondering if I should keep the ridge curve as-is, or narrow it a bit (see second photos) to match the profile of the overall vocoder curve. I know, a tiny detail that I'm certain wouldn't make a difference for approval at any level, but I'm curious to hear your opinions. Lastly, I have a teeth sanding question which I'd like some input on. When using needle files on my teeth I tried to sand in a somewhat inward direction on the tops and bottoms to help hide the thickness of the cut/trimmed ABS, but on the left and right sides I mostly sanded straight back. My thought was that I'd paint those little 1mm edges and they'd appear to be a continuous tooth surface, but would that give each tooth too much depth? Do I instead need to keep sanding inwards at a tight angle (to match the colored lines below) to effectively remove those tiny tips from visibility? As my original tooth-trimming post images show, none of these tiny edges are visible from straight on. They can only be seen when looking down onto or from below the helmet, or from the left or right. Will the Testors 1139 semi-gloss black on the vocoder pass L3 muster? Would maintaining the shown height on my 2nd and 6th vocoder ridges hold me back from L3 approval for this STUNT build? Any tips for getting a smooth, consistent surface finish on your vocoder? I'm wondering if I should keep the vocoder ridge curve as-is, or narrow it a bit (see second photos above) to match the profile of the overall vocoder curve. How should I handle sanding and painting (on the teeth) the edges between each tooth (from the ABS depth/thickness)? Lens Installation Hovi Tip Recess Reinforcement Final Eye Trimming & Sanding Helmet Interior Painting Paul and Justin - Thanks for your thoughts! Your input is always valued and welcome!1 point
-
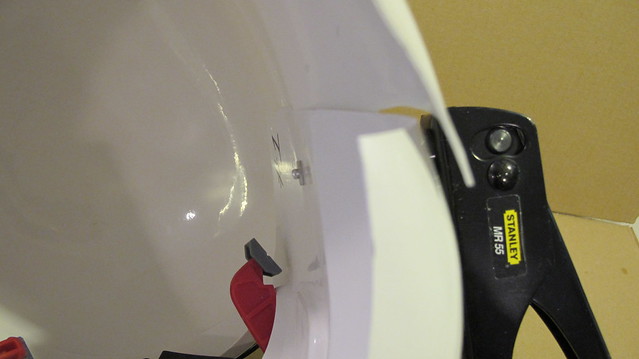
Quick update for anyone following/interested in this thread. I came across this awesome alternative to the standard plastic convoluted wire tubing: TechFlex F6 Woven Wrap 5/16" 10' Wiring Split Wire Covering https://www.amazon.com/gp/product/B00C1NZLGC Side by side comparison to your standard tubing which I used initially: The neat thing about this is twofold. First it is a woven wrap so it looks much cleaner and the overlap mechanism on it hides wires much more thoroughly. Second, it's much softer than plastic if it presses against your skin. It is also a little bit more flexible so I ended up easily folding it around my inner padding to downplay the wire runs from the switchbox up to the top even more. Here's the updated inside look with that added:1 point
-
Oh for sure, I didn't interpret it as a knock I just thought it was funny I never actually put it on in hindsight, or even turn the electronics on to demonstrate the sound either. And absolutely, making this work meant making the positioning and offsets of all electronics/padding/etc work with my specific head. And that's a good point to make because anyone trying to do a build like this will need to keep in mind that your positioning will likely differ a bit. There are smaller 12V box options (ones that don't need 8x AA), you can reduce the size of the iComm by removing it's box, so on and so forth. That said, I think most should be able to do this type of thing with their helmets with the right trial/error and planning. I was lead to believe the RSP helmets run smaller than most so if that's true than other helmets may actually be easier to pull this off.1 point
-
In retrospect, I never did put the helmet on in the video to prove I can also get my head in lol. But yes, of course I can. Even better is that it is a perfect fit. The offset the electronics and padding creates at the top is exactly at the height I need to have my head aligned in there right so my eyes are perfectly lateral to the socket centerpoints. Moreover, the four additional helmet padding I placed near my cheeks and ears causes a very snug fit, it isn't floating or going anywhere as I move my head around. Also, the depth the junction box creates actually rests against my chin gently creating a four point lock system. Anyway, I'm certainly a happy camper it all worked out and thought maybe all this demonstrated work could help others in their endeavors to create something similar.1 point