Leaderboard


Popular Content
Showing content with the highest reputation on 02/19/2021 in Posts
-
More work done, here is the progress. And then things got weird... Next update probably comes next Friday. List of modifications so far: 1 - Blast Shield 2 - Black Interior 3 - Two-tone paint job 4 - Antenna and radio 5 - Utility belt 6 - Universal supply box Have a nice weekend.4 points
-
Jus got my basic approval today. On ward next is Expert.3 points
-
Thank you! Yeah I’m definitely gonna look into the strapping on the sides see if I can do anything about it without needing to shim, as for the rest of the changes I’ll give em a shot thanks a ton!2 points
-
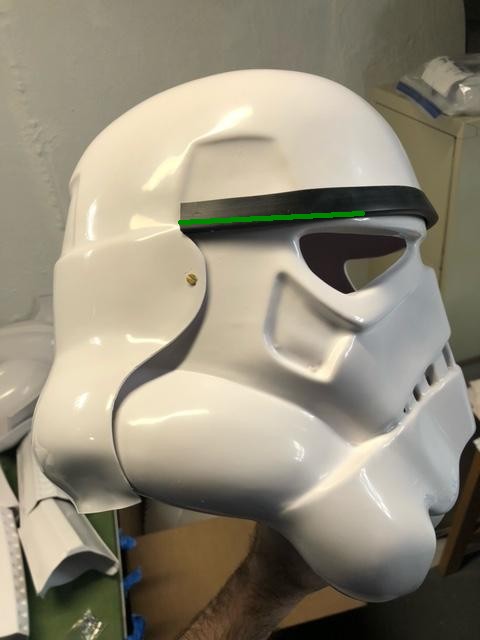
Looking better, just on the sides watch the angle of the brow trim. You may be able to trim just a little off the cap to help straighten it. You may find this is common to WFT helmets, just compare with a few other build threads

 2 points
 -
I’ve trooped my RWA armour many times. It’s an excellent kit for the price point. As above, excellent service from Ross. I also know many other troopers with RWA and the feeling is positive all around. :-) RWA armour (with another make of helmet). :-)2 points
-
Oh man. The antenna/module detail is crazy cool. Great use of all the little parts, it looks like an authentic part of the Star Wars universe. Happy to see you used the Muji box too I sent you way back. Plans to add lots more details or close to finishing? looks fantastic so far!2 points
-
Hi Robert, Mine is a RWA creations armor, and let me say that I'm very pleased with it. Ross has a great customer service and comunication. He has also several and so practical you tube tutorial videos2 points
-
I have attached Velcro to it for foam under my shoulder bells! I did not notice any difference between this surface and the surface of the plastic. So take that how you will!2 points
-
Hey troopers, I think we all know that this very forum is a hot bed of experienced troopers and helpful information. Years of experience and TK knowledge. To that end, here are some of the key features, (sometimes subtle, sometimes obvious), that I feel really make an iconic ANH Stunt Stormtrooper, all in a simple, easy to digest video. Topics include; -brow height -eye trimming -ear trimming -vocoder painting styles -hovi tips ...and more Enjoy the video, and please feel to ask any questions or comment. :-)1 point
-
Here I am again. I was first approved back in 2017 with a First Order Stormtrooper and given my 501st number. Over the years and other kit builds later here I am again, a newly approved with the Imperial Stormtrooper (ANH Stunt). During that time with many troops under my belt my journey has me living my dream and seeing the smiles that I can bring. It has been a totally awesome ride!
 1 point
 -
General Info · Name = Maria Katrina Maloom · TK ID = 18112 · FISD Name = Architect18112 · Garrison = Cebu Scarif Garrison Body Type · Height = 5’4” · Weight = 56 kg Costume · Armor Maker = AP · Helmet Maker = AP · Blaster Type = Doopy Doos Full Resin Kit · Boots = Imperial Boots · Canvas Belt = DIY · Hand Plates Type = Trooperbay ANH Stunt White Rubber · Electronics = None · Neckseal Maker = Darman Props · Holster Maker = Darman Props EIB Link: Armor Photos Full Body Front Full Body Back Full Right Full Right – Arms raised Right Side Detail Full Left Full Left – Arms raised Left Side Detail Action Shot Helmet Off Armor Details Gloves Shoulder Bridge Back Thigh Pack Attachment Sniper Knee Attachment Drop Box Back Crotch/Butt Detail Helmet Detail Photos Front Sides Back Hovi tip / Vocoder details Lens color S-Trim Accessory Photos Ammo Belt and Holster Neckseal Boots Blaster left side Blaster right side Blaster D-ring Thermal detonator Interior Strapping Abdomen Detail Kidney Plate Notch Split Rivets Abdomen to Kidney Plate Abdomen Plate Forearm Details1 point
-
Yeah I'm in agreeance too. The WTF didn't have too much guidance on where to cut here other than following the back of the shell's line. Glad I'm not crazing when I thought I saw it dipping on the sides there. Thanks!1 point
-
Nice work trooper, a couple of adjustments you could make. Shoulder bells could come in more at the top, you may find if you double over the elastic from chest to back it will be tighter and not be pulled as much. There are some big gaps on your sides, either tighter strapping or perhaps had some shims. For EI and Centurion: Any gap between the abdomen and kidney armor is no more than 1/2" (12.5mm) wide You could trim the extra material from your TD clips, also rotate the TD so more of the O can be seen Butt plate is sticking backwards, perhaps tighter strapping, also watch positioning of your drop boxes, should align with the ends of the plastic belt Vocoder could have a little more paint on the second ridges. Also add some white paint to the rim of the hovi tips Adding some foam behind your sniper plate should help hold it forward away from your thigh A bit hard to see some fine details but most just appears to be some fitting and tweaking. Great work and good luck with approval
 1 point
 -
Cocking Lever is Pinned and Glued!! Backsight is Printed! Still not sure how soon I'll get it (we're still thawing out here in TX), but once I do, I'll get it added!!1 point
-
Anyone have any experience with this armor? Our garrison has a cadet I’m going to help and I’m not familiar with it. Sent from my iPhone using Tapatalk1 point
-
It looks amazing brother. Thank you for sharing. Sent from my iPhone using Tapatalk1 point
-
1 point
-
Thanks Tony. I’ve pinned it in this section.1 point
-
Thanks I just requested full access. Onward to Expert next.1 point
-
Normally you need to post a link to your legion profile but unfortunately your record is classified due to falling retired, once your GML/CO has you back to approved post your profile link here. You may also want to check the CRL's as some changes may have been made and you may have to update your costume before being reapproved, CRL's can be found here: https://databank.501st.com/databank/Costuming:FISD_CRL1 point
-
I find my rubber gloves from Woolworth's, also a good idea to have some of the white cotton liner gloves, they help soak up the sweat so the rubber gloves don't stick to your hands. I go through a few pairs of the cotton inners during a troop, it's like putting on a fresh glove when you swap them out1 point
-
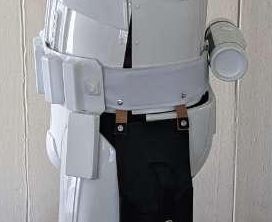
Normally snaps are used which are a lot stronger than those pop's. I use another snap in the center which helps to stop the belt moving up or down (in red below)1 point
-
New stickers in place! I've also thickened the rank bars.1 point
-
Our DL Andrew @Sly111 point
-
Pretty nice going to have to try this out.1 point
-
I agree. Impressive1 point
-
We should pin this somewhere1 point
-
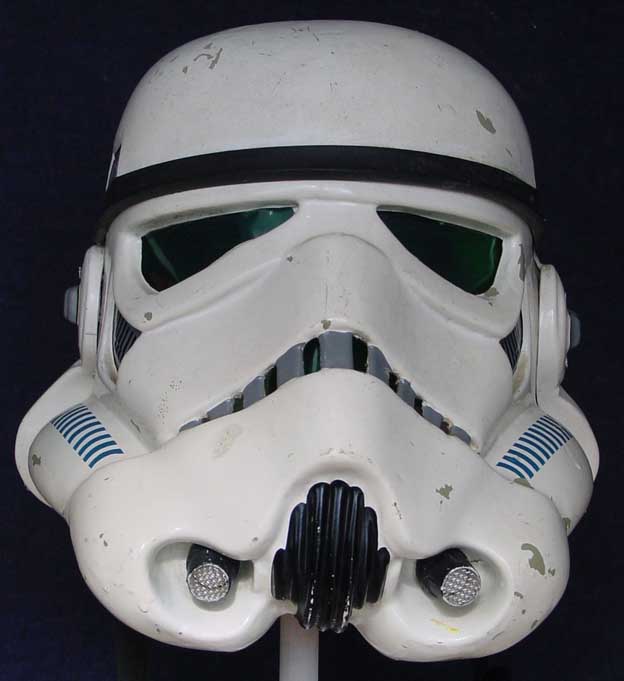
Sprayed mine with just a basic satin black to stop any reflection to be seen through lenses.1 point
-
Sprayed the inside of my helmet black for the same reason as Brien (@Harbinger) with simple spray paint. I totally love it but it got some light wear and tear during the 40+ troops made with it. Guessing that won't happen with Truck Bed Liner.1 point
-
Cory, I'll echo what the others have said. Check out the build thread of others to get some ideas. There are also some great video on youtube of members building their kits or kits for others. I watched this series a few time when I built mine. https://www.youtube.com/watch?v=onQkQVB3JVw&t=1s Also, don't be afraid to reach out to your Garrison. Most of them have and "armorer" that would more than likely be happy to assist you. I know with COVID armor parties are bit more difficult, but If done with some proper social distancing and mask, you might be able to get a one on one. I know you said you were in the EST, but where are you located geographically? I've built two kits, so I'm not expert, but I'm happy to help as best I can.1 point
-
Depends which game version you are going to build, there are many differences between them. For example there is someone working on the Fallen Order version, there are difference in the costume not just a standard armor, he posted references and discussion started from there You would also start a build thread on the forum supply reference images, speak with our DL (detachment leader), the costume would then be discussed and reviewed any any changes made, once that has happened a CRL would need to be developed and then the LMO's would become involved.1 point
-
This is actually coming out really well - keep up the great work!1 point
-
thermal detonator done! its a little bit long and kinda lopsided, but I doubt anyone would notice/care.1 point
-
All right I trimmed the TD clips at both ends. Re positioned on the TD so the washer is rotated more to the rear. Also added the soft side of velcro to the back of the clips to prevent scratching the armor.1 point
-
After making some strapping adjustments. I took some submittal pics and submitted for basic approval with my GML. Here are some of them. Once basic is approved I will get the Eib pics going and submit them.1 point
-
Well I did my first full suit up. Oops forgot to put on the Thermal detonator. I do have some adjustments to do. The forearm to bicep strapping. And on the thigh strapping needs some adjustment. Also need to redo the velcro on the calves. Need different padding in the helmet bubble head. That is on order. Over all I'm super happy with this suit up. Submission pics tomorrow.1 point
-
I hope so, Brian... Meanwhile the work continued: The last photo got posted to discuss the best color option for the ear screws. They could be painted in matte black, NATO green, Humbrol grey or I could leave them brass as they are now. What do you think? Thank you for reading and commenting.1 point
-
A couple of threads on the subject1 point
-
Thanks! Still lots to do. Once it’s done I have a couple 3D printed E11’s to assemble. One will get the other Blast FX kit installed. I will then build a blaster “charging” and storage rack for display similar to one in security room on the DS. I will make it a multipurpose SE-14 / E11 / DLT charging station. With the 3D printed SE-14 I just got the files for, I will have a nice little arsenal. Pew pew!!!1 point
-
Okay, so I just realized it's almost exactly a year since I started this thread. Time for an update I guess.... I think I am about 80% done. Since posting, the world went to crap and I moved across the country and started a new job in the RCAF. Lots happening. I'll post a ton of pics here about the DLT. A few points: I'm trying to decide where to place the displays supplied in the BlastFx kit. The scope and rounds remaining displays. I don't like the round counter displayed on the bottom of gun as this doesn't seem logical. I may go my own way and install it on the back of the left side "aluminum box" with scope display so that it faces the shooter. Makes more sense to me. I have painted and assembled most items. I was installing the BlastFx elextronics and a few wire solder connections to components snapped. I think the overall quality is pretty freakin fantastic, but the wires are very thin and while trying to manipulate components into the blaster the connections failed. I soldered the items, but then some weird electronic stuff started happening. I got in contact with TRamp (fantastic service!) and after lots of back and forth troubleshooting, I sent my DLT and E11 components back to him in the UK. He is working on the stuff now, so the build is on hold. After a ton of research on the DLT and looking at pics of actual MG34's, I decided to upgrade much of the hard ware to make the blaster look more realistic. The hardware provided by 3Dprops is very functional, but not "real world" accurate A side note about the 3D props hardware: He does provide a schematic, but it is very hard to discern where each bolt, screw washer or nut goes. Better diagrams or instructions are required. Having spent DAYS and WEEKS looking at MG34's and other blaster builds, I can say that this kit is fantastic! Very accurate dimensionally and in detail. Another knit-pick is the bipod build-up. The bipod is split halfway up, and an aluminum plate is used as a joining plate on the inside between the two parts. I have glued this various ways and it has failed at least 3 times on one leg. It is attached now but there is a hairline crack between the two parts. Sanding and filling is required, with the obvious sanding and repaint. Build notes: I sanded like crazy, and used primer / filler rattle cans between sanding. Primed with 2 to 3 layers of black rattle can. There are Several different colours for MG34's, depending on quality, restoration, year made, etc. I didn't want a flat black, so repainted most components with Tamiya XF-85 Rubber Black. A very dark charcoal colour. Looks much better. I'm going easy on weathering. This is meant to replicate a blaster used on the Death Star Garrison, not in a swamp or desert. I mainly used the well known limited photos of the screen used DLT. Highlights and various scratches were done with Tamiya XF-16 Flat Aluminum and XF-56 Metallic Grey. I used graphite powder lightly rubbed along big flat surfaces to show wear and add visual interest. It was rubbed heavily on some corners, and also used on the two rings that join the receiver to the butt. Butt was sprayed with rattle can Rustoleum Satin Dark Walnut to replicate the bakelight material. I then sponged some lighter buff and black colour on it. The barrel T-strips will be replace by WannaWanga items. They are excellent quality and I won't need to sand like a madman... Overall pieces Wannawanga strips on right Front assembly; Wire is from barrel LED flash emitter. I asked TRAmp to install a connector and split wire in two. This way I can break down the DLT for transport. Barrel cooling jacket and barrel will be glued the front after feeding wire through. Replaced bipod attachment hardware with more accurate bolt and split pin. There is a bit of scratched paint on washer from using tools to bend pin. This will be touched up along with those little areas of orange plastic showing through LED emitter The front site is moveable (pivots up and down) as well Weathering Bipod legs Darn bipod crack.... Feed cover. Replaced hardware with more screen accurate. I cur off the head of a large lag bolt and glued on opening latch. Lots of sanding to get rid of 3D print lines Receiver: Hairspray method for chipping Rear sight moveable Extended peep sight. Numbers will be painted in. Receiver bottom. Main support tube is PVC pipe. I cut holes in bottom for easy wiring access to trigger wires. Will be cleaned up. Top view into receiver, towards the butt end. I cut the PVC pipe to have a big area for wiring and eventually a battery pack for everything. I kept a small piece of the PVC and re-glued it back in. This tab will eventually hold a magnet that will be used to secure the back of the feed cover. Reciever was printed in 2 parts, front and back. This is the seem line that I filled but then cracked. Will need to fill and repaint... Recover and cover pivoted up Cover just sitting down on receiver. A little force is used to squeeze two parts together. This is where the magnet will hopefully work. I also scribed the grip marks on the latch Butt colour. This is actually a little lighter. Dark colour due to lighting. Over exposed to show colour variations Sanded print lines smooth, then scribed the gripping grooves. Also drilled a hole and inserted the head of a lag bolt. Hole to be cleaned up. Note the 2 rings. These was simply done by masking the butt and receiver, then applying the graphite powder and buffing like crazy. Now looks like a separate metal piece. Less exposed pic Partially assembled. This is how far blaster will break down for transport. Sanded disk smooth, and used hairspray technique to weather. Supplied cocking handle with bolt. Can be unscrewed for storage and transport. It is way too short and thin. To attempt to make it bigger I started gluing plastic sheet on it. I bought a toilet repair pipe at Home Depot that looked like right thickness. This will slip over the supplied piece and get glued together. I have to figure out a way to do knurling. Barrel shroud Some hardware to replace supplied stuff. The small pack of screw posts will be used to replicate the domed screws on grips. And from when I first got the blaster. I have no clue what the part, 2nd from left, is or where it fits. It is the oval with hole drilled. Once again, the assembly instructions are lacking.1 point
-
Resize as needed when printing1 point