

Greg S
-
Posts
171 -
Joined
-
Last visited
-
Days Won
1
Content Type
Profiles
Forums
Gallery
Articles
Everything posted by Greg S
-
Thanks Justin.
-
Thanks. Time to get things sorted and get that Expert star.
-
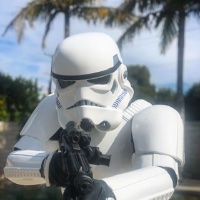
Attention on Deck. My HWT is finally approved. Onward to Expert. But here are my approval pics.
-
Thanks Yah I know this 3 D printed blaster has been a pain. It will be sorted out. I got tired snd sprayed it with some black. After we get approved for basic I will work on those pesky print lines. I can’t complain it was free from a guy in my garrison.
-
Fitted up on the mannequin. Weathered the Paldron
-
It has been awhile. Finally finished my DLT-19. Next to start weathering things. So close.
-
I fitted and glued the back end and main body of the DLT-19. This is ready for sanding and filler. Also cut and fit a wood dowel to strengthen the barrel. Glued and epoxied the first section of the barrel. Then I set the dowel in E6000. Going to let it dry and cure for 24 hrs. Top pick is a test fit.
-
Ok finally getting back to my HWT build. A fellow garrison member gave me this 3D printed DLT-19. Next is to put the parts in order assemble and finish. The bipod is still printing.
-
Thanks that makes perfect sense to do it this way. 1 strap or 2 straps on the pouch? Im thinking 2 sorta close together. Then need to figure out where on the left strap to put the one with the 2 snaps. Mission excepted.
-
Thanks again. Now to mount the shoulder magazine pouch.
-
All right moving along I finished the ammo belt and pouches. Started off with a new belt from Rob Kittel. Marked punched and installed the snaps for the armor. Next mounted the ammo belt with the rivets. Next glued on the rivet cover. Next I modified the magazine pouches. Blackened out all the white stitching. Removed the slanted straps. Installed some new webbing glued together and riveted on. Next made some fake foam magazines to fill out the pouches.
-
Thanks.
-
Mounted all the boxes, tube and siphon using double sided tape and sheet metal screws. Added some 1/4 foam in the rear cut out for a buffer between the back armor and pack. Just need to give it some weathering. Next up is to build the ammo belt with the magazine pouches.
-
All cut out holes are covered. Hit them with some flat black paint. Sewed clip buckles onto the 1 inch webbing. Positioned and mounted to the pack with some #6 machine screws and finishing washers so they won't pull through. Sprayed with flat black paint. Next is to mount all the boxes and tube. Used a soldering iron to burn the strap holes
-
Cut the funnel and both caps off. Next is to cover the holes and add the shoulder straps.
-
Finished the siphon finally. Now onto the pack (Oil Pan) Parts are not mounted yet.
-
Thanks a bunch.
-
Thanks a bunch
-
Yup did that. No Ca glue just e6000. It’s really solid.
-
Got started on the siphon. Cut down a cup 4" on top to 3 1/2 on the bottom. Cut a piece of 1/16 abs for the top and glued it on. I will glue the soda cap later. Also I had a super thin abs 1/32 i think from a older project. Rolled into a cone. Glued and clamped. That's it for now need to let the glue dry for the cone 24 hrs.
-
Thanks Oh yah you know it all the way to Centurion of course.
-
Been a bit since my last post. So I finished the radio box. Finished the round canister. Finished the PopIt boxes. Next need to get on the siphon. Radio Box assembly Canister PopIt Boxes cut the lip and ABS sheet bottoms and top plates. Added all the appropriate parts. ABS cover plates All the completed parts so far. They are not mounted yet. Need to make the siphon now.
-
Thank you Sir. Just getting started.
-
Thanks. I should make some good progress this week on the pack.
-
Yah thanks I want to make the card board box a rigid and durable as possible. Yup I know about removing the drain funnel. Good idea on the foam. I have some left over on a Shore Trooper armor commission I did a while back.

