Leaderboard


Popular Content
Showing content with the highest reputation on 12/05/2020 in Posts
-
Love this idea and it's awesome to hear more about you guys! I guess I'll give it a go as well: Justin "TheRascalKing" R., reporting in! I've been a member of the 501st since October of 2017, after the Orange County Squad of the Southern California Garrison began regularly visiting my work - the Children's Hospital of Orange County, where I was in Hospitality Management for many years. I distinctly remember being in our clinic, waiting for the elevator, when the doors slid open to reveal Lord Vader standing there, flanked by a stormtrooper and officer - it was like something straight out of a movie scene. I was blown away - I've been a Star Wars fan since childhood, but had never seen costumes like that in real life. After their visit, and seeing countless kids and staff members absolutely light up when interacting with them, I spoke to the wranglers about joining, knowing I had to get involved. I saw Episode One at a young age and was hooked, eventually reading my way through the Expanded Universe novels (which I credit with helping me learn to read well), but never really went to a convention or knew there was a 501st unit near me. My new friends suggested an Imperial Officer costume to get me started, and a few months later, I had submitted and was approved as ID-61490 (6/14/90 being my birthday!). I have since taken that costume and gone all the way to the IOC's Level 3 approval "Imperator" status, and added some cool accessories, like one of @gmrhodes13/Q's MS-P5's, and a Rogue One style poncho, which I LOVE. I almost immediately started looking into an Original Trilogy Stormtrooper, and ended up purchasing an Anovos kit from a Garrison mate not long after. I completed the kit (with a LOT of help from @ukswrath/Tony's guide) in December of that year and was approved! I have had some truly amazing opportunities as part of the 501st, including trooping several times at CHOC Children's Hospital, in a 100+ member parade down Main Street USA at Disneyland, on Fox Sports in the announcer's booth at an Angels baseball game, in the Hollywood Christmas Parade (including marching the 3 miles last year with full blown cancer), on stage with Weird Al, and in a little project called "Huckleberry" to name a few... If you would have told me as a kid (or even a year or two ago) that I would get to be IN STAR WARS and to actually BE A REAL STORMTROOPER, I never would have believed it. This club made it happen and I am forever grateful for the incredible opportunities I have had. Some things have changed since then - I took that same set of armor up to Level 3 "Centurion", not once, but 4 times now - as a ANH-Stunt, Hero, ESB, and HWT Stormtrooper, before finally retiring it recently after 50+ events. I was diagnosed last year with stage 2 Hodgkin's Lymphoma after finding a lump in my neck, and underwent several surgeries and months of aggressive chemotherapy and radiation treatment, and am waiting for another scan in the new year that will hopefully show me cancer free. I got engaged to the amazing DZ-71490 (her birthday wouldn't fit, but 714 is our area code and she was born in '90 as well, so her TKID is one number off of mine) who deserves full credit for all of my Centurion photos and tolerating my living room almost constantly being full of white armor projects. I also left CHOC and now work in the biotech sphere, specifically with connecting patients to clinical trials, to help improve their lives and help get new treatments to patients faster. We've been working on a LOT of COVID-19 studies and I've been pretty busy lately, even working safely from home, so armor has taken a bit of a back seat. (My fiance and I at The Mandalorian Season One red carpet premier) I am in the home stretch on my Rogue One armor, and will be starting a First Order TK overhaul in the new year as well. The only thing I love more than trooping myself, is being able to mentor new members and share that passion with others, so I have been pretty active with my Garrison both in person at armor parties and such (before treatment and the pandemic), and online answering questions - more recently as an Imperial Attaché here on the boards. Outside of Star Wars, I enjoy surfing, skateboarding (downhill longboard racing specifically), beer and homebrewing, working on cars and autocross racing, watching movies, playing bass guitar, and playing with our two cats, Jack and Zero. Well, there's my whole life story, thanks for reading! haha (big thanks to @MaskedVengeance for showing how to make the photos smaller and a little more manageable... sorrynotsorry for the huge photo dump! )2 points
-
As Rob would say 'This is not for me'. Watching the tuts, I was like - I can do that! Now each cut frightens me to death. My first ever hard armor build. A RS Propmasters 'Idealized' Stormtrooper. PVC build. I've got a bad feeling about this. :p First shot is thrilling, here I recieved my shipment of beautiful ANH Stormtrooper armor. I couldn't wait to open up the helmet box and marvel.1 point
-
--EDIT-- Future Jason here... So for those who have followed my rather sporadic build down below, well, actually over in the ROTK section, you'll know that I've been kind of all over the place. However, one reason I've been slow-rolling this build is because I've kind of been pestering people about the possible inclusion of a Remnant Stormtrooper CRL. The thought first occurred to me after watching a few episodes of The Mandalorian season 1, but my thoughts really ramped up after the season 2 trailer dropped. My comment/ question in the 3D ROTK build thread was (referring to my 3D kit): "My original plans for this armor were to eventually weather it and turn it into a Jeddah trooper kit. But, if I wanted to do a Remnant Stormtrooper instead, what's the process for approval? Does this require a new CRL? Would it basically say "refer to ROTK and weather it?" [September 15, 2020] With that said, I'm not using the 3D Armor for this build. There's other plans for that. So, yeah. I've wanted to make a remnant for almost a year, but haven't really felt the push until now. With that said, I do reference another post later on in this thread because there's been a few of us discussing the Remnant and Anthology TKs for a while. If you haven't done so yet, please view the conversation here: https://www.whitearmor.net/forum/topic/48305-new-anthology-tk-crl/ So, how did my ROTK build thread end up over here in the new Remnant/ Anthology section of the forum? Well, future Jason (page2 of this WIP) posted that he will be turning this build into a Remnant Stormtrooper and then went on to post pics of a cool OT helmet that will become part of this costume. I also requested that this thread be moved over to this section so I can officially begin transitioning this to a Remnant. Here are my goals: 1. The original title of this build was "Centurion from the Start." The idea behind that is to build to the highest standard from the beginning, that way you don't have to make major modifications to the costume to take it from basic to tier 3 approval. So far I'm on the right track, so I'm going to continue going down that path. 2. Finish this as a ROTK/ Anthology build, then make the transition to Remnant towards the end. I've already got a good plan for this build and don't want to deviate too much. Additionally, I still think value will be added to the build community by carrying on the way I've been going. In the end, this WIP should be a good example for others traveling down either the Anthology or Remnant paths. 3. You'll see later on that I've done a lot of things that are different than other builds, but more accurate. Since I started this build, I've gotten another costume approved that has some of these modified characteristics, i.e. the shoulder/ bicep 'j-hook' bungee connection. By the way, I can't emphasize how good this works, nor can I imagine doing my arms any other way now. For this build, I'll pull out a few things that haven't been tried previously, but make the costume a) more accurate, b) more comfortable, and c) more functional. I'll try to explain each as I go along. 4. There have been questions about whether this is a different costume or not. I think we laid out a good case in the aforementioned thread, but as I start transitioning from anthology to Remnant, I'll explain the differences in better detail. So, you've heard my musings and now understand why my build thread has moved over here. Please enjoy the build and I promise to keep on it, even if I'm doing it from a little apartment, which I'll talk about later. So with that all laid out, future Jason is now turning back over to the past. Please enjoy my build thread as I now send you back to December 4th, 2020. So, this just happened: For those who observed my insanity for the last few months as I did the 3D printed ROTK build, bear with me as I photo dump, type extremely long posts, and showcase what @TheRascalKing called in his own build thread, a "descent into madness." Ultimately, I enjoy doing these and hopefully later down the road, others can learn from my success and failures. First, I want to thank @11b30b4, @gmrhodes13, @Sly11, @TheRascalKing, @tarok, and all the others who I've previously bothered with questions, and who have been more than gracious in helping me out. I know there's others, this community has been great. Additionally, I really want to thank @jimmiroquai for the exceptional service over the last few weeks. I'll get to the product in a minute, but what really needs to be showcased is how well Jim answered all my questions, went above and beyond in his customer service, and really just showed pride in his work. If I could write him up for an award, I would. Thanks. So it begins... I titled this build thread Centurion from the Start. Now, some may look at that and think it's kind of cocky, but that's not the intent. Over the last 9 or so months, I've been fairly active in all the 501st forums and everywhere I look, people keep advising others to build to the higher level standards from the beginning. While this seems like sound advise, or even common sense, I've also followed up on these threads and observed less than half going there. That's a rough number which is probably even smaller, but it's similar to what I observed with the 3D printed armor build; plenty of people started, but then... Honestly, I think it has something to do with just getting worn out after doing a build. Sometimes after dedicating so much time to something, a person just wants to rest. I've seen this at work, with sports, and in life in general. That's what I did after Halloween, but that soon turned to restlessness. It just didn't seem right not hearing my 3d printer at all hours of the day and night. So, while I waited for this to happen, I printed off an entire scout trooper and finally figured out my Simplify3D PETG settings. I will say this; of all the forums I'm active in, FISD members seem to listen to the higher level advise more-so than others. I think the Pathfinders comes next, but really this idea seems to be a mantra in the FISD. Because of that, this is the direction I'm taking this build. Additionally, for those who saw the 3D print build, you saw that I attempted to build things to the higher standards, but ultimately I decided to hold back at basic approval. Though I reigned myself back, every one of those little things I learned about the 3d print build, I can apply here. This includes the eye bump I'm so proud of. So, that's enough rambling for now. I'm getting ready to go for a run, because a huge portion of this build, for me, is to get my body looking screen accurate. This is going to take a lot more work than the armor. Here's what I got: First, Jim sent me this pic and a tracking number last Friday. Knowing that it was coming from the Philippines, I actually wasn't expecting it for a while. However, just seeing the pic got me excited. Then this happened: This has to be highlighted. I saw when the BBB was dropped off, but once FedEx actually processed it, the BBB's journey across the globe happened in a freaking blur. Keep in mind, this is during a world-wide pandemic. Much kudos to Jim for the service and for keeping me updated. Wow! Unfortunately, a box just can't travel across the world in three days without it's Fragile sticker being disregarded. At first I got a little freaked out, but honestly after seeing the video Jim posted about his flexible fiberglass I wasn't worried. Also, with all the bubble wrap and great packing job, I knew it would be fine. After laying it all out, everything checked good. So here we go. This should be a lot of fun. Thanks for looking and I'll start updating soon.1 point
-
Name: Mark Gambino Username: MightyAtom Knightfall Garrison Melbourne, Australia https://www.501st.com/members/displaymemberdetails.php?userID=33163 Armour: AP Helmet: AP Blaster: Premier Props (Etsy) Height: 6' Weight: 178lbs Boots: Imperial Boots Canvas Belt: Imperial Issue (Kittle) Hand Plates: [mention=22112]justjoseph63[/mention] Electronics: [mention=35426]MissionTrooper[/mention]Arduino Nano Neck seal: Darman's Props Holster: AP1 point
-
Hello all! As the title says, hello from Ireland. Live in the south east, married, we have a near 2 year old little girl and work in finance. I have been following for a little while and have decided to go ahead with a tk build. That’s it really - any questions or want to stop for a chat and questions feel free. I’ll be setting up a build discussion thread shortly so I can benefit from all of the members experience. thanks all!1 point
-
Thank you Harder. That's a wonderful compliment. Yea I built me an arcade a few years back, 40x60 2400 square ft. About 60 + classic 80s cabinets and no chance of keeping up with repairs. I've never seen the sense in half efforts. Experiment and go slow at first, but once you got the hang of it, then dive in with both feet. Yea I do alot of electronics repair being I collect those old cabinets in barns for years. I saw someone once use the Pace desoldering station and I was instantly hooked after a while of using a solder sucker. Using the oscilloscope is a bit more complex to use. I typically will use my PAT9000 to test out a board initially. Mame and other emulators are fine and a blessing sometimes when ROM chips fail. You can just reburn the image onto a new Eprom and plop it back in the socket. I've had to replace ALOT of sockets. Just did recently with the Amiga 2000, 68000 processor. Battery acid damage. THIS, I've never done before so it is a new experience for me. Thankfully I have the tools onhand to compensate for my inexperience. With the 501st and FISD as well as the Garrison, this is an enormous wealth of information and sometimes instant answers to hard questions. I don't know if I'll ever get to Troop but I can say right now it looks like alot of fun and compassion. I think the real challenge for me will be getting to around 170 or under and LOOK the part. Thanks again Harder. P.S.: That carpet is actually UV reactive. Under black light it illuminates the entire room without any additional light necessary. But you probably want to wear a fresh washed pair of pants before entering as there are 6 sets of fluorescent black lights mounted on the ceiling.1 point
-
Old thread from over a year ago [emoji4] Sent from my iPhone using Tapatalk1 point
-
Perfect work on the angles on the ends of the ABS belt meeting the canvas one, but the outside edges of the drop boxes should be aligned with the outside edges of the ABS belt. This is not a requirement for Basic approval, but is you are (hopefully) aiming for Centurion level it will be and is screen accurate. Some E-6000 glue behind the straps will keep it in place. Speaking of E-6000, I noticed that you mention CA glue a lot. Yes, it dries instantly, but I honestly do not suggest using this. The reasons being: 1. It can run (drip). If it gets on your armor in a place where you don't want it, it has to be sanded down and re-polished. Not an easy task. 2. If you make a mistake when attaching something it is unforgiving. I have seen more that one instance where the pieces involved had to actually be replaced. 3. It can become brittle over time, causing the join to fail. Using E-6000 is pretty much the tried and true method. It takes time (12+ hours) to cure and has to be clamped during the process**, but does not get brittle and can be removed if needed, even if it seeps outside the join. Trust me on this one. ** This is what the neodymium (rare earth) magnets are used for.1 point
-
Ah okay, thanks. i'll steer clear from both stay and ebay... Forever.1 point
-
Great work with your TD.1 point
-
That Rascal guy is just the worst. Surprised his head still fits in his bucket ;P1 point
-
Thanks guys, I'm really looking forward to the build. Something tells me this is going to be a lot more enjoyable than the 3D Print. You know what I'm really looking forward to... not working with pounds of Bondo Spot and Glaze putty; now I'll actually be able to use it as the package instructions tell me. So @TheRascalKing brought up some great points. Let me go through them; I'm going to have tons of questions over the next few months: Amen! I painted a few things way too early last time and paid the price for it later i.e. shoulder strap trapezoids. Strapping is something I hadn't really thought of, but it totally makes sense. I do need to get some new suspenders, the ones I got for ultra cheap on Amazon last time were way too stretchy. I do have a lot of black 2" webbing left over though, so I may just make my own like Jeff and Kyle did on the @Kal Akaan R1TK WIP thread. What do you guys advise? Any suggestions on suspenders? Also, last time, my leg armor was the bane of my existence. I actually wore one of my old Marine Corps Martial Arts Program belts and strapped the thighs to that. So, I totally started putting pieces all over my arms and legs as I pulled them out of the box. Yeah, fiberglass is very itchy. When I went for my run I was feeling it. I'll hold off on the sanding. This is one that I've been tossing around. I was going to use automotive paint with hardener, because I wasn't happy with how beat up my Rustoleum paint job got after one day of costuming. However I was kind of talked out of it. After painting my Mando costume, I started to love the Montana Gold paint, but after doing some research it appears that others don't advise it for TKs. So, I picked up a can of Rustoleum High Performance Enamel Spray (the stuff in the chrome can) and will be spraying a clone helmet tomorrow. I've read great things about it and will discuss this afterwards. The reason I'm probably going to rattle can it again is for the ease of touch-ups and cost of products. Also, with all the disasters I encountered last time, I've learned my lessons and am far less concerned. So, this all happened so fast I didn't even have time to put together a shopping list for myself. Fortunately, I've got plenty of stuff left over from my TK and Mando builds but this is where I'm reaching out to you guys. Let me go over a few things that kicked my butt last time. Keep in mind, I'm looking directly at centurion. 1. Paint. I've got all the Model Masters colors I need, but what are the opinions on this. Is Humbrol a better choice? - I just talked about the Rustoleum High Performance Enamel. I'll test it tomorrow on that CT Bucket and even though it's satin, it should give me a decent indication of what it's like. What are your opinions? Let the debate begin, or direct me to a thread where the argument has already ensued. 2. Strapping. I've got plenty of black elastic, including the 10" material for my back closure. I already asked for recommendations on the suspenders, but what am I missing? I feel that the suspenders and abdomen are the base of the entire costume, so I want to get this right. Last time I tossed my snaps in favor of high strength Velcro but the Velcro tore up my Darkside Closet undershirt. Ideas? 3. Speaking of undersuits, since I already have the shirt and knee gaskets, I declined to purchase Jim's set. However, my cycling tights are probably going to be retired soon (they've been doing double duty and since it's cold in Virginia, I actually need them for cycling). I need to grab something new, but I really don't feel like going to Lululemon with my wife. 4. Blaster. Jeff provided me a pretty good list last time I asked this question, but some of the companies are no longer making blasters, or all I saw were OT weapons. I'm going to be picking up a resin printer in the next couple weeks, so that's an option, but what are the rest of you trooping with? According to the build roster there's still only one EIB/ Centurion ROTK, so has anyone else crossed this bridge yet? Also, I know the blaster is an optional accessory, but did I read somewhere that for EIB and Centurion it's required? Maybe I'm wrong. 5. CRL. With everything I learned last time, and after seeing what I'll be working with, I'm not worried about missing the mark on anything. But, regarding the lenses, what does "very slight curve and (are) convex in style" mean? Last time I did the basic welding shield lens trick, but I don't think that's enough this time around. Jims kit came with a nice piece of green acrylic, but it seems like it would fit into the flat category (even though the piece is curved). I told you I write a lot. Any help is appreciated. Also, please throw out anything I may have missed. I don't do these build threads for just myself, in my real life I'm an analyst, so I actually enjoy building these "databases" for everyone to learn from. Hmm... database... that actually gives me a few ideas. Oh. One more thing... Mandalorian spoiler alert. I finally saw a anthology (ROTK) costume with a pauldron and no back pack. Also, what did you think about the TK Mortar-man? I'd gladly paint a yellow stripe down the front of my old armor and get that guy going.1 point
-
To tighten up the top portion of the right bicep I pivoted pieces together leaving the bottom edges with no overlap. I think i have a good fit now but I'll wait until i have the torso pieces on before doing the final cuts. I'll trim down the left bicep so it's a bit larger than the right so it will be easier to tape together. Right now its really unwieldy with all of that extra ABS. I added blue tape to mark the center of the inner pieces to help on alignment. This is both sides of the right. And the ends of the right.1 point
-
Very nice! welcome. And going right for the Centurion too.. perfect!1 point
-
Today, walked by something smelling like bantha fodder. Guess it’s that time of the week to get this done.1 point
-
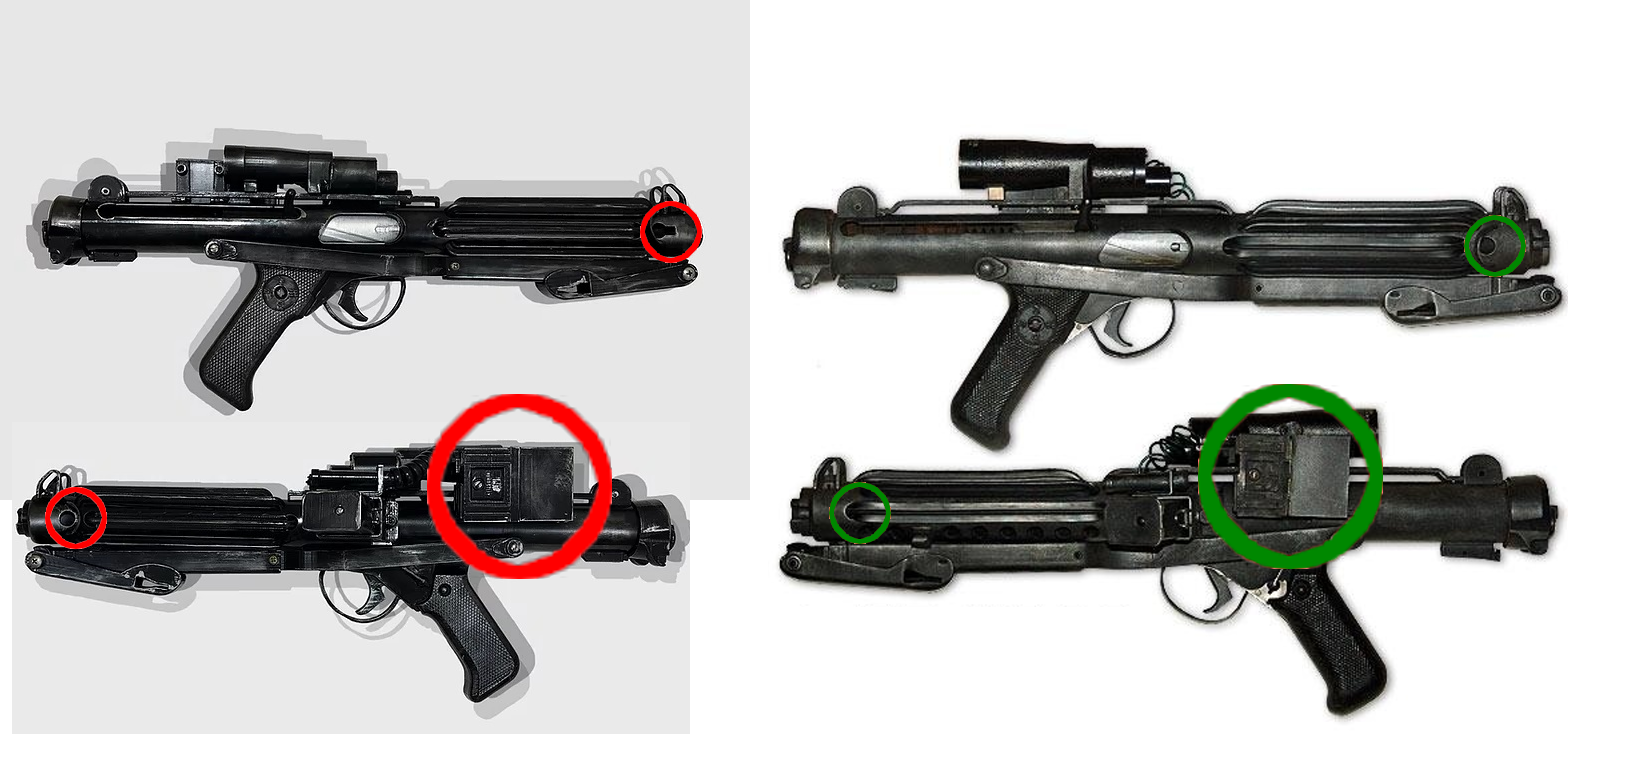
Just having a quick look and there would need to be some adjustments made for Centurion. Front holes on both sides of the barrels are incorrect in details. Also hengstler counter would need to be moved further forward. By the looks of some of the pieces details it may be 3D printed as there seems to be lines on the end of the magazine and hengstler, any lines would need to be filled, sanded and painted
 1 point
 -
some I ordered from ebay and some I got from hobby lobby. Thanks for the compliment. these are the hobby lobby ones they are pricey. I only get them there because faster then waiting for ebay and want something to do.1 point
-
Oh snap, I love it! I'm eventually going to do a whole "what I learned if I had to do it again" post on my thread, but I'll try to cobble together the Lite version to help you out. So much trial and error, but I think it would go WAY smoother if I had to do one of these again, knowing what I now know. Way excited for you though, man - congrats! And yea, Jim's shipping ain't cheap but it's freaky fast and he's a pleasure to work with. I've heard he's actually like an optometrist in real life and just does this for fun? Pretty cool. The most important (and time sensitive) advice I have is to measure, trim, and test (maybe even strap, at least temporarily) fit everything before you do ANY paint. Start with a soapy water bath and a maroon scuff pad to get any stray fiberglass or mold release off, but resist actually sanding any bare fiberglass if you can - it just opens up tiny bubbles. After cleaning and trimming, I would spray the whole thing with at least two "layers" (a layer typically being 2-3 light coats... Or about 2-3 cans for each layer to do the entire suit) of different color primer, then go with spot putty for any defects still visible, THEN sand... But never all the way down to the fiberglass. It also would not hurt to do an additional THIN coat or two of resin on the inside to help seal the glass strands. It sounds obvious, but you need to REALLY think about and plan out the order of the steps of your build to maximize efficiency... It's hard to go back and correct the previous step once you move on. Food for thought. I probably would have been better off paying someone to paint it, my first time around... but after what I've learned, I'm less afraid. I'm around if you have any questions!1 point
-
Thanks for sharing Justin and not to worry - we love photos, the more the merrier I’d say Fingers crossed for you getting the all-clear come next year!1 point
-
Alex Cardenas TK-55105 Centurion Letter TKSpartan http://www.whitearmor.net/eib/certificates/55105-centurion.png1 point
-
You don't have to use metal brackets although they are screen accurate, you can actually use snaps and elastic all around. If you do use them the bracket screws can split the plastic on the edges so adding some material behind them is a good idea for a little extra strength. Great tutorial from @ukswrath Standard system with no brackets and double snaps1 point
-
Great to get some more entries here from our trooper brothers and sisters. [emoji1303] To catch you all up on my own story, since starting this thread back in 2018, I’ve switched jobs, had another child, built a LOT more helmets and another set of armor, started an ever growing stormtrooper based Facebook group, seen my YouTube channel grow in popularity, started building my C-3PO costume and plenty more besides. One of my highlights was being one of 16 UKG troopers on the blue carpet at The Rise of Skywalker European Premiere in London almost a year to the day. That was wonderful. Anyway, still checking the boards daily and helping where I can. Also now an “armourer” for the uk garrison, helping more troopers prepare for 501st clearance. Hope to see lots more posts added below. Come on, troopers - yelp is a little about you and spread the love. Best wishes Dan :-) Premiere C-3PO1 point
-
Thank you And I only stepped down from Staff, not stepping down from FISD1 point
-
Welcome! I'll be interested in your build as well. I'm new and have AM armor, too!!1 point
-
You certainly went from zero and nervous about the first cut to full steam ahead pretty quick. Great work there, it is always daunting but once underway it gets easier and easier. Sent from my iPhone using Tapatalk1 point
-
I needed this right now.1 point
-
But I'm cheap, ie, furloughed from work and then a couple months later - laid off. So I needed a long winter project. And away we go. It's like the little Engine that could. I think I can, I think I can. I HOPE. Dove in on the Helmet first. Most I've ever used my dremel I've had for ages. Let's see what I can do here. Looking...Original and thanks to all those in the Ohio Garrison and FISD for helping me along so-far.1 point
-
1. Colin 2. Adams 3. TK-25622 4. Letter 5. JustJoseph63 http://www.whitearmor.net/eib/certificates/25622-centurion.png1 point
-
Well... it’s after thanksgiving. Time to clean up all the messes.1 point
-
Alright, time for an update to finish out this thread! I took some photos to show the things that needed to be changed to convert to ESB. Helmet I finished modding the new Anovos helmet from earlier, adding the mic tips and finishing the interior. Front Left Right Back Interior Gloves and Handguards I trimmed down the AM Snowie-style handguards and E6000'ed some 1" elastic into them to pair with my rubber gloves. I decided not to go with the satin ones because I didn't feel like sewing and usually troop in a pair of specific lightweight gloves, so I would only ever wear em for photos (like my rubber gloves). Belt and Holster I use snaps to attach my plastic belt to my canvas belt, which allows me to detach it and ROLL my Imperial Issue canvas belt so that I don't put strain on the insert by folding it in my tiny crate. It also allows me to use the same plastic belt for all three of my TK variants (ANH-S, HWT, and ESB) that I use the base suit for. I paired it with a ESB holster from Darman's Props and opted for the 8oz leather, which is sturdy, looks excellent, and has the correct LOOPS instead of rivet attachments. It is set up to be worn on the RIGHT side of the belt, instead of the left. That's pretty much it! I did not need to make any permanent changes to the base suit for a successful conversion - just added a few new parts. Aaaaaand I actually already submitted to our GMLs and received my approval this weekend, I'm happy to say! Next stop, EIB and Centurion! Thanks for reading and I hope this helps someone out!1 point
-
More updates... Removing the painted on trap/tear details was a paaaaaaain. Just work slow and steady until they're gone. I'll be applying the decal set I got from TrooperBay! Looks pretty nice, but was not cheap ($26USD?!). I'm going to apply them using some decal application fluid so I can "float" them into place, then used a squeegee to remove any excess liquid. I like to use a small screwdriver to help position the decal so I don't have to touch the adhesive with my fingers. And there's the first one on there - actually fits pretty well considering it was clearly not made to fit exactly. They're symmetrical (the helmet isn't) and not quite "tall" enough, but really not bad. And two... Time for the front traps - these fit pretty well also, but were obviously a little crooked if you follow the shape. Just trimmed off the excess at the bottom, as it's hidden by the brow trim anyways. Decal application really isn't that exciting, but here it is with all of them on! Next up was spraying the frown black. Started masking... Then layed down some rattle can Satin black: Did about 3 coats from different angles... Removed the masking... yikes, gotta clean up that overspray and mask more carefully... And boom, more or less finished result: Time for finishing touches like the mic tips, lens, and interior assembly, but I knocked a big portion of the helmet build out this weekend... sweet!1 point
-
The little swoop on the Left side facing forward
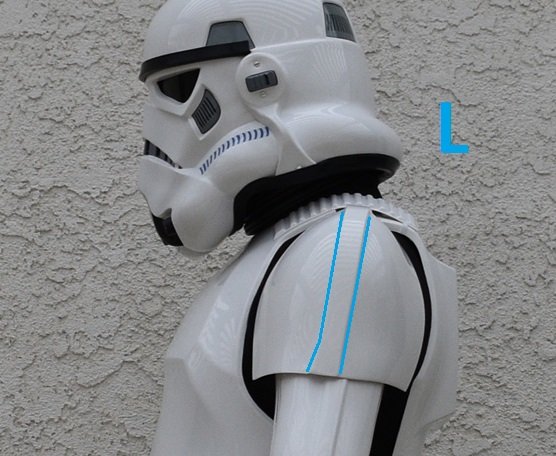
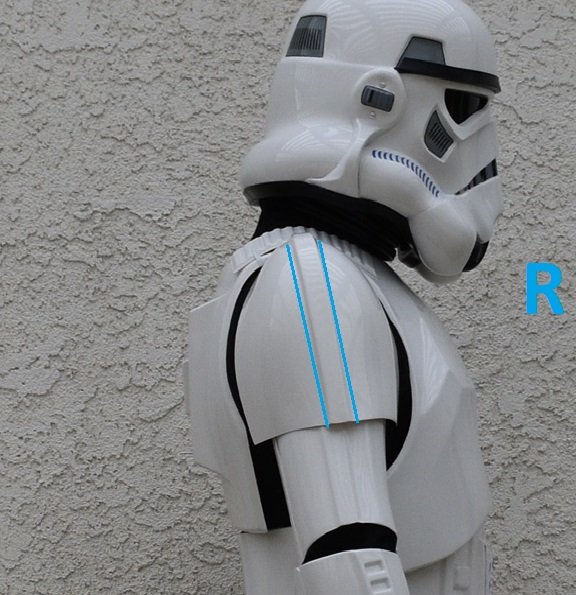 1 point
 -
TD Final Finishes Painting the screws and contemplating working on the ab buttons next. Finished product. Well, mostly finished. The screws got a bit scuffed up during assembly. I'll touch those up the next time I have the black paint out.1 point