Leaderboard


Popular Content
Showing content with the highest reputation on 12/04/2020 in Posts
-
3 points
-
Love this idea and it's awesome to hear more about you guys! I guess I'll give it a go as well: Justin "TheRascalKing" R., reporting in! I've been a member of the 501st since October of 2017, after the Orange County Squad of the Southern California Garrison began regularly visiting my work - the Children's Hospital of Orange County, where I was in Hospitality Management for many years. I distinctly remember being in our clinic, waiting for the elevator, when the doors slid open to reveal Lord Vader standing there, flanked by a stormtrooper and officer - it was like something straight out of a movie scene. I was blown away - I've been a Star Wars fan since childhood, but had never seen costumes like that in real life. After their visit, and seeing countless kids and staff members absolutely light up when interacting with them, I spoke to the wranglers about joining, knowing I had to get involved. I saw Episode One at a young age and was hooked, eventually reading my way through the Expanded Universe novels (which I credit with helping me learn to read well), but never really went to a convention or knew there was a 501st unit near me. My new friends suggested an Imperial Officer costume to get me started, and a few months later, I had submitted and was approved as ID-61490 (6/14/90 being my birthday!). I have since taken that costume and gone all the way to the IOC's Level 3 approval "Imperator" status, and added some cool accessories, like one of @gmrhodes13/Q's MS-P5's, and a Rogue One style poncho, which I LOVE. I almost immediately started looking into an Original Trilogy Stormtrooper, and ended up purchasing an Anovos kit from a Garrison mate not long after. I completed the kit (with a LOT of help from @ukswrath/Tony's guide) in December of that year and was approved! I have had some truly amazing opportunities as part of the 501st, including trooping several times at CHOC Children's Hospital, in a 100+ member parade down Main Street USA at Disneyland, on Fox Sports in the announcer's booth at an Angels baseball game, in the Hollywood Christmas Parade (including marching the 3 miles last year with full blown cancer), on stage with Weird Al, and in a little project called "Huckleberry" to name a few... If you would have told me as a kid (or even a year or two ago) that I would get to be IN STAR WARS and to actually BE A REAL STORMTROOPER, I never would have believed it. This club made it happen and I am forever grateful for the incredible opportunities I have had. Some things have changed since then - I took that same set of armor up to Level 3 "Centurion", not once, but 4 times now - as a ANH-Stunt, Hero, ESB, and HWT Stormtrooper, before finally retiring it recently after 50+ events. I was diagnosed last year with stage 2 Hodgkin's Lymphoma after finding a lump in my neck, and underwent several surgeries and months of aggressive chemotherapy and radiation treatment, and am waiting for another scan in the new year that will hopefully show me cancer free. I got engaged to the amazing DZ-71490 (her birthday wouldn't fit, but 714 is our area code and she was born in '90 as well, so her TKID is one number off of mine) who deserves full credit for all of my Centurion photos and tolerating my living room almost constantly being full of white armor projects. I also left CHOC and now work in the biotech sphere, specifically with connecting patients to clinical trials, to help improve their lives and help get new treatments to patients faster. We've been working on a LOT of COVID-19 studies and I've been pretty busy lately, even working safely from home, so armor has taken a bit of a back seat. (My fiance and I at The Mandalorian Season One red carpet premier) I am in the home stretch on my Rogue One armor, and will be starting a First Order TK overhaul in the new year as well. The only thing I love more than trooping myself, is being able to mentor new members and share that passion with others, so I have been pretty active with my Garrison both in person at armor parties and such (before treatment and the pandemic), and online answering questions - more recently as an Imperial Attaché here on the boards. Outside of Star Wars, I enjoy surfing, skateboarding (downhill longboard racing specifically), beer and homebrewing, working on cars and autocross racing, watching movies, playing bass guitar, and playing with our two cats, Jack and Zero. Well, there's my whole life story, thanks for reading! haha (big thanks to @MaskedVengeance for showing how to make the photos smaller and a little more manageable... sorrynotsorry for the huge photo dump! )3 points
-
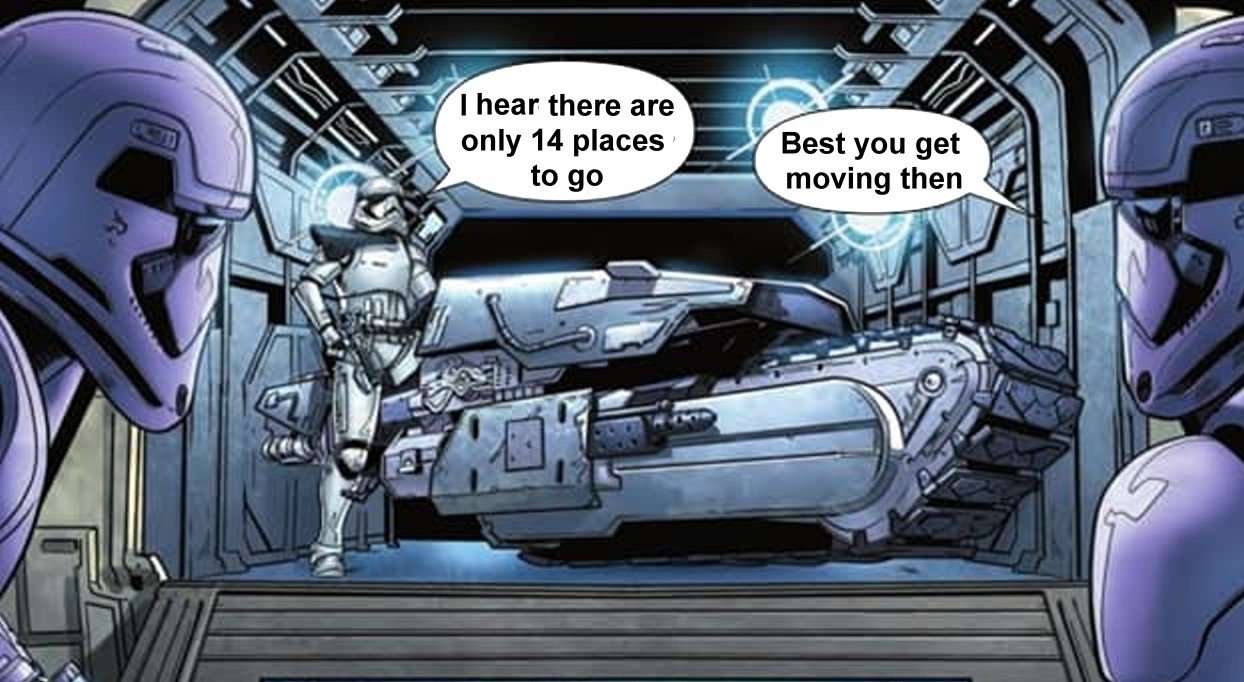
14 to go, congratulations to Alex , TK-55105 of the Florida Garrison, Centurion #486!3 points
-
You don't have to use metal brackets although they are screen accurate, you can actually use snaps and elastic all around. If you do use them the bracket screws can split the plastic on the edges so adding some material behind them is a good idea for a little extra strength. Great tutorial from @ukswrath Standard system with no brackets and double snaps3 points
-
--EDIT-- Future Jason here... So for those who have followed my rather sporadic build down below, well, actually over in the ROTK section, you'll know that I've been kind of all over the place. However, one reason I've been slow-rolling this build is because I've kind of been pestering people about the possible inclusion of a Remnant Stormtrooper CRL. The thought first occurred to me after watching a few episodes of The Mandalorian season 1, but my thoughts really ramped up after the season 2 trailer dropped. My comment/ question in the 3D ROTK build thread was (referring to my 3D kit): "My original plans for this armor were to eventually weather it and turn it into a Jeddah trooper kit. But, if I wanted to do a Remnant Stormtrooper instead, what's the process for approval? Does this require a new CRL? Would it basically say "refer to ROTK and weather it?" [September 15, 2020] With that said, I'm not using the 3D Armor for this build. There's other plans for that. So, yeah. I've wanted to make a remnant for almost a year, but haven't really felt the push until now. With that said, I do reference another post later on in this thread because there's been a few of us discussing the Remnant and Anthology TKs for a while. If you haven't done so yet, please view the conversation here: https://www.whitearmor.net/forum/topic/48305-new-anthology-tk-crl/ So, how did my ROTK build thread end up over here in the new Remnant/ Anthology section of the forum? Well, future Jason (page2 of this WIP) posted that he will be turning this build into a Remnant Stormtrooper and then went on to post pics of a cool OT helmet that will become part of this costume. I also requested that this thread be moved over to this section so I can officially begin transitioning this to a Remnant. Here are my goals: 1. The original title of this build was "Centurion from the Start." The idea behind that is to build to the highest standard from the beginning, that way you don't have to make major modifications to the costume to take it from basic to tier 3 approval. So far I'm on the right track, so I'm going to continue going down that path. 2. Finish this as a ROTK/ Anthology build, then make the transition to Remnant towards the end. I've already got a good plan for this build and don't want to deviate too much. Additionally, I still think value will be added to the build community by carrying on the way I've been going. In the end, this WIP should be a good example for others traveling down either the Anthology or Remnant paths. 3. You'll see later on that I've done a lot of things that are different than other builds, but more accurate. Since I started this build, I've gotten another costume approved that has some of these modified characteristics, i.e. the shoulder/ bicep 'j-hook' bungee connection. By the way, I can't emphasize how good this works, nor can I imagine doing my arms any other way now. For this build, I'll pull out a few things that haven't been tried previously, but make the costume a) more accurate, b) more comfortable, and c) more functional. I'll try to explain each as I go along. 4. There have been questions about whether this is a different costume or not. I think we laid out a good case in the aforementioned thread, but as I start transitioning from anthology to Remnant, I'll explain the differences in better detail. So, you've heard my musings and now understand why my build thread has moved over here. Please enjoy the build and I promise to keep on it, even if I'm doing it from a little apartment, which I'll talk about later. So with that all laid out, future Jason is now turning back over to the past. Please enjoy my build thread as I now send you back to December 4th, 2020. So, this just happened: For those who observed my insanity for the last few months as I did the 3D printed ROTK build, bear with me as I photo dump, type extremely long posts, and showcase what @TheRascalKing called in his own build thread, a "descent into madness." Ultimately, I enjoy doing these and hopefully later down the road, others can learn from my success and failures. First, I want to thank @11b30b4, @gmrhodes13, @Sly11, @TheRascalKing, @tarok, and all the others who I've previously bothered with questions, and who have been more than gracious in helping me out. I know there's others, this community has been great. Additionally, I really want to thank @jimmiroquai for the exceptional service over the last few weeks. I'll get to the product in a minute, but what really needs to be showcased is how well Jim answered all my questions, went above and beyond in his customer service, and really just showed pride in his work. If I could write him up for an award, I would. Thanks. So it begins... I titled this build thread Centurion from the Start. Now, some may look at that and think it's kind of cocky, but that's not the intent. Over the last 9 or so months, I've been fairly active in all the 501st forums and everywhere I look, people keep advising others to build to the higher level standards from the beginning. While this seems like sound advise, or even common sense, I've also followed up on these threads and observed less than half going there. That's a rough number which is probably even smaller, but it's similar to what I observed with the 3D printed armor build; plenty of people started, but then... Honestly, I think it has something to do with just getting worn out after doing a build. Sometimes after dedicating so much time to something, a person just wants to rest. I've seen this at work, with sports, and in life in general. That's what I did after Halloween, but that soon turned to restlessness. It just didn't seem right not hearing my 3d printer at all hours of the day and night. So, while I waited for this to happen, I printed off an entire scout trooper and finally figured out my Simplify3D PETG settings. I will say this; of all the forums I'm active in, FISD members seem to listen to the higher level advise more-so than others. I think the Pathfinders comes next, but really this idea seems to be a mantra in the FISD. Because of that, this is the direction I'm taking this build. Additionally, for those who saw the 3D print build, you saw that I attempted to build things to the higher standards, but ultimately I decided to hold back at basic approval. Though I reigned myself back, every one of those little things I learned about the 3d print build, I can apply here. This includes the eye bump I'm so proud of. So, that's enough rambling for now. I'm getting ready to go for a run, because a huge portion of this build, for me, is to get my body looking screen accurate. This is going to take a lot more work than the armor. Here's what I got: First, Jim sent me this pic and a tracking number last Friday. Knowing that it was coming from the Philippines, I actually wasn't expecting it for a while. However, just seeing the pic got me excited. Then this happened: This has to be highlighted. I saw when the BBB was dropped off, but once FedEx actually processed it, the BBB's journey across the globe happened in a freaking blur. Keep in mind, this is during a world-wide pandemic. Much kudos to Jim for the service and for keeping me updated. Wow! Unfortunately, a box just can't travel across the world in three days without it's Fragile sticker being disregarded. At first I got a little freaked out, but honestly after seeing the video Jim posted about his flexible fiberglass I wasn't worried. Also, with all the bubble wrap and great packing job, I knew it would be fine. After laying it all out, everything checked good. So here we go. This should be a lot of fun. Thanks for looking and I'll start updating soon.2 points
-
thanks I needed this info. I know about the hole placement but anovos has the indentations in it. I thought would look silly. I still have some trim room to bring it down more. I really needed that close up of edge.2 points
-
I am impressed with how quickly the membership are making ground on this initiative. Well done everyone, keep the submissions coming in, as we change in to top gear and power through the corners to the finishing straight. The pit crew.....I mean DO team, have the tools and are ready to bring you home.2 points
-
If you want to be absolute screen accurate the hole is normally a little closer to the end/top. Also the curve cut out is not so rounded, you can see flat areas that meet the curve. You also want to check the length of the strip as some armor makers make them longer then they need to be, should stop just short of the corner sections of the thigh
 2 points
 -
Depending on your preference, you might choose one or the other, or, you might choose a hybrid. For example, you might like the look of the original bracket system but want to reinforce with the “practical popper” method. Personally, I’ve run the practical popper method on my first suit for 18 troops and it held up perfectly. Here’s that method; Now, I’ve gone for the original method. So far, I really like it, however, only time will tell regarding any potential stress points : You could even just install the nuts and bolts but just have nothing on the other side, just to get that “original” look. [emoji1303]2 points
-
Ok Guys just 14 laps to Win !!! The D.O. Team is Ready to Serve!!2 points
-
Haha I miss you too Greg2 points
-
Great to get some more entries here from our trooper brothers and sisters. [emoji1303] To catch you all up on my own story, since starting this thread back in 2018, I’ve switched jobs, had another child, built a LOT more helmets and another set of armor, started an ever growing stormtrooper based Facebook group, seen my YouTube channel grow in popularity, started building my C-3PO costume and plenty more besides. One of my highlights was being one of 16 UKG troopers on the blue carpet at The Rise of Skywalker European Premiere in London almost a year to the day. That was wonderful. Anyway, still checking the boards daily and helping where I can. Also now an “armourer” for the uk garrison, helping more troopers prepare for 501st clearance. Hope to see lots more posts added below. Come on, troopers - yelp is a little about you and spread the love. Best wishes Dan :-) Premiere C-3PO2 points
-
Howdy! I’m Scott from the Dune Sea Garrison / Jundland Wastes Squad. Getting into all this has been a journey that I wish I would’ve started so much sooner. I always liked the stormtroopers and then I saw a video on YouTube showing a never ending parade of them going down an escalator at a convention. I was dumbfounded. If there’s that many of them in one place surely, I can find a kit myself I thought. Many years later, when my employer made a “whoops” that resulted in owing me a handsome amount of backpay I ordered a kit from Anovos and joined FISD. Having been bitten by the bug I started working on some foam armor for the younglings in hopes we three could march around the neighborhood together come October. My first troop was in 2019. My favorite so far has been going into hospitals and cheering up the little ones there. Seeing a kid in a hospital bed have their expression change from despair to utter excitement and joy has been amazing! My boys have outgrown their foam TK’s and now join me at every event they’re allowed to rocking a Gonk droid and Jawa costume as Galactic Academy cadets.2 points
-
Name: Mark Gambino Username: MightyAtom Knightfall Garrison Melbourne, Australia https://www.501st.com/members/displaymemberdetails.php?userID=33163 Armour: AP Helmet: AP Blaster: Premier Props (Etsy) Height: 6' Weight: 178lbs Boots: Imperial Boots Canvas Belt: Imperial Issue (Kittle) Hand Plates: [mention=22112]justjoseph63[/mention] Electronics: [mention=35426]MissionTrooper[/mention]Arduino Nano Neck seal: Darman's Props Holster: AP1 point
-
Ok mine looks like a few of those. Just match it up on both sides. Thanks bro. I was about to go searching for a replacement.1 point
-
Hellos to all members of the 501st ...My names Stuart i live in the UK it Was in the 70s I remember my bro showing me Starwars, my first comment after seeing the big guy in the black outfit was i am going to work for Vader when i grow up ( i am 50) okay a lil more then grown up now , depends who you ask lol, so yes i have my RS Prop masters Suit that was built to my measurements with the stunt bucket, i am soaking up all the info i can. i look forwards to getting my suit passed for centurion level and get ready to troop, that's when we can that is, sadly. Thanks1 point
-
A couple of approved anovos centurion apps1 point
-
Heck yeah it does. After this pic I came down a tiny bit more also on the tops. I put the rivet in while I did it so I could get a good visual of how it would really look. And now I realize that I could have left that anovos dimple and just made my own hole tiny bit above it to where the rivet top would have concealed the dimple also.1 point
-
Looks much better1 point
-
Looks really nice Justin, well done sir.1 point
-
Congratulations Mark and welcome to Expert Infantry1 point
-
Congratulations trooper and welcome to the EI ranks, a well build kit, nicely done1 point
-
Oh snap, I love it! I'm eventually going to do a whole "what I learned if I had to do it again" post on my thread, but I'll try to cobble together the Lite version to help you out. So much trial and error, but I think it would go WAY smoother if I had to do one of these again, knowing what I now know. Way excited for you though, man - congrats! And yea, Jim's shipping ain't cheap but it's freaky fast and he's a pleasure to work with. I've heard he's actually like an optometrist in real life and just does this for fun? Pretty cool. The most important (and time sensitive) advice I have is to measure, trim, and test (maybe even strap, at least temporarily) fit everything before you do ANY paint. Start with a soapy water bath and a maroon scuff pad to get any stray fiberglass or mold release off, but resist actually sanding any bare fiberglass if you can - it just opens up tiny bubbles. After cleaning and trimming, I would spray the whole thing with at least two "layers" (a layer typically being 2-3 light coats... Or about 2-3 cans for each layer to do the entire suit) of different color primer, then go with spot putty for any defects still visible, THEN sand... But never all the way down to the fiberglass. It also would not hurt to do an additional THIN coat or two of resin on the inside to help seal the glass strands. It sounds obvious, but you need to REALLY think about and plan out the order of the steps of your build to maximize efficiency... It's hard to go back and correct the previous step once you move on. Food for thought. I probably would have been better off paying someone to paint it, my first time around... but after what I've learned, I'm less afraid. I'm around if you have any questions!1 point
-
l have to admit, this is the second time I've watched your suiting up vid and you look absolutely authentic. I'd seen this video before. Very impressive.1 point
-
I, to this day do not understand why Lucas went with Hook and hole x8 for the shins rather than hook and loop velcro. I can't imagine fidgeting in all that armor with those each time I get suited up. I mean there is the 'original' thing, but there's also superior methods. At least IMHO. But to each their own I suppose my friend. I'm sure there are many dissenting opinions. I think those two things would be the only 2 things I'd modify on this armor with whitch to still maintaining the CRL and Centurion build. I think I'm still on track for that with those mods? Plenty of time to consider.1 point
-
I am liking this 'Standard System' at least for the clamshell. When I begin getting into the Elastics, this is what I would like to go with. I'll have to do some research on this Standard Strapping System.1 point
-
It’s looking pretty darn sweet! This will be such a good looking build when it’s completed. Where did you get your snaps from? I think I need to order a bunch for my TK.1 point
-
Thanks for sharing Justin and not to worry - we love photos, the more the merrier I’d say Fingers crossed for you getting the all-clear come next year!1 point
-
Hey thanks again everybody, I'm really glad to have made it and appreciate all of the help!1 point
-
Congratulations Mark welcome to EI brother Few adjustment and you'll be ready for Centurion, hope to see you there.1 point
-
I would leave about 1/4 inch on the bottom of the chest plate if you are going with the strapping system, a bit more if you use the brackets. You can (and should) leave the same amount (at least 1/4 inch) on the top of the chest. bottom of the back, top/bottom of the kidney and top of the posterior (butt) plate. Below is what I personally consider the perfect trim job.1 point
-
Thank You so much. Will attend to the alterations and make my my way toward Centurion. TK-578991 point
-
The moral of this story is, heat guns can be very dangerous to ABS and very quickly. Plenty of practice is always best before unleashing the heat on your hard earned armour kit. Someone well versed on using a heat gun can tend to make it look very easy but different thicknesses react at varying times and the ambient temperature when using them also plays a part in hpw long is too long before you end up with a floppy melted piece of plastic.1 point
-
Ive got to say this is such a clean and tidy build. keep up the great work.1 point
-
Yea I conceal my terror well don't I. Honestly that is kinda my modus operand. If I don't have a clear idea I will just stop, ask and once it becomes clear, proceed with a clear understanding. In the case of the belt plate, I didn't even know the inner 45's was a thing. I'm sure that's going to happen to me again, where I wasn't aware of some detail, which courage or not, is going to lead to having to rebuy a piece of armor. It's a blessing and a curse as far as being assertive and ignorant. haha. But anyways, thanks so much.1 point
-
Perhaps should have been more clear in my initial post but.....I’m just stepping down from Staff, not from FISD so I’ll be seeing all of you I get that the ”stay safe everyone” could have had a meaning of me leaving all together (sorry for the misunderstanding) but I’m just nice like that1 point
-
Thank you And I only stepped down from Staff, not stepping down from FISD1 point
-
Congratulations Trooper!! Welcome to EIB ranks.1 point
-
Congratulations Brother. Welcome to EIB. Centurion next!!!1 point
-
Congratulations and welcome to the EI ranks trooper, a few tweaks and hopefully we will see you at centurion soon1 point
-
Hi KC, I appreciate your patience. Thanks for your application and for the frown paint fix. CRL and EIB Application Requirements All required photos are now in and, after review, we are pleased to welcome you to Expert Infantry rank. On behalf of the DO team and myself, many congratulations! Other-Armor Fit/Assembly In this area we review observations made by your fellow troopers and the DO team. Some observations may lead to suggestions to improve the overall look of your armor. Note that we consider both text (CRL) and pictures (screen caps/reference images) when reviewing submissions Starting with the helmet, I know Anovos helmets come pre-painted and pre-assembled, but the vocoder paint could be cleaned up: Reference Images: Moving on to a couple dressing issues, keep an eye on your arm cover strip alignment when getting dressed. Of course it's going to change the minute you move around, but we like to look our absolute best during the L2 and L3 submissions. Next, as was already pointed out, your biceps are sitting a bit high. This may be necessary for mobility, but ideally we want to minimize the black gaps showing, and if you dropped your biceps and forearms you might be able to reduce the gap at the elbow and wrist. Reference Image: Next, it's correct that the belt should touch or slightly overlap the bottom ab buttons, but your belt is sitting just a touch too high. This is an area of some degree of variation, but most of the screen-used examples we can find don't have the belt covering the bottom buttons quite so much. Reference Image: Continuing on, it again could just be the photo angle, but your TD is sitting quite high, so you might see if you can push it down further, or possibly 'unroll' the clips so it sits lower. Reference Images: Next, your butt plate is sticking out just a bit so you might try double checking the strapping. I also noticed the return edge is quite thick, so you could consider trimming it back some so it lies flatter. Reference Image: Moving along, as was also already mentioned the sniper knees were trimmed in a more angular manner vs the softer curve you have. Should be a pretty quick improvement. Reference Image: Finally, another dressing issue. Next time you're getting suited up, have someone check the alignment of your calf closures. A very small detail, but it helps clean up your look. Reference Image: Centurion Requirements In this section we prepare you for Centurion. More photos may be requested in the future that allow us to make better decisions on possible adjustments. If there are any areas of concern they will be discussed here. Because Centurion photos show much more detail than EIB, items to pertaining to Centurion might be seen there and not here. We try to point out all that we can from what is seen, but the final accuracy is the responsibility of the trooper. Starting from the top, the L3 CRL states: There should be a minimal gap between the shoulder armor and the chest/back plates. Your shoulder bell gap from the front looks great, but on the rear the gap is larger than we'd like. It may even be just a matter of adjusting the bells slightly so they are positioned more evenly. Reference Image: Next, your arm armor is very large compared to your arm size. We absolutely welcome troopers of all different body types, but we do expect that for our highest level of approval, the armor is sized appropriately to the wearer's body. From the side the arm armor looks the right size, but from the front and rear, they're quite large. We've noticed this a lot recently with Anovos armor so it may be a matter of how the arm pieces are shaped. In order to size down the biceps and forearms, you'd need to carefully remove the cover strips, trim back the pieces some, and re-glue them. A hot water bath may also be helpful in re-shaping the curve. Reference Images Next, I suspect this is actually more due to the angle of the photo than anything, but your dropboxes don't seem quite aligned with the end of your ABS belt. The L3 CRL states: Drop boxes are vertically aligned with the end of the ammo belt with minimal gap between belt and box. If necessary, you can add a drop of glue to the elastic holding the boxes on to keep them from wandering. Reference Image: Finally, a couple issues with your blaster. First, your Hengslter counter is mounted too far back. As you can see in the reference photos, the rear edge of it does not go past the rear of the sight. Second, as the T-tracks were black plastic on the real blasters, they shouldn't have any metal weathering on them, so we're asking you to just cover up those weathering spots with some black paint. Reference Images: And that's it! You do have a bit of work to reach Centurion, but you truly have a lovely build, and I have full confidence in your abilities to make the necessary changes. As always, please reach out to us or any of your fellow troopers for assistance. Until then, please accept our congratulations in reaching EIB!1 point
-
My thinking was just to keep this one going, so sort of a re-introduction to the re-introduction1 point
-
Incredible looking blaster and stand, simply beautiful.1 point
-
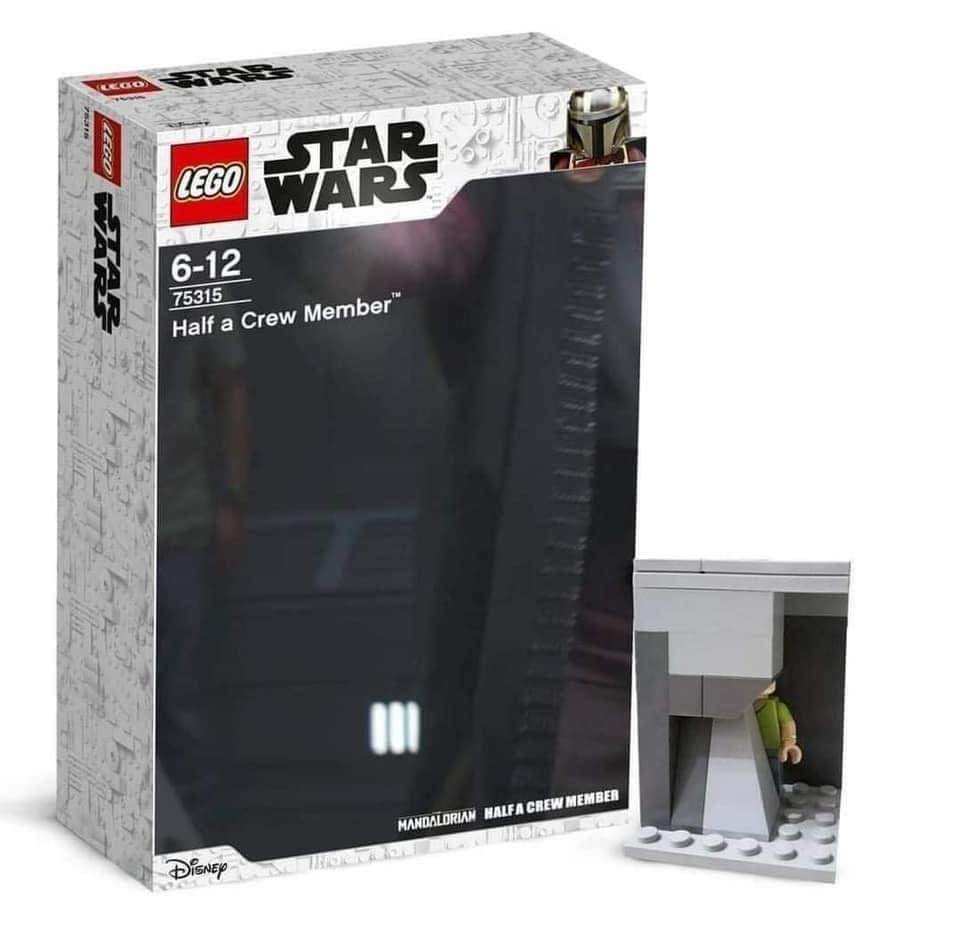
We've been joking about this in command, must be real, he has his own figure, and a Lego figure
 1 point
 -
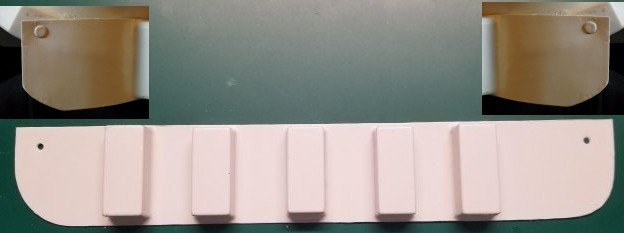
7f. Thigh Ammo Pack installation In this section I'll be installing the thigh ammo pack. The thigh ammo pack is located on the right thigh for those who do not know this. By this time your ammo pack should be trimmed and ready to install except for creating the mounting hole. I'll be using Cap rivets to mount the belt to the thigh. Reference images Ammo pack after trimming Starting with the left side of the thigh lower return edge, measure approximately 1/4" from the back left corner forward. Note: The goal here is to center the ammo pack rear edges on the thigh. You should have an equal distance between the left and right rear corners of the thigh and the ammo pack. The front of the ammo belt will not be centered with the cover which is normal. Drill 1/8" holes at the predetermined location set by Anovos Install cap rivet to secure the left side ammo pack to the left side of the thigh Inside view Outer view Wrap ammo pack around the front of the thigh. Mark the thigh through the ammo pack mounting hole. Drill the mounting hole in thigh then secure the right side with a cap rivet. Inside view Outer Paint. Using white paint, paint the outer rivet heads Final note, the ammo pack can be straight or angled upward a bit. Either way is accepted at all levels of approval. You might also want to add a dab of E6000 between the thigh and ammo pack as well to help prevent the ammo pack from falling down over time. Done!1 point
-
12c. Upper Back Plate connection point modification This small segment is for those having an issue with the back plate design directly effecting how it fits on taller individuals. In a nut shell I'll be giving the upper connecting strap area a hot water bath to help tone down the sharp angle. This is a suggested fix only. You are not required to perform this modification, nor does it have any bearing on any approvals. Do so at your own risk. Back plate out of the box, after trimming. First thing you want to do is remove a good majority of the return edge at this corner either blending it into the remaining return edge below or removing some of that as well. I found out the hard way, if you don't will crack even when softened up. Bring some water to a boil and keep it around 197F. While wearing protective gloves submerge the corner for around 30 seconds. Remove from water and gently but firmly press onto a flat surface After reshaping the right side Right side view after alteration. Left side is still in its original position.1 point
-
thanks for the comments so far, much appreciated, one problem i have is the thighs, as im a footballer my thighs are quite large and the bottom of them are pinching my knees, should i maybe attach them higher up?? Here are my helmets still need to do a bit on the one on the right.
 1 point