Leaderboard


Popular Content
Showing content with the highest reputation on 11/08/2020 in all areas
-
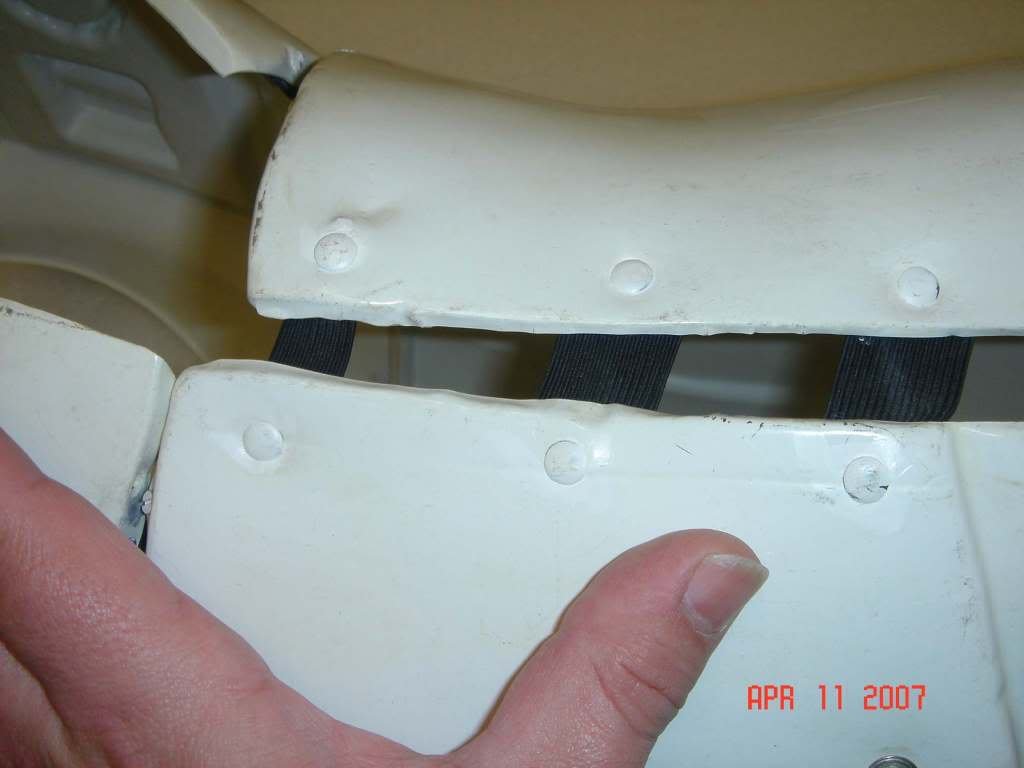
I think I fixed my holes. This was a daunting task at first but I learned a lot. I wish I had taken a lot more pictures along the way but here's how I fixed my Ab rivets being in the wrong location ie 20MM instead of 10 from the edge. All said and done I now realize I am skinny enough that I could have gone the "Ninja" route that TKspartan suggested above but I went ahead and removed, filled, and replaced all of the split rivets. When I was doing tests on this procedure I made a few errors. First I was making the test holes far larger than the 1/8th inch holes I was really going to need to fill on my armor. Second I didn't have a good selection of sand paper. I had been trying to form the filler circles by hand and let me tell you, trying to make a little perfect circle smaller than the cap of a pen is a huge pain in the exhaust port. I discovered that I had a leather punch that makes almost perfectly sized circles to fit the 1/8th inch holes. If you do this let me emphasize that you should only do ONE circle at a time. I was using a very small screwdriver to force the plugs back out so to prevent damaging them I would cut a thin scrap ABS first then the target thickness next. I would then push them backwards out the cutting side but that would leave an impression hence the sacrificial piece first. I removed all the split rivets and used painters tape on one side of the armor. Took a Q-tip with acetone and rubbed the inside of the hole before dropping in the plug. Be very careful with how much acetone you use! If too much gets on the outside of your armor you may have more work. Also be sure if you tape the outside that it seals well. One of mine did not and I had a couple acetone marks to repair / sand. Don't worry, the mark next to the hole pictured is just pencil. Every one wasn't perfect so I added some ABS paste to a couple and after some sanding with 1000 grit sandpaper, some oxidation remover and then moving onto high gloss polish that I had in the garage for use on my fiberglass jet ski it turned out nice. There's a slightly noticeable spot where each hole used to be on the Ab. Most of the holes on the kidney were under the lip of the split rivets.3 points
-
Good luck with approval, I hope you hear back soon, nothing worse than stalking your email account every 5 minutes There is no position given and I don't think the DO's will penalize position (unless it's miles out), here is the section from Joseph's references For Level 2, The thigh ammo belt is attached with one solid head rivet on each side, painted white, and located in the upper corner fastened to the lower thigh ridge. Rivets shall be cap or split style rivets. No pop rivets are allowed. Rivets should be approximately 5/16ths (8mm) in diameter (exterior). NOTE: Although not specifically listed in the CRL, in order to remain true to the "spirit" of screen accuracy and a better overall look we have historically insisted that the following issue be required for Level 3 approval: Back edges of ammo pack need to be an equal distance from the "corners" of the ridge at the rear. Larger reference. If anything the rivet could be brought up a little on yours. Notice also that the lower corner is not fully rounded off, you can see where the curve starts and ends3 points
-
Finally got around to taking some proper photos of Cameron fully suited up in his armor today! This trooper Mom approves. Took it out for a stroll in our neighborhood. Because fall, y'all! Cameron reports that the kit is comfortable and totally troopable! Looking forward to when we can get out and do our thing again. Stay safe!2 points
-
Glen, I understand completely. Fortunately my hands have held up fairly well, but I had to make significant alterations to other parts of the armor to compensate for joint issues. I probably should be printing at a higher resolution (finer), but I think I lack patience when it comes down to larger prints like helmets. That's one of the reasons why I'm experimenting with different techniques during this "down time" between builds. Funny that I consider building a Scout Trooper "down time." Regarding the large resin printers... wow! If I had an extra $3000 floating around I'd have a Peopoly Phenom L running around the clock (if I could afford the resin). Right now I'm trying to muster up an extra $300 for either a Phrozen Sonic Mini 4K or Elegoo Saturn 4k. However, when I first started researching 3D printers, something the equivalent of my CR-10s would have cost the same as that Peopoly. Let's give it a few years. Thanks for the comments.2 points
-
Lol. I suck at Photoshop. So, thanks to those who encouraged me to continue with the build. I guess I was just really frustrated after I saw what I felt was the destruction of my work, but when I reassessed the situation, it was all superficial, which apparently is pretty common. For those who can't read Aurebesh, under my TK ID it says First approved 3D Printed ROTK. My wife told me yesterday that I acted happier about this than when I graduated from college. My reply was, "well Penn State doesn't have racing shirts." To recap this build (again), I had been "trolling" the 501st resources and forums for a while, speaking with members, and just wondering if this could be done to an acceptable standard. I had seen plenty of people start 3D printed builds, but couldn't find any finished projects, with the exception of some awesome helmets. Additionally, I saw plenty of YouTube videos of people building armor, but nothing indicating that they had applied for legion membership, or built their TKs to a reasonable standard. However, with all the awesome clones, Mandalorians, and other various 3D builds I had seen get approved, I thought "let's try it. I'm either going to irritate people with all my questions, or find a great group who's willing to help." Fortunately it was the latter. Thanks again for everything. So, I've spoken to a few people about other projects and I'm mulling over another big 3D build i.e. Shoretrooper, (thanks again @11b30b4 for prodding me over the edge), but honestly the last couple days has felt weird not going into my garage and fighting with plastic and paint. I've got a few things I'm going to tweak on this armor, because as you all saw from the thread, I was trying to build to the centurion standards, though I'm not sure it's attainable with a 3d kit. Regardless, I'll clean up a few items, but I'm fairly certain that I'm done printing big parts for this set. If you see me request an EIB look, that's probably where I'm going to call it until I receive my BBB.* *Previously I mentioned that I'm going to go ahead and order a new kit, likely from Jimi. After that arrives, I'll be posting a whole new build thread. So, while I'm waiting for that to arrive I'll be playing around in the Pathfinders forum. I just started something that I should be able to finish in about a month: This will be a lot of fun, and make for some awesome pictures if I ever get around to visiting my family back in the Redwood National Forrest. Also, this quick project will give me the opportunity to try out a few new techniques, like printing helmets upside down. Rough on top due to the supports, but this gets filled, primered and sanded anyways. The interior of the dome however is smoooooooooth. So, thanks again to everyone. You're all awesome and proof that this is a great community. I'm happy to be aboard!2 points
-
So after 8 long months ( thank you Covid ) BBB day finally arrived. I had originally ordered a trimmed kit from Daves Darkside but with time constraints between work and home ( again , thank you Covid) I opted for a commission build , otherwise it would be another 8 months before I could even get around to start working on things and I cant wait that long :-) Unboxing day and got everything laid out , Dave's packing job was excellent ensuring every piece was well wrapped and taken of during transit, big thumbs up. Once everything was laid and I ensured all pieces ( and then some) were accounted for and it was time to try things on . After reading the directions carefully and watching some YT videos I felt prepared enough to give it a try. I opted not to put on the bootsor the thermal detonator at this point, just wanted to get a feel for the armor. Full understanding that this is the first fitting and I have to get use to things , but after studying MANY builds and using the CRL as a reference I got a bit concerned , wasn't exactly how I thought the fit would go. I talked to Dave at Daves Darkside and showed him some of my concerns and I have to say his customer service is above board , ( 5 stars all the way) , after reviewing some of the pictures and concerns he is fully prepared to correct the following after I sent more measurements along with pictures to help with the details. I will include pictures below on my concerns and welcome comments from this team and/or recommendations and ensure I am on the same page with other builds I have studied and followed. I fully realize that I am not a 'skinny" guy , I am rocking the dad bod at 5'9" at 210 , but this suit seems to be 'conformed' to a 6 foot 240+lb guy , with the picture below in the garage , this thing looks huge on me :-). Fully expected to add girth , it is armor after all , but just seems I am a "large" body into an XL size kit? wrong on this? See pictures and comments below. 1) shin pieces are a bit on the bulky side , taking them in a bit and may shorten things ( Velcro came off on the left leg, couldn't fasten). 2) with the thighs , these things are HUGE on me , he will be taking these in as well specifically the bottom part 3) He wants me to send these back as well to ensure proper fit, they are a bit on the large side as well. 4) Biceps need a lot of work , very LARGE on me and push my bells out when I flex my arm. My next post I will try and seek some advice ion the chest / cod piece and helmet fit, having some concerns there as well ..1 point
-
TROOPER INFORMATION: Name: Lluis Quinquer Username: Quinquer TK-15711 Spanish Garrison 501st Legion Member Page: https://www.501st.com/members/displaymemberdetails.php?userID=32719 ARMOR INFORMATION: Armor Maker: AF Props Helmet Maker: AF Props Blaster Type: E-11 made by AF Props Boot Maker: AF Props Canvas Belt and Holster: AF Props Hand Plates: Rubber latex with Rubber Gloves (AF Props) Neck Seal: Leather (AF Props) Expert Infantry Status Application: Modifications after EIB: -Modified paint of the helmet (rear traps, tears and ear bars lines and Vodocoder). -Modified brow trim. -Added mesh behind the frown. -Enlarged the bicep's elastic straps to let all the arm down evenly. -Sniper Knee lined up. -Shorted the elastics of the connection between the shoulder bells and the chest armor. -Added white elastic band to held down the plastic shoulder straps in the back. -Worked on the shims to refine them so they are not visible. -Drop boxes vertically aligned.1 point
-
Hey everybody, I'm TB32899 from Garrison Carida. Been informally with the 501st since 2015 after they came to visit me after I had brain surgery, and I've formally been a member since March of 2019 with my Biker Scout suit. I'm looking to expand and make an ESB TK and then work from there on a new costume that uses it as a base. Looking forward to working with everyone on here and learning from you guys!1 point
-
Hey all! So, since this is an ANH Stunt helmet, I'm posting this here because I can't post images on the MEPD forum for some reason. I wanted to do a Sandtrooper next year, as I finally finished my TIE and got approved a couple months ago. I have this ATA Stunt bucket that I assembled and weathered awhile back, but the right-hand ear worries me. Is it too wonky for basic approval or is it fine?1 point
-
It's more the alignment of the rivets to the top which is a little off, the distance to the end of the sides looks ok. Again this is more for higher level clearance and shouldn't affect basic approval.
.thumb.jpg.b26565994511001387e4de9dd4dd0894.jpg) 1 point
1 point -
Excelente trabajo Lluis.!!!! . Mucha suerte con tu solicitud... Excellent work Lluis.!!!! . Good luck with your application...1 point
-
Looks like your side rivet placement is a little low on the top rivets. Also your Han snap is a little far away from the corner. In saying that these are higher level issues and you may be ok for basic approval (depending on your GML)

 1 point
 -
I oriented the buttons and magnets how they will end up and marked with a sharpie on the side that would be glued to make sure they were oriented correctly. I glued the magnets in the cover strip, added the magnet buttons and another magnet on top of that on the outer side for strength. The magnets were moving when the hole strip was over them so I am letting it glue in this position for 16 hours, realign and then cure for an additional day or two.1 point
-
looking great , well done1 point
-
Lol I thought so too. We’ve been nagging him for ages. I think he saw the interest when Paul Prentice started a new research group this weekend [emoji6] Definitely jump on ST Fam, the place to be for ST research. [emoji1303]1 point
-
Another successful hot water bath in the books. I found that overlapping the sides kept them in line when forming, holds the shape better and brought it very close together. Moving forward with gluing the magnets in!1 point
-
Well done mate! That’s awesome! And of course just as you get yours complete, Nico Henderson starts designing ROTK armour to go with his bucket [emoji23][emoji23] Btw, are you on Shoretrooper Fam on FB?1 point
-
Thank you! As always, you're a wealth of knowledge! I'll leave it for now and make a call once I start moving through EIB and Centurion applications. Thanks again. Sent from my Imperial Communicator1 point
-
I've submitted my GML! While I wait for a reply, I thought I'd take a look at L2/3 requirements. I have a feeling that the pre-drilled holes in the ammo pack are not to spec and I'm mentally preparing to dismantle the piece, fill holes, sand, smooth, drill, glue, etc. The holes are currently ~14mm from the top and end edges - will this meet L2/3, or what should the measurement be?1 point
-
Awesome, thank you for the info!1 point
-
Great news BBB finally arrived, shame about the fit but purchasing ready to wear sometimes needs some tweaks, better the armor is too big than too small, looking forward to seeing the progress1 point
-
Thanks Glen! And since I'll be working on the other ear this weekend, I'm sure I'll be doing this followed by this and repeat...and repeat...and repeat as needed, LOL!1 point
-
So what do you do when you get an armor kit and 2 weeks later Covid lockdown starts? Build the armor! Well I did and received Basic approval. Shortly after with no opportunity to troop and with the push from @justjoseph63 and a few others I was approved for EIB #981. So now I need to get to Centurion. One because I'm attempting to be in the Centurion 500, and two because it's a challenge to perfect the armor to that level. I'm posting here to get help on some of the processes - ABS paste, alignment of certain pieces and just small tweaks. I know this community is a wealth of knowledge so I'm looking for ideas, tips and tricks. So here we go.1 point
-
Finally, at long last- SHE'S APPROVED!!! My beautiful shiny girl is finally ready for some trooping! Now to wait for a troop that's longer than it takes me to suit up in her...1 point
-
Next those gnashers . I've scraped off the edge paint , and touched it up . What do you think ? Sent from my iPad using Tapatalk1 point


.jpg.233d752613021e8fc37ba5b30d27df05.jpg)