Leaderboard


Popular Content
Showing content with the highest reputation on 06/13/2020 in Posts
-
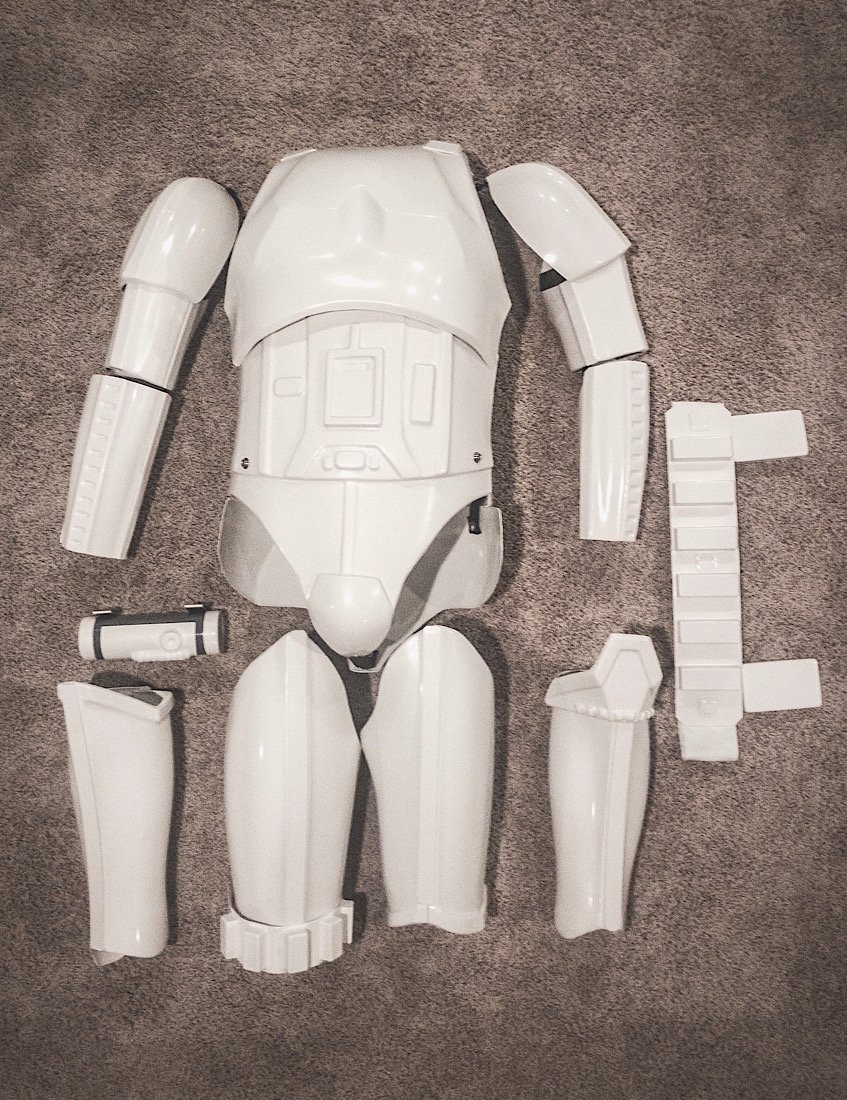
Hey everyone! My name’s Fred and this is my first post! I‘m currently in the process of building my ATA armor, and it’s been awesome! I’m still working on getting a helmet. I’ve emailed several makers, RT-Mod, AM, AP, and T/MC, and only got one reply and he’s since gone ghost. I’ll just assume they’re all busy. Anyways, I look forward to having fun with this armor! I plan to join 501st eventually, but what I’m excited about the most is putting it up on a mannequin and occasionally putting the armor on and scaring my wife lol.
 4 points
 -
Congratulations to Ashley (aroberton), TK 21864 for becoming EI # 969! Only 31 more spaces left to a part of the "Original 1000", folks.3 points
-
Hello and welcome aboard, just watch out when using different helmets the color can differ from one maker to another2 points
-
I had the opposite problem ...My S-trim was very thick and I couldn't fit my head inside the helmet...Or maybe the problem is the size of my head2 points
-
Muchas gracias ....una disculpa por contestar hasta ahora pero el trabajo ha estado intenso.... agradezco la atención y en los siguientes días reviso lo que debo trabajar y comenzar hacer los ajustes que se vayan presentando. Que agradable escuchar que pasaste una buena estancia por estos rumbos ....jajajaja cuando tengan oportunidad de volver no duden en contactarme para hacer mas cálida su estancia. over&out.2 points
-
painted a few more parts had some runs looks good from a far2 points
-
Hello, fellow troopers! I’m thrilled to be here. My hands still hurt from holding the Lexan scissors too tight and cutting through 2mm acrylic-capped ABS. Do you feel my pain? Ha ha! Anyway, I can’t wait to get out there and troop! If Only You Knew: Well, I thought I needed to buy everything under the sun to make this kit, and after buying way too much stuff, I realized, man, I only need glue, my dremel, some sandpaper, blue tape, and some magnets. A few clamps, too. But I just had way too much stuff lying around that I never, ever used. In that case, I made the job seem harder than it was because I thought I needed all this “stuff.” Top 5 things I learned: 1) Take your time. Accomplish only one “big” thing each day. Today I’m working on the right shin. That’s it. If you go too fast, you will screw up! 2) Don’t start without mentors. Make sure you have some guidance from experienced troopers and send them pictures as you build. 3) Listen to your mentors. If you ignore them, you will make mistakes! Stubbornness does not equal screen-accuracy! 4) Your family may not be as excited about you getting your thigh piece to fit as you are. Don’t be disappointed. Once they see you fully suited up, your appearance will blow them away. 5) When using the dremel and sanding roller, hold the piece tightly against your chest and use smooth, light strokes. Ignore the dog licking your leg no matter what. Oops!: My kit was a little big on me, and after fitting it, the entire torso was sitting too low and the thighs had no room to move. I had to redo my shoulder straps (tighten them up), and cut the neckline on the chest plate to give myself more room, and then take a full inch off the backs of my thighs to get them to fit properly. It was a pretty big challenge, especially when I thought I was nearing completion. Time to "embrace the suck" and take a risk! And so I did... Warnings I received were mostly about being too OCD versus screen-accuracy. Sometimes the screen-accurate way looked ugly to me, but in most cases I got over that and learned to love the asymmetric and wonky nature of these kits. A funny thing happened on my way to the Death Star: I decided to become a stormtrooper after teaching a Star Wars class at the University of Central Florida: https://news.cah.ucf.edu/news/star-wars-telep/ https://www.fox35orlando.com/video/637681 I invited the Makaze Squad to visit my classroom and talk about the 501 and about trooping in Central Florida. After hearing the fun and inspirational stories, I couldn’t help but want to be a part of this great community. That was last October, so it’s been an eventful eight months to say the least. My armor did take a long time to reach me (ABS plastic shortage when I ordered) so I was taking pictures of myself looking like a James Bond henchman from a 60s movie, LOL. I kept telling my friends, my armor will come soon! This is the best I can do for now: Shout Outs: I received great tips and advice from my armor builder, Troopermaster, who treated me like a good friend and answered all my questions as though he was standing by his phone, waiting for me to ask. This was a GREAT first experience with an armor builder, and that made it even more memorable. I also received incredible help from Gary Collins, Sr, his son Gary, Derek Zink, and Daniel Branton. All of these generous troops spent a lot of time answering my questions, sending me pictures and videos, and trying to put me at ease as things didn’t come together as I’d planned. Of course my family put up with me and with stormtrooper parts lying all over my kitchen and formal living room. The place looked like a plastic warehouse and smelled like E6000, ha ha. Finally, I’m really excited to be here, to start trooping, and to put some smiles back on people’s faces during a very challenging time in this world. In that way, I guess we are entertainers and should help make people forget about the cares of the world, at least for a little while. TK-33348, ready for duty!1 point
-
I realized yesterday that I still hadn't attached the ab boxes on the ab piece. Time to bust out the E6000! Thankfully these two boxes have little grooves on the back so I could align them pretty much where they need to be. The larger middle box (not pictured) and the box to the right of it also have little grooves in the back of them for easy placement. The rest needed to be eyeballed on. I allowed a day for the E6000 to cure, and then it was time to paint. This part of the build is soooo flippin' satisfying. Two initial coats, and lookit that shiiine! As I proceed with the white gloss, I'm seeing areas that have very small flaws that I missed. And I can safely state that I'm finally at the "Good Enough" part of the build, so the small imperfections don't get to me now (you know what I mean... it's the stage when you don't care about itty bitty details enough to continue along with building). When I see something I overlooked (such as small pinhole in a Bondo'd area), I tell myself, "Battle damage!", and move along. I have really had enough of the fill/sand phase. My wire hangers arrived today (yay!), so I'll be able to hang and paint more parts in one session. If weather allows tomorrow, next up will be Round 2 of gloss white on the pieces I wet-sanded today.1 point
-
Hi there! I got most of my parts for my r1tk cut and sanded and now it comes to strapping. One thing I couldn't quite figure out is the lower arm. Looking at pictures I see that there is no strap coming from the upper arm to the lower arm. Is that correct? If so, should I use foam to keep the lower arm in place? Thanks in advance1 point
-
Welcome Fred! Sent from my iPhone using Tapatalk1 point
-
Hi Fred and welcome to the FISD! Your ATA armor looks great so far. So the issue you were having with the sales area is you have to have a minimum post count in order to post there. I believe it's either 4 or 5 posts. So you only have to make another one or two and then you should be able to respond. As far as helmets go you have a couple of options. Stick to ATA and hopefully he will be able to get you taken care of so you have the same helmet and armor. If not then I know MTK is just pulling sets of armor now and he has helmet kits available. You can reach out to Mike at [email protected] or on his facebook page at trooperbay. Otherwise there are a couple of helmets for sale in the personal sale area. I may actually have one listed there if you are interested . If you have any other questions then don't hesitate to ask!1 point
-
And not to miss anybody, so congrats to Peter (@4Runner), TK 33348 for becoming EI #968!1 point
-
Looks a LOT different, and good to go!1 point
-
It looks like the forearm rolled a little bit out of the right orientation. Below are pictures of the arms more properly aligned. Also, I think the original left forearm was more curvy than the right. Do you think this looks acceptable?1 point
-
Yes you are right, there is no strap connected from the forearm to biceps in the ROTK armor. You are on the right track putting foam on the forearm to hold it in place, so keep it up bro! Sent from my LYA-L29 using Tapatalk1 point
-
I did it so. Unlike the ANH TK. I sewed a piece of hook and loop to my undersuit, glued the other part on the inside of the armor. works quite good. If you opt to go EIB or Centurion, you have to wear another undersuit with ribs. This helps to keep the forearms in its place.1 point
-
Good looking kit, now go and serve the empire!1 point
-
Hi Fred, welcome to FISD. good luck with your build.1 point
-
Welcome to the FISD Fred, I look forward to following your build Sent from my SM-G960F using Tapatalk1 point
-
Welcome to FISD, Fred! I too am working on an ATA kit! It looks like you already have much of your armor together, and if you end up getting an ATA helmet, check out Panda’s ATA helmet tutorial below: https://www.whitearmor.net/forum/topic/14806-how-to-assembling-ata-abs-helmet-1/ If you decide to start a build thread, I’ll be excited to follow along with you, and feel free to check out my thread as well! We can journey towards the 501st together! Sent from my iPhone using Tapatalk1 point
-
Welcome to FISD Fred... The truth is that it's difficult to achieve some armor parts at this time, due to the global pandemic. Don't worry, and good luck with the helmet!!!1 point
-
used a razor to try and bring out the details of the cover strips will try DarthBiscuits idea of filling some of the pinholes with a paint brush and re sand and give the notches a touch up1 point
-
You have been added to the roster brother.1 point
-
What he ^^ said1 point
-
Did some dental work.1 point
-
Great story as to how you ended up here! Congratulations trooper! Happy trooping to you!1 point
-
Sorry to make this a discussion but, I’m a GML and if I noticed straps this wide I would not approve it. L3 should never approve it either as it’s supposed to be about higher screen accuracy, unless something has changed from when I was D.O then it’s my bad. For basic I would however not. Your GML might feel different and let it slide so I suggest you touch base with him/her just in case1 point
-
Welcome to the TRUE home of shiny white armor, Devin! Know that not only are you in the right place, but that you have an entire Detachment of folks who are here to help you every step of the way on your journey to become a member of the 501st community and a "real" Stormtrooper! We welcome those those who want to join our ranks, and are here to answer any and all questions you may have so never be shy about asking for advice! (It's what we do best)!1 point
-
Hi, welcome to FISD Davin...There is no way back....1 point
-
Hello and welcome aboard, good luck with the journey it can be a fun one1 point
-
Oh, I'm sorry. Here they are. How much does an armor cost? Quick armor comparison ANH ESB ROTJ Cheers,1 point
-
Hi Davin, welcome to the FISD. I'm in the Garrison next door - Badlands. As mentioned above, check out the getting started section. https://www.whitearmor.net/forum/forum/38-getting-started-read-this-first/ You might also want to check out the build section (there are different sections for different costumes). If you are planning a classic ANH TK, a really good build to check out is this one: https://www.whitearmor.net/forum/topic/35086-ukswraths-anovos-tk-build-stunt/ It is for a Anovos kit, but the methods can be applied to most kits. and also check this out: https://www.whitearmor.net/forum/forum/79-tutorials-tips-and-howtos/ It's all going to look incredibly daunting at first, but it will make sense eventually. Take some time to read through the posts on the page. The best kit for you will depend on your body shape and budget. If you have any questions, don't hesitate to ask. You have the right attitude - don't be afraid to take your time and do some research. Homework assignment: go watch ANH... again!1 point
-
So one step forwards, two back. Basically, I dropped it. This was the 1st part I printed and the temperature wasn't hot enough, and I am pretty sure under extruded. So it broke. As infuriating as this was last night it was always going to break, just a case of when. At least I've not done much assembly and finishing on it. I double checked some things this morning, like extrusion width and also destructively tested some of the chest parts I won't be using. I am pretty happy that with current settings the replacement will be up to snuff. That said, that right angle is a bit of a stress raiser so will reinforce it either by welding it or fibreglass. Also I'll try not to drop it again, especially as the price of filament has gone way up due to demand. Butt plate is almost done. The main sections are pretty large and more or less maxed the Z axis. Size seems good just hope it all fits once assembled! I'll be doing some of this before I get too ahead with the chest plate incase I need to make any changes. I also managed to get hold of an older copy of the chest plate file, which has holes! They are still the wrong shape so I have knocked up a "fixer" in fusion 360 that I will use to correct them. Once the part is printed I can measure the holes and update the parameters in the fusion file and print that. Once that's done I can carefully file the chest plate until the fixer fits and then fill all the remaining gaps and smooth it all.1 point
-
Hola Ulises. Por supuesto que podemos ayudarte...Para eso estamos...No te vamos a perder de vista...Pon un montón de fotos y haznos un montón de preguntas...Aún estás a tiempo de entrar en el top 1000 de Expertos en Infantería, y en el top 500 de Centurion... P.D. :Que buen verano pasé en 2019 por tu tierra(Así se siente México en la piel...)... Hello Ulises. Of course we can help you ... That is why we are ... We are not going to lose sight of you ... Put a lot of photos and ask us a lot of questions ... You still have time to enter the top 1000 of EIB, and in the top 500 of Centurion ... P.S. : What a nice summer I spent in 2019 in your country (This is how Mexico feels on the skin ...) ...1 point
-
Wet sanding does allow the sandpaper to last a little longer and not clog as easily, a few drops of washing liquid added to the water can also help.1 point