Leaderboard


Popular Content
Showing content with the highest reputation on 06/05/2020 in Posts
-
This is an All-In-One compilation of various resources for ANH Stunt Stormtrooper builds which will hopefully be helpful to prospective troopers as you get started and begin your research. Many TKs over many years have spent countless hours documenting their tips, tutorials, and builds, and this index includes posts and links which have been helpful on my own journey to the 501st. Printable PDF documents are included with select posts. This index will be updated as additional resources are created and identified by troopers helping troopers. 501st Legion Links: 501st Legion - Member Application 501st Legion - Available IDs 501st Legion - Garrison/Outpost World Map TK ANH Stunt CRL FISD Forums Getting Started - Read This First ANH (Stunt & Hero) Forum Tutotials, Tips, and How-Tos Vader's Valkyries (women of armour) Getting Started Forum Pinned Threads (selection) Various Types of Armor (Vetted Vendor List) by Daetrin Vendors to Avoid by RogueTrooper [NEW ADDITION] Common FISD Acronyms & Glossary by justjoseph63 Steps to Join the Legion by Dark CMF Cost of a Stormtrooper by Dday Imperial Attaché List by Pretzel Supply Lists OT TK Supply List by justjoseph63 (Print PDF) List of Soft Parts by justjoseph63 Build Tips and Resources Quick Reference Guide OT TKs by justjoseph63 (Print PDF) Armor Party 101 by justjoseph63 Return Edges 101 by justjoseph63 (Print PDF) Paint Color Guide by themaninthesuitcase Billgrams One Stop Shop (some diagrams may be outdated) Things/tips you wished you had on your build by DTKC and others How to paint ab button plates by JBar Magnets 101 by justjoseph63 (Print PDF) Butt-joining Armor by ZacMuleer Sanding Before Gluing by Shinyarmour1 Make Heat Gun Return Edges by pandatrooper Make Return Edge Sealing Iron by Daetrin Making ABS Paste by kman (Print PDF) Resize Armor with ABS Scaps & Paste by Harbinger (Print PDF) Armor for Bigger Troopers by ELP Altering Armor for Shorter Troopers: See Cricket's builds (WTF, RS Props) ATA Armor Sizing by Thrawndike bar Armor Fitment for Skinny OTTKs by Morgi V-Tabs for Kidney & Butt by gmrhodes13, Cricket's implementation, Colin's implementation Kidney Plate Shimming by Bullseye Fix Back Plate Kidney Overlap by A.J. Hamler (also in his build thread) Reinforcing Super Strong Shoulder Bridges by A.J. Hamler (Print PDF) Arm Armor Assembly by pandatrooper [ARCHIVED] Forearm Alignment and Shoulder Bells by CableGuy Thighs Assembly by pandatrooper [ARCHIVED] Thigh Trimming by Cgarduc Fill Thigh Ridge Gaps with Sugru by justjoseph63 Angled Mobility Cuts Behind Knees by ABS80 Attaching Flexible Hand Guards by justjoseph63 (Print PDF) Tips for Using E-6000 by jeebus68 and others E-6000 Safety Precautions (PPE) by cm325i Cover Strips threads: gazmosis, I'm Batman, sith_241, & Falciform13 ANH & ESB Cover Strip lengths and Ends by CableGuy Scribe technique for Cover Strips by chiefbonan Bending the ABS Belt by gazmosis, Boba_Skywalker3 Heat Bend Belt by pandatrooper Attaching Belt to Abs by GnrlGrievous Holster Placement on Belt by CableGuy Current (2021) Holster Placement by gmrhodes13 (follow-up to previous thread above) Belt Assembly by ukswrath Removable Holster with Snaps by Harbinger Belt, Holster, & Drop Boxes video tutorial by RWA (youtube) Combat a Fraying Canvas Belt by CallMeMrTibbles Thigh Ammo Pack Positioning by CableGuy Armor Thickness: 1.5mm, 2mm, Capped by Jakebullet Shoe/Boot Stretchers by justjoseph63, OneStrangeCyka GO TO Resources by ukswrath Strapping Systems Rivet Setting 101 by justjoseph63 (Print PDF) Snap Setting 101 by justjoseph63 (Print PDF) Snap Setting Hardware Solutions by TheRascalKing E6000 and Snaps Discussion by Harbinger, Snap Options by ukswrath Snaps with Rivet Heads by TheSwede Split Rivet Placement by DroidHunter How to Use a Rivet Tool by huttman How to Make Snap Plates by stukatrooper Elastic ABS Reinforcement by Cricket Magnetic Shin Closures by Cricket (Print PDF) Magnetic Shin Closures (supplement) by Zugor Alternate Magnetic Shin Closures by OddViking327 Types of Inner Strapping by Shinyarmour1 Internal Strapping by justjoseph63, nrgband RascalSnaps by TheRascalKing Thigh Garter System by Pencap510 Making Thigh Garters by Spectre Bicep Hooks by Pyrates and Brent Shin stabilization by Cricket and themaninthesuitcase Helmet Assembly ATA ABS Helmet Assembly by pandatrooper (Print PDF) ATA Stunt Helmet Assembly by Ales (Print PDF) ATA Helmet Build by maxsteele ANH TE2 Helmet Build by TK-4510 Helmet Ear Tutorial by gazmosis (Print PDF) Draw No Gap Ear Line by bpoodoo (Print PDF) Ear Trimming Foil Hack by trooper96 Choose Your Brow Height by CableGuy (Print PDF) Helmet Alignment by CableGuy (Print PDF) Template Painting 101 by justjoseph63 (Print PDF) Tube Stripes by CableGuy (Print PDF) Vocoder Paint Examples by CableGuy (Print PDF) Helmet Painting Tips by CableGuy Replicate the Screen-Used Look by CableGuy Hovi Tip Found Part Groundbreaking Discovery! by Dan_O and Sly11 Helmet/Bucket/Lid Interior Attach Lenses Using Sugru by justjoseph63 (Print PDF) Mounting Lenses by Solcar23 Helmet Padding by Boba_Skywalker3 Hard Hat vs Foam Helmet Liner by han_solo1 Interior Painting #1 and #2 Post by Staffa359 Truck bed-liner vs plasti-dip by TheRascalKing Helmet Fan Placement by RLH2515 What's in Your Bucket by Ragtooth Helmet Interior Build by kamikaze Helmet Internals Purchase Options by JZYL Clean frown mesh install by Toothdoc & others TrooperTalk iOS App by BrinkHouse Voice Changer Suggestions by nick007 Voice Amp System by JFarwell iComm + Aker Volume by kaa1304 iComm Help by endy iComm 3D Box Holder by Garbz Modding an iComm with External Battery by Sly11 Video Tutorials (youtube) RS Prop Masters' series Pandatrooper's series TK-4510 (Trooperbay) Password to access scruffynerfherder CableGuy's build video series Armor Building with TK1636 (forum post here) RWA's Youtube Channel How to put on Stormtrooper Armor (dressing tips) by CableGuy Stormtrooper Series by Nairy Photo References FISD Gallery LFL Archive Photos: Part #1, Part #2 538 HD Screen Grabs by dashrazor (2010) 1059 frames of TKs in ANH by Jeklynhyde (2020) Armor Cleaning, Sanding, & Shining Wetsanding and Polishing by Ensi (Print PDF) Best Way to Clean Armor by Daetrin Novus Plastic Polish by Darth Aloha Armor Yellowing Yellowing Preventative Measures by Brandon Make Aged ABS White Again by dashrazor Reversing UV Damage on TK ABS (external) Trooperbay Whitening Gel (external) Password to access scruffynerfherder Additional Yellowing Discussion and Resources Combat holster staining thigh armor: suttontech post & Daetrin post Image Posting Photography Tips for Posting by CableGuy Posting Imgur Photos 101 by justjoseph63 Post images on Imgur by Ensi **NEW** Post images on Flickr by Nairy E-11 Blaster FISD E-11 Blaster Reference (Print PDF by Blaster Team) Rubber Blasters: Hyperfirm vs. Praetorian by kman Rubber Blasters: Hellhounds (vs. Hyperfirm & Praetorian) by MaskedVengeance Another Hellhounds Props E-11 variant review by Toothdoc Hellhounds Props E-11 Review/Experience by KaiserintheHood Completion Sets for E-11 Resin Kits by T-Jay Sterling SMG & E-11 3D Print Files by trooper96 [NEW RELEVANT POSTS] Full Aluminum Parts Kit by fieldmarshall Previously Unknown E-11 Prop Detail by Joe and gmrhodes13 TroopaCoola JMC E-11 Build by CableGuy Sterling Sub-Machine Gun Diagrams / Handbook / Images by gmrhodes13 Sterling Main Spring Forming Tool by trooper96 E-11 Suppliers 2021 by gmrhodes13 How to Smooth Out a 3D Printed E-11 by justjoseph63 Gun Rack for Blasters by T-Jay ANH E-11: Sterling vs Bapty Differences by justjoseph63 Scope / Hengstler Decals by gmrhodes13 The Leia Leveller - A Mr. No-Stripes E11 Recreation by revlimiter Armor Storage/Transport TK Storage Bin by Garrett803 Husky Cog Wheel Covers by GoofTrooper Add Shelves to Husky Bin by TK21999 Husky Bin Modification by VancouverTrooper Customizing your Transport Cases by OddViking327 FISD and Stormtrooper Supplemental Posts Armor Tree History by Locitus ATA Armor History by c6dy A Sad Day for FISD by Sly11 FISD User Ranks & Awards by Harbinger Your First Troop Tips by justjoseph63 Emergency Trooping Kit by justjoseph63 Tips for Hot Weather Trooping by justjoseph63 Talk Like a Stormtrooper by Thrawndike bar Christine's PVC Mannequin by Cricket Adjustable PVC Mannequin by TK4205 Terry's Duct Tape Mannequin by pandatrooper Trading Card Holster by swagger What does your TK ID Represent? by gmrhodes13 How did you choose your TK ID? by humperdingle Story Behind Your Nickname by Snaps Re-Introductions by CableGuy Differences Between OT TKs (Post #1) & (Post #2) by sharkbait Rogue One TK vs OT TK by 11b30b4 Joseph's TK Mancave by justjoseph63 Help Fix FISD Dead Links & Photos by Sly11 Using a Torch/Flashlight to Find Armor Cracks by CallMeMrTibbles FISD Memes by Morgi Recasting What is recasting and when is it bad? by Sonnenschein TM Troopermaster recast CFO by sskunky ANH Stunt Build Threads (WIPs) ukswrath (Tony) - ANOVOS (Print PDF by harris.adp) Harbinger (Brien) - ANOVOS kman (Kalani) - ANOVOS Uxorious (Fredrik) - ANOVOS Rat (Jim) - ANOVOS Blast 'Em! (Shane) - ANOVOS unfinished ukswrath (Tony) - AM 1.0 pandatrooper (Terry) - AM LTM (Lou) - AM A.J. Hamler (A.J.) - AM (Print PDF by MV) OddViking327 (Colin) - AM 4.5 AsBlondeAsLuke (Diana) - RS Props tsongololo (Jennifer) - RS Props DudeSidious (Wayne) - RS Props unfinished Cricket (Christine) - WTF, RS Props, RS #2 (Mr.) shashachu (Sha Sha) - WTF StrmTRPR85 (Jeff) - WTF LadyInWhite - AP (google doc) Pyrates (Aaron) - AP wook1138 (Greg) - AP zv288bot (Jorge) - AP Scimitar (Eric) - AP Bud Spaklur (Matt) - AP MechaPumpkin (Danny) - AP SpiceCredits (Rick) - AP batmanmike (Mike) - AP unfinished Shinyarmour1 (C) - AP unfinished (photography) rwmead10 (Ryan) - AP unfinished MightyAtom (Mark) - AP Sly11 (Andrew) - AP Dark CMF (Tim) - TR-Mod LEGOeatPokemon (Jonas) - SDS dereferenced (Brian) - T/MC unfinished Redforce (Anthony) - NE maxsteele (Ron) - NE CableGuy (Dan) - RWA CTID (Mark) - RWA NOTE: Many of the Pre-Approval, EIB, and Centurion request threads below are for ATA armor, as that is my armor type. Threads from other makers are included for their valuable content ATA Build Threads (WIPs) ukswrath (Tony) - rebuild Ensi (Daniel) DStep (D'Angelo) echo327 (Erick) StarTrooper (Jayke) TheLorelei (Lorelei) Bazz (Adi) Quixotic5891 (Antonio) RampantLion (Leo) REAPERofDAISYS (John) Zarlon (Kyle) gmrhodes13 (Glen) wingnut65 (Jeff) pandatrooper (Terry) - MEPD TD FIVE (Noel) - MEPD TD Flykiller (Jerome) - thigh question timecyspace (Clay) - unfinished MaskedVengeance (Caleb) - unfinished (Print PDF) Pre-Approval Requests Actionsdower (Jim) - RS iEmpire916 (William) - AP husky68 (Robert) - AP TKModder421 (Greg) - ANOVOS Jared (Jared) - ATA REN2100 (Ryan) - ATA Hotel (Jim) - ATA MissingNo (Peter) - ATA echo327 (Erick) - ATA 31-9 (Jayson) - ATA unfinished snipedoc2001 (Cody) - ATA Swarzo (Cory) - ATA unfinished Cesarisamisfit (Cesar) - ATA unfinished EI & Centurion Informational Threads Advanced Tactics: EIB and Centurion by justjoseph63 ANH Stunt EI Visual Checklist by Sly11 and Wingnut65 ANH Stunt EI Photo Submission Guidelines by justjoseph63 (PDF by Sly11) Multiple EIB Award Recipients by gmrhodes13 Expert Infantry Honor Gallery by gmrhodes13 ANH Stunt Centurion Visual Checklist by Sly11 and Wingnut65 ANH Stunt Centurion Photo Submission Guidelines by justjoseph63 (PDF by Sly11) EI Requests TKittell (Robert) - 100 AM Dargas (Richard) - 163 ATA gmrhodes13 (Glen) - 291 ATA Boba_Skywalker3 (Dominic) - 310 ATA TK6682 (Michael) - 337 RS Props Warwitch (Gabriel) - 340 TE2 EnemyZero (Tom) - 355 ATA ukswrath (Tony) - 435 ATA sylverbard (Mark) - 456 ATA YESSRAM (Yessid) - 465 ATA CrookKnight (Shawn) - 638 AP Cricket (Christine) - 700 RS Props TheRascalKing (Justin) - 807 ANOVOS Wargasm (Joshua) - 810 ATA lucnak (Luc) - 815 ATA Jared (Jared) - 841 ATA TK 71627 (Jose) - 850 WTF REAPERofDAISYS (John) - 944 ATA echo327 (Erick) - 948 ATA equuspolo (Ardeshir) - YR2019 ANOVOS Ruffalo - 949 RS Props husky68 (Robert) - 953 AP revlimiter (Adam) - 1037 AP benthemonkey (Ben) - 1044 RS Props Starkiller (Marek) - 1047 Anovos Nairy (Jonatan) - 1051 RS Props (also Hero) Doggydoc (Gerald) - 1052 AP MaskedVengeance (Caleb) - 1055 ATA Centurion Requests gazmosis (Steve) - 32 ATA Solcar23 (Carlos) - 52 ATA JEDISTAR (Charlie) - 60 ATA niugnep (David) - 76 AP piklz36 (David) - 86 ATA Jancelot (Chris) - 92 AP Techne (Chris) - 108 ATA RampantLion (Leonard) - 115 ATA Vader's Wingman (Jason) - 123 ATA ukswrath (Tony) - 144 ATA DarkOrder66 (Christopher) - 160 ATA YESSRAM (Yessid) - 165 ATA justjoseph63 (Joseph) - 167 AM2.0/ATA Squimspickle (Aaron) - 213 ATA Cricket (Christine) - 316 RS Props Daetrin (Paul) - 326 TM Soulart (Teresa) - 335 AP jamihal (Jim) - 344 ATA Ruthar (Taylor) - 354 ATA TheRascalKing (Justin) - 396 ANOVOS menschie (Colin) - 404 ATA Scimitar (Eric) - 425 AP (photography) Bazz (Adi) - 436 ATA MissionTrooper (Andrew) - 454 AP Ruffalo - 457 RS Props OddViking327 (Colin) - 485 AM MightyAtom (Mark) - 488 AP (photography) revlimiter (Adam) - 508 AP MaskedVengeance (Caleb) - 522 ATA Purchase Options (my build) Armor and helmet: Affordable Trooper Armor (ATA) Undersuit: Trooperbay One-Piece Double-Zipper (courtesy of a GA Garrison mate) Password to access scruffynerfherder Boots: Imperial Boots 421 (NAME CHANGE: KeepTrooping) Gloves: See hand guards below. (mine) Hand Guards: justjoseph63's kit [NO LONGER AVAILABLE] Strapping: TheRascalKing's kit Holster: Darman's 8oz leather (tan straps) Neck Seal: Darman's Premium (zipper) Belt: TKitell's Imperial Issue TD Hooks: ukswrath's kit Mounting Hardware: justjoseph63's kit Hovi Tip Screen/Mesh: ukswrath's kit Helmet Fans: ukswrath's Cooling Kits by ukswrath (Etsy) Voice Mod/Amp: iComm + Aker amp Blaster: Hellhounds Props E-11 Alternative Accessory Options: TrooperTronix Helmet Fans Henry's Helmet Fans DIY Neck Seal by BrinkHouse Making a TK Neck Seal by Doggydoc Geeky Pink's Neck Seals Making a TK Neck Seal by Doggydoc Also see Joseph's Soft Parts List above Other External Resources Ukswrath's Website Less Intimidating Build by imperialbrewer TK41973 Blog Tony Barnett TK300 Website (snaps) | FISD wordmark used with Command Staff permission |3 points
-
Just make sure you practice, there is a very minimal time between soft plastic to molten mess, definitely try on a lot of scraps before proceeding with armor pieces3 points
-
I made a wood support of sorts... I kind of eyeballed the curve of my armor and cut out a piece of scrap wood in that shape (I made a flatter curved version later which was easier to work with). I also used a small piece of a wood paint stir stick to help flatten out the returns once the plastic was soft. You kind of "polish" the plastic while it is hot with the stick. Think of rebuilding the returns as a sculpting process. When you first build the return, it'll look kind of warpy. This is okay. Once it's all folded over, do another pass with the heat gun and flatten out everything again. Oh! Another tip... Be sure to mark with a pencil where you want your return to bend. A visual guide is really helpful to keep your return on track. And keep your heat focused only on the area where you want to bend. I shielded the areas above the bend (as indicated with a pencil mark) with a piece of wood stir stick. This will help prevent the rest of the kidney from warping above the return.3 points
-
No problems mate always worth asking. Sorry you have been waiting so long, Anovos has dropped the ball massively and it's just a shame how many are still waiting. If you want to have a look at what they have so far for the CRL head here https://forum.specops501st.com/forum/171-first-order-sith-trooper/3 points
-
Could use anything for strengthening, strip of plastic, abs paste, 2pack epoxy glue, resin and mat, JB weld, really what every you have handy. Any cracks you really want to get a hold on as soon as you can as they can split further with any pressure and movement.3 points
-
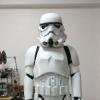
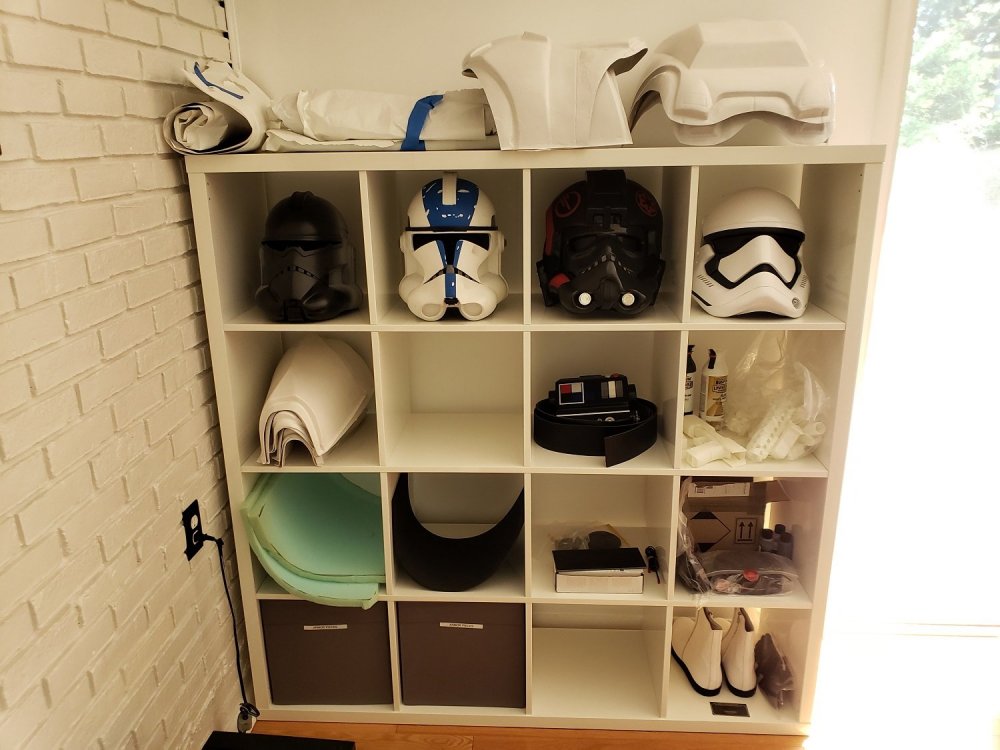
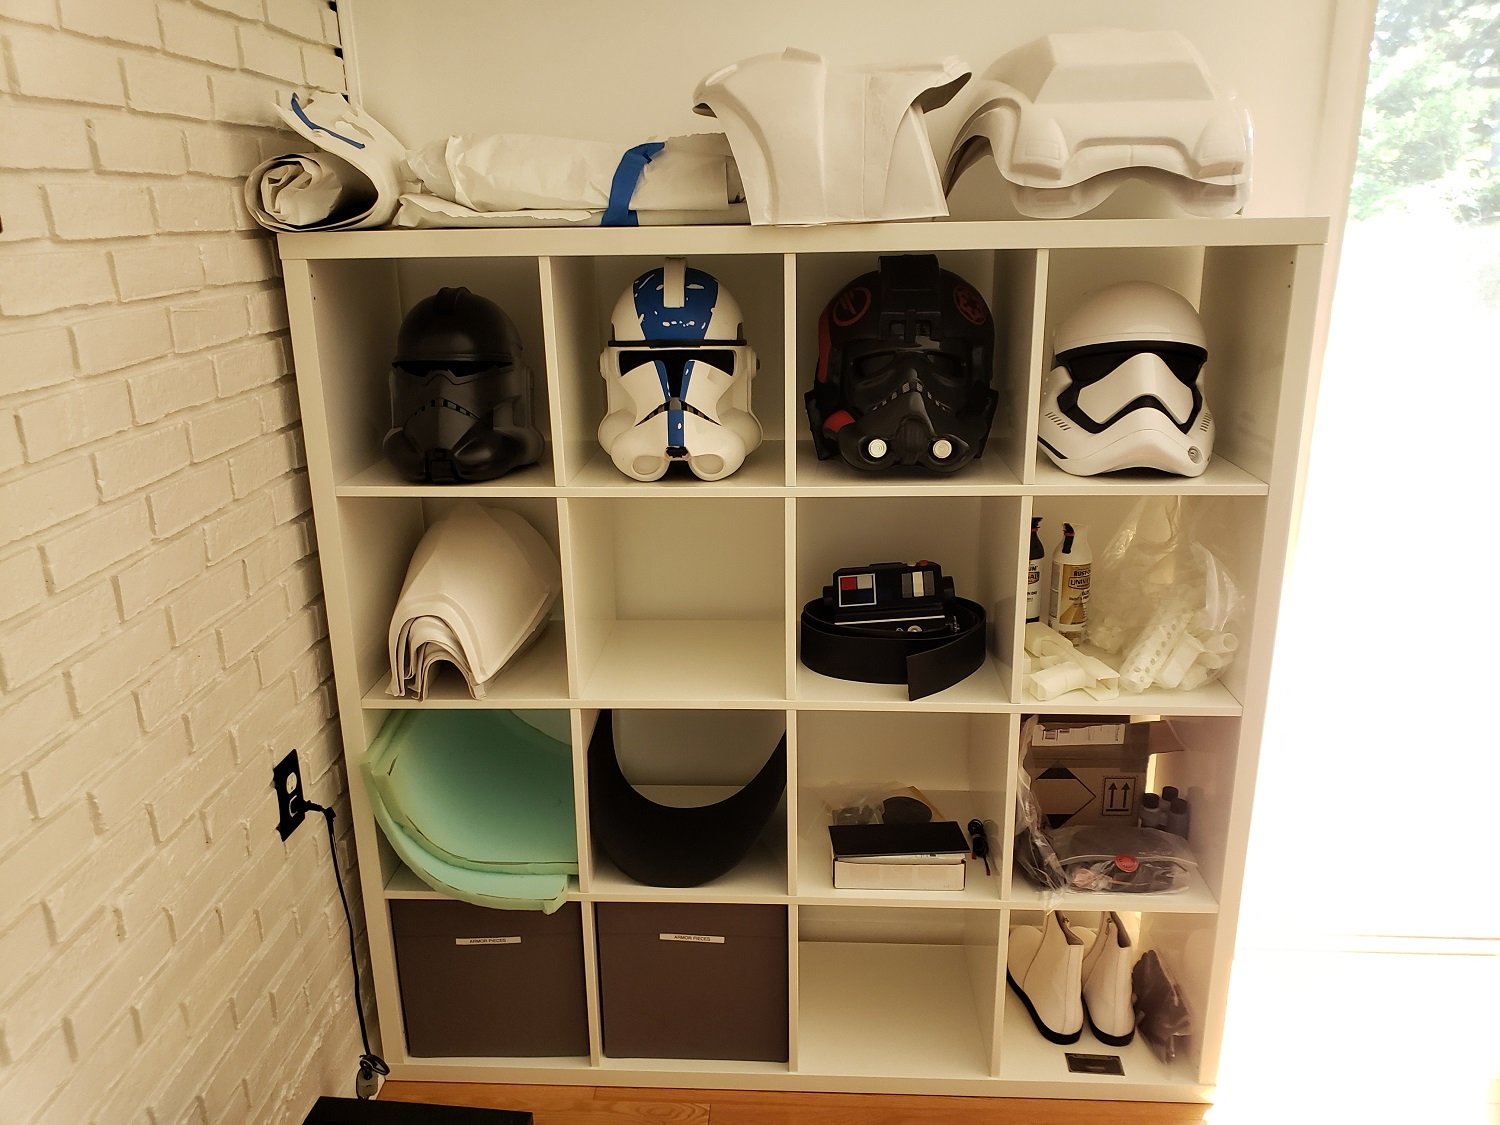
Feel like forever since I made my introduction post, but I'm finally starting my very own build thread! Been waiting for my KB armor to arrive since October and it's finally on the way, hurray! As I've done an ANH TIE Pilot and Inferno Squad build so far, this'll be my first "full armor" build. My goal is to go for Centurion level, so... that'll be fun. Pretty much have all of the accessory bits ready to roll, now just need the armor. Luckily enough my squad is doing an armor party next weekend so I am hoping to make some good progress on it there. I'm planning to document the build in detail, but we'll see how well I remember to do that as I go Parts: Armor - KB Props Helmet - Anovos Gaskets - Imperial Gaskets, Geeky Pink's, Sheev's Emporium (redundant much?) Belt - Belts of the First Order Gloves and Boots - Imperial Boots Neckseal - Anovos, Geeky Pink's, Sheev's Metal Holster - R2Dan Anything else I'm forgetting - Probably F-11D and SE-44C - Imperial Factory (updated 19 Oct 21) My collection, with all my FOTK stuff anxiously awaiting. Don't mind the clone armor still in progress
 2 points
 -
This is true. But if you're using a bracket system, you'll want to leave enough space for the bracket installation. Also keep in mind that you'll want the newly created return to be larger than the "finished" return. Consider it a seam allowance. The edges always heat faster than the rest, and they typically end up kind of warpy, no matter how much you smooth 'em out. Once you've made your new crispy return edge and are happy with it, you'll trim off the extra warpy areas at the edges, which will leave you with a nice, sleek return edge.2 points
-
Christine has given you some absolutely golden advice there, Emma. I know it may seem like a pain to make a template like that, but I have every faith that you will do a fantastic job, and it will be well worth the effort I promise. Just keep the heat gun a lower setting and take baby-steps. It may help to practice on some scraps first to get the hang of how far away from the armor you should keep the tip of the gun. Also, remember that the return edge does not need to be very wide... just enough to keep the bottom of the kidney from sliding over the posterior plate.2 points
-
I may have missed one or two, lol.2 points
-
Here are some size small rubber gloves: https://www.ebay.com/itm/New-Marigold-Industrial-Rubber-Insulating-Black-Glove-Size-Small-30-mil-flock/322167592127?hash=item4b02af54bf:g:1jIAAMXQlgtS1IsV The grip on these looks fairly accurate, and have the fingertip texture too.2 points
-
That sounds so scary! But yes hopefully backing the crack with glue and an abs square should do the trick, plus the rubber S trim will cover it up so it won’t even be visible, but better to be safe than sorry!2 points
-
Appears they have better luck supplying sewn costume pieces than hard armor2 points
-
Oh no!! Good catch- the plastic is very thin there. Do you mean you recommend paste or a thin piece of plastic to brace it? Currently I used a spare thin square of plastic and clamped it with some glue over the break2 points
-
Amen. Been there, done that, and it wasn't pretty, lol.1 point
-
Thats more or less how I've been joining the parts, then going back and "welding" them with a soldering iron and filament filler. Sadly this went at a weak spot. It was a very early print and I've changed a lot of how I print since, so I plan to reprint. That said I will repair this too so who knows, I need to fibre glass some bits anyway and maybe that will save this part?1 point
-
That came out excellently! I am not sure I have wood like that so I might have to go shopping at the hardware store, or get a bit creative. Thank you thank you for your help!1 point
-
I got a larger pair of the same gloves to use with my build. I got more than one pair, and used one of them for hot water baths and they worked well. So yours should work for hot water baths as well, and as Cricket said, only a bit of heat comes through after extended exposure (but it's not hot). I've never tried them with a heat gun, so I don't know how they would work, but they do provide at least some protection to hot water. Good luck!1 point
-
Some heat will go through them, at least heat goes through on mine a bit. If you leave your gloved hands close over the steam of a boiling pot o' water for a few minutes, you will feel it! The heavy rubber provides a protective barrier for a short period of time. Good enough to dip, shape, etc. Here's a link to what I use: https://www.ebay.com/itm/3217870016051 point
-
If those gloves are indeed 28mil, they should do very well. My chemical gloves are 14" long, 14mil thick and have served me very well through many, many hot water baths!1 point
-
Wanted to drill out the holes so I had an option to see red light (very small amount), not cannon but cool and can turn on/off as needed. Whoops! Replaced with brass tubing Gutted! Pew Pew button Now with more pew-pew1 point
-
I swear by Glam Gloves for my itty bitty hands. They fit well (and are Centurion approvable!). I once even found a pair on clearance at WalMart for less than a buck! Look for black gloves, just remove the decorative cuff.1 point
-
Congratulations Kevin, good luck with your build !!!1 point
-
Looking good. If you haven't done yet , you may want to take a look to this post about Return Edges. I think It could be useful as it has been for me. cheers1 point
-
Started with the scope. Switch will be on the top, so had to cut the scope in the middle. Switch in the scope Need to drop the lens into the housing Complete1 point
-
with a 850aw kit your going to have to paint it all if you want the color to match the greeblies so either way your going to paint1 point
-
Nice progress so far Josh, keep it up. We shall have some new visual guides for Expert Infantry and Centurion being added to this area over the next few days, be sure to print those out and have a look if you decide to go for higher levels of accuracy.1 point
-
I've researched build threads and seen many reference pictures about the return edges on different armour parts. As long as the forearm wrist and bottom of shins have no return edges, everywhere else is optional. I like the thick armour look, so I am going to keep a little return edge on some of my pieces. However the illusion of thick armour can also be prone to stress cracks/splits, so I will also keep that in mind.1 point
-
All the best! Looking forward to your build!1 point
-
Oh okay I thought I was crazy lol I was trying to restrain from asking but I’m still new so I did an impulse buy and got the sith kit from Jim tripon since I’m still waiting for my first order one from anovos wow can’t believe 3-4 years have passed already and I have everything for it except the armor lol so funny so I guess the sith trooper will be my first Sent from my iPhone using Tapatalk1 point
-
No Spec Ops are still working on it, they had a couple of projects to get done over the last few weeks so there has been another delay, I have been assured that they will be completing very soon1 point
-
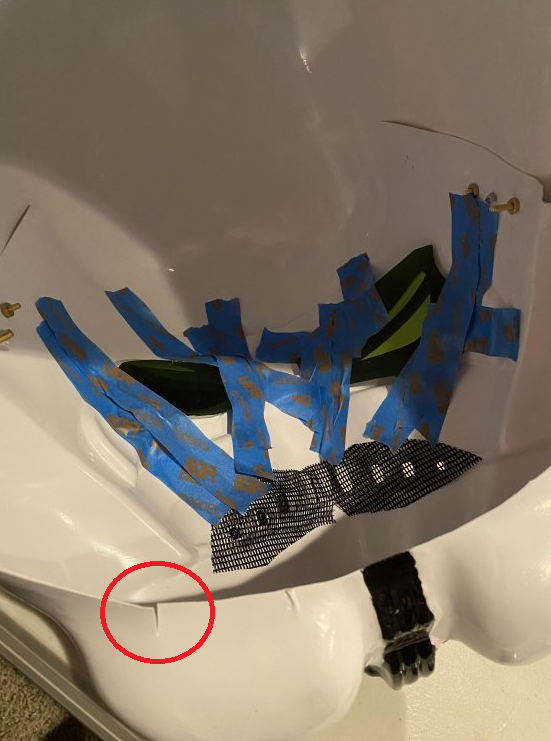
Looking at the photos of the helmet, I see a break that worries me ...Maybe you can stick a little abs on the inside, to stop the progress of that break. Maybe a piece of cloth soaked in cyanoacrylate or something similar can help too...
 1 point
 -
Hey guys, sorry for the lack of updates. I’m just waiting for stuff to come in. I’ve ordered a strapping kit, frown mesh, and some tools off Trooperbay. That’s about it.1 point
-
starting to work on the yoke and back area. completed pile of parts grows almost daily1 point
-
I havent gotten membership yet, however I sent over some $$!1 point
-
Hi Jay, and congrats on starting your build!! I have a few suggestions if I may... First, I would highly recommend starting a build thread here. This will serve a few purposes. You can (and should) ask all the questions you have in one area, which will help you better keep track (and show off your build progress)! Another reason to do this is so that you can post photos of any issues you may have. When it comes to asking for advice, a picture really is worth a thousand words, and seeing the issue will help us provide more detailed answers. Another thing you should check out are some of the build threads designed for smaller troopers. In my opinion, the best one is by Christine @Cricket which you can find here: https://www.whitearmor.net/forum/topic/38416-crickets-rs-stunt-build-for-the-vertically-challenged/ The forearms (and other armor parts) can be effectively cut down to size and still be 100% approvable at all levels, but again, photos will really help. I suggest opening an imgur account which will help with that. I have a tutorial here which will help: https://www.whitearmor.net/forum/topic/48799-posting-photos-using-imgur-101/1 point
-
I'm not a Legion member yet, but I intend to be this year, so I donated! I'm glad to be a supporter of this fine group! When we pool together we can do great things!1 point
-
Got a couple nifty new 3D printed parts from my buddy and his resin printer. They were found on Thiniverse here: Sterling SMG. A very detailed Sterling with another file of parts to turn it into an E-11. They are an excellent match to everything I wanted to fix on my Doopydoo. Kudo's to TK14082 for this great design. I have also threw on a coat of primer on the main parts and started painting some of the smaller bits.1 point
-
Many of us use Imgur, very easy to upload then copy the "direct link" to your image straight into your post1 point
-
You may want to use some app to store photos and then post then via direct link. most in this forum uses Imgur. Here are 2 links that may help: https://www.whitearmor.net/forum/topic/42381-howto-post-images-in-threads-using-imgur-easy/ https://www.whitearmor.net/forum/topic/48799-posting-photos-using-imgur-101/1 point
-
Now updated to match current CRL requirements. Visual guides updated by TK-50297 Wingnut65 Printable PDF below 09 HWT L2 EIB - Ver 002.2020.pdf1 point
-
Hey guys, Previously I have trouble finding a high resolution of the crosshair to be printed in HD on stickers as everything elsewhere is in JPEG format. So I decided to draw my own. based on references I found on the white armor (FISD) forum. Sharing it here for all to use/mod. (This is in AI format, so all may size it to whichever sizing required without it getting pixelated) Cheers! Happy Trooping Wilson TK31593 Preview: E11 Ratina Display V1.ai1 point


.thumb.jpg.77bd551337f7adc46a4b151e703df6be.jpg)