Leaderboard


Popular Content
Showing content with the highest reputation on 04/16/2020 in Posts
-
Hi everyone! I’m Brad Letner from SoCal. I found the 501st in 2013 while in Afghanistan. back then I thought I wanted to be a Vader when I grew up (even joined the Sith Lord forum as a potential recruit). Time passes, I retired from the Army in ‘14 and focused on my post- Army career. During that time I’ve seen a few 501st events and realized that at 5’10”, I wouldn’t make the best Vader AND it really only makes sense to have ONE at any single event - and TKs are forever! I’m buying a commission build from Dave’s Darkside Depot with AM 4.5 (or whatever number it’s up to) - filling the bucket with almost $400 of electronics from our exalted XO, ukswrath. Ordered my Imperial boots online too. So I’m over $1,000 invested with nothing to show for it yet! LOL But after 7 years, it was high time to take the plunge and dive in. Look forward to one day finally serving with you.3 points
-
Thank you very much everyone for your help! I've already started work to keep going.3 points
-
Hi , I have started with a Hasbro Mod E11 , but when I decided to go for Centurion Level I had to change it, now I'm trooping with a Praetorian E11 Blaster, hard Rubber made and very accurate and excellent, (my own opinion), for trooping in case of droping it. Another option that some troopers use is a DIY resin kit from Doopydoos , but not always in stock. https://www.doopydoos.com/stormtrooper-e-11-complete-anh-e-11-blaster-kit-offer-2685-p.asp here a build thread for this kit. https://www.whitearmor.net/forum/topic/16135-doopydoos-all-resin-e-11-build/ Cheers2 points
-
Welcome to the TRUE home of shiny white armor, Brad! Fantastic to hear that you went with AM. My Stunt and HWT armor are from them, and even after countless troops no cracks, splits or yellowing. If you haven't had the chance yet, I would highly suggest getting all your build materials in place before you start. Being ex-military I am sure you have some mad organizational skills as well as patience... (hurry up and wait, lol) so besides research, my advice is take... your.... time. Once you start your build thread, be sure to ask any and all questions you may have and post up lots of photos. We LOVE photos, and they are especially important if when you run across an issue. We are here for ya', and thank you for for your service!2 points
-
Hi, I think the following post can be helpful for all about return edges. Cheers2 points
-
Thank you! Will definitely post in the build thread. Right now only pictures are an empty wallet and semi-tolerant wife. LOL2 points
-
Welcome to the FISD, Brad! Commission build or not, start a build thread and post some pictures. There are always little things to finalize and we are more than happy to help you with that. Good luck!2 points
-
It’s ANH set. The back and butt have to be cut2 points
-
I figured it out thank you and it’s from WTF Sent from my iPhone using Tapatalk1 point
-
Brad, I have found these forum posts that may be interesting and usefull for you: Cheers1 point
-
It looks great in detail. Just for your consideration I noted a detail in the mold compared to my Praetorian. This is just a comment, I think both are expensive and great quality and have some details. If you want I can take some pictures of my E11 for you to compare. cheers1 point
-
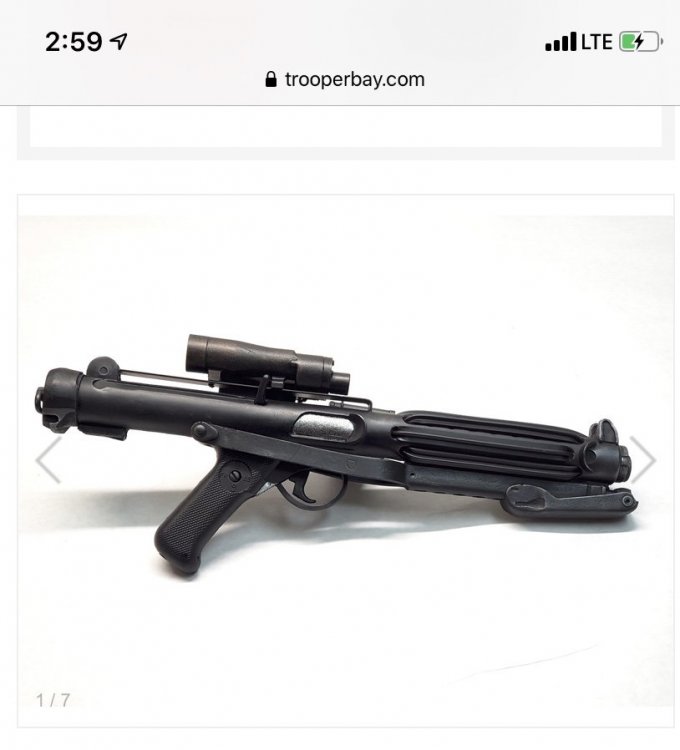
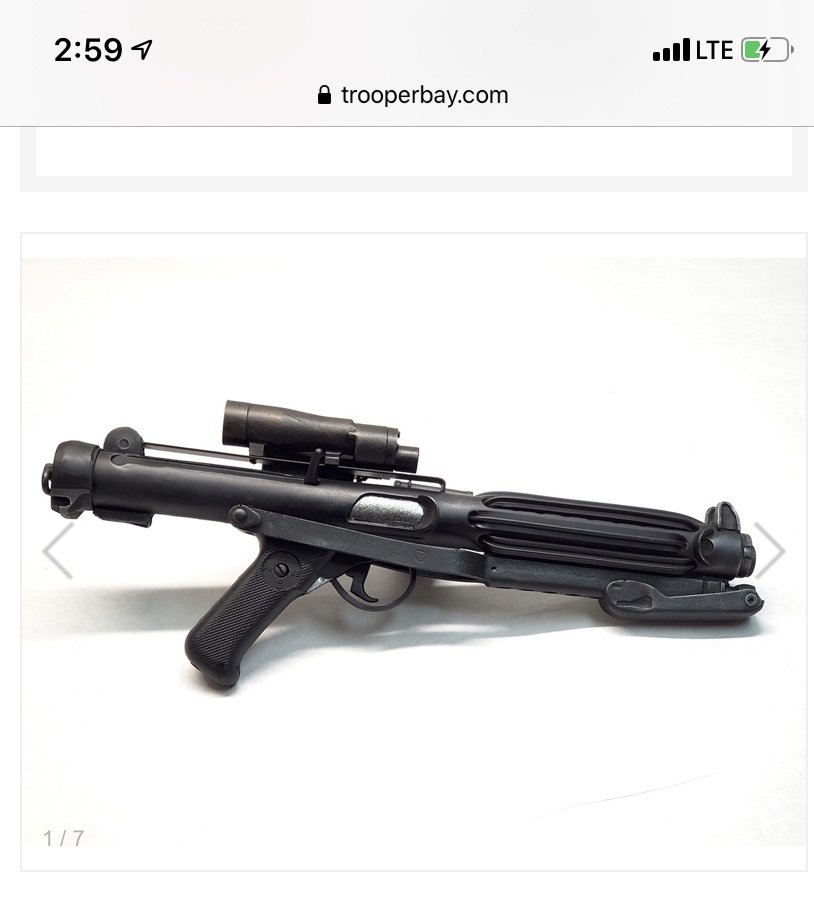
This is the TrooperBay E-11. Write up all how it’s molded from the original British MG, etc, etc. https://trooperbay.com/tfx-l2a3-blaster-rifle But $250. Dang.
 1 point
 -
Hello and welcome aboard1 point
-
If you can provide a link to the ebay sales thread or some detailed photos of the ad that would be great. Please note that many (if not most) ebay sellers tend to stretch the truth when it comes to Centurion level approval, including armor and weapons.1 point
-
Welcome to the FISD Brad Sent from my SM-G960F using Tapatalk1 point
-
Still semi-tolerant? Oh, I remember those days.1 point
-
Welcome future Trooper! AM is a great choice, you will love it!1 point
-
Welcome Brad, TK's are the best and unfortunately there will never be enough of us around to properly defend the empire! Sounds like you've got a lot of great help right there in your Garrison. That UKSwrath fella has been heard of all around and has great stuff. Sent from my sorrosuub C1 comm link device using Tapatalk1 point
-
Hi Brad, Welcome to FISD, glad you have started your new mission as a future Imperial Stormtrooper, feel free to ask questions and looking forward to see your first photos.1 point
-
Welcome to the FISD, Brad. Like Anthony said, browse the forum and have a look at the Getting Started Section. You already ordered your armor, but there is still a lot of other useful information. And if you get stuck, just ask and we'll try to help. Enjoy your TK journey and don't forget to post pictures from your big brown box, once it arrives...1 point
-
Welcome Brad! Good luck with your build. It sounds like you're off to a great start. Go ahead and browse around the forum and ask questions. We are here to help.1 point
-
Hello Dan! Welcome to the FISD!1 point
-
It's an ugly mess that I need to clean up a bit but, it's in the cheek well. Sent from my sorrosuub C1 comm link device using Tapatalk1 point
-
Hello and welcome to FISD.1 point
-
Welcome to ranks of Centurion, well done Trooper.1 point
-
LMAO, Delivery Covid 2028 give or take a month or 4 https://www.anovos.com/products/ohana-mask?_pos=6&_sid=fc6ca6bdc&_ss=r
 1 point
 -
Is your easy assemble board available for purchase? Sent from my LYA-L29 using Tapatalk1 point
-
There's no way back Trooper, go for Centurion!!1 point
-
Belt is back on my TK washing my canvas belt has removed all the stains off it and brought it back to a good white. How the belt now sits on my ab Sent from my iPhone using Tapatalk1 point
-
Everything looks great congrats!!!1 point
-
Thank you all! This is definitely a dream come true! Once things get a little back to normal out in the world, I can't wait to get out there and start trooping!1 point
-
OH NOOOOOO... dang, I know that people take photos with the blaster across the front of their body and block important details, so I intentionally tried to hold it to the side, but okayyyyy... might be a couple days before I feel like donning it all again, it's an ordeal haha Thanks tho! My R1 suit has been taking up all my time and energy...1 point
-
Hi Gaines, Thanks for your application and for all of the fixes! It's really inspiring to me to see a trooper bringing an older set of armor to EIB (and hopefully Centurion!). We're glad to see you here. CRL and EIB Application Requirements All required photos are now in and, after review, we are pleased to welcome you to Expert Infantry rank. On behalf of Joseph and myself, many congratulations! Other-Armor Fit/Assembly In this area we review observations made by your fellow troopers and the DO team. Some observations may lead to suggestions to improve the overall look of your armor. Note that we consider both text (CRL) and pictures (screen caps/reference images) when reviewing submissions Starting from the top, the painting on your vocoder is a little soft compared to the screen-used examples. It would improve the accuracy and look of it if you make the outline a bit sharper. Reference Images: Next, as was already pointed out, just be careful that your shoulder straps aren't tucked underneath your back plate when you're kitted up: And I'll mention is simply as a note of accuracy but I don't think it's possible due to your height - on the screen-used suite, the rear part of the shoulder strap did not have the large tab. If you were shorter I'd suggest you remove it, but as it is, it would likely make your straps too short. Reference Images: Finally, your thermal detonator clips should be flush against the plastic panel. This won't be blocking since it's not visible while you're dressed, but if your TD can take any more tweaking, we're strongly suggesting you replace and reposition your clips. Reference Images: Centurion Requirements In this section we prepare you for Centurion. More photos may be requested in the future that allow us to make better decisions on possible adjustments. If there are any areas of concern they will be discussed here. Because Centurion photos show much more detail than EIB, items to pertaining to Centurion might be seen there and not here. We try to point out all that we can from what is seen, but the final accuracy is the responsibility of the trooper. Starting at the top, the L3 CRL states: Ear screws shall be slotted, flat topped, countersunk and painted white. The lower screw on your right ear is sticking out just a bit. Should be easily fixable. You can lightly turn a large drill bit in the screw hole if you need room to countersink it. Reference Image: Next, the L3 CRL states: There should be a minimal gap between the shoulder armor and the chest/back plates. Yours actually look quite good, especially from the front, but it does look like you may have some room to bring them in. The right shoulder bell especially looks like it could have it's strapping shortened to bring the top of it closer in. You'll also want to double check that you've removed all the lower return edge of the shoulder bells. This isn't an area that we're extremely picky about due to the wide variation in troopers' body types, so do your best. Reference Images: Moving along, the L3 CRL states: The plastic shoulder straps need to be held down in the back via a white elastic band to the white fabric that connects/bridges the chest and back piece. I'm not sure if it's there and I can't see it, but it doesn't appears you have the elastic in place. It should be about 1/8". Unfortunately elastic is extremely difficult to find these days due to folks sewing masks, so you may need to wait a while if you don't already have some. Reference Image: Next, the snap on the ab plate (the 'Han' snap) should have the white paint removed. This isn't specifically called out in the CRL, but the reference photos are clear. Reference Image: Moving on, the L3 CRL states: Ideally there no gap between the abdomen and kidney armor. You do look like you have room to close that gap on both sides of the ab/kidney. Viewed from the front, I actually wonder if you could close the left side gap with a bit of a hot water bath on the kidney to help it curve around your body better. Reference Images: Moving on to the belt, the L3 CRL states: The top of the ABS ammo belt should sit at or just above the bottom of the central and vertical abdomen button panels. As compared to the screen-used suits, your belt is sitting a bit low. You can see that the top of the ABS belt can even slightly overlap the bottom ab buttons. On my own kit, I added two thin strips of velcro to my ab plate to keep the belt from sagging. Reference Images: Next, the L3 CRL states: Canvas belt must be firm / sturdy in appearance. No creasing or sagging I'm not sure what material you're using for your belt, but it definitely seems to be creasing. I'm not sure if it would need to be completely replaced for Centurion, or if you might be able to open it up and put a layer of sturdy canvas or other stiffer material inside. Reference Images: Finally, regarding your blaster, the L3 CRL states: The blaster may have minor weathering or base metal exposure however, T-tracks and grips shall have the appearance of black plastic. Since the T-tracks on the screen-used blasters were made of plastic, they shouldn't have any metal weathering on them. Just a few minutes with some black paint should fix that right up. Reference Images: And that's it! It's a number of fixes before you can apply for Centurion, but I hope you'll enjoy the process of making your armor even more screen accurate. It really strengthens the idea that our costumes are never truly 'done.' Please accept hearty congratulations from me and Joseph on achieving EIB!1 point
-
William Stuart 90913 Centurion Letter Sha Sha Thank you! http://www.whitearmor.net/eib/certificates/90913-centurion.png1 point
-
Jon Hannaby 14097 Centurion A4 Sha Sha Thank you http://www.whitearmor.net/eib/certificates/14097-centurion.png1 point
-
José María Sánchez 30173 Centurion A4 Sha Sha Thanks... http://www.whitearmor.net/eib/certificates/30173-centurion.png1 point
-
Hi William, Thanks for your application and for your patience. CRL and Centurion Application Requirements All required photos are now in and, after review, we are pleased to welcome you to Centurion! On behalf of Joseph and myself, many congratulations! Other-Armor Fit/Assembly In this area we discuss areas that could benefit from additional improvement. Note that we consider both text (CRL) and pictures (screen caps/reference images) when reviewing submissions As mentioned in your EIB review, we'd ideally like to see the ab paint a bit smaller, but ultimately the choice is yours. Reference Image: And that's it! Hopefully we'll all be able to get out and troop soon, but until then, please accept our hearty congratulations on reaching Centurion!1 point
-
updating this project a bit, i canceled the led drivers and moved to 3 transistors + 3 resistors 1/2w to control the 3watt RGB super bright leds i will post more updates with the scheme1 point
-
Small progress over the weekend. Spent almost 2 hours with my mouse sander and armor parts to get the seams super smooth. I had hoped to do more, but all I was able to tackle was the back plate, a thigh, and both shoulder bells. In the pic, the box in the front is all of my son's FOTK parts. The box behind it is all of my Shoretrooper parts (progress currently pending completion of this build). You can see some of the completed PPE face shields I've printed out, too (they're the orange curvy things on the left). My printer has been busy! Glad I was wearing an N100 respirator for sanding. Even though I was working outside, I was covered in powder-fine dust when I was done. I would not want that stuff in my lungs!1 point
-
I know I am VERY late to the party, but may I add that those helmets may in fact be re purposed anovos helmets? It’s not too far fetched, as disney owns them. I own an Anovos TK kit, and the helmet looks identical to me Sent from my iPhone using Tapatalk1 point
-
This is truly an awesome blaster, especially since it is made from wood and therefore lightweight and PERFECT for long troops! While this particular E-11 would be 100% acceptable at Expert Infantry level, unfortunately it can not be passed at Centurion level as there is no cocking handle.1 point


-Copy.thumb.jpeg.8715a83cb32a3e6745f879885b26e712.jpeg)