Leaderboard


Popular Content
Showing content with the highest reputation on 04/13/2020 in all areas
-
Alright, time for another update. It's been pretty rainy here in Southern California for the last couple weeks, and being immuno-compromised with all this COVID stuff, I've been stuck at home almost 100% of the time. So wanting to work on armor, but weather not permitting and not having some supplies has made for a frustrating few weeks! Nonetheless, I have made a bit of progress. The barrel has finally been sanded and moved to its second coat of primer (it has more ridged details than any other panel so I've admittedly been avoiding it...) Got the helmet on its second coat as well - it wasn't rough enough to need filler primer, so I did a coat of 2x flat white primer first, then gray Sandable, then it'll get flat white again. With Covid lockdown, I can't have my paint guy do it after all, so it's on me. It'll be a challenge! More on this in my next post. The helmet is really a beautiful casting and didn't need tootoo much cleanup. I'm glad I added resin to it tho - it is light, but I worried about its strength. I also lowered the brow trim with a file a bit, if you notice. Debating doing more... Speaking of which... if you haven't caught on to my perfectionist yet rattle-can paint technique yet, I'll explain it a bit more below. Work left-to-right, as needed, for each panel: Step 1: Every panel gets a rub down on both sides with some wet/dry 100grit just to literally clean them up and remove any mold release/wax/residue/loose glass strands whatever. Step 2: Rough panels get a coat of light grey filler primer - this stuff sprays pretty chunky but does a great job of filling any pinholes and is pretty high-build to give an idea of any larger low/high areas on the panels (ie, the inside of the thighs were real bad, same as Jeff's), but sucks to sand. Step 3: Sand with like a 200grit block. Step 4: Mark with a pencil any pinholes/chips/whatever and fill with body filler, then sand with a 400block. Step 5: Spray with dark grey Filler primer - it also will fill any leftover pinholes. The alternating light/dark primer colors reallyreally helps you see when you've sanded through one layer and into the next, as well as makes any small imperfections "pop" and be much more visible, and easier to fix. Step 6: Sand with like 4-600grit. Step 7: Spray with medium grey primer - most panels only needed two colored primer coats before white, but I used a 3rd on any rough ones. More body filler as needed after it dries. Step 8: Sand with 4-600grit. Step 9: Spray entire panel, front and back, with flat white primer - by now, any pinholes or imperfections should be filled - if not, you'll really see them with the contrast of the white and can fix them. Step 10: Wet sand Step 11: Mask flat backsides of panels and spray with Gloss White. Step 12: Wet sand to level any orange peel. Be careful not to actually remove any of the white, exposing darker bottom layers, just level it. Step 13: Spray with 2K Gloss Clear (as many coats as you can afford haha) Step 14: Wet sand/polish as needed. Yea it's not fun. My arm hurts from sanding, but damn is it gonna look good (I hope!) haha As for the helmet, I always like spraying my interiors black, so I did - using Rust-oleum truck bedliner. It has a nice texture and I'd like to think it gives the helmet like 0.01% extra impact strength. The helmet also received two additional layers of resin, so it's MUCH stronger than previously, especially in the dome, and I feel a thousand times better about it. It was pretty thin in a few spots before... I masked the eyes with tape and neck trim area with a garbage bag and sprayed a coat of sandable primer just for good measure after scuffing the interior resin with 100grit. I then put a bit of Bondo on a few low spots and sanded the filler once with 200 to even it out a bit and help the bed liner stick. The interior doesn't need to be anywhere near smooth, but I figured it couldn't hurt and would level some of the glaring imperfections. The photo doesn't do it justice, but it looks great with the black interior. I'll paint in around the eyes after I cut the tube stripe vents out, which I also started. Holy heck is this gonna be a pain with just a drill and jeweler's files, unless I find a better bit that fits for my Dremel... Not doing the cheek or rear traps forsure. As for the rest of the armor, it all finally got a coat of resin on the backside, so it's ready for more painting and sanding. I made decent progress on the thighs, biceps, and accessories (which are now in flat white primer), but the forearms and shins are still on their first coat of filler and are the furthest behind. I'll be working on them this week, weather permitting. The remainder of the armor is near the end though - I began masking the backsides of any of the panels that were ready for final gloss and clear. I'd like to keep the backside of the panels flat white. My goal is to get EVERYTHING done in white gloss, wet sanded, and masked before I spray the clear all at once. 2K is excellent and will hopefully give me a strong, durable, automotive-quality finish, but being 2-part in nature, I will have 48 hours MAX to use an entire activated can. And at about $20USD a can, I don't want to waste any. I've been working in stages on most of this stuff, but it will all get clear at once! I'll probably try to do all the armor with my first can, then the helmet and an additional coat on everything else with the second can. From there, strapping and fitting should come together pretty quick, I hope - I have most of it together already. I'll be using Velcro on most of the suit to allow it to be easily adjustable, then I'll likely switch to snaps down the line (it's a specialty of mine haha), once I know I have the suit fitting well. On the health front, I had great PET scan results come back and my cancer is no longer showing as "active" on the scans. I got cleared to do 4 weeks of radiation treatment starting next week, and then should be done with this cancer nonsense by summer if all goes well. Fatigue is the major side-effect of radiation, as opposed to the nausea of chemo, so we'll see how it plays out and affects my progress on the armor. Priorities tho. That's it for now! Thanks for reading.6 points
-
As we continue to improve our support for the FOTK we've comprised a list of all the Hard & Soft goods vendors to help you with your build. We will continue to monitor and update the list as needed. Just a reminder the FISD does not endorse any particular vendor, nor is responsible for any transaction between you and the vendor. Please do your research before purchasing. Armor/Helmet: Jimmiroquai - Origin PHILIPPINES: Kits are partially assembled/fully trimmed lightweight fiberglass (ready for rigging and painting). No issues with quality or service reported. Contact for delivery times/price details. FB Link Here, Email Here or send a private message @jimmiroquai Imperial Surplus (Kevin Weir) - Origin USA: Kits are made of ABS and require trimming and assembly. Armour kit is vac-formed with ABS and cast detail parts and decals are included with the kit. Quality has been solid, communication and service good. Kits ship out in 4 weeks or less Link Here WTF - Origin USA: TFA and TLJ new kit awaiting member feed back and reviews for quality etc. Kit made of ABS with some resin parts. Link Here Denuo Novo - Origin USA: Purchase Anovos and are now supplying kits are made of ABS and will need to be trimmed and assembled. Website Link Here KB PROPS Unavailable Origin USA: Kits are made of ABS and will need to be trimmed and assembled. No issues with quality or service reported. Contact for delivery times/price details. Link Here, Email Here Armoryshop Props - Origin RUSSIA: Supplies a range of First Order Armour and Specialised 3Dprinted Helmets Link Here No longer Listed 850 - Origin USA: Kits are made of ABS and will need to be trimmed and assembled. No issues with quality or service reported. Contact for delivery times/price details. Link Here No longer Available Anovos- Offers a "Pre-order" FO kit at this time, but due to legal issues and extended (1 year plus) wait times is no longer recommended or available Soft goods vendors: Soft goods assorted (Soulart) - Origin CANADA: Neck seals, Harnesses, Shiny biker shorts, First Order gaskets, Phasma capes. Link Here Soft goods assorted (Imperial Gaskets) - Origin USA: Rubber gaskets, Pauldrons and Waist belts. FB contact Soft goods Rubber gaskets (Thorsson Associates Workshop) - Origin USA: Link Here Email: [email protected] FB: https://www.facebook.com/Thorsson-Associates-Workshop-112076042142986 Soft goods assorted (Trooper Bay) - Origin USA: Link Here Under Suit - Stormtrooperundersuit Link Here link not working Gaskets - Sheev's Emporium - Link Here (Facebook sales page) Belt - Trooperbay Origin USA: Link Here ?Belt - Belts of the First Order (JAFO)- Origin AUSTRALIA: Link Here Boots - Keep Trooping (formerly Imperial Boots) Origin CHINA: Link Here Crow Props Origin Ecuador South America: Link Here Gloves - Keep Trooping (formerly Imperial Boots) Origin CHINA: Link Here Endor Finders Origin USA: Link Here Trooperbay Origin USA: Link Here Neck Seal - The Dark Side Closet Link Here (Facebook sales page) Sheev's Emporium - Link Here (Facebook sales page) Suspension - Awaiting vendor Waist belt pouches - Trooperbay Origin USA: Link here Hardware vendors: Holster - R2Dan. Origin GERMANY: Other hard accessories available by application. V2 Link Here Hand Plates - As above Shoulder bell supports- (Accuracy upgrade) - ukswrath Origin USA: Link Here Waist belt center box base (Accuracy upgrade) (Empire 3D) - Origin AUSTRALIA Link Here Machined metal components - Justin Morrison Origin UK: Parts for Blaster rifle and pistol mounting, Resin holsters and other greeblies, machined metal components and more. Email Here FB links https://www.facebook.com/groups/1654472361474254/user/802819468 https://www.facebook.com/kingleezard Helmet Lens - OPLE props Origin GERMANY: Link Here Accessories: Pauldron - Denuo Novo (No stock currently) Pauldron - Trooperbay Link Here Riot Shield - Awaiting vendor Tactical Vest - Awaiting vendor 3D files: 3D print files TLJ helmet (Sano) Sanotized Creations - Link Here 3D print files F11D (The5thHorseman) - Link Here 3D print files SE-44C (The5thHorseman) - Link Here Holster 3D files: 3D print files Holster (TheRascalKing) - Link Here Commission builders: Crooknight - [email protected] dbetters - [email protected] Building Guides/Thread,Tutorials & How To: Please refer to Building guides ... Weapons: General - Link Here F11D - Branfurh Studios (Etsy shop) Link Here Executioner Laser Axe - Armory Shop (Facebook sales page) Link Here / Etsy shop Link Here 3D print blaster kits - The Imperial Factory - ( Facebook sales page) Link Here Email Link Here Electroprod - (Empire 3D) - Email here. Link Here Picatinny rails: Purchase: F-11D/E-11 Picatinny Rails - (justloseph63) - Link (purchase) F-11D/E-11 Picatinny Rails - (evike.com) - Link (purchase) F-11D/E-11 Picatinny Rails - (m416gelblaster) - Link (purchase) Free 3D files: F-11D Picatinny Rails - (themaninthesuitcase) - Link 3D files E-11 Picatinny Rails - (TK14082) -Link Part of Rogue One 3D files Tactical Vest 3D files - Tactical Vest Slider Buckle Link Please refer to Vendors weapons list for up to date links/info5 points
-
Sounds great, just let me know if there's anything else needed. Having fun working on this. Been trooping it for years and have been meaning to do this. Glad to finally get going.2 points
-
It's been one of those days, you know? haha, sorry for that.2 points
-
Hey everyone! Long-time Star Wars fan, first-time cosplay! I'm talking movies, shows, books, and games; canon and legends; all of it! I have a bunch of Disneyland lightsabers, even one from Savi's, and a Rubie's Jedi robe, but nothing so legit as a movie-quality Stormtrooper costume! I met up with a guy in Feb who showed me his ANH TK and ESB TS. So awesome! I wasn't supposed to be interested, but I couldn't help myself. He introduced me to the websites and resources and I was hooked! I started looking around the 501st and thought I'd check out some Phase II Clonetrooper armor (the customization options were intriguing), but I knew that my first costume just HAD TO BE a Stormtrooper! Looking through the versions, I really like the crisp lines, refined details, and vent depth of the Rogue One TK! I checked out the vendors and decided on Jimmiroquai! Sadly, my wife was not on board with the financial cost or required time to produce a full suit. She was more open to starting with a helmet, and if I enjoy it enough and improve my DITY skills, then supposedly we’ll readdress the rest of the armor. So I ordered Jim’s R1TK helmet a few days ago and, COVID-19 restrictions permitting, it won’t be too long before I get started! For now, I’ll just keep scouring the forums to gather everything I’ll need for my helmet so I’m ready when it arrives! The work looks daunting, but I think starting with just the bucket will help me focus and ease in. Plus, I’m sure this community will provide plenty of guidance as needed. So excited to take my first step in joining the 501st!1 point
-
Hey Dan welcome to the FISD. R1TK exciting. Looking forward to your progress, helmet or other.1 point
-
Welcome!1 point
-
Hi all Another little update. I wanted to find a way to get a really nice finish for the wrist end of the forearms. So, rather than scissors, Dremel or saw, I decided to literally just sands the whole edge with sand paper. Full details of the process in this 6 minute video; Here’s some finished pictures. I’m really pleased with the end result. [emoji1303][emoji1]1 point
-
Submitted my photos this morning and just got the word that the judges all agree that I meet approval! I couldn’t be happier and prouder of this build. It was quick but I loved it, especially building the pack. Sent from my iPhone using Tapatalk1 point
-
Thanks man, couldn’t have done it as quickly without your awesome tutorial! Sent from my iPhone using Tapatalk1 point
-
Great work, William! I'll be with you soon.1 point
-
Welcome to the FISD Dan! Great story. Everyone starts small It gets addictive. But a great kind of addictive. Especially the helping out parts. Enjoy your journey! Good Luck Future Trooper!1 point
-
Welcome to the FISD, Dan. It can all seem daunting at first, but it is not as difficult as it might look. I think you will find yourself a very satisfying hobby at the end of the day. You will also learn to better manufacture "alternate facts" for the benefit of your wife and your marriage.1 point
-
Hi Chris, The cut line you were recommended won’t really accommodate the ears. The ears are more of an S shape so the helmet needs to follow; The comparison above is to one of my builds (not a screen used helmet) but the blue line shows the cut line on the back/cap section. The green line shows the approximate alignment of where the ear cap will sit. The blue line and green line must match up to allow the the ear cap to cover the seam (where the two parts of the helmet meet). As such, and in this video that I did, I’d suggest rough trimming your ears first - you can then hold them up to the helmet and see where the back/cap section needs to be cut. On another note, and as per the helmet alignment link that TKSpartan shared, there are common traits with stormtrooper helmets. As below, the slight rise in the brow section (compared with the mould line on the back of the helmet) is one of them. Below is a comparison to a screen used Hero helmet; Hope that helps a little. :-)1 point
-
I still follow this thread after 4 years [emoji16][emoji106] - stellar job girl! Sent from my iPhone using Tapatalk Pro1 point
-
Is this correct? Having a hard time finding a thread for a Level 3 ANH Hero only stunt was wondering how much of a difference that made?1 point
-
Very cool! nice work1 point
-
Welcome Dan. It may seem daunting but once you've completed one piece you'll sit there starting at what you've made feeling a sense of glorious satisfaction and feel invigorated to complete another. Keep researching and preparing my friend. You've just stepped aboard a rollercoaster of pride. Sent from my sorrosuub C1 comm link device using Tapatalk1 point
-
Hello and welcome aboard, good luck with the build1 point
-
Came out a treat, nice work1 point
-
Hi Dan, welcome to FISD. Congratulations for your first steps in becoming an Imperial Stormtrooper. Looking forward for your Helmet build thread and don't be shy in asking questions, we are here to help. Cheers1 point
-
Thermal Detonator....Done End caps fit together easy enough, and got the faceplate/control panel centered and glued....Final length right at 7.25 inches. Used some metal snips to square off the corner as @ukswrath mentioned. Next I needed to find the correct screws as the ones Anovos sends aren't accurate. I had ready however that the ones Anovos uses to attach the ears on their helmet while wrong for the helmet are the right type for the thermal detonator! Right: Anovos Incorrect "V" shape philliips screws Center: Anovos screws from TK Helmet - TD accurate pan head slotted screws Left: Replacement TK helmet accurate angled screws Painted the heads black: Screwed the TD together. Done!1 point
-
Finally got me a set of rare earth magnets. Should suffice to give me a brief idea of how the helm will look when I put the face and cap together. Face - Front -1 Face - Side - 1 (Note: the Brow area still needs to be even out a bit so I am still working on some trimming.) Face - Side - 2 My only dilemma is trying to figure out if I can still wear my prescription glasses underneath the helm.1 point
-
Just finished all the cutting and filing. Again going for level 3 cert.1 point
-
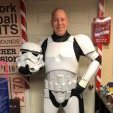
During this scary time.. I had to get the ol' gear out and test it after some major repairs due to cracks and such... Was out entertaining the building while many are in lock down due to COVID-19. Stay safe all!!
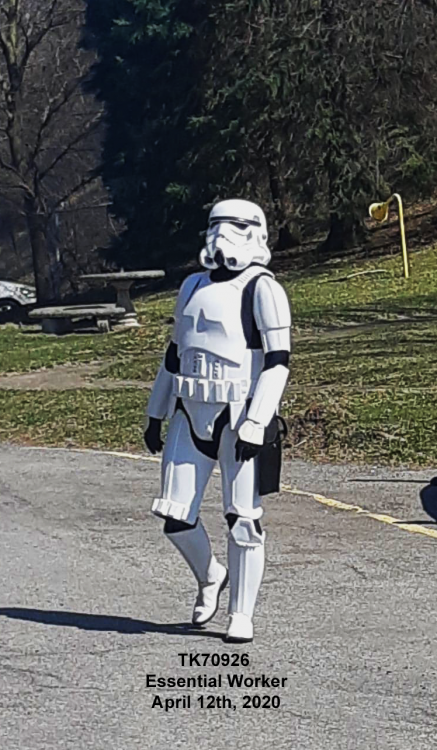 1 point
 -
@justjoseph63 ah, phew! thanks, and glad it gets your approval @ukswrath thank you so much! Your build guide continues to be incredibly helpful.1 point
-
Fair enough, I appreciate the attention to detail since I’d like to go for centurion straight away! The rivets are ~10mm from their respective edges as shown below (if you can’t read the display on the calipers they’re set to 10.01mm). Ab plate: Kidney plate: W/O calipers:1 point
-
Nice work mate1 point
-
And there we are. Just need to add the foam, trim the bolts, replace the nuts with white ones, and paint the light tips on the front. Sent from my iPhone using Tapatalk1 point
-
Bringing joy and even giggles is what it's all about1 point
-
It may have been a little too thick. But I’m a big fan of over-engineering things so they’ll never break. I hate doing something twice. Sent from my iPhone using Tapatalk1 point
-
Nice work Michael, looks awesome1 point
-
I realized this too late and didn't fix it.. I meant to say Sven, please tell me there's more but got mixed up.1 point
-
Guess who's coming to the USA!!!????? That's right.. Brattie will be in the USA this weekend at the Strong Museum of Play in Rochester!!!!! Whoohooo I can't wait!!!1 point