Leaderboard


Popular Content
Showing content with the highest reputation on 03/30/2020 in Posts
-
Thank you all very much. Cover strips cut down and TD clips shortened. Going to submit today for basic approval with my garrison. Wish me luck.2 points
-
Awesome, thank you, legend!2 points
-
With all that's going on in the world, many of us are staying at home and wondering what to do to keep our sanity, lol. Here are a few suggestions that will help you get ahead so that when it's time to troop after all this you will be prepared. 1. Break out the armor bin- Since most of us only see our armor during a troop, maintenance issues can be forgotten, "I'll fix that later....". Well, it's later. Taking out each piece and examining it for cracks, loose straps, scratches, etc. will put you ahead of the game. 2. Line your armor bin- If you have access to a fabric store or even Walmart (many are still open) consider picking up some 1 inch thick foam sheets and spray glue to line the inside of your bin. This will help prevent it from jangling around during transport. 3. Clean your armor- On many troops, we sweat. Although the under suit absorbs most of it, the ABS can really start to reek over time, especially if not wiped down after an event. To help keep your bin and from smelling like a gym locker, grab some disinfecting wipes (or even plain old soap and water) and give the inside and outside a good cleaning. While your'e at it, air out your boots and gloves. 4. Organize- Once you get everything clean and ready, organize and pack everything away in preparation for your next troop. This way you will be ready to walk out the door knowing you haven't forgotten anything. Still bored? Spend some quality time here on the FISD- There are a lot of future (and existing) Troopers who need help and guidance. Remember back when you first started your white armor journey and pass your knowledge along to those who have questions. EI and Centurion- If you are already approved at Basic level, consider taking some time to bring your armor to the next levels of screen accuracy. Binge watch all the SW films- (It's OK if you fast forward through all the scenes with Jar-Jar Binks). Stay safe, and if anyone has any other ideas post em' up!1 point
-
Congratulations!!!! Very good job... Regards...1 point
-
Congratulations trooper and welcome to the EI ranks1 point
-
Following your build with great interest!1 point
-
Congratulations trooper, Welcome to the ranks.1 point
-
Congratulations Jonas, Welcome to EIB Well done Trooper !1 point
-
Great news! It is truly fantastic the way you have prepared for this build, Chris. Which piece(s) you choose to start with will be up to you, but to get a feel for things I suggest starting with the biceps. I am looking forward to seeing your progress, and hopefully a ton of photos! Just remember the old saying "measure twice (or 3-4 times), cut once" and if you run into an issue, ask and post up a pic before proceeding. We are here to help, sir.1 point
-
Well done Trooper and welcome to Expert Infantry1 point
-
Jonas Andersson 22423 EIB A4 Joseph Thank you for everything! My pleasure, brother! http://www.whitearmor.net/eib/certificates/22423-eib.png 2781 point
-
Hi Jonas, and thank you for your EI submission! In the following review I will be going over items pertaining to your current submission, as well as those that will be required for Centurion level should you choose to apply. CRL and EIB Application Requirements: All required submission photos have been posted and I am very pleased to announce your armor displays all the necessary elements to qualify for ANH Stunt Expert Infantry. On behalf of Sha Sha and myself, Congratulations! Other-Armor Fit/Assembly: In this section we review observations made by your fellow troopers and ourselves. Some observations may lead to suggestions to improve the overall look of your armor. Note that we consider both text (CRL) and pictures (screen caps/reference images) when reviewing submissions. First, I gotta' say that you really put a lot of hard work into this "re-build", brother, and it shows... great job! Only two suggestions in this area, which I am sure you can handle: Although they are crisp and clean, we would like to see the lines on the vocoder extended up a bit to where they cover the tops of the "ribs". Easy fix! Reference images The end of the clip shown below on your TD could (should) be trimmed a hair. Reference image Centurion Requirements In this section we prepare you for Centurion. More photos may be requested in the future that allow us to make better decisions on possible adjustments. If there are any areas of concern they will be discussed here. Because Centurion photos show much more detail than those for Expert Infantry, items to pertaining to Centurion might be seen there and not here. We try to point out all that we can from what is seen, but the final accuracy is the responsibility of the trooper. The first two items are simple strapping issues that I am sure will be pretty straightforward. It looks like your right shoulder bell could come up a bit. Bringing the top to where it touches the shoulder bridge (the right one is PERFECT) would remedy this. It would also reduce the gap between your bell and chest. Reference image We are suggesting that you drop the left bicep down a bit to even them out. You may want to check the forearm/bicep gaps afterward. Ideally they should be identical on both sides. Reference images As you know, because SDS has the attached buttons the plates will need to be replaced with ones that have the buttons integrated. TB sells those here if it helps. NICE job on trimming the one you have, (I appreciate the fact that you have the corners square, not rounded) but on the next round remember to trim the small plate a bit more. Reference image This will be an easy one! The angle on the tops of each side of the sniper knee plate should be increased as shown in the Reference images. 5 minutes with a Dremel or ABS scissors and you are good-to-go! Reference images Lastly, you did a an awesome job on that blaster but we are requesting that you move the Hengstler counter forward. Ideally, the back edge should line up with bolt that holds the folding stock on at the rear. Since there are usually only 2 screws that are used to attach it to the scope rail, this is another pretty simple fix. Reference images And that's it, sir! After following your build thread for so long, it really does make me happy to see that you have reached Level 2. Once you get the new ab-button plates and spend some time with those fixes I expect to see that Centurion submission! Hopefully you will be able to get out and troop soon as the newest EI in the Nordic Garrison!1 point
-
Hello everyone. This virus has slowed everything down for us which is a shame. I'm sure everyone here has been affected already. The person we gave our belts to has taken around 3 weeks and counting on putting our threading on our belts. Apparently she's resstarted a few times, which is a bit annoying. We've finished everything else at this point on my armour, just waiting for the belt to be finished so we can do a full armour fitting and get to editing before approval. Some questions about the ears, are these gaps fine as they are?: Also where do the belt boxes sit in relationship with the end of the hard-belt? 1, 2 or 3? Thanks all. Stay safe and healthy out on the field troops! 1 2 31 point
-
BBB Day is getting closer!!!1 point
-
You're Q Eagle Eye man !!!1 point
-
Nice work on the fixes, you may also just want to remove the excess clip showing under the belt. Also the cover strips on the rear of the shins should stop before the top ridge1 point
-
Thank you so much! I am so sorry for posting in the wrong area again! Extremely new to this site.1 point
-
1. Cody Elder 2. 51550 3. EIB 4. Letter 5. Joseph http://www.whitearmor.net/eib/certificates/51550-eib.png 2771 point
-
Finally some more kitted up pics without UKG logo Sent from my J8210 using Tapatalk1 point
-
Hovi tips and teeth correction Sent from my J8210 using Tapatalk1 point
-
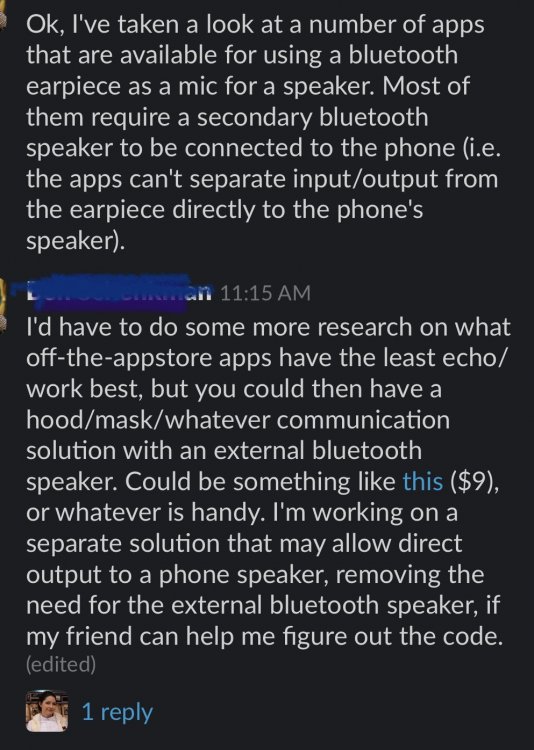
Troopers!!! I need your advice urgently! How are you addressing this issue with your buckets? Could your solution be adapted to work with a full face snorkel or scuba mask? (please share this with anyone and any group or detachment you think could help) If you have a solid Solution or are interested in helping directly by joining the teams slack channel, please PM me through Facebook.com/jeneyrecosplay or because I’m so busy coordinating so many different aspects of this I might miss a reply to this post. I attached a picture of the problem we’re trying to solve. I’ve been volunteering with this project that has gathered many of the most brilliant minds in engineering, medicine , and tech to craft a solution to protect our medical personnel using full face scuba masks and extremely high-end specialized 3-D printers. They have a plan. They’ve conducted rigorous quality tests. They’ve even started delivering masks to grateful doctors. But one of the challenges is communication while wearing the masks. And that’s where I’m hoping you troopers can help. “We adapt full-face snorkel masks to fit breathing filters that are already being used in hospitals. With your help, we will mass-produce mask adaptors via 3D printers and distribute to hospitals and clinics across the country. To achieve the highest possible quality in the shortest possible time, our clinicians engineers and manufacturers have conducted rigorous quality tests such as: saccharine tests on air-sealing, post-sanitation virology swabs, and OSHA N95 fit tests. Dozens of clinicians in seven hospitals have been involved in field-testing our prototypes in the first week alone.” (And if you don’t have a solution, but are willing to find or share the go fund me, that also helps. And if you are in the greater Boston area and want to help with assembly, check the public post on my wall) Read more https://www.gofundme.com/f/3dcorps?utm_source=customer&utm_medium=copy_link-tip&utm_campaign=p_cp+share-sheet
 1 point
 -
From EIB review, I have adjusted the TD clips to rotate tube so that the bar and circle are level and visible. So what I did was cut between the two current holes and rotate the tube down. Then drilled new holes in the clips and TD and fastened it in place. I know there could be a few bends in the back of the clips to angle it in then out, but will leave that for another day.1 point
-
Added a set of suspenders to keep things in place better. I almost don’t need them as I think I’ve fit the armor to myself pretty well. But the weight of things and moving around a bit cause things to shift and get off center. And as I’ve noticed you can’t see a darn thing with the bucket on. So I would just like to have things secured enough so I don’t look like a bargain bin mess of a trooper. I ordered an inexpensive set of Dockers suspenders from Amazon. I made sure to get the set with four round clasps. Took a 1/2” paddle bit and cut the holes far enough in that the clip closure would still function. Played around with the elastic straps and found the approximate length of strap I needed to remove from each point. Then just had to cut them and sew the ends back down. And just like that, new suspenders to keep your trooper pants up. Sent from my iPhone using Tapatalk1 point
-
I agree with Dan (cableguy), despite i like the lower brow look, is more screen accurate put the brow with a small separation from the top of the eyes and I'm aiming to swat level, so, i don't have much of a choice there. However, I'm also agree that at the end is up to you. Look at my helmet... Sent from my GM1900 using Tapatalk1 point
-
Thank you very much, the certificate looks awesome. Sent from my iPhone using Tapatalk1 point
-
Upgrades because… Since I am no longer working on a Sandtrooper, its just easier for me to keep all of my TK content on FISD. As previously mentioned, I posted this on MEPD but I am transferring it here for anyone who finds it useful. NOTE: this build thread outlines me using ½” thick Sentra as the base material; however, the Sentra snapped at the stock after I finished the build. In March 2019, I rebuilt the gun (a third time) where I used a planed down white pine board as the base material. Everything else is the same as you will see in this build. So, I recommend you use white pine, it weights less than the plywood and is more rigid than Sentra. Finding a ½” thick board is difficult. More than likely you will find ¾” boards at any Home Depot and you will need to plane them down to ½”. In my previous build I used plywood as the base material, and it is a bit heavy after trooping with it for any period of time. I also used Spool86's cast kit (heavily modified) for a lot of the parts. I like Spool86’s parts but they are not as accurate as I would like. Also, cast parts weigh more than 3D printed parts and this added to the overall weight. So, I wanted a more accurate and lighter weight T-21. To this end, I have modeled a lot of the parts and 3D printed them. I will make these parts available for free download from my Thingiverse page here: https://www.thingiverse.com/11b30b4/designs So, a few notes before we begin. The overall dimensions are very close to Pandatrooper’s diagram. I will be reusing the already made stock from my original RO T-21 and some of the other parts. I hope to re-use the barrel, but I will need to determine if it will mate with the new printed parts. Yoshix created a thread MEPD to discuss the RO T-21 differences but I had not seen it until now since most of my previous stuff was on FISD. A good catch was the space on the barrel before the rubber tubing. I did not build my previous T-21 with this gap in mind but I will endeavor to include it for this build. Another thing that has come up has been the discussion about the aerial gunner sight. Specifically, if it is an aerial gunner’s sight or as one of my friends has suggested that it is actually a coil cable (think phone cable) as a nod to the ANH T-21 and it is just sticking up oddly. What I am talking about is the red circles in these pics: I believe they are an aerial gunner sight and will be building my RO T-21 with this in mind. Although there are five different variants of the Lewis gun and there are a ton of different manufacturers of each variant I will be primarily using the MK1 variant. There are not a lot of pictures of the RO T-21 and the ones that I have found are lacking in detail. I have collected a large number of detail pictures of actual Lewis guns from across the internet to develop the 3D models. Although I could make a completely accurate model, there are a few areas I will need to divert from to make this something more buildable. One specific thing I have omitted is the underside of the cooling vent area mid-section of the gun. Seen here (yellow outline) is what was omitted for anyone wanting to go overboard in their build. There are a few other very minor details that I did not include in the 3D models but for the most part, they should be correct. I have embedded many of the roll marks seen on various pictures I have found. Most notably will be roll marks on the feed tray. For the base material of this build I will be using ½” (12.7mm) thick Sentra. I purchased a 4’x’8 sheet of Veranda HP brand PVC board from Home Depot for $69.00. Obviously, you will not need a whole sheet of this stuff but its hard to find in smaller quantities. Sentra is PVC board and Veranda is just a different brand. Keep in mind that I am working within the limitations of Tinkercad as I am not a CAD engineer. That being said, here are the models I have built so far. This is the main feed tray cover, mid-section cooling vents and vent housing. This is the center feed tray, ejector, feed operating arm, rear sight mount, forward feed tray, and assembly pegs. Receiver left side. Receiver right side. Rear receiver and stock mounting plate. I have already started printing these parts and here are some of the raw prints before finishing. I have a Prusa I3 Mk3 and I use MatterHackers MH Build series 1.75mm ABS filament. Some tips on printing: Any of the parts with horizontal holes or overhangs should be supported. I printed everything in ABS and to prevent any elephant foot (warping near the build plate) I printed everything with a brim. As for detail I used 0.07mm ultradetail with a fill of 15% for anything that had any detail. I printed the receiver rear and stock mounting plate at 0.10 detail with all the same settings for fill, brim, and support. Update 12/2/19 I have added a few additional 3D models to my Thingiverse for this build. First, I redesigned the rear sight mount. I added the rear sight with roll marks and adjustment knob and combined them with the receiver rear and stock mount plate I modified my T-21 transition to fit a Shop Vac Extension Wand (read further to understand why) and included the front radiator and flash hider, a backing for the radiator, the front end cap ring, and two barrel ends for the sides of the receiver. Lastly, I finished the models off with the two end caps for the oil brush that are mounted in the stock, the front sight, the trigger, and the gas key adjustment lever. Once I finished the models, I printed them, and they came out great. I should note that each file is printed in 0.07 Ultradetail which takes about 30 hours. After printing, everything got sanded and cleaned. After cleaning, everything got primer and then paint. Next, using Pandatrooper’s pattern and making some minor alterations, I cut the rifle out of Sentra. Once I had the shape, I started to dry fit parts and figure out where things would sit. Initially I was using a larger PVC pipe for the sides of the receiver and in these pictures, the lines you see where for the larger pipe. Here I was working out the trigger and test fitting the trigger guard. I reused the trigger from my previous T-21 but I have made a 3D model for anyone wanting to print one. Around this time, I realized the pipe I was using was a bit larger than I wanted so I found some ¾” SDR 21 PVC pipe which is irrigation thin wall PVC. I used this pipe along with a section of ½” Schedule 40 PVC pipe to make the side barrels on the receiver. I cut each pipe lengthwise in half then sanded them. Next, I drilled the ejection port and finished it with the dremmel. Next, I painted the ¾” pipes black and the ½” pipe silver. I glued the ½” pipe inside the ¾” pipe and then test fit them on the gun. Notice the remainder of the glue line under the new pipe, from the larger pipe I removed. This size pipe better aligns with the barrel part of the radiator. Next, I needed to replace the top aerial gun sight that is seen on the Rogue One version of the T-21. On my previous build I used an iron pipe I-bolt. Since reducing weight was one of my primary goals, I needed to find a new solution. I eventually decided to make the sight out of aluminum. I took some aluminum stock and worked it on my metal lathe. Next, I threaded the parts then cleaned the parts for painting. I also needed to remake the aluminum legs that protrude from the stock mounting plate and into the stock. Once everything was cleaned, I painted all the parts with a black bake on metal paint I use for gunsmithing. While the parts were baking, I took a hard look at my previous T-21 to determine what were the heavy parts. As I stated previously, the base of the T-21 was plywood and the switch to Sentra seamed to reduce the weight buy more than half. All the resin parts on the previous T-21 were heavy as well and switching them with 3D parts further reduced the weight. Switching from the Iron sight to an aluminum one reduced the weight; however, I soon realized that one of the heaviest parts on the previous T-21 was at the extreme front end of the gun, the 2.5” electrical conduit I used for the tapered bore of the barrel shroud was very heavy. I originally used this part because the outside diameter was 2.75”. I looked for a good replacement, but I had very little luck. I could special order a pipe with the outside diameter of 2.75” but most of the options were either too expensive, the wrong material like acrylic, had too thick a wall, or weighed too much. I was forced to consider a pipe with an outside diameter of 2.5” and again I was hard pressed to find a light weight option. Eventually, I found a shop vac extension wand a Lowes that had an outside diameter of 2.5” at one end and tapered to 2.25” at the other end of its 20” length. I only needed about 7” in length and if I measured the seven inches from the larger end the outside diameter of the smaller end would be just shy of 2.5”. The wand was fairly thin walled (about 1/8”) and very light. So about $8.00 this should work. I reworked the T-21 transition 3D model and included it on my Thingiverse page. So with all the parts gathered I continued to assemble the T-21. Next, I looked over the reference pictures and discovered that there are only two rings visible on the large part of the barrel shroud. One about 2” from the rear of the shroud and one with the front sight attached to it. There is also only one on the smaller part of the shroud at the extreme front of the barrel. So since I was reusing the barrel from my previous build I needed to remove some of the rings, fill some holes, re-score the exposed parts of the shroud and re-apply the rubber tubing. I used ¼” windshield washer tube for this. I added 4 mounting screw holes near the rear of the shroud that will be covered by the rear most ring and will make the barrel removable for easy transport. I still need to apply the feed tray parts and grips and finish painting then do a black/ brown wash over the whole thing to weather it but it is coming along nicely and the weight is amazingly very very light. I wish I had though to weigh the previous gun for a comparison, but I would say this thing will end up being 1/4 -1/3 the weight of the previous version. Update 12/5/2019 I assembled the radiator, flash hider, back plate, and end cap ring on the tapered part of the barrel shroud. Next, I installed the tapered barrel shroud to the transition then I dry-brushed silver on all the parts and attached the Feed operating arm, ejector, and the barrel ends on the sides of the receiver. I used E6000 to adhere the grip scales then masked off the radiator and bolt and applied a weathering wash comprised of black acrylic and light brown. Once this dried, I applied a flat clear coat over the whole rifle. I think the dry brush will look more natural in these pics. I did the black wash over the dry brush and it mutes the silver. I am inclined to agree with you about using bondo between the transition and the two parts of the shroud. The line between the transition should not be as defined; how that change will need to wait a bit before I can address it. For anyone interested the total estimated weight of the T-21 is 4.5 pounds. Back on topic, the stock is white pine, as are the grips. I made the stock for the previous version of the ROT-21 and re-purposed it here. The stock consists of two halves roughly ¾” thick and 8” x 18” once I have the outside rough shape, I hollowed out the interior with a router then glued the two halves together. The stain is Minwax Ebony with a satin clear coat on top. As for the strap, from the best images I could find I determined the width of the sling webbing to be 1.25” and the webbing to be black nylon webbing (most likely Mil Spec: MIL-W-4088 Type 10, Class 1A). At one time I made tactical gear and I am familiar with webbings and types. Some things to note from my research: In this screen grab you can see where and how the forward end of the sling is attached (Yellow Circle) and it looks to be an AK-47 sling mount screwed to the top of the barrel shroud just behind the front sight. Note the round (looks to be an areal gunner sight) sight just forward of the feed tray and is in the dead space of the barrel shroud between the two barrel shroud rings (Red Circle). Also note the rubber wrapped tubbing on the barrel shroud goes past and covers the middle barrel shroud ring (between the Red Circle and Yellow Circle). Lastly, note the rear sling mount appears to be on the side of the stock (Light Green Circle) and is most likely in the spot as the bras ID disk seen on some Lewis Guns. An assumption can be made that they are using an Uncle Mikes style sling mount and quick detach since this has been used on several weapons from Rogue One. I hope this build helps others out in making RO T-21s and feel free to ask question and/or point out anything I missed. Update March 2 2019 So Sentra was not the best idea I have ever had. The T-21 snapped where the stock meets the receiver when I snagged it going through a door. Since plywood was too heavy and the Sentra was too weak, I have rebuilt the rifle again using all the previous parts but this time I used a 3/4" white pine board that I planed down to 1/2" thick and seems to be holding up great and the weight is fine. Thanks for the interest.1 point