Leaderboard


Popular Content
Showing content with the highest reputation on 08/23/2019 in all areas
-
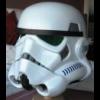
Okay. Time for the big reveal. I always wanted a TK helmet that was as true to a real one as possible, and I think I've come pretty close. I will probably modify the items as time goes on to make them more durable and user friendly as they are made out of thin plastic card stock. Everything is made out of plastic scrap and bit and pieces I use to build models. Everything except the battery modules cam from TK Products. AWESOME STUFF I used the well known Stormtrooper interior helmet pics you can find online, and spent MANY hours figuring how to fit everything inside. Poorer quality ref pic with items named: It is a VERY snug fit with all the wiring, electronics and 4 fans. I don't need padding to hold the helmet in place, but may add some thin stuff for comfort. This helmet is fully functioning with all the prop pieces in it. ICOMM box is above left ear Two of the fans are the silver "speakers" on either side of the helmet. The silverish cording running from the fans to the central unit are decorative The USB power modules for the fans are located under the blue / grey button panels on left and right The central " air exhaust,/voice filter unit / comlink microphone" large panel piece is easily removable (with velcro) and hides the main part of the Hearing assist unit. The microphone for the Hovi's is free floating in front and sits right against my lips. The thin black cord running out of the helmet comms from the Hearing Assist module is to my ear phones. The microphones for the hearing assist are installed under the helmet ear pieces out of sight, just behind the silver fans. The 9V battery for the hearing assist is over my right eye with cabling running around the edge of the eye and down. The air intake and exhausts are covers for the rear of the Hovi speakers. The black plastic tubing running from the Hovi's to the button panels is decorative with no function. ICOMM voice Amp and junction box. One of the buttons for the fans is just up and left of the AUX input. One additional black fan is above the AMP Back of helmet: Most cabling is tucked in the 3/4" wire lume along the back neck area. 4th fan is to the left, beside silver fan. You can see the two fan buttons (one controls silver, the other black) just above the wire lume. There is a wire Y cable coming out of the SPKR jack on Voice Amp. One leads to the Hovi tips, the other attaches to the Satellite speaker I have installed on my chest plate. I just run a long 3.5 mm cable from my chest, under the neck seal to the back of helmet. Right side: Straight in view Central piece removed. Battery cover removed Issues I have with this. With the fans running right by my ears, they create a resonance in the helmet. Even with the hearing assist on and earphones in, there is a constant buzz in my ears. It doesn't help that the silver fan only fit on top of the hearing microphones located in the helmet ears. I can only hear people when they are talking fairly loud within 3 or 4 feet of me. Without the fans, no issue and the hearing assist works extremely well. I have tried placing soft foam between the fans and the helmet. This helps ALLOT, but now the fans are too far out from the sides of the helmet and I can barely get it on. If all this annoys me a may have to forgo accuracy and place the fans just behind the Hovi tips. These fans are 40x40x20's. I have ordered 40x40x10's, so they are half as thick. Hopefully they will arrive tomorrow before I depart for my troop. I will use them with some soft backing foam and see if that knocks down the helmet noise. Hope you like!4 points
-
Eye sockets too small you need to remove more material, ears too wide, holes on frown too small, your forearms and biceps too big, your belt rivet cover caps are too big, too much return edge on sides of chest plate ect... Mark2 points
-
This is turning out to be true. Loving every minute of it.2 points
-
First Order Jet Trooper2 points
-
Welcome, trooper. My advice would be; • Check out the vetted sellers list - https://www.whitearmor.net/forum/topic/11538-the-various-types-of-armor-and-where-to-find-them/ • with all of the amazing kits available, avoid TKUK and Shepperton Design Studios /originalstormtrooper.com. You can do a lot better. Any questions, just ask.2 points
-
It’s been a long time but got my suit. Doing mods. Got lots done. But I made a boo boo on the holster but fixable. It looks really good . Did a few walking around outside. Man it’s weird. But sooooo cool . But with some mods it’s fitting way better. Working on the thighs. A bit big as someone pointed out . It’s a head tuner2 points
-
For everyone with a Husky armor box..., lets make a more usable workspace. This build will explain how to easily add shelving to your armor box, giving you more staging room when you’re suiting up for a troop. First let’s start by removing the 2 plugs on the opposite side of the handle. Same location, opposite side, of where the handle slides into the box, there are 2 plugs that need to be removed. From the underside of the ledge, push the locking-foot up and start working the plug out. For me one plug just popped out and the other was very difficult to remove. To make it easier, you can drill a screw into the face of the plug, then clamp vice-grips to the screw, making it easier to pull the plug out. Don’t forget to push the locking-foot up. Removed? Great! Next you’ll need 2 each, 1/2” pvc 90s and some 1/2” pvc pipe. 1 piece roughly 19” long and 2 pieces roughly 15” long. Leave the lengths a hair long just to make sure you get the best fit. You can trim them down as needed. The 19” piece of pipe is your center and the 15” pieces are the legs. Connect the pipe with the 90s to make a U. Now take your U of pvc and slip each leg into the Box where you removed the plugs. Take your Tote that came with the Box and set it in the pvc U and mark the pipe, near the Box, so you know what the maximum distance the pipe needs to be extended to hold the Tote. As long as you’re happy with the fit, go ahead and glue that pipe to the 90s to make your U solid. To hold the U in place while in travel I used a Velcro cord wrap. I drilled 3 small holes side-by-side and trimmed between the holes to shape a slot. Then I feed the Velcro strap through the slot and secure the U. NOTE - Do not use the U, secured or extended, as a handle to lift your box. Lid shelf frame - You’ll need some 3/16” steel rod which should be available at any hardware store. I bought 36” lengths for my small shelf frame. Measure the distance apart of the eye ports on the underside of the lid. Mine measured about 12” apart. That will be the width of your shelf. Next decide the depth of your shelf. I went with 10”. Now take your 3/16” steel rod and measure the depth first (again, mine was 10”). Bend there 90 degrees. From that bend measure the width (again, mine was 12”). Bend another 90 degrees making a U. Now the last leg will be to long and will need to be cut. Hacksaw, bolt cutters or I used a copper pipe wheel cutter. Cut the last leg the same length as the first leg. WARNING - CUT EDGES ARE SHARP! Use a file, grinder, stone or concrete to round off and smooth out the cut edges. Take your steel rod U and test fit it to your lid. If it’s angled up to high, remove the U and bend the last inch or so of each leg down a little, then reinstall. Repeat until you get the angle you like. Like magic, you made a shelf frame. Repeat to make an additional shelf frame if needed. Next you need a shelf platform for your pvc U and your steel U. I used fabric for mine. Basically you’ll need a piece like a pillowcase that will slip over the frame you made. With that said, it’s possible a pillowcase might work for the pvc U. But an even easier option would be a tee shirt ab section. Take an old tee shirt you don’t mind cutting up, see if the opening securely slides on the pvc. If so, trim it down, cutting straight across from armpit to armpit. For the steel shelf frame find yourself an infants tee shirt and do the same thing. You can always make your own if you, or someone you know, is handy with a sewing machine. That’s it! Now you have more room to set out and access your armor for a troop. Upon closing up your Box, pack up your armor, return your Tote to its position, remove the fabric platforms and toss them in the Tote. Next remove the steel frame U and turn it legs-down, over your Tote, against one of the inside walls, it will just hang there. Slide in the pvc U and secure it with the Velcro. Happy Trooping!2 points
-
At the encouragement of @ukswrath, here is a post I originally made a year and a half ago on the Anovos FB build group, which is handy for all makes of armor, not just Anovos. ABS Paste?!?! WTF is THAT? I've seen variations of this question over and over. So perhaps this will be helpful. ABS paste is homemade glue for your ABS plastic. It literally melts and reforms the plastic into a solid piece, so it's more like welding than gluing. But as the warning phrase "it literally melts..." foreshadows, you should be careful. Making couldn't be easier. Get a GLASS jar. Don't be that person who makes it in a plastic cup. You know... the one that puts plastic melting stuff into a plastic cup. You've met that guy. Don't be that guy. All you need is a jar, some ABS scrap, and some construction grade acetone. Nail polish remover is NOT strong enough, even though it has "some" acetone in it. Pick up a bottle at Home Depot or the like. (For people in other countries, like the UK, where Acetone is not readily available... you have my sympathies) For containers, I feel a glass baby food jar is ideal. It's just the perfect size (unless you doing something epic!), stupid cheap (if you don't already have one somewhere), and easy to work with. I'm going to assume baby food jar, so if you choose a 2 quart mason jar, scale as needed. In general, ABS paste is practically free, other than the price of a tiny bit of Acetone and maybe a buck for a jar of baby food, if you don't have a suitable container already, since your source material is scrap from your own build. (never toss that armor scrap!) A NOTE ABOUT FUMES: Pure Acetone is nasty stuff. You really don't want to be breathing Acetone fumes. A whiff here and there likely won't cause lasting harm, unless you have existing pulmonary issues, but still, do your best to avoid breathing a lot of the stuff. At a minimum, you can end up with a NASTY headache. At worse, you can actually cause damage to your lungs. Use your own level of protection that feels best for you... some want to wear a full respirator (with a volatile organic cartridge), others, like myself, are content to work outdoors and minimize breathing it. (Once the jar is capped, it should be fine to bring indoors.) FILL the jar with the tiniest scraps if ABS you can get. I literally used the curly-que and powdered scrap from under my belt sander, after all my rough cuts, in addition to cutting up a few pieces of scrap into 1/4" square pieces, with scissors. And now the magic. Add approx 1 teaspoon of Acetone (and remember, I'm assuming a baby-food size jar... scale accordingly if you're trying to go big and make enough for your entire squad to build with!). Cap the jar, wait 15-20 min (or more, no worries) and then check on it. Poke it with a stir stick. (You can literally use a stick. Although IMO, a wooden coffee stir stick (free at Starbucks!) is ideal, and Popsicle sticks have their proponents, too, as does the toothpick crew, for detail work.) If you literally do not have a stick, a strong piece of scrap you don't care about will do, just be careful where you set it afterwards. But poke at it. Get an idea where it's going. Then add about 1 tsp more Acetone. Re-cap it again, wait 15-20 min, then check again, and this time, stir it a little more seriously. Note the consistency. You'll probably want to add some more, perhaps 1 more tsp, perhaps less? You may be starting to get a feel for it by now. Let sit for a good 1/2 hr, then check and stir AGAIN. We're going slow. Slow is good. Watch some TV or read a book. You have better things to do than watch ABS melt in super slow motion. At this point, you SHOULD be close to ready to go. If not, I recommend letting it sit overnight before checking it again. (in fact, that's not a bad idea in general, but it's not strictly necessary) Only add more Acetone if you still really think it's too thick and clumpy in the morning, after stirring it some more. Repeat until you reach that magic mayonnaise moment. Correct consistency is *roughly* mayo-like. I'd say somewhere between Elmer's glue (a little too runny?) and Toothpaste (perhaps a little too thick). Too runny = bad. Remember the "melting plastic" part? You don't want that running down your armor. Too thick and you may get air pockets. Shoot for the Goldilocks zone. ) When you're ready, apply with a stick. Let it dry (duration depends on thickness... maybe 20 min, maybe overnight?) and sand it down. Repeat until pretty. Relatively small amounts (read: the small patches that ABS paste is generally best for) should be relatively safe to use indoors, just be aware of the fumes. Larger projects (or sensitive spouses... not that it smells too different from the nail salon, in my mind) are probably best to work on outdoors. The beauty of using the same plastic your armor is made from, to make paste, is you get a dead-on 100% perfect color match. No painting needed! (note: The level of polish/sheen will not be the same, but the color itself will be a match. ABS paste isn't really good for large area applications... and trying to do that will likely end up causing warping from too much acetone anyway) (2nd note: ABS paste is not as strong as the original plastic. It's not actually a glue, even if it looks like one. For connections needing a very strong join, use CA glue, as usual.) (pre-sanding... but note that color match to the Anovos armor!) The paste doesn't really go bad, but eventually it'll harden and you'll need to add more Acetone. Keep it capped, and it'll last longer, of course... you can dry it out quite fast if you leave the cap off for more than a few hours. Future batches you can probably go faster (read: add more acetone, sooner), but I recommend the slow approach when you're starting out, until you have a good feel for it. Good luck!1 point
-
That’s great, thanks. I actually considered that, but wasn’t sure what it would do to the silicon (it’s difficult to test it on a small area when you don’t have much surface to play with). Think I’ll try it and hope for the best.1 point
-
Hi Erick, I would suggest to post another complete armor photo when you have your boots and we can see the whole set. Keep on doing a great job. cheers1 point
-
Yeah one issue I see is your thigh piece is a cylinder, and should actually and more accurately be a cone. Wide at the top and more closed at the bottom. This will also help with keeping it in place. The main question though is how is it secured to your armor? Sent from my SM-G950U using Tapatalk1 point
-
thank you very much friend!!! Many greetings from Spain !!!1 point
-
I used E6000 to glue the shim down. If I let if cure for 24 hours will it be as strong as CA glue or should I use this as a test run and if it works, CA glue the shim down? My understanding is that the E6000 when it cures is pretty strong but that CA is stronger.1 point
-
Seems Mr kaplan is indeed a busy man.1 point
-
Good looking Txutxi!!! C'mon, you got this!!1 point
-
did more sanding still needs a lil more for those lil spots so far im happy1 point
-
Rodrigo! I am surprised with your commander. Come on you already have it !!!!1 point
-
Rodrigo, you've done an amazing job with your commander. Good luck friend!1 point
-
Took off a little less than an inch on both sides of the kidney plate to make a clean surface to glue on the shims. Measuring I needed a little more than 7 inches top to bottom, and my spare abs was only 6” and change wide. Fortunately it was two and a half feet long. Given the extra cutting and how things are going I trimmed the abs to give my the full width of the abs sheet with the length necessary. With things cut, I grabbed my E6000, magnets, clamps and got to work. I’m not sure if you can see it, but I left 5mil or so over the top of the kidney plate so that I can iron over some return edge. We’ll see how it turns out tomorrow. If it looks good, I’ll mix up the ABS paste and cement it down. Wish me luck. In the interim, my re-glued thighs came out well. Upward and onward.1 point
-
Probably going to be a slow build but have some progress to share: After trimming various parts, the biceps are now glued: And the Thermal Detonator is completed: Probably going to keep this at level 1 depending on how much upgrades are... I have a lot invested in two Vaders and wanted a cheaper, and less stressful, build.1 point
-
Thanks Glen Hey Eric if you're looking for specific inner suspension refer to the Strapping and Torso: Suspension sections iin my thread If you have any questions feel free to hit me up1 point
-
Since I'm so close to being done with my build and I really can't do anything till my boots get here, I decided to do a little work on a custom case for my armor. I know most of you use the huskey locking case but i had this in my garage for years. I repurposed it and it's now an imperial transport trunk. Looks official right!!?? I even have the proper amount of propaganda on it too!!! Sent from my SM-N960U using Tapatalk1 point
-
Hello and welcome aboard, research is the key to this hobby, some great info in the Getting Started section, would always recommend purchasing form a vetted seller1 point
-
Since you're in England I'd strongly recommend RWA Creations. I know a number of taller European troopers who love their RWA armor. Ross is located out of the Isle of Wight and has "Big Boy" armor for taller troopers. His kits look fantastic. Since you'd be shipping inside the UK, his prices are fantastic. Great guy. Been very helpful to me in my build and I don't even own his armor. You'll find a number of RWA builds going on in the WIP forums. He's also got a you-tube channel for how-to-build. https://www.facebook.com/groups/rwacreations/ PM me and I can send you a link to his pricing.1 point
-
Thanks you very much!!!! Love to read no tips this time!1 point
-
That snap you have in the Cod should actually be a Split Rivet. Doesn’t need to be functional. You can use the same hole, just drill out the inside (not seen) part of the snap, it’ll split apart. Then glue a snap plate over top, or just in front of the split rivet.1 point
-
Some custom sewing. I made a velcro belt to hold up the thighs. Adjustable and secure. Closing in on it! Sent from my SM-N960U using Tapatalk1 point
-
Almost done with this thing1 point
-
Personally I don't believe I have heard any chatter in the OT movies, usually coms too or from a TK is one to one.1 point
-
I think Kalani and Glen may share a chromosome or 2..1 point