Leaderboard


Popular Content
Showing content with the highest reputation on 07/15/2019 in Posts
-
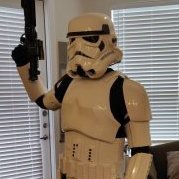
7 coats later and I may remove the tape and putty tomorrow to see how it looks. Found a good tip on YouTube for spaying plastidip. Shake the can for 5+ mins and put the can in a bowl of warm tap water (not boiling water) for 5-7 mins. It then sprays as a fine mist giving an awesome finish. Learnt this after the first blotchy coat. Sent from my iPhone using Tapatalk3 points
-
I'm new to this forum and a just getting started on getting parts together for my ANH E11 build. This may be of interest but Helston Gunsmiths in the UK (helstongunsmiths.com) are selling genuine Sterling magazines for £8.50 ($10-11?) plus shipping (£4.50 in the UK). I think that's cheap - another place I found wanted £20. I've just received mine and it's just great! Obviously it'll need shortening but if I mess up, a replacement is inexpensive.3 points
-
I forgot to post the most exciting part of this past weekend. BBB day was like Christmas! Sent from my SM-N960U using Tapatalk2 points
-
-------------2 points
-
Hey Simon You need to request and get approved for Expert Infantry (L2) Before Centurion, love the enthusiasm though https://www.whitearmor.net/forum/forum/19-request-expert-infantryman-status/2 points
-
TK-61490 "TheRascalKing" - Senior Armorer [22 points] 1. TK-10272 - EIB - 2pts 2. TK-42199 - Basic + EIB - 3pts (5 total) - Apprentice Armorer Achieved 3. TK-62345 - Basic + EIB - 3pts 4. TK-11914 - Basic + EIB - 3pts (11 total) - Armorer Achieved - 28Jun2022 5. TK-82077 - EIB - 2pts 6. TK-40473 - Basic - 1pt 7. TK-10896 - Basic - 1pt 8. TK-98752 - Basic + EIB - 3pts 9. TK-55582 - Basic + EIB - 3pts 10. TK-18529 - Basic - 1pt (22 total) - Senior Armorer Achieved - 09Jun2026 1. Jessie H., @JHowe102 - TK-10272 - Anovos ANH-S TK - EIB #805 - 2pts - Armor assembled by @Oztrooper - Full strapping kit install and fitting - Exterior Armor White and polish, interior clean - Helmet disassembly, Armor White and polish, interior paint, reassembly - Armor crack repairs and additional trimming - Fan and electronics reinstall - EIB photos https://www.whitearmor.net/forum/topic/44176-tk-10272-requesting-anh-stunt-eib-status-anovos-805/ 2. Max P., @Ninety-Nine - TK-42199 - AM ANH-S TK - Basic Approval, EIB #923 - 3pts (5 total) - Apprentice Armorer Achieved - Full armor and helmet trim, build, and fit - Full strapping kit install and fitting - Fan and electronics install - Basically Approval, EIB, & Centurion (#499) photos https://www.whitearmor.net/forum/topic/47461-tk-42199-requesting-anh-stunt-eib-status-am-923/ 3. Dwight S., @Dsposato0 - TK-62345 - Anovos ANH-S TK - Basic Approval, EIB #1038 - 3pts (8 total) - Full armor and helmet trim, build, and fit - Full strapping kit install - Fan and electronics install - Basic Approval & EIB photos https://www.whitearmor.net/forum/topic/51455-tk-62345-requesting-anh-s-stormtrooper-expert-infantry-status-anovos-1038/ 4. Michael G., @Gh0stxxiv - TK-11914 - Anovos ANH-S TK - Basic Approval, EIB #1048 - 3pts (11 total) - Armorer Achieved - Armor upgrades, trim and fit, and Centurion prep - Full strapping kit install and fitting - Canvas belt replacement - Fan and electronics install - Basic Approval & EIB photos https://www.whitearmor.net/forum/topic/52552-tk-11914-requesting-anh-stunt-eib-status-anovos-1048/ 5. Scott S., @BeardedFett - TK-82077 - RS ANH-S TK - EIB #1049 - 2pts (13 total) - Armor upgrades, trim and fit, and Centurion prep of commissioned build - Helmet disassembly & interior paint, upgraded lens and padding - Full strapping kit install and fitting - Canvas belt replacement - Fan and electronics install - EIB photos https://www.whitearmor.net/forum/topic/52615-tk-82077-requesting-anh-stunt-eib-status-rs-prop-1049/ 6. Michael W., @Crow2xs - TK-40473 - Anovos ANH-S TK - Basic Approval - 1pt (14 total) - Armor upgrades, trim and fit, and Basic prep of ensemble build - Basic Approval photos (Classified Record on Holocron) 7. Yahir G., @OFFICER_LASKY - TK-10896 - Anovos ANH-S TK - Basic Approval - 1pt (15 total) - Armor upgrades, trim and fit, and Basic prep of self-build - Basic Approval photos https://www.501st.com/members/displaymemberdetails.php?userID=36635 8. Zachary D., @stormztrooper1 - TK-98752 - MTK ANH-S TK - Basic Approval, EIB #1092 - 3pts (18 total) - Armor upgrades, trim and fit, and Basic prep of commissioned build - Basic Approval photos - Multiple EIB photos https://www.whitearmor.net/forum/topic/57481-tk-98752-requesting-anh-stunt-eib-status-mtk-1092/ 9. Justin K., @Midnight_cosmonaut - TK-55582 - Denuo Novo ANH-S TK - Basic Approval, EIB #1095 - 3pts (21 total) - Senior Armorer Achieved - Full armor and helmet trim, build, and fit - Full strapping kit install - Basic Approval & EIB photos https://www.whitearmor.net/forum/topic/58715-tk-55582-requesting-anh-s-stormtrooper-eib-status-denuo-novo1095/ 10. Brandon N., @Brandonis - TK-18529- Anovos ANH-S TK - Basic Approval - 1pt (22 total) - Full armor and helmet disassembly and re-trim, build, and fit - Full strapping kit install - Fan and electronics install - Basic Approval photos https://www.501st.com/member/18529/1 point
-
Happy new year , happy new project… Since a while I am thinking about building a shelf to store my E-11 blasters and some smaller display pieces. Drew various designs and finally decided for a wall-mountable rack with vertically stored blasters (muzzles on top and grips towards the wall). Problem for resin builds: There is a risk to damage the thin ring holder at the end cap, if the weight of the blaster only rests on this. Thought about using a horizontal bar (blue pen in 3rd picture). But E-11s are top heavy and to prevent flipping over, it requires a stop (red pen). Unfortunately that would complicate moving the blaster… Diagonal placement also did not help, but a 3rd contact point (black pen) did. Repositioned the blaster to get some space for the smaller display pieces below it. Tried to give the shelf a bit of a Star Wars-look and changed the final design to this: Could look nice with paint and some greeblies. Next update will show the build. Thanks for stopping by1 point
-
Name: Simon Phipps Forum name: simorph Legion ID: 30878 Garrison: UK Garrison EIB Application: https://www.whitearmor.net/forum/topic/47536-tk-16566-requesting-tk-anh-stunt-eib-status-rwa-924 E11 Build: https://www.whitearmor.net/forum/topic/46398-simes-anh-tk-build/ Armor = RWA Helmet= RWA Blaster= Doopy-doos + Tino Finishing Kit Height = 5'10" Boots = Roamers Equestrian Boots dyed white Canvas belt = RWA Hand Plates = RS Props gloves with flexible hand guards Electronics= TRamp Neck Seal = RWA Holster = Scratchbuilt Full clearance image album here: https://imgur.com/a/u5MKk8P FULL BODY Front – Arms at side Left Left – Arm raised Right Right – Arm raised Back – Arms at side ARMOR DETAILS Ab/Kidney Attachment – Button Orientation Kidney Plate Notch Butt/Kidney – Fixed: Yes/No Yes - Butt and Kidney are separate Hand Plates Shoulder Bridge Back Shoulder Bridge Front Thigh Pack Attachment Knee Plate Drop Box Back Cod and Butt Plate Attachment Interior Strapping Back/Chest Connection Wrist side of forearms HELMET DETAILS Front Side – Left/Right Back Hovi Mic Tip Detail Lens Color (Backlit if required) S-Trim BLASTER DETAILS Blaster – Right Blaster - Left ACCESSORIES DETAILS Neck Seal Thermal Detonator – Back Holster Attachment1 point
-
Hey guys thanks to everyone here for all the support, ideas and advice. And to Ross at RWA for a terrific kit (and lots of support), RS Props for the gloves, Doopy's for an ace E11 kit and Tino for the finishing kit that made my E11 more awesomerer. Just been approved by the UK Garrison - time now to get that Centurion application in! Here's the link to the build: Hope everyone's having a great weekend, wherever in the galaxy you're based! Best Simes1 point
-
I was out finding out how I could build an ANH E-11 blaster, and created this list. I thought I could share it with everyone. Keep in mind, everyone is free to comment for me to add anything, or take anything down if it is no longer for sale. The tools and materials are not absolutely needed, but recommended. The info I added was what I found to have good amount of info incorporating what is in this list. Resin Kits: DoopyDoos: Completely resin kit. Resin Parts: Bulldog Props: M38 & M19 Resin Scope Kits Hengstler 400 Counter Replica TK-50101 Completion Set: T-Jay: Completion kit. 3D Printed Parts: Suitcase Props Various 3D printed parts for an E11 Blaster. Plastic Parts: swpropman: Various Plastic parts for an E11 Blaster. Electronics: TRamp T-tracks: WannaWanga Marv Gino Todd's Costumes COMPLETED BLASTERS: HFx Productions 3D-Props Praetorian Blasters ---------------------------------------------------------------------------------------- TOOLS/MATERIALS (Thank you to FISD E-11 Reference Team for a majority of info) Green Stuff Bondo Cream Drill Bits Dremel, Or something similar. Sandpaper, Wet and Dry, Various Grits Files (Nail filers, key files, the works.) Super Glue (E-600, Epoxy, etc.) Exacto Knife, Small blade Carving Tools Letter Stamps (If you want to put custom numbers/letters onto your blaster) Weathering palettes ------------------------------------------------------------------------------------ HELPFUL INFO: Did I miss anything? Feel free to send me anything I missed. Thank you guys for the updates and details.1 point
-
And at least one other1 point
-
Have you tried this?1 point
-
Awesome - welcome to the Legion Trooper1 point
-
I got an email from the Outer Rim GML to tell me that I'm approved! I'm just waiting for my TKID from the 501st. Thanks everyone for all the help.1 point
-
Aha! Thanks! (Again!)1 point
-
No worries. It’s to ensure we have quality photos on how the suits fit and the allignment of the rivets and ab/kidney. Sometimes the photos provided are of low quality that zooming doesn’t help. It been this way for quite some time, it’s always a good Idea to look at other applications and see what photos are requested, there’s also an EIB photo checklist (which is going to be updated) were one can get a good Idea on what photos to upload1 point
-
This is also a link to your build thread and not a previous EIB. I will also need some additional photos - with that said, I´ll bee your D.O during this endavour # Right/left side detail - arms raised. # Inside ammo pack fixings. # Hovi mic detail - both of them. # Inside pic showing the cod and posterior fixings. Thanks1 point
-
-> Thank you Tino for the t-tracks tutorial -> Hassan, for the paint job (the more difficult job for me : I hate painting ), it'll be a flat black, with just a little weathering. I wasn't satisfied by the screw fixing the hengstler counter. The head was too big and touch the main tube when fixing the rail. The counter wasn't strictly vertical. I also wanted the counter not to rotate on the bracket. So I decided to had a nut in the counter in order to tighten more the screw. The nut is fixed with bi-component epoxy glue for metal. I also changed the screw with a more curved head one. The result is more solid and the screw is less visible.1 point
-
Yep, my bad - amended in the original post. Username here is 'simorph' - I was using my Mercs id on the UKG site and completely got mixed up. Thanks!1 point
-
Hey, I'm a trooper now....I thought aiming for the wrong target was mandatory! Thanks!1 point
-
I was looking at the Sith Trooper again today and suddenly recalled an unused weapon concept that was described for the Executioner back in 2017. If this two pronged version is based on the same weapon it will have a spinning action. Sent from my iPhone using Tapatalk Pro1 point
-
Sent from my iPhone using Tapatalk Pro1 point
-
There are some pretty decent 3D files for the forearm. It’s one of the few parts of the kit I think could work as a print. Sent from my iPhone using Tapatalk Pro1 point
-
Well you certainly nailed those thighs, great work. Sent from my iPhone using Tapatalk1 point
-
Thanks a lot for the advice, seems like there is still quite a bit of work to be done!1 point
-
Looks amazing. Sent from my SM-G960F using Tapatalk1 point
-
A lot of work but thighs came out very nicely, well done1 point
-
First step PANIC, then settle down once you've made your first cut. When ever in doubt check the gallery section, a lot of great references there. Good luck with the build.1 point
-
Great to see this coming along so well1 point
-
Make sure to leave the helmet alone for a few days to allow the paint to cure properly before you start the detailing. I know it's hard but it will be worth it in the end.1 point
-
Yeah, I can post a picture but the trauma plate is too small, so I will have to shorten the rear split part it looks like.1 point
-
Well, the helmet is now white. First off, Hycote White primer. Ears attached ready for gloss. Even attaching the ears caused a small amount of damage. Or, “weathering”.... ;-) Now on to the gloss white. Halfords Appliance Gloss White has been referenced in the UK many times and is also the spray I used for my previous re-spray. It’s proper white so I will not be going straight for an aged look. This ended up being about 2&1/2 coats (if that’s possible).1 point
-
Almost there!! Enviado desde mi SM-G955F mediante Tapatalk1 point
-
Congratulations trooper, welcome to EIB!1 point
-
Hey Max, congratulations, Welcome to EIB. Next step Centurion !!!1 point
-
I use computer for the following not sure how to do the same on mobile. Go to the top right of the forum then click on your profile, select "account settings" then on the left of page select "signature" once there you can add images and links. To add your link go to web address bar at the top of your post and copy the URL, click where you want to add the link in your signature, use the chain "link" option on the menu above, paste the link into the URL field, then add a name for the ling in the "Link text" box. Hope that explains it.1 point
-
Awesome! I appreciate your attention to detail. It looks like all you need now are some T tracks and then paint. This is a quality blaster! Oh, and I like your stand for it too!1 point
-
Congratulations trooper and welcome to the EI ranks1 point
-
Congratulations Max excellent job. Welcome to Expert Infantry1 point
-
Hi again Max and thank you for your EIB application. In this review I will ensure that your armor follows the requirements set out in the CRL L2 Expert Infantry Badge and also point out what I can to prepare you for Centurion, should you choose to apply. I hope you do! Let´s get started shall we! CRL and EIB Application Requirements: All required submission photos have been posted and I am very pleased to announce your armor displays all the necessary elements to qualify for ANH Stunt Expert Infantry. On behalf of myself and the entire D.O.Team, Congratulations! Other-Armor Fit/Assembly: In this section we review observations made by your fellow troopers and ourselves. Some observations may lead to suggestions to improve the overall look of your armor. As we navigate through this review we are going to start from the top and work our way down. We dive in with the helmet and the black outline on the decals AM provides tend to be a bit on the thicker side compaired to screen used helmets, those were also hand painted and as your painting on the ear bumps are flawless we suggest you consider painting the rest as well. Dropping down to the brow we just like to mention that the majority of the Stunt helmets had a slightly higher brow, just something to consider. We keep focus on the brow and the ends looks a bit forced in there, raising the brow as mentioned above would sort this to and/or snip them off a bit shorter. Although there are exeptions, for the most part the brow trim ended just at or before the end of the trap and the cuts were more othen than not straight rather than at an angle following the line of the trap. Just some nitpicking to make you look as sharp as ever. Moving on to the eyes we suggest you trim out some more at the bridge and more to a point for a more menacing apperance when staring down a crowd. Next up we have the ears and as seen below on most Stunt helmets the ears had more of an angle to them so if you feel up to it we feel it would add even more to that ANH-feeling, Another thing to consider would be to trim the left ear (as looking at the helmet) a bit thinner, it would also make the ears match a bit more. Here we suggest dropping the whole of the arms and also to have the biceps and forearms closer together as seen on the Troopers below, perhaps not so low that the bicep pop out from the shoulderbell but you get the idea. Looking at your forearms we also noticed there´s a good amount of return edge and we suggest to remove all of it on the inside part as indicated by the blue lines and most if not all on the outside were indicated by red arrows. Original armor had very minimal if any return edge and that would make it a bit more comfortable as well. As seen in the reference image the button plates themselves reside within the mounting area so to be more in keeping with the original armor we suggest some minor trimming (Pardon the not so great lines on the smaller one). As we´re not sure which photo is the latter showing the rivets you might already touched them up so we figured mention it as a "just in case" The posterior plate seem to have gone Rogue on you so here we advise you to thighten the strapping. As seen in the reference image the cod rivet is usually placed closer to the edge and an easy fix would be to trim the rather long end of the cod. Last on our suggestion-list is to do some trimming on the sniperknee, just to tidy things up. That´s it for EIB Let´s move on to the next step! Centurion Requirements: In this section we prepare you for Centurion. More photos may be requested in the future that allow us to make better decisions on possible adjustment etc. If there are any areas of concern they will be discussed here. Because Centurion photos show much more detail than EIB, items pertaining to Centurion might be seen there and not here. We try to point out all we can from what is seen but the final accuracy is the responsibility of the trooper. Below you will find areas that will need to be adressed for a future succesfull Centurion Application. As per L3 there should be a minimal gap between the shoulder armor and the chest and back plate so we need you to close that gap some more. The original bells were not trimmed straight but with a curve to follow the chest and back plates so that might also be worth looking into apart from the usuall adjustments of thighter strapping/undersuit issue etc. The AM back plate holds some challenges but every problem has a solution so look at this thread to see how a fellow AM Trooper fixed his overlap https://www.whitearmor.net/forum/topic/47357-how-to-fixing-the-am-armor-back-plate-overlap-issue/ The sides should be together nice and thight and some tighter strapping should have this sorted. Moving on we see that the dropbox need some sorting so it stays put at the very end of the of the ammobelt with no to minimal gap in order to comply with L3. It looks like it just got stuck but needs sorting none the less. Beeing mindful when taking the submission photos might be all that´s needed. When out Trooping it´s always a good idea to check the boxes from time to time - we all want to look sharp and not have a dropbox sneek into the thigh Another challenge on your road to Centurion would be the forearms, as they stand now they don´t fit you properly as they are too big. Hopefully E-6000 was used and it´s a matter of popping off the back coverstrip and rezise them to fit you better, a good rule of thumb is to just barely getting your hand through the wrist openings and as seen in the the reference image the thighter the better. You might already be aware but as a heads-up, per L3 the handgurds are latex or latex-like with no visible strapping. Final item in the review is the blaster and it could be the photo but as per CRL L3 the grip can´t have any metallic damage/weathering showing so if it does it needs to be removed/painted for Centurion. We also suggest to give the entire blaster some adding of black paint , we do understand wanting to the blaster to look real but the blasters in the movie were more of an all-black piece. Last part is a suggestion only. There we have it! Again congratulations on your Expert Infantry title and we hope to see your Centrurion application in the future1 point
-
Try not to have cover strips passing the armor sections, they can catch. Also try adding a little off cuts of abs behind your thigh lower ridge gaps, will just look a little nicer1 point
-
Hi MMELENDEZ, This by far is the most popular option people are going for - one made of resin that you put to gather on your own. Do explore completion kits available, notably T-Jays offering here on FISD, you won't be disappointed. Hope that helps [emoji106][emoji6] https://www.doopydoos.com/stormtrooper-e-11-complete-anh-e-11-blaster-kit-offer-2685-p.asp Sent from my SM-G960W using Tapatalk1 point
-
Update #02 - Painting, assembling & weathering As the blasters are black, I looked for a dark grey color and ended up with graphite-grey, RAL 7024. Hm, if painted in black or grey, this could look interesting. But I soon skipped the idea, because this rack is not symmetrical. When the blasters are inserted, the cog emphasizes that fact. And most of the time, the blasters will be there. Well, sometimes less is more… Next update will probably be the last one and shows the rack equipped with blasters and accessories. Still waiting for sunny daylight to take final pictures, but currently we only have cloudy winter days over here… Thanks for reading1 point
-
Update #21 - Back on track (T-track tutorial) Every single track in a kit is important. If just one of them gets messed up and a replacement is required, it causes a delay plus additional costs. To avoid this, there should be enough time when starting this work. Tools prepared: heat gun, gloves, side cutter, nose pliers and possibly a flat screwdriver and sandpaper or a file (not all is mandatory, just showing what options there are). It is really important to maintain a safe distance between track and heat gun during the whole process, as the arms might become tired after a while. The heat takes some time to get into the plastic part. Depending on the tool‘s power (1000 to 2000 W), this roughly takes about 1 minute - a bit less to correct the „banana bends“ and a bit more for a full bend. Too much heat or a close distance will both result in the „lizard skin effect“ (next pictures). And this cannot be made undone! Therefore it is useful to add the heat to the flat bottom of the track, not to the top. When gravity clearly starts to bend the part, a few more seconds will guarantee it is warm enough. Then it should immediately get bent. When it cools down, the material tries to get back in the original shape. Therefore it is important to keep the part in position for at least half a minute. If the heat gun burned the surface, the track might still be long enough for a different row of venting holes after cutting off the damage. Otherwise a replacement track is required. If everything went fine (or in cases of very little lizard skin) the heated end can be inserted into a receiver hole. All holes are the same (except the bigger one behind the front sight) and it does not matter, which one is used to bend the track. I personally prefer the row with the magazine well, because here the track can be worked in full length without anything in the way. Note: This is the only row with 10 holes to cover. All other rows have only 9 holes. If a track got messed up here, it might still work for another position. To permanently install a T-track, the correct length needs to be found. 10 mm to the front end of the farthest hole will save enough material for a nice bend. In case the tracks are being installed prior to the scope rail, it is useful to temporarily cover the receiver hole for the rail - just to avoid accidentally installing the top track there Only 6 of the 8 rows need to get covered. Tracks are not required on the row with the bayonet lug and the bottom row (because of the folding stock). If one or more tracks are rattling on the receiver tube, this can easily get fixed by semi-heating both ends. The material will then try to get back to the original (straight) shape. As a result, the tracks will hold themselves locked in the receiver holes. It is recommended to not paint T-tracks (if not inevitable). The different color and surface will make them look more believable. Weathering with colored highlights is questionable, as the prop makers also used black plastic tracks for the Sterlings in the movies. Scratches or dust are no problem. That's it for today. Thanks for any comments, questions and critics1 point