

simorph
-
Posts
106 -
Joined
-
Last visited
-
Days Won
1
Content Type
Profiles
Forums
Gallery
Articles
Everything posted by simorph
-

HOWTO: Cricket's Magnetic Shin Closures
simorph replied to Cricket's topic in Tutorials, Tips and HOWTOs
Just wanted to say a big thank you for this tutorial - it worked brilliantly for me, and I'm pleased to say I passed Centurion the other week! Pretty much followed the tutorial to the letter, although I did accidentally order magnets that were half the thickness that I needed, so ended up having to sandwich two magnets with a bit of E6000. One thing to note is to shape the bottom of the shins with boots on - I found that the extra thickness of the back of the boot does push against the bottom magnet a little so that's something I wish I'd made more effort to take into account during my build. Thanks again! -
Request your Centurion Certificate here:
simorph replied to justjoseph63's topic in Request Centurion Status
Simon Phipps 16566 A4 Daniel Thank you! http://www.whitearmor.net/eib/certificates/16566-centurion.png -
Request your EIB Certificate here:
simorph replied to justjoseph63's topic in Request Expert Infantry Status
Simon Phipps TK 16566 A4 Daniel Many thanks! http://www.whitearmor.net/eib/certificates/16566-eib.png -
TK-16566 requesting TK ANH Stunt Centurion status [RWA] (440)
simorph replied to simorph's topic in Request Centurion Status
Thanks everyone! Much appreciated! -
TK-16566 requesting TK ANH Stunt Centurion status [RWA] (440)
simorph replied to simorph's topic in Request Centurion Status
Never underestimate the power of the Dremel... Return edges obliterated... -
TK-16566 requesting TK ANH Stunt Centurion status [RWA] (440)
simorph replied to simorph's topic in Request Centurion Status
Roger that! I'll give them a trim and post back. No worries about the delay - I was on vacation these past few days anyhow! Thanks! -
TK-16566 requesting TK ANH Stunt Centurion status [RWA] (440)
simorph replied to simorph's topic in Request Centurion Status
Okay, so post EIB-approval and following all the little suggestions and fixes for Centurion - there's a whole, brand new set of photos for you guys to take a look at up there! Thanks! -
well, I gritted my teeth last night, unscrewed everything and went for it - I took 2-3mm off both ear caps, swapped in small screws into the original top holes of the ear caps so my visor would still hold in place, trimmed back as much of the ABS under the ear region as I could without disturbing the pop rivets, re-sited, drilled and remounted the ear caps as tilted and in-line with the back of the temple/traps as it would let me without revealing the pop-rivets. Only two bits of trauma - nearly drilled through a fan wire, and a small issue where the heat from cutting off the long bolts caused a screw on the bottom of the to pull through the ABS. But that's as 'Hopey' as I think I can get.
-
TK-16566 requesting TK ANH Stunt EIB Status [RWA] (924)
simorph replied to simorph's topic in Request Expert Infantry Status
Thanks Dan! well, I gritted my teeth last night, unscrewed everything and went for it - I took 2-3mm off both ear caps, swapped in small screws into the original top holes of the ear caps so my visor would still hold in place, trimmed back as much of the ABS under the ear region as I could without disturbing the pop rivets, re-sited, drilled and remounted the ear caps as tilted and in-line with the back of the temple/traps as it would let me without revealing the pop-rivets. Only two bits of trauma - nearly drilled through a fan wire, and a small issue where the heat from cutting off the long bolts caused a screw on the bottom of the to pull through the ABS. But that's as 'Hopey' as I think I can get. (I'll take a look at those stripes and see what I can do though, thanks!) -
Well, I passed EIB, which is cool. And the guys gave me a stack of suggestions. So, I took a swing at them... Straightened out the brow ridge by trimming back the ABS edge behind the trim, and then applying a few spots of E6000 to stop it sliding back down Made the mods to the Thermal Det... The clips butted up to the plastic but the original bend on the clips wasn't quite round enough to hug the tube, so I removed the clips, carefully bent the tips and replaced. There's a teensy gap on one side and I'm leaving it there as I can't pry the white plate off. So more accurate, not 10000% perfect. Trimmed back the cod... Trimmed the final rectangle off the shoulder bridges, which takes nearly an inch off the bridges... Trimmed the canvas belt (again) but this time took some Resolene (the acrylic top coat I use on leather pieces) and soaked all the way around the edge of the belt. This means that none of those stray threads are going to come loose ever again (I did worry that at the rate I kept trimming it, I'd end up with nothing but a piece of string) Trimmed back the return edges on the arms...which should give me more room to move! Scuffed up the hovi tips... Tightened the strapping on the ab plate by adding an extra snap to the elastic on the right... ...and making much shorter straps on the left.... Now the natural position for the ab at rest is with the plates overlapping - so the gap should be as narrow as possible now. And then (thankfully, I kept the stencils!) I added an extra stripe - took the spacing of the bottom edge of the stripes, but tilted the stencil forwards... So hopefully more New Hope... And finally, I took out the return edge on the shoulders so that'll hopefully close up the gaps even more and give more movement... Still terrified at the prospect of tilting those ears back - the helmet's held together with pop rivets and prayer. But can't do anything to it for at least a couple of days while the new tube stripes cure...
-
TK-16566 requesting TK ANH Stunt EIB Status [RWA] (924)
simorph replied to simorph's topic in Request Expert Infantry Status
Sooo...I went through the list and made the following mods.... Straightened out the brow ridge by trimming back the ABS edge behind the trim, and then applying a few spots of E6000 to stop it sliding back down Made the mods to the Thermal Det... The clips butted up to the plastic but the original bend on the clips wasn't quite round enough to hug the tube, so I removed the clips, carefully bent the tips and replaced. There's a teensy gap on one side and I'm leaving it there as I can't pry the white plate off. So more accurate, not 10000% perfect. Trimmed back the cod... Trimmed the final rectangle off the shoulder bridges, which takes nearly an inch off the bridges... Trimmed the canvas belt (again) but this time took some Resolene (the acrylic top coat I use on leather pieces) and soaked all the way around the edge of the belt. This means that none of those stray threads are going to come loose ever again (I did worry that at the rate I kept trimming it, I'd end up with nothing but a piece of string) Trimmed back the return edges on the arms...which should give me more room to move! Scuffed up the hovi tips... Tightened the strapping on the ab plate by adding an extra snap to the elastic on the right... ...and making much shorter straps on the left.... Now the natural position for the ab at rest is with the plates overlapping - so the gap should be as narrow as possible now. And then (thankfully, I kept the stencils!) I added an extra stripe - took the spacing of the bottom edge of the stripes, but tilted the stencil forwards... So hopefully more New Hope... And finally, I took out the return edge on the shoulders so that'll hopefully close up the gaps even more and give more movement... Still terrified at the prospect of tilting those ears back - the helmet's held together with pop rivets and prayer. But can't do anything to it for at least a couple of days while the new tube stripes cure... -
TK-16566 requesting TK ANH Stunt EIB Status [RWA] (924)
simorph replied to simorph's topic in Request Expert Infantry Status
Thanks guys! Much appreciated! -
Thanks. All fixed now, pointing in the correct direction, and even less likely to snap off!
-
So, I used the 3D print as a guide and fashioned myself an all-aluminium one - this'll never break, and once I've painted it and secured it with epoxy, it'll never come out... I'll just make sure I put it in the right way around this time!
-
There's a 'that's what she said' reply in there... I love my 3D printer I have some more aluminium on order, so plan is to use the 3D print as a template/guide for making a metal one. Good to know though, that if I have an emergency troop (which I won't) I can be up-and-running again in the time it takes for glue and paint to dry!
-
Dammit! That was a good spot. You know - I know which way around that piece should be. I've studied the ref a gazillion times. I swore it was the correct way round when I read your post on my phone... But it wasn't! For some insane reason, I had indeed glued it totally the wrong way around. Pleased to say I did a great job of fixing it in, making it completely robust. Which meant, that to get it out it snapped into multiple pieces and I had to drill the rest away to get the fixing bolt out. Time to source a new one/scratchbuild a new one from aluminium. Thanks...I think...
-
TK-16566 requesting TK ANH Stunt EIB Status [RWA] (924)
simorph replied to simorph's topic in Request Expert Infantry Status
Happy to - least I can do to repay you guys for all the help and support. If you can point me to a definitive set of images, I can happily sort it. -
TK-16566 requesting TK ANH Stunt EIB Status [RWA] (924)
simorph replied to simorph's topic in Request Expert Infantry Status
Okeedokee - uploaded a bunch of photos and added them to the original post. Fire away with any more questions. Just thinking - if you wanted a more visual set of checklists for the two PDFs for EIB and Centurion (I've taken all the headings for my post from those two docs), if you can point me to a definitive set of photos, I could rework both PDFs for you so that they have thumbnails of the example photos alongside the checklist... I'm an artist/designer/web/print designer - that's my job, so I could happily do you a second more visual version of those docs. I'd just need a set of images from you guys. If there are any specific things you might want to call out on those images, I could easily drop in callouts (e.g. 'make sure Han Snap is visible in this shot', 'make sure belt overlaps button plate', etc.) -
TK-16566 requesting TK ANH Stunt EIB Status [RWA] (924)
simorph replied to simorph's topic in Request Expert Infantry Status
Aha! Thanks! (Again!) -
TK-16566 requesting TK ANH Stunt EIB Status [RWA] (924)
simorph replied to simorph's topic in Request Expert Infantry Status
Sorry my bad - didn't realise that EIB meant what it was when I accidentally filed Centurion app, so subbed in build thread in that field. On the right/left detail with arms raised - what's the difference between that and zooming in on the full body pic? Just querying so I know what you might be looking for that's not in the full body pic? Thanks! -
TK-16566 requesting TK ANH Stunt EIB Status [RWA] (924)
simorph replied to simorph's topic in Request Expert Infantry Status
Yep, my bad - amended in the original post. Username here is 'simorph' - I was using my Mercs id on the UKG site and completely got mixed up. Thanks! -
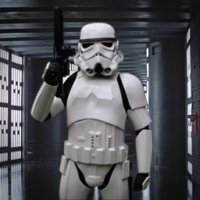
Ooops - been told I have to apply for Expert Infantry before I can apply for Centurion, so here's all the pics and info over here in this thread. Thanks! Name: Simon Phipps Forum name: simorph Legion ID: 30878 Garrison: UK Garrison EIB Application: https://www.whitearmor.net/forum/topic/46398-simes-anh-tk-build/ E11 Build: https://www.whitearmor.net/forum/topic/46398-simes-anh-tk-build/ Armor = RWA Helmet= RWA Blaster= Doopy-doos + Tino Finishing Kit Height = 5'10" Boots = Roamers Equestrian Boots dyed white Canvas belt = RWA Hand Plates = RS Props gloves with flexible hand guards Electronics= TRamp Neck Seal = RWA Holster = Scratchbuilt Full clearance image album here: https://imgur.com/a/q0bp6uR Additional details image album here that should cover all Centurion app questions: https://imgur.com/a/RWgk4mm FULL BODY Front – Arms at side Left – Arm raised Right – Arm raised Back – Arms at side Right Side Detail - Arm raised Left Side Detail - Arm Raised ARMOR DETAILS Abdomen Details Action Shot Ab/Kidney Attachment – Button Orientation Kidney Plate Notch Butt/Kidney – Fixed: Yes/No Yes - Butt and Kidney are separate Hand Plates Shoulder Bridge Back Shoulder Bridge Front Thigh Pack Attachment Knee Plate Drop Box Back Cod and Butt Plate Attachment (Note - exterior brass rivet is cosmetic - I didn't want to put strain on the armour, so glued a snap plate over it to take the actual strain.) Interior Strapping Back/Chest Connection (Additional snaps around outer corners of the butt/kidney are redundant - that was experimenting with best attachment points for best fitting of butt plate - I plan to remove those) Wrist side of forearms HELMET DETAILS Front Side – Left/Right Back Hovi Mic Tip Detail Lens Color (Backlit if required) S-Trim BLASTER DETAILS Blaster – Right Blaster - Left ACCESSORIES DETAILS Neck Seal Thermal Detonator – Back Holster Attachment
-
TK-16566 requesting TK ANH Stunt Centurion status [RWA] (440)
simorph replied to simorph's topic in Request Centurion Status
Hey, I'm a trooper now....I thought aiming for the wrong target was mandatory! Thanks! -
Name: Simon Phipps Forum name: simorph Legion ID: 30878 Garrison: UK Garrison EIB Application: https://www.whitearmor.net/forum/topic/47536-tk-16566-requesting-tk-anh-stunt-eib-status-rwa-924 E11 Build: https://www.whitearmor.net/forum/topic/46398-simes-anh-tk-build/ Armor = RWA Helmet= RWA Blaster= Doopy-doos + Tino Finishing Kit Height = 5'10" Boots = Roamers Equestrian Boots dyed white Canvas belt = RWA Hand Plates = RS Props gloves with flexible hand guards Electronics= TRamp Neck Seal = RWA Holster = Scratchbuilt Full clearance image album here: https://imgur.com/a/u5MKk8P FULL BODY Front – Arms at side Left Left – Arm raised Right Right – Arm raised Back – Arms at side ARMOR DETAILS Ab/Kidney Attachment – Button Orientation Kidney Plate Notch Butt/Kidney – Fixed: Yes/No Yes - Butt and Kidney are separate Hand Plates Shoulder Bridge Back Shoulder Bridge Front Thigh Pack Attachment Knee Plate Drop Box Back Cod and Butt Plate Attachment Interior Strapping Back/Chest Connection Wrist side of forearms HELMET DETAILS Front Side – Left/Right Back Hovi Mic Tip Detail Lens Color (Backlit if required) S-Trim BLASTER DETAILS Blaster – Right Blaster - Left ACCESSORIES DETAILS Neck Seal Thermal Detonator – Back Holster Attachment
-
Hey guys thanks to everyone here for all the support, ideas and advice. And to Ross at RWA for a terrific kit (and lots of support), RS Props for the gloves, Doopy's for an ace E11 kit and Tino for the finishing kit that made my E11 more awesomerer. Just been approved by the UK Garrison - time now to get that Centurion application in! Here's the link to the build: Hope everyone's having a great weekend, wherever in the galaxy you're based! Best Simes
