Leaderboard


Popular Content
Showing content with the highest reputation on 11/30/2018 in all areas
-
I'm not really building yet, but since I'm starting to order pieces I thought I'd start a build thread. A little intro- I am a total n00b to armor. I'm an intermediate seamstress, earning my stripes through drafting and sewing my staff officer and Rey costumes. I'm 5'2" petite build so I know I'm in for a lot of trimming... but yes, I have seen the threads from the ladies who have been here before me I will be leveraging heavily. I've been eying a TK build for years, but honestly have been scared due to my height and inexperience with armor. But last weekend while shopping for TIE armor for my husband I (drinking wine) also asked for a quote for TK armor, and pulled the trigger on both. So, status: Costume Armor: WTF ordered Undersuit: ordered from Academy, hoping it works- but it's like $20 total so if not, no giant loss https://www.academy.com/shop/pdp/bcg-womens-turbo-long-sleeve-shirt#repChildCatSku=111076921 https://www.academy.com/shop/pdp/bcg-womens-cold-weather-training-legging#repChildCatSku=111460350 Other stuff Cut-resistant gloves ordered, because I'm a walking disaster https://www.amazon.com/gp/product/B00MXUHHGK/ref=oh_aui_detailpage_o00_s00?ie=UTF8&psc=1 Scissors ordered https://www.amazon.com/gp/product/B007KN0RQM/ref=oh_aui_detailpage_o00_s01?ie=UTF8&psc= Up next: Lots of stuff saved in Evernote notes! Gloves, neck seals, etc. go measure my feet for good TK boots size Other tools Wait... worry that I won't be able to pull it off... remember that it took me 2 years to sew an officer uniform... worry that I am too short, etc. etc.2 points
-
I suffered over what to use for mine, and ended up using copper tubing/caps. I thought the ends of the caps should be completely flat (like the DD ones come) but in looking at reference pics noticed that were actually slightly rounded. I cut down the caps to length and flattened the tops a bit. (The photograph angle makes the right one appear a little longer). I used aluminum for the base plate. Much easier to work with. Reference image Finished product This was the most fun for me... almost needed surgical skills, lol.2 points
-
Yes, the power cylinders in the DoopyDoo's kit are not very accurate. But with some effort, you can turn them into something good. From Derrek (Dday) I heard, the power cylinders are one of the most tricky parts, to cast in resin. That is why his cylinders are made from 2 resin pieces, while DoopyDoo's does it all in one piece. However, I am sure your cylinders will look great in the end.2 points
-
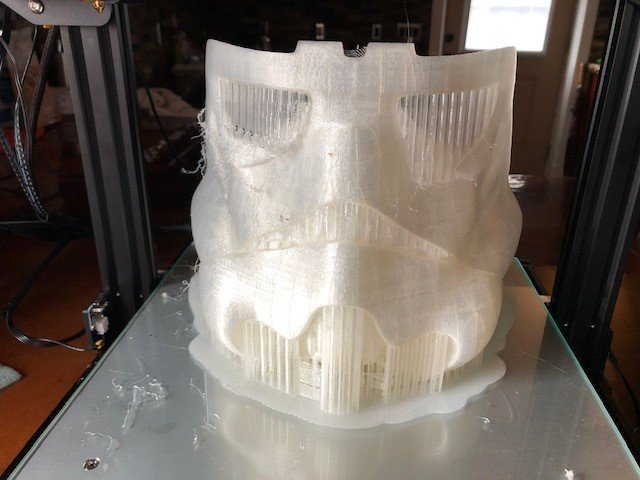
I have all the build materials now. Picked up the proper gloves and will start on those. I guess I need to look at the pictures and just try to line it up as the reference photos show? For the blue and black buttons on the ab I thought about printing some round vinyl paint masks so the circles will come out perfectly round. Pics to come. While waiting I started printing an Inferno/TIE Pilot helmet. Takes a long time! It will get assembled, cleaned up, and probably molded so I can pull some a carbon fiber helmet. I have some yellow kevlar, that might look kind of cool too as a prop. Each half of the helmet will take 2-1/2 days! Too bad we don't have a section here to post TI stuff. I may have to make a clay bust first to adjust some things...we will see what it looks like after assembly.
 2 points
 -
Correct. FWIW, I'm not sure you really need to bring your back plate up. I think if anything, it looks like a lot of blakc space between the top of the back plate and your helmet because you may have a longer neck than average and your helmet may be tilted towards the front.1 point
-
So you mean ab and kidney plates? Done the painters tape thing [emoji4] trust me, those babies ain’t getting any closer. There’s no requirement for them to be flush for basic approval though. Sent from my DH77 using Tapatalk1 point
-
Just to update, received blaster today, looks great as expected!1 point
-
That will be the plan...1 point
-
Baaaaaad plastic!! Or at least not suited for that particular project. Fingers crossed it’s not your deathtrooper kit1 point
-
Doopy power cylinders do take a lot of work to get them to look accurate. Those caps are an interesting find for the ends. I found the cylinders to be the most difficult to capture the details but its rewarding when it done and you see how they look compared to the original doopy state.1 point
-
Nice work, I do prefer a heat gun over water bath, there is more control but you really do have to practice before using one. I've seen a few local troopers with RS armor have issues with the shins cracking at the top due to stress opening, you can either glue some strips of ABS behind or use ABS paste, both will help it cracking further. Looking good.1 point
-
Oh, those shins look so symmetrical and sit so flush - stuff I have always dreamed of during my RS build looking good, and soon you will be part of the ranks1 point
-
Looks great! Keep up the great work. Just make sure they are not too tight that you can't walk.1 point
-
Quick update, while I play the waiting game: Ordered an two piece undersuit from stormtropperundersuit. It's already on it's way from UK so I hope I'll have it by next week. Also ordered the RS Strapping and Belt (Andrea knows how to sell stuff ). And I'm waiting for my E 6000 to arrive. There seems to be no alternative in Germany and importing it from US was cheaper than buying one of Amazon. Yes, with shipping! While I'm waiting for all this to arrive I started to annoy our neighbors and went outside at 5°C for sanding down the edges. So much better now. The limit for putting it on and off is my elbow that colides with the lower return edges. Although not needed I wanted to give it a little depth. Looks good, but the ends where the two halves meet, are twisted or sticking out. Guess I won't have a level edge if I stick to the lower return edge. I also marked the meassurements Rob gave in the vlog and like I expected: My arm's to big. Is it better to adjust the inner or the outer half to fit my arm? Or evenly? It's not much but about 1 centimeter. Feels like it fits fine like that, but as mentioned: The elbow thing for slipping in and out.1 point
-
I am humbled by your comments Brian – coming from someone who manufactures scopes. No curtains anytime soon, the show will continue! I agree entirely, Andy's resource is the definitive source for power cylinders. Tino, your work is an inspiration to me and to many others. IMO, this and your 2016 build are the builds that show cases what’s possible, deserving to be binded for quick reference. Yup! They’re timeless go-to pieces for generation of builders to come. Excellent reads to expand the mind! No kidding, really. Sent from my SM-G390W using Tapatalk1 point
-
Oh yeah, sorry Tino, I should have noticed that too. Your builds are like pages out sacred texts. Never leave home without them!.1 point
-
When building my first set of power cylinders, I had also worked with Andy's great document. It simply is the best resource out there. But hey, the photos in that binder on top look familiar to me - did you really print the steps from my first build to refer to? Wow, I am out of words, man.1 point