Leaderboard


Popular Content
Showing content with the highest reputation on 10/09/2018 in all areas
-
Yes! YES!! HECK YEAH!!4 points
-
Well, I posted my application photos for PO over at MEPD. I guess we’ll see. In the meantime, more fun in photoshop. Sent from my iPhone using Tapatalk2 points
-
Should know that soon.... still got to make the bolts and a few more pieces to know for sure.2 points
-
Nice. Pretty sure I can make that little block on my own Sent from my Pixel 2 using Tapatalk1 point
-
Sorry i didnt make this to be able to put a real trigger group in it.... didnt want there to be any confusion about this build with the firearms people LOL1 point
-
Looks like an easy pass for basic. Echoing the comment regarding the drop box strap length. Would also suggest you secure them to ensure they are correctly aligned with the ends of the ABS belt.1 point
-
That was quick! Congrats!1 point
-
Thanks for the feedback Eric. I was thinking some modification was going to be needed for the shoulder strap positioning. There are a few things I want to redo in that area. One of the white elastics is a bit tight and pulling up the chest armor more than i like so going to redo that entire piece sooner than later.1 point
-
Good for basic approval!1 point
-
Nice work Sent from my iPhone using Tapatalk1 point
-
Nick, first off, nice work! I also think you're good for basic approval. I struggled a little with the AP shoulder bells too since they're a bit smaller than others, so like Arthur suggests I had to keeping trimming the return edge down to get them in closer to the chest. I did leave a bit of return edge to give them some depth though. You might also want to move your shoulder bell snap base from the center of your shoulder strap to the inside edge (closer to your neck), that will help pull the top of the shoulder bells back up & in and assist with closing that chest/bell gap too. Doubling up the elastic for the shoulder strap can help too, makes it stronger and keeps it from pulling out from under the shoulder bridges. Good luck with approval!1 point
-
Very nice built you have got there. Say, if you can bring the shoulder bells a bit more closer to your chest plate (by removing all the return edges at the bottom) that will get you closer to the reference photo look. You are considering EIB application right?1 point
-
Nice work, a very clean build, one thing I would suggest is reducing the length of elastic on your drop boxes, will help them sit straight. You could also bring up your an section a little, will give you a bit more room around the thighs. Good of luck with approval.1 point
-
Nice work Nick and I would say easy basic approval. It also looks like a pretty clean for EI too. Sent from my VK815 using Tapatalk1 point
-
Took the clamps and magnets off the forearm this morning and it looks...okay? Haha. It's pretty wonky. I think it should be okay but it'll need a lot of filler and sanding.1 point
-
More progress on the armor [emoji106] So, put together all of the front and most of the back. Things to fix: - connect the ab and kidney on the sides so they close -put padding in my helmet -get shorter elastic and Velcro to connect my kidney and butt plates and kidney and back Other than that, I think it's turning out good! DEFINITELY will need to install my fans once my building is done. It gets stuffy in there! Sent from my LGLS992 using Tapatalk1 point
-
Congratulations and welcome to the ranks trooper1 point
-
I have also had some difficulties with the ATA backplate kidney gap. I found I had to shorten the straps holding the back plate to the kidney a little( to keep the gap small), and lengthen the shoulder straps a little to allow the back plate to angle out at the top so the return edges can meet up better. It’s been a trial and error process, as too short a strap between back plate and kidney and the return edges want to overlap at the sides. And too long of shoulder straps will allow the shoulder bells to sag off the arm, and the whole armor to hang too low in the crotch. Sent from my iPad using Tapatalk1 point
-
Alright, after my first very exciting weeks in the Legion, Saturday marks my first official event, and since there are only two people attending I'm also gonna experience the duties of an OLC... I'm really looking forward to it tho, and on top of that I painted some parts of my Stanley box white and put my ID on it as well, and I worked on my armor and applied for EIB a second ago. Interesting times ahead Cheers, Freddy1 point
-
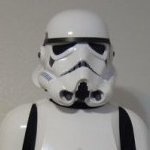
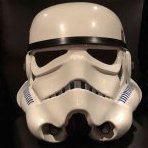
Approved for basic! TK32568 reporting for duty Moved the left ear back, now need to fill a hole And filled Now to EIB and then centurion1 point
-
Don’t want to be the barer of bad news but you will most likely need to shorten those cover strips, they should end at the start of the ridges.1 point
-
Approved. TK32568 reporting for duty. Now on to EIB1 point
-
Left ear moved back and the hole is filled/polished1 point
-
Have you attempted to cost out how much one of these babies would be to buy, kit form or assembled?1 point
-
Wow those grips are pretty amazing. I love that the outside sandwich pieces are separate. And chance you're making just the block on the heel of the grip for those of us with trigger groups?1 point
-
Tssk tssk ()1 point
-
Nice progress. :-)1 point
-
I bought all 3, I'm secretly a billionaire Very cool finds though! Anyone know which ANH helmet trooper that was?1 point