Leaderboard


Popular Content
Showing content with the highest reputation on 09/13/2018 in Posts
-
A Salute is in order3 points
-
It’s a good idea to check the gallery’s, some great screen references can be found there https://www.whitearmor.net/forum/gallery/ There are also a lot of helpful build threads for those with shorter legs, some even cutting their tops of thighs and forming new return edges. These may come in handy if you decide to trim them: http://www.whitearmor.net/forum/topic/12972-howto-make-a-return-edge-on-armor-using-a-heat-sealing-iron/ http://www.whitearmor.net/forum/topic/11836-how-to-make-thigh-tops-anh-style/ http://www.whitearmor.net/forum/topic/13513-anh-thigh-tops-on-am-armor-craziness/2 points
-
Thanks, I did indeed put ABS paste on the top and underside of the crack. I sanded and polished the top but left the underside "raw" as it won't been seen. I also tried to get a bit of acetone right into the crack with a small paintbrush. I will see how it holds up over time. Mark2 points
-
I say leave it for now and do some more walking and see how it is, you can always remove more later if needs be - looks great2 points
-
Depends on what Velcro and how it’s applied, I’ve been using it for 6 years and @ 45 troops a year and not had any issues yet I use industrial Velcro and attach with E6000 glue, pretty simple, the only thing difficult is making sure the back strips close flat, most backs of the calves are slightly round and once you attach a flat cover strip it angles away so a little heat is needed for a better fitment.2 points
-
As Tony said they will work fine as long as it has pressed over the post. I do find if you use a Philips head screwdriver and tap on the post lightly it will help to spread out the post, then when you use the setting tool it will spread better, worth a try.2 points
-
Nice fix with the tube stripes, looking good1 point
-
Found out yesterday from Diversity Props that my bucket will come with fans built in. Part of what is included in paying them to finish the armor for me. One less thing I will need to purchase and a nice surprise.1 point
-
Update, So I did the black wash last night. Here is a picture of the wash still wet. Once the wash was dry, I took these pictures. Notice how the wash has toned down the silver. I will wait for 24- 48 hours then clear coat everything. After the clear is dry, I will wrap the “D” gasket and that will complete the project. Thanks for the interest.1 point
-
Then it was time to trim the ab button plates. The smaller trimmed down to 70mm x 20mm. The larger has around a 5mm frame surrounding the raised area. Just need a sanding and then they're done Sent from my SM-A520F using Tapatalk1 point
-
More work on the strapping system Sent from my SM-A520F using Tapatalk1 point
-
Awesome build! Best of luck on your application.1 point
-
Helmet Time!!!!! Here's the untrimmed AP helmet. I love the fact that it has the trim lines molded into the ABS and approx screw locations too!! No wonder the stormtrooper's couldn't hit anything they shot at... So I started off drilling small holes in the eye sockets with a dremel and then moved the drill bit sideways to connect the holes and cut out the eyes. After that was a lot more sanding and filing than I expected. It took a long time to get the eyes looking the way I wanted. Mark1 point
-
I have the 25 gallon one as well. I second everything Cricket said. And it fits in most small cars.1 point
-
Just FYI, you'll need to remove the small tray that comes inside it. I have never needed it.1 point
-
Awesome, thanks Tony! A 20-pack should be fine (I think?), and waiting on China shipping isn't that bad.1 point
-
Nice work, Robert. One of the team will be with you soon. :-)1 point
-
Correct. As for the magnets, those will do but are expensive. If you can wait a bit a cheaper alternative would be the following. Been using these for a few years now. https://www.ebay.com/itm/20PCS-12mm-X-4mm-N50-Strong-Round-Disc-Cylinder-Magnets-Rare-Earth-Neodymium/272016153745?hash=item3f556d1c91:g:M8sAAOSwT5tWHkaS1 point
-
I use this bin for my kit. I nest the arms and legs all together, and those fit inside the torso. Helmet goes in a separate helmet bag. I use old white pillowcases as padding and protection. There's even extra space for a repair kit, boots, and my blaster. https://www.homedepot.com/p/Husky-35-in-Mobile-Job-Tool-Box-222167/2050532571 point
-
I have the old 4 piece forearms but thought maybe the 2 piece would be too hard to size down for me anyway. Really nice fix!1 point
-
This is for Centurion only, but looks like your left belt box is not quite aligned with the edge of the plastic belt. A dab of glue will probably hold the strapping in place.1 point
-
Talk about a speed build! Looking good!1 point
-
Correct and if you already are a 501st member you should request member status1 point
-
Here you go https://www.whitearmor.net/forum/topic/30456-how-to-join-the-501st-legion-as-an-imperial-stormtrooper-tk/1 point
-
The left bicep and left shin are a bit oddly shaped too so you may need to shape those as well. I would say the thighs aren't the biggest too so be sure to size before you trim.1 point
-
I wouldn’t trim it down until you see what spacing you have between you thighs, shins, COD and butt plate. It’s easier to take off later than try to add on if you trim too much. You can however trim off the return edge as it’s not required, that should stop the pitching and give you a little extra room1 point
-
Yeah I noticed some of the pieces were close to almost 1/8" inch thick in some trim areas. I have a dremmel which I used the drill bit and cutting bit on my bucket for the eyes and teeth. Good to know on the forearms. I will be trimming off excess and hopefully taping things together for initial sizing this weekend with photos. Sent from my MSE-6 droid using Tapatalk1 point
-
ATA is pretty much like most, it does have a round and an oval forearm, most apply a little heat once assembled to make the oval one a little rounder to match, other wise one looks huge in photos. It is also a lot thicker than most other armor, score and snap will work with cover strips once you give them a few passes, but you won’t score and snap the armor pieces, better off getting a dremel (or knock off version), I use 3 of them with different heads, drum sander, cutting disk and drill, saves a whole lot of time trying to cut with sheers1 point
-
i had it sitting as high as it goes and it felt pretty long, the bottom stops right in the middle of my knee1 point
-
Awesome, thanks! Sent from my iPhone using Tapatalk1 point
-
I hear ya on the left to right transition. Straight to centurion that is what we like to see. I did the same on mine, just waiting on my EIB application so I can move forward towards centurion. Sent from my VK815 using Tapatalk1 point
-
Congratulations Nicole! You look sharp in your armor at events! Your hard work is paying off! I think you're the first EIB in Timberline Garrison!1 point
-
1 point
-
Thanks for the suggestions.....I managed to fix the little crack forming in the corner of my right shin. Here we go: Chop Chop Chop... Poured in some acetone. Spilled some on my cutting mat and immediately lost the paint off the mat. Wow, this stuff is strong. I waited a few hours, splashed in a bit more acetone.....waited longer.....mixed with a stir stick.... At this point it was getting late and the ABS paste was still pretty lumpy so I splashed in a bit more acetone and covered it to sit overnight. The next day it was nice and pasty... I quickly put a blob of ABS paste on top of the crack and below it. I was amazed how quickly it started to set. You have to work fast. Then I waited a little more than a day to make sure it was hard. The next day I sanded and polished the ABS Blob. Wow, good as new.... Next I heated up a small piece of cover strip material and shaped it to fit the area. I glued this in place to help re-enforce the shin hopefully stopped that area from continuing to flex when I am putting on the shin. It's not the prettiest but you can't see a thing from the top or front. It's all inside the shin and will be covered by my leg. :-) Mark1 point
-
I don’t know about behind the camera work but a number of 501st members have been cast as extras or in at least one case voice actors in some of the new films. Watch the speech scene in TFA and you’ll see 501st members, not sure what other scenes. Also Jeremy Bullock aka Boba Fett is/was a cleared 501st member with a Boba Fett. As far as I am aware he’s the only properly cleared actor from the films.1 point
-
Ok thank you! Time for Testors I guess. Sent from my iPhone using Tapatalk1 point
-
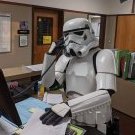
Good work ! You did very well on that armor ! And you should be proud of it ! The staff will be with you shortly . The only thing they will ask you is that you take a picture of the TD screws I think . Goodluck on that application!1 point
-
Well, I got it. It’s great... except the teeth paint.... all Anovos don’t look like that do they? Sent from my iPhone using Tapatalk1 point
-
BBB DAY HAS ARRIVED! Sent from my MSE-6 droid using Tapatalk1 point
-
Looking sharp~ Good luck!1 point
-
Yess! Congratulations Kyle! Sent from my iPhone using Tapatalk1 point
-
Congratulations and welcome to the ranks trooper1 point
-
Congratulations Kyle, job well done1 point
-
As the title states, here is my un-boxing of the new imperial boots! outer bag: inner bag: Shoe box: Boots! I can't wait for the rest of my stuff to arrive!1 point
-
Me on the left, Rob from RS in the middle and Paul from Tramp on the right. It was a joint Troopacoola and Tramp visit [emoji846] Sent from my SM-G950F using Tapatalk1 point
-
The pics no doubt show the new Anovos helmet. Like Mr Timberwoof said: If the price is right for you and you feel the seller is to be trusted. You can however get pretty much any helmet you want for that price. Anovos is good but if it were me I´d rather go with the RS or TM helmet - But at that price they will be in kit form though to build yourself. Your choice of course1 point
-
Went ahead and attached a good length of elastic strapping to the chest piece to prepare for sizing it to the back. I'm officially out of good snaps so I'll have to wait for my order to arrive before continuing that step, that should be tomorrow though. Something else I picked up from Christine was at the armor party, I watched her setting some snaps in elastic and she was using ABS sandwiched where the elastic was doubled over for reinforcement. Definitely seems smart for a junction like this, so in some ABS went. Now pulling this apart pulls against the plastic rather than the elastic.1 point
-
In this HOW TO I'll be illustrating how to modify and attach Wyatt's Imperial cloth gaskets to a FOTK under suit from stormtrooperundersuit.com. After receiving my gaskets from Wyatt my first impression was they appeared flat in thickness in comparison to the rubber gaskets. No disrespect to Wyatt's wife for making these excellent gaskets however, being I can never leave well enough alone I decided to add to the perfection and increase their thickness. Something that also frustrated me about most the gaskets out there was having to buckle the left and right arms together or velcro the gasket to the armor. I wanted something that would basically be part of the under suit itself so that I could step into my armor with less effort, like with a OT TK. To do this I found it easier to just sew the Imperial gaskets directly to the under suit. Items needed: Cloth Imperial Gaskets Under suit form stormtrooperundersuit.com 2" x 6" black Velcro (sew in type) 2 yards of 1/2" polyester filler 2 yards of fabric backing to seal in the filler Tools: Scissors Exacto or similar (split seams) Fabric pencil or similar Sewing machine Imperial gaskets Stormtrooperundersuit.com under suit Starting with the legs, measure, cut and sew filler and backing to underside of knee gaskets. Next, remove stitching from shoulder gaskets seems Sew in filler and backing. With the shoulder gaskets turned inside out, sew the seams together that you separated earlier. Before After. Notice any difference? Returning to the legs. Locate the center of the leg gaskets. Cut a 2" x 2-1/2" section of velcro. Note This only applies if you currently have velcro retaining your knee cap armor. If not you may want to switch or find a way to incorporate your mount into the gaskets. Place the velcro on the fabric and outline Sew in place At this point there's two ways you can go here, either sew the seams together creating a round gasket where the outer diameter is the same at the top and bottom, or you can taper it, like the shape of your leg. If you want to taper it, using a fabric tape ruler measure the upper and lower legs where the gaskets will reside when finished. Cut the fabric accordingly giving yourself 1/2" extra for the sewing seam. Another way to do this is to turn the gasket inside out, wrap it around your leg overlapping one side, using a fabric pencil mark the over lapped section. Don't forget to add 1/2" for seam. Sew the seam. After With the armor knee cap. With under suit With armor, test fit Ready to sew in place Install leg and shoulder gaskets. Mark under suit and gasket locations. Sew in place. Cut of shoulder gasket connecting straps as they are no longer needed After, front side After, back side Finished I'll try to get a few more pictures with better angles.1 point
-
I found with my small frame that my sides of my armor kept wanting to pop out, even with strapping and a very tight belt. I came up with this fix, working well for me so far so I thought I would share it will you all. Fisrt found a few scraps of ABS, in my case these where 30mm x 40mm, but you can use any size you want. I then gave them a small bend so they would follow the inside of the sides. Roughed both surfaces with some coarse sandpaper and applied glue and clamps. I used two on each side, top and bottom. Here we are finished and the sides stay where they should. I may just paint the outside of the ABS black just in case you can see the pieces when I move1 point


.thumb.jpg.9e934f6d8fe42c9336611e829a1973bd.jpg)