Leaderboard


Popular Content
Showing content with the highest reputation on 04/20/2018 in all areas
-
Old age and treachery will overcome youth and skill.3 points
-
Could I add a suggestion to your great info piece? When making magnet sachets, it's a really good idea to make sure that you've got polarity-correct pairs. An easy way to help identify magnet pairs is to assemble them using fabric with high-contrast colors. Kind of like this:3 points
-
Hi Jeff, Ideally, the smaller ab plate would have zero return edge. As below in this reference pic.3 points
-
OK, future Troopers, many of you have asked about how to set snaps for your armor connections, so I thought I'd whip up a little tutorial. Please note that the example that I am making is based on using the "double snap" connection system (see last photo). I highly recommend this method, especially on the back/kidney, kidney/butt, and ab/kidney connections, as it provides an extra layer of confidence. Yes, it costs a bit more to do due to the extra snaps involved, but you can be sure that no matter what happens, you will NEVER have a piece come loose or fall off on a troop. Some builders may have used others, but after countless troops I have experienced no problems. So here we go.... Materials needed: 1. Hammer 2. Soldering (woodburning) iron. (Available at home improvement and craft stores. WELL worth the $10-$12.00 investment). NOTE: The tip of this thing gets CRAZY hot, so be very careful where you set it. Many come with multiple tips, but I suggest the pointed one. 3. Snap setting kit. (Available at all craft stores). Please note that I am showing both sides of the base... more on that later. Convex side Concave side 4. For this purpose, I am using 2 inch (5cm) wide black nylon and 1 inch (2cm) black nylon. The 1 inch strips will be attached directly to your armor. I suggest using E-6000 glue and clamps for this. 5. Snaps, of course! Don't "cheap-out" when buying these. The cheap ones come undone very easily and are garbage. For this tutorial, I am labeling the 4 parts as such: STEP ONE Cut the 2 inch strapping to about 4 inches long** (or as needed) for the particular connection. Cut the 1 inch nylon into 2 inch lengths as seen below. **NOTE: The actual length will depend on there you are using them, i.e. the kidney to posterior plate connections will be shorter. Just be sure there are no gaps, and that the 1 inch wide base pieces are in the correct position before attaching them. Example: The ends will be a bit ragged and will fray. Use the soldering tool to seal them. Again, using the soldering gun, make 4 holes in the 2 inch wide nylon as seen below. Be careful not to make them too large (just larger than the shaft of the snap base) or the snap may eventually pull out. Take one of the 1 inch wide nylon pieces and slide it up under one end of the 2 inch wide piece, even with the end. Once it is lined up, use the soldering iron to make holes in the 1 inch wide piece. This will assure that the holes for the snaps line up correctly. (VERY important)! You should end up with this: Repeat for other side, but be sure not to get the sides mixed up, as one set of holes may be farther apart. Insert one of the male bases into one of the holes in the 2 inch wide piece. Flip it over and place one of the male snaps on the post. Place the base in the concave side of the snap setting kit base. Place the striking rod in the center (straight up and down) and strike it several times firmly with the hammer. The inside shaft should be sufficiently widened to keep the top from coming off. There... your snap is set! NOTE: Do not attempt to do this step on a regular table. You need a hard surface, and a heavy duty workbench or concrete surface works best. Repeat this step for the remaining 3 holes. Now onto the 1 inch wide strips.. Insert one of the female bases into one of the holes, then (as above) place one of the female snaps on top. Place the female snap base into the convex side of the snap setting base. Again, using the striking rod, give it a few good whacks. (Getting the hang of this now)? This is what you should have at this point (only one end shown) CONGRATULATIONS, you have one strap completed! Now that you realize how easy this is and have it down to a science, repeat as necessary. NOTES 1. For added security, the double snap system can be applied to other areas as well, including shoulder bridge attachments and bicep to shoulder bridge, (example below) This is especially good for those who wear packs (HWT, Sandie, Spacetrooper). 2. Snaps set in elastic (as seen above) can pull out over time with repeated use. For added strength I recommend doubling the elastic over before attaching the snaps. 3. Be sure to use the female base on all the straps that will be glued to your armor. The reason being is that the bottoms are flat, insuring a tight seal. 4. Some folks set the female snaps in ABS instead of nylon when gluing them to the armor. There is absolutely nothing wrong with this, it's just a different way of accomplishing the same goal. The reason I use nylon is that I find it conforms to the curved parts of the armor better, and gives a larger surface area for the glue to adhere to. 5. Some use CA (super) glue to attach the 1 inch nylon to their armor. I have found that it can get brittle and break off or even cause warping on ABS due to the heat it puts off while drying. E-6000 needs to be clamped and takes more time, but trust me, it's worth the wait. 6. When gluing the 1 inch nylon to your armor, do NOT keep the 2 inch wide nylon attached with the snaps. Some of the glue may seep through the hole in the snap and glue the whole connection together. Not a good thing. If you should have any questions, just ask here or PM me, and best of luck on your build! Photo 1 (Double snap system.. note clamps). SHOUT OUTS: Gary jr. ( @flashpoint0214 ) The guy who introduced me to the double snap system! Jeremy (Copper) who supplied the nice clean photo of the double snap system.2 points
-
This is a mini tutorial about the use of Neodymium ("rare earth") magnets. As you may have read here in different build threads, these little devils are invaluable when constructing a set of TK armor. BUT.. there are a few things to consider before purchasing and then using them... For purposes of this tutorial, I will be referring to magnets that are 7/8 inches (23mm) in diameter and 1/8 inch (4mm) thick, (as seen below) with a strength of N40. First, know that these things are STRONG! (Imagine a regular magnet the same size, but 10 times more powerful). This is a good thing for our purposes, but you should know a few quick facts first: 1. I mentioned that these are strong already, but know that the strength is such that they can (and will) jump up to 8 inches to reconnect with each other or another metal object. If your finger is between the magnets and this happens, it can cause injury, from bruising to serious cuts. They also can (and will) shatter if allowed to connect from a distance, and flying chips can cause eye injuries. In a word, be careful. I highly suggest wearing eye protection. That is up to you, but please read this post from Glen located below. 2. Due to the strong magnetic field, those with pacemakers or the like should take extra caution when handling these. 3. Whatever you do, keep these away from children. Now that I've scared you a bit, on with the show! When considering what size to buy for your build, I cannot recommend the 7/8 x 1/8 size enough. The reason being is that you will only need one on each side of the connection you are gluing, and they have a large surface area. Anything smaller (or thinner) and you run the risk of having to "double up" (stack) them to get the proper adhesion, and the thinner ones shatter more easily. When you receive them, they will have little plastic separators between each one. To get them apart, the easiest (and safest) way is to slide them. As you separate them, again, be sure to keep them as far apart as possible to prevent shattering or injury. (Save the plastic inserts). After separating them, I strongly recommend doing one of 2 things... 1. Wrapping each one in masking or painter's tape, (this will prevent them from scratching your armor) or 2. Making mini "sachets" for each one. The tape method is quick and easy, but the sachets are really handy if you have the time. To make them: Cut 4" (10cm) squares from a piece of fairly thick cloth, (not t-shirt type material) for as many magnets as you have. Place one magnet in each one**, and secure it with a zip-tie. (I used a rubber band for the photo, which will not work in real life). This gives you a "handle". NOTES: **Be SURE that you do half facing one direction out and half facing the other (north/south poles). Otherwise they won't adhere. Using a sachet will not prevent them from shattering. Cricket added a great example photo and tips in a post below. After you have applied the E-6000** to the seam you are gluing, place one magnet on the top of the cover strip, and carefully add one to the opposite side (inside). To keep the cover strip tight to the join along the entire length, I suggest placing magnets every 3-4 inches apart. If you see any areas where the cover strips are not flush with the armor, add more magnets. For the ends, you can use clamps as seen above. Be sure they have rubber or plastic on the ends, though. After the E-6000 has cured (usually 12-24 hours) it's time to remove the magnets! IMPORTANT! I have found the best way to remove them is this: First, remove the clamps. Then, using one hand, grasp the magnet on the top closest to the end. Using the other hand, SLIDE the one on the inside out, keeping them well apart. Stack them using the plastic separators they came with. Now, it's time to look at that perfect seam and think "Hey, I'm one step closer to approval"! NOTES: ** As the vast majority of TKs will tell you, E-6000 is really the best adhesive out there for armor. Unless you are an experienced builder, if you choose to use CA (super) glue, know that if it drips, you run the risk of it running onto your armor or causing the magnets/sachets to adhere to your seam. You have been warned. 1. There is no such thing as having "too many magnets". I know they are not cheap, but the more you have the more pieces you can glue at one time. I recommend having no less than 12. 2. There are many sources to purchase this size magnet, and the prices can run up to $3.00 each. But, you can find them on eBay most of the time for a lot less. This seller for instance offers them for $9.99 for six, which includes postage. https://www.ebay.com/itm/6pcs-Super-Strong-Neodymium-Rare-earth-Magnet-Disc-for-sale-7-8-dia-x-1-8-thick/281060567507?ssPageName=STRK%3AMEBIDX%3AIT&_trksid=p2057872.m2749.l2649 Another good source is here: https://totalelement.com/products/3-4-x-1-8-inch-neodymium-rare-earth-disc-magnets-n52-8-pack Tim (PICTreed) found a great site that is a fantastic magnet source here: https://appliedmagnets.com/neodymium-disc-magnets-1-in-x-1-8-in-w-countersunk-hole-p-601.html 3. When you have completed your build, please consider "paying it forward" to someone in your Garrison/Squad who is starting their build by selling them your magnets at a reduced price. "Troopers helping Troopers"!2 points
-
So I just bit the bullet and went ahead with the defacing of a perfectly good TK bucket. I mixed up some ABS paint. Which is essentially coloured acetone, and proceeded to slop it onto my helmet. This will take a few attempts and some sanding and polishing, I’m sure. It is just a few drops here and there, but still nerve wracking. Sent from my iPhone using Tapatalk2 points
-
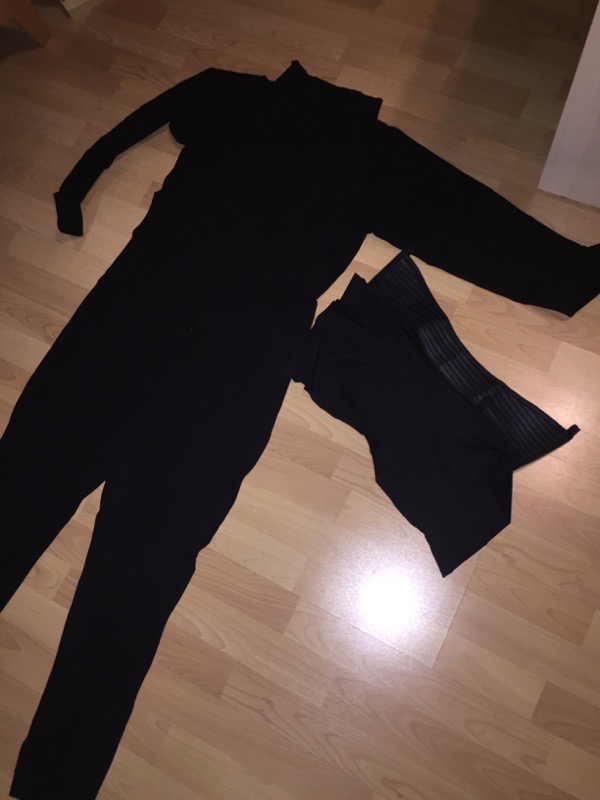
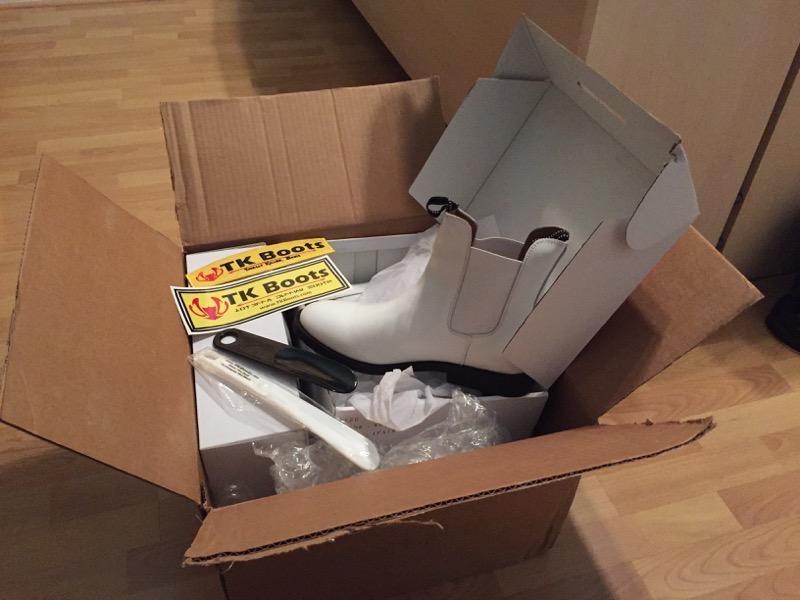
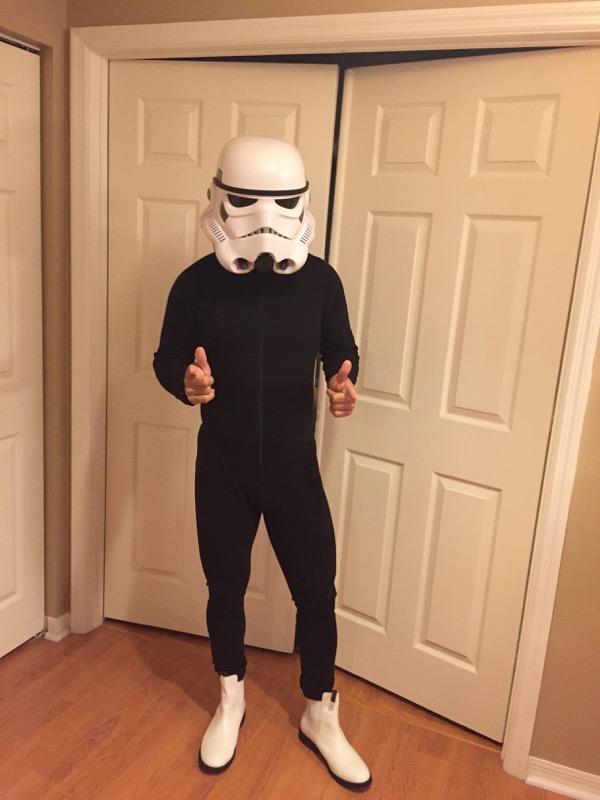
Greetings everyone! Well, as you can tell from the title, this is no ordinary build as we're going for not one, not two, but three TK's at once! I'll be joined in this build by my brother Javier (Chinchilla on FISD and DarkTrooper71 on the Florida Garrison forums) and my 16 year old son Alex (soon to join the Galactic Academy, but counting down the days he can become an official legion member). We dove head first into this adventure and are eagerly awaiting our really BBB day after purchasing our armor from Mark at AP. In the meantime, we've got a few items purchased and slowly rolling in. Tried to upload a couple of pictures of what's arrived to date using the attach file option, so hopefully that works. Undersuits - stormtrooperundersuit.com Boots - TKBoots Neck seals - Darman neck seals Blasters - QuestDesignCanada And of course we had to try the stuff on (that's a Hasbro Black Series helmet just to get a proper feel for it ;o). Nothing like a TK in his underwear.... Next up is to start gathering the other materials we'll need for our build. Given our crazy schedules, we opted for the fully trimmed kit just to help prevent the build from becoming excessively long, but leaving enough work for us to do to make it a worthwhile and satisfying experience. We've also already met some of the great members of our local squad and completed one troop as handlers, with a couple more likely before we're ready to apply for 501 status and officially troop ourselves! Light side or dark side - may the Force be with us!

 1 point
 -
Thanks @Neb Sgird and @TheSwede. That definitely makes sense. I’ll get on it and post some new pics either tonight or tomorrow. Really appreciate your help and guidance with everything!1 point
-
Agreed. Try it on with the undersuit to get a better idea. Your pants especially will get in the way. Pull the cod/butt up high (but not too high if you know what I mean) for your test fitting. Based on the existing pictures, I would say you need to minimize the gaps in the back. There should be little to no gap between the butt/kidney and a "minimal" one between the kidney and backplate. Pulling the cod/butt up will help this, and you may be able to bring the back down a tad as well (hard to tell with the tape masking where the shoulder pieces of the backplate end). You may end up having to re-do your straps in those areas to get rid of those gaps. Looking forward to updated pics1 point
-
Could you try it with your undersuit on and lift the cod and butt plate up as high as possible?1 point
-
Yeah. That happens some time. Not to speak for Walt but I believe he was using a smaller different pipe with those caps. His new ones fit like a glove on PVC pipe now. I had same issue and he sent out replacements quickly. Looking great so far! The end is getting closer by the day!1 point
-
As suppliers we shouldn't be afraid of customers concerns and customers shouldn't feel bad about asking questions, that's what good communication and service is all about. As you've also stated Walt has great customer service . Something simply just got overlooked and now is being remedied.1 point
-
Hi everyone, Tried to get some work done this week. Not as much as I had hoped but very happy with my counter! Found a Hengstler 400 on the internet this week. Put it together with the parts from Dennis Blue Snaggletooth this evening. I also started to modify and hollow the folding stock. Untill next time! Verstuurd vanaf mijn SM-A520F met Tapatalk1 point
-
I know LTM had a similar issue with his end caps on his pipe and also ended up ordering from Trooperbay. I think we both ordered our kits around the same time so not sure it it was just a one off or what.1 point
-
Happy BBB-day - can’t go wrong with a TM1 point
-
Congrats on your BBB day!! Always exciting. Good luck on your build.1 point
-
Oy, in my day the pack was required. And there were no kits - you had to scrounge Goodwill for parts. You young-ins have it too easy!1 point
-
Ok thanks Dan, I’ll wait to hear then.1 point
-
Actual left eye if wearing the helmet.1 point
-
Pics are a little blurry but they look to be okay (I think).1 point
-
Heyya Dan! Actually, it should be done today or tomorrow. I'll post some pics as soon as it's done. It doesn't quite have all the mods of yours, but I didn't want the build time to take too long...excited to get out to my first troop! Thanks again bud, for your help! Greatly appreciated!1 point
-
All screws on TD swapped out. Tried to show the side on profile of the screws used. Are these ok?1 point
-
Hey Troopers, it's been a while since I last updated this build thread, since I've been a bit busy with college. Anyways, I last left off with my mic tips painted and installed. I next painted the vocoder, the frown, and ears using Humbrol Gloss Black (#21) and Amiral Grey (#5), respectively. It took a few coats (and a lot of reshaping with a toothpick) to get the effect that I wanted, but I am pretty proud with the results. I didn't use the lens that RS provided, but rather ordered a green welder's replacement screen, which I cut to size and installed. Here are the ears, minus the black outline and rank bar. http:// Here is the completed helmet. http:// http:// http:// Stormtrooper selfie! http:// http:// Here's the completed interior of my bucket, minus the helmet fans. I finished this part yesterday night. http:// While working on the bucket, I also started working on the torso. A few weeks prior, I had cut and sized the torso pieces. This time I cut out and sized the button panels, then painted them with Humbrol Ad Grey and Humbrol French Blue (#14). Then I glued both in place with my E6000. http:// Next, I drilled holes and put in the metal brackets. I marked with a pencil where to drill holes using a nifty piece of scrap metal that I had measured out the bracket posts. http:// http:// Next I painted the screws using two coats of Humbrol Gloss White (#22). http:// http:// http:// Last night, I also worked on and completed the torso strapping. I used 2.5" pieces of nylon folded into a loop and sewed them together using a sewing machine (I have to give my mom credit for this one, I can't sew for my life!). It was a bit tricky screwing back together the brackets after I had slipped on the strapping, but I somehow managed. I don't have pictures of this yet, I'll get some later. Now it's onto the split rivets and shoulder straps. Going to go up to Home Depot today and see what they have. 8mm with 6mm shanks, right? Also, I'm a bit confused on the elastic portion of the shoulder strapping. I know that if you're taller that you make the strap longer, but by how much? I am 5'9" tall. What is the normal length of the elastic straps?1 point
-
Thanks Dan! I only glanced over the screenshots and should have gone into the RS suit gallery. To be updated pulling that button off later today and removing the edge1 point
-
Hi Thor, Overall, it looks like you're heading in the right direction. Just a few dressing issues and you should be set for your clearance submission. The main things that stand out to me that could be tweaked would be: large gap between back plate and kidney - could possibly lower the back plate and/or raise the butt/kidney to meet the back thighs look quite large on you - could possible reduce them to fit your legs a little better shoulder bells are quite far from the shoulder bridges - you could try shortening the shoulder elastics to bring them close to (almost touching) the shoulder bridges hovi tips appear to be black inside and out. Whilst I'm not an expert on Hero lids, I beleive they should still be white inside, same as Stunt lids the belt looks like it might be fitted too loose, leaving a little dragging at the back. Next time you kit up, you could probably just wrap it a little tighter to avoid the drooping Also, you could try using the "BBCode (message boards & forums)" copy feature on Imgur. If you copy the BBCode link for each picture and paste that into your thread, the images will show in the forum (rather than following the link to Imgur itself). We will probably see much more feedback if they are directly in your thread. Best wishes, Dan1 point
-
If you can't see them then anything is fine. Strapping isn't considered for approval. Just look from the outside is judged.1 point
-
I remember getting a set from china, via ebay, with only a few pages from a local newspaper as packing, thought they had not arrived, then noticed they were stuck to the inside of my letterbox I also found them really handy for finding a few nails that had been used on a wooden window frame that had been skimmed over......see, they also have practical uses.1 point
-
If you use an E6000 glue you can disassemble most stuff easily, I need to do my thighs but haven't found time. Also there's lots of adjustment in just changing the length of the elastics which is easy, so long as you don't glue them in but again most use snaps.1 point
-
So after all the Mimban troopers and Mud troopers we finally have an image of a TK from the Solo movie. Looks like it is exactly the same as Rogue One, which makes sense. If that does prove to be the case should the Rogue One TK crl be renamed to something not specific to one movie?
 1 point
 -
Congratulations! Welcome to the ranks.1 point
-
Nice job. Sent from my Moto X Play using Tapatalk1 point
-
Congrats. Sent from my iPhone using Tapatalk1 point
-
Good call on the Make-A-Wish scenario, Rebecca. In cases like that I would be more than willing to be human pinata.1 point
-
So close! Fairly straightforward fixes there, Jessie. If you have any questions on how to get them where they need to be, just let us know. As Tony suggested, switching to the snap system would be a great idea. I have a thread here that can help: https://www.whitearmor.net/forum/topic/44617-snap-setting-101/1 point
-
I kept the screws in my chest, so it looks screen accurate from the front, but used the straps/buckles on the inside. Best of both worlds.1 point
-
You could try upload your pics using Imgur - free and easy to use looking forward seeing your suit and I’m actually working on my RS this very moment1 point
-
awesome tutorial! I believe at this point in time, I can give anyone a run for their money on bent, misaligned snaps......I probably bought an extra 2 bags of Tandy line 24 snaps because I've ruined so many female side snaps (the convexed ones). For those having trouble keeping the both sides of the snap mated straight, here is what I did: glued some rubber to the convex side of the base tool. This made sure that the it wouldn't slip/slide around during each whack started using a rubber ended mallet to initiate the deformation of the post (steel hammer bad....but can be effective with the male side snap as it is more forgiving) finish off the final blows with the plastic side mallet When I used a steel hammer on the female snaps, they tend to go helter-skelter and the post would flare out and seal way too quickly....usually in misalignment. Take your time with the blows from the rubber mallet; this will allow you to keep your snaps aligned as they are set into place. I'm OCD so I couldn't live with the misalignment. it was still functional, but looked pretty sketchy. Plus, I didn't want to throw down $200 for the vice tool at Tandy Leather1 point
-
That's my next step is report soon1 point
-
Congrats trooper and welcome to the Centurion ranks!1 point
-
Looks like some nice cuts to me Sent from my iPhone using Tapatalk1 point
-
Just realized they put me as older AM kits, I'm still a contact for the new AM kits we're pulling [emoji4] . We've got a run that'll be ready in about a week. Best, TG [email protected] Sent from my SM-G950U using Tapatalk1 point
-
For anyone still interested in any progress on these scopes,etc. please go to my Facebook Bulldog Props Page. Due to the photobucket fiasco, I haven’t found a reliable way to post pics so I am using the Facebook page for now. https://www.facebook.com/BulldogPropsJapan/1 point
-
OK, just a little update. And by little I mean just that. While we can't always get to do some meaningful sized work, it's always good to do something, no matter how trivial! Ab plate buttons done... And, I went ahead and thinned out the rank bar on the ears as recommended earlier (thanks for the catch David!). Hopefully later this week, we get to make some serious progress on the thighs after completing our fittings this past weekend. Once those are done, then the final push starts on the torso pieces, belts and strapping!1 point
-
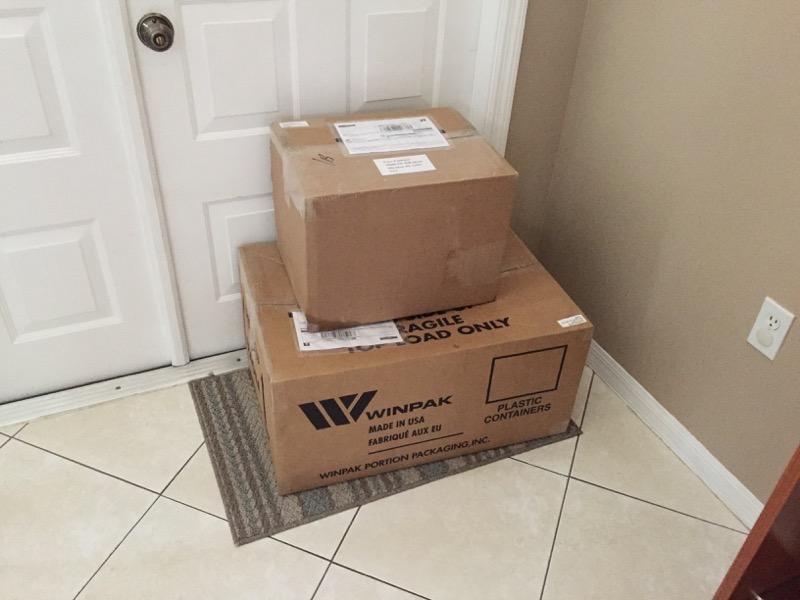
Well, BBB day finally arrived and it just got a little more real! I was greeted by these two lovely packages from Mark at AP yesterday. Now to start getting the last of the supplies and start some of the build (likely the helmet and hopefully before we leave on vacation at the end of the week)! If only I could convince my employer that a TK armor build is the perfect reason to ask for a sabbatical... Here are the boxes... And here is the entire squad unpacked!
 1 point
 -
I had a few folks ask what I used for my lens template. So in order to make use of one of the duplicate post spaces here is the template if you would like to have it! I'll add it as a .pdf too, when I get home.1 point
-
The one day I was able to attend I was on the floor completely suited up for about 1 hour 45 minutes with no breaks for my first appearance and then I went back out for about an hour later that day. Being my first time in the costume at an event I wasn't really sure what my body could take. In the future I think I could do up to 2 and a half to 3 hours for 1 day or do 2 separate shorter shifts. Overheating wasn't as big of an issue as some of the pain of the costume. I'm working on getting a larger set of arms since those are currently the tightest piece.1 point
-
After 3 years of gathering parts and assembling I finally got the chance to debut my 3PO costume. Unfortunately forgot to take submission pics when I was suited up, but here's some from the event: There are some more photos at my page on facebook, https://www.facebook.com/pages/KC-3PO/917322388313043?ref=aymt_homepage_panel Thank you all for the compliments and encouragement along the way!1 point