Leaderboard


Popular Content
Showing content with the highest reputation on 03/29/2018 in Posts
-
Oh I am not the creator. You are! i am a simple sword maker. You are the Samurai !7 points
-
I do lurk4 points
-
Hey, lookie at what I finished! No, that's not my WTF kit. haha... I built a PVC mannequin last week and dressed my RS kit on it. I think my kit is much happier here than in my bin. My helmet is displayed on my wall, so that's why the mannequin was headless. I've since added a foam head, complete with a beret and aviator sunglasses. Anyhow, if you've got an extra $35 bucks or so laying around, and you want to display your kit, I highly recommend picking up some PVC pipes and fittings, and building a PVC mannequin. I'm still building the platform base (to hide those ugly pipes and to properly display some 'display only' boots), but it'll be an easy assembly once I get time for it. And now, back to the build! I tried on the torso last week and discovered that the right side of the kidney could be trimmed about 2 cm to better fit my frame. I hadn't trimmed anything off the sides of the kidney yet, and glad to realize that I didn't need to take much off in that area. In fact, the 2 cm only needed to come off of the right side! Yay! I used my compass tool to draw my cut line on the kidney. I removed the gaffer's tape and traced again before cutting. And I measured about four more times after this to ensure that everything would be even on both sides if I did this little trim. But before I could cut, I needed to remove the kidney tab from the inside. See, I told you that it's important to use e6000 for this! Okay, I can't deny that there is immense satisfaction when you can peel a whole section of e6000 off at one time. It's as good as popping bubble wrap, am I right?! Okay, with that tab removed, I removed the brackets on the right side of the butt plate and kidney as well. I have to move the brackets due to the loss of that extra 2cm of material. Here's the outline for the new kidney notch. The return was so strong that I couldn't cut through it. I had to cut along the corner, then score/snap the return first. This allowed me to then easily cut the ABS of the kidney. I'll patch up the extra holes left from the previous placement of the brackets, then install the brackets in their new location once everything has cured. I did some minor hot water bath shaping on the chest to curve it in a little more and fit the ab better. And glued the ab buttons on. I'm currently waiting for glue to dry on the chest/ab elastic connections. I've glued just the ab parts first, and will follow up with securing the chest part later. I think I'll tackle the shoulders next. I don't want to get the ab/chest fully attached just yet because I don't have the shoulders properly fit at this point. Once I get the torso fully dialed in, then I'll begin sizing down the legs.2 points
-
Thanks for all of the comments...it means a lot coming from the folks and wealth of experience here.2 points
-
As Greg mentioned the alignment and bunching issue he had I feel the need to point out that on my builds I used the screen accurate method (like you see above) and to be perfectly clear, theres nothing wrong in using a different way, that`s not the point I`m trying to make - important. Just to state that I had no issue with alignment or bunching using the same method as they did on the Movie. Feel free the check my builds and video by using the links under the Nordic Garrison logo And...check out Gregs build too, lots of great info there2 points
-
2 points
-
Great attitude to have, no use in rushing. Seen way too many people here have to re-buy things because they couldn’t wait.2 points
-
The creator has posted to my thread. This is a good sign2 points
-
I have some WTF being shipped to me for a customer of mine. Really looking forward to working with this armor.2 points
-
So Walt must be checking this build. Just posted that he needed to make a new master for the bell, and the new one is 1.5 inches deeper. If you want to get replacements, PM rocky.2 points
-
Original ANH knee plate for comparison.1 point
-
Looks good to me...1 point
-
1 point
-
Hey Luc thanks for your patience, Andrew or myself will be with your shortly.1 point
-
Gloves are done! E6000 peeled off the rubber as soon as I moved them, and CA glue just soaked into the fabric backing on the back of justjoseph's hand guards (which are excellent, BTW). What worked was this: the E6000 from my first attempt had stuck onto the fabric backing and wouldn't come off. The CA glue stuck to the gloves and that E6000. I accidentally found something that worked! Sent from my iPhone using Tapatalk1 point
-
I'm hoping to get my shins and TD done in the next couple of days. I'll do some full kit shots with everything on, and I hope to get some feedback. Thanks for taking a look. Sent from my iPhone using Tapatalk1 point
-
You could pad your kidney a little bit, but you will still need side shims to meet Centurion specs. Insert some padding, cinch your belt up snug and see what gaps you have left. Don't touch your ab plate, only add shims to your kidney plate, and yes, try to square up the shim if possible, vs a pie shaped piece.1 point
-
That was not the RS suit I showed, but one in store at the LFL archives. But it's accurate none the less.1 point
-
I did it the screen accurate way, but one side is velcro’d so I can break the arms down for cleaning/etcetera.1 point
-
Ya, as has been mentioned, I would bring your forearms up a tad. It shouldn't block your approval, but it would make your look just a tad better. Looking great, You'll have your TK number in no time!1 point
-
Basic approval is a slam dunk! Great job and you`re well on your way for the higher levels as well1 point
-
Yay belt an pouches !! Sent from my iPhone using Tapatalk1 point
-
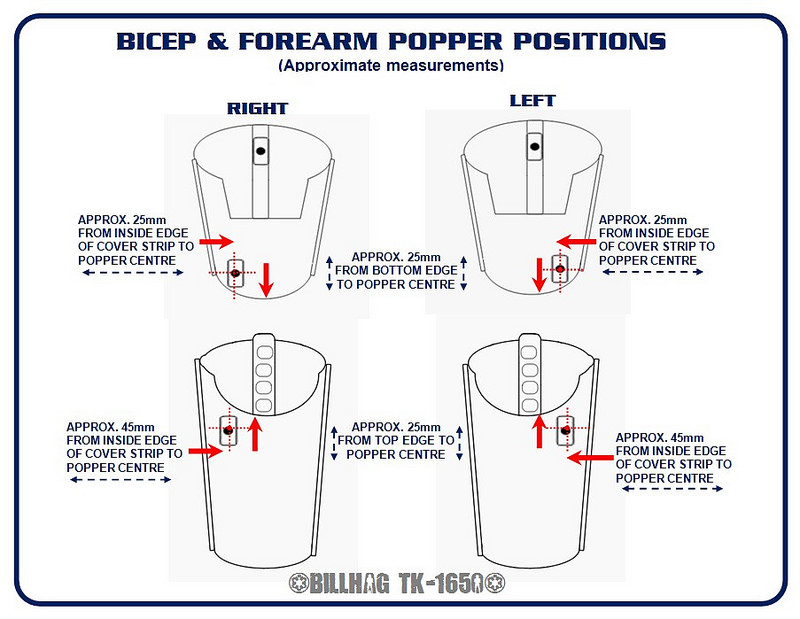
To repeat others - yeah, the coverstrips need to be lined up. For the elastic, I used something closer to B. I tried having my elastics offset like the Billhag diagram (similar to the RS suit). I didn't like it. Then I put the elastic underneath the cover strip seam - and it was much better (my forearm kept better alignment with the bicep and the elastic didn't bulge out when I bent my arm). I also went with thinner elastic - I tried the wider first but found is bunched up too much when I bent my arm. That is what worked for me but, as long as you use E6000, you can change it down the road if you are not happy. Keep up the good work!1 point
-
What Mathias showed you is the right arm from the RS suit (Movie accurate) and as Brien mentioned the cover strips should line up. here`s another ref pic for you and you can find them all in the gallery (Still the right arm) -----------1 point
-
I'd say it's half way between both A and B. Run the edge of the 2" elastic along the cover strip with the body of the elastic on the inside of the arm. So approx 1 o'clock ish if the cover strip is noon.1 point
-
Correct. If you've been watching the program from the start, those L3/L2 requirements actually do get the makers to change their kits. FX and RT changed their kits to make them easier to go Expert Infantry out of the box, e.g. replacing large black ab plate buttons, splitting the butt/back plate, offering raised bumps on the ears, etc. That is part of the advantage of an L3 program - armor vendors can see changes that aren't required but optional, and they can take that feedback and improve their kits. In the meantime, regular members can get in with as-is kits. The 501st base requirements today exceed the EI requirements when I get in, and in fact many of the original L3 requirements are now L2 or even L1 as makers have tweaked their molds over the years.1 point
-
Worth every penny!! :-)1 point
-
Looks awesome. I'm going to follow your thread for my Doopydoos blaster. Where did you pick up the T-Jays kit?1 point
-
Aah, it's been a while since somebody did the mod with the metal inlays in the trigger group. Very well done. And I am really curious to see you building that counter. It remindes me of something... BBB-day today? Keeping fingers crossed for you. Happy Easter!1 point
-
Hello, Time for a litte update! this week I received parts from Dennis Blue Snaggletooth to recreate the counter. I also have been working on removing and replacing some parts from the trigger group with custom made aluminum replacement parts. This was a looooooot of work! It took me several hours to get it to fit nicely. I'm currently working on the other side of the gun to do the same. And there is more news! I received my UPS tracking this week and today me RS Propmasters kit will be arriving! However I instructed myself to finish the blaster first before starting to work on the armour.1 point
-
Thanks for the pics!
 1 point
 -
I sanded the piece to straighten the edges and I used some wetsand to remove the paint which I redid but smaller to leave some space around. I just placed the button piece on the abs without gluing it to get your opinion on the job done. If you say it's OK, I'll glue it, if not, I'll continue working on it but at least, I won't have to remove the glue. I want it to be the right size but I fear to do too much and scrap the piece.1 point
-
For the elastic you'll go with "A"
 1 point
 -
Yeah, that's good feedback. I'm going to stay away. Unfortunately TK boots is done ... just selling their dwindled remaining stock and no boots in my size. I'm just doing the wait for Imperial Boots. Was hoping for something a little quicker as I'm dying to start trooping, but it's worth the wait to get it done right.1 point
-
Most conscientious suppliers do1 point
-
Coverstrips should line up, like 'B', but your elastic is incorrect in both options. Should be to the side not right on the joint if that makes sense.1 point
-
Hi Kevin, looks like you've got everything you need to entertain us here on FISD. - including a very cool work space. Ha, that wallpaper on your laptop is on my desktop, too. Off to a great start. Following... Ouh, that black screw in the bottom of your grip was meant to go into the front muzzle. There is one silver screw without the crosshatch pattern which is for the grip.1 point
-
Coming along wonderfully, Rat! Keep up the good work!1 point
-
I put my armor on my dressform yesterday afternoon to see how it all looked together. It all looked good, shiny, white, no problems! This morning, things looked very different. Going into my office, I found my armor had been embellished by my kids. I think they're rebel spies. Something must be done!1 point
-
Just start with Novus # 3, and work your way up. I'm sure it'll polish right out....1 point