Leaderboard


Popular Content
Showing content with the highest reputation on 03/20/2018 in all areas
-
Hey, things are looking really good and coming along nicely. Just something I noticed is the cover strip on the top of the right thigh sticks out a little. If your GML is anything like mine, they may point that out too. The belt will help a lot with the ab and kidney lining up. The tab system is cool and I really like it but I was always afraid the thing will snap off or something. Paranoia. This was my solution. You have probably seen it already. I used four of the large panels (one joins the back plate to the kidney plate) to hold the core body together.2 points
-
TK 73076 [emoji5] Sent from my GT-I9505 using Tapatalk2 points
-
Hiya. Congrats on getting your kit. They’re great fun to work with. If you message T-Jay(TK) he’ll give you all the details. https://www.whitearmor.net/forum/profile/19331-t-jay/ best wishes, Dan2 points
-
Thanks so much for all the kind words. It certainly means alot coming from the people whos opinions and expertise I have come to rely on over the last several months.2 points
-
I went with AM and it worked perfect at 260, even better now at 245. I just know I’ve always had a broad chest and shoulders. Some shirts don’t fit well cause of it. Sent from my iPhone using Tapatalk2 points
-
Hey folks! It has come time to post a build thread for my E-11 build. I promise not to let the thread die like I did my TK build thread (don't worry, I did get approved). This will be my trooping blaster, so while I hope to keep it pretty darn screen accurate, I also won't worry if the doopy kit is a few millimeters off in places. My main sources are the full DoopyDoos resin kit with Tino's completion kit. My buddy, who is currently studying electrical engineering, will be helping me build custom electronics for the blaster. He has the added advantage of still being in school, so he can get electronic components at cost (score one for me). The only experience I have with electronics has been in the music field (guitars, amps, soundboards, etc.), so his expertise will be invaluable. Maybe I'll even get him to register and explain things that I can't hahaha. I will be shamelessly robbing ideas and methods from several of you guys, including (but not limited to) @T-Jay, @themaninthesuitcase, @Xinx, and @skyone While I hope this thread will be helpful for others building their blasters, expect lots of questions from me! Even though I've read several good build threads and endlessly purused the reference library, I'm still feeling overwhelmed! Then again, I felt the same way starting my TK build and it all worked out perfectly. I'll continue updating this first post with my resources list, but here's what we have so far. Note that if I haven't hyperlinked a source, I have no idea where to get the part! Any ideas on that front would be appreciated. I won't be buying electronics until next month, the racing shirts ate up my 501st budget for this month. Basic parts: DoopyDoos full resin kit $55 Tino's completion kit, $65 aluminum rod (to mount LEDS to) Replacement stock cube and front sight, printed from files made by @themaninthesuitcase Black paint Silver paint (for weathering) Gold paint (for weathering) Too much green stuff, $18 Electronics: Basics: Integrated arduino/sound amp board (being built by "The Buddy") Microswitch (for trigger), $1 Rotary switch (comes with TIno's kit) Voltage Regulator Rechargeable 9 volt battery, $22 (pack of 4 and a charger) Lights: 5 RGB LEDS, $3 5 LED drivers, $5 .66" OLED display, $15 Sound: 2 3 watt speakers MP3 reader board, $1.50 Total cost (so far, not counting tools): $152 Tools: Two part epoxy glue Clay carving tools Dremel with plenty of sanding attachments in various sizes1 point
-
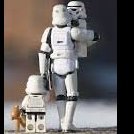
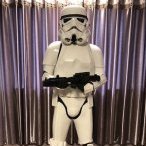
Hi guys, thought I'd share this as I've recently cleared as the LFL Promo Trooper and thought it'd be good to start a build thread to show my research. After being a Stunt TK for about a year I've had tons of fun wearing my ANH Stunt TK but wanted to stand out as something unique. I've always loved the Promo Trooper which is somewhat of a mystery. Although it was never featured in the film it was used heavily in the promotional run-up to the 1977 release and is still in use today in Lucasfilm merchandising. SO WHAT IS THE PROMO TROOPER? In 1976 Lucasfilm commissioned several studio shots of the stars of the film including a Stormtrooper. Presumably because of availability of the props, this particular trooper featured a few notable differences to the costume. Instead of the standard issue E-11 this Stormtrooper is seen with an SE14r blaster, probably because the screen-used Sterling rifles were in storage in the UK and not available for the shoot. The other major difference is the holster which is smaller and a different design to the ones used in the film. Apart from this handful of studio shots there is little known about the origin of this costume which was probably thrown together from parts they had after filming had completed. THE BUILD Using my current DA Props ANH Stunt TK as the base for the armour I bought a new Hero style lid, again from DA Props. The actual Promo Trooper lid is still in the LFL archives and can be seen here. It's great to see it's still in good shape although the bubble lenses have been lost... Using these photos as reference I followed every detail - even down to the gaps in the ears! THE BLASTER The SE14r blaster was a challenge to track down. My original plan to commission a 3D print was a problem as most of the files out there are based on the newer Rogue One Deathtrooper version which has more detail and looks completely different the Promo version. Finally I managed to find a resin kit on ebay although this needed a lot of work. The front barrel 'fin' was missing so this had to be added. I crafted this from a piece of ABS and glued in place. I also wanted to replace the resin scope for a real 4x20 scope which meant removing and retooling the scope mount. Really happy with the finished result - it has a really nice weight to it too. THE HOLSTER Again, this was a tricky accessory to track down although I was lucky enough to get help from Clive Barzillia (Burkbench Designs) to get one custom made. The detail on this is incredible, even down to the leather which is brown tan dyed black. Once this arrived it was just a case of adding the two extra rivets to the belt. FINISHED! Really thrilled to bits with how this turned out! I even managed to recreate one of the original studio poses below - I'm on the left and the original 1976 shot on the right! Here's some more recent shots:1 point
-
Name: Yiqiao Zhao 501st TK ID: TK-88101 (Link to 501st : http://www.501st.com/members/displaymember.php?userID=25423&costumeID=124) EIB Request Link: Armor = RS Helmet = RS Blaster = RS Height = 176cm Weight = 55kg Boots = TKBoots Canvas Belt = RS Hand Plates = RS Neck Seal = RS Holster = RS Thank you for your consideration!1 point
-
Those are blue milk storage tanks.1 point
-
I love how we all have different versions of a tabbed system! Whatever works, right? https://www.whitearmor.net/forum/topic/41502-crickets-wtf-hero-build-even-more-tk-for-the-vertically-challenged/?do=findComment&comment=6016451 point
-
That is brilliant. I will have to give that a shot. Thank you! Sent from my SM-G950U using Tapatalk1 point
-
Here's a photo of both sides. I originally did two tabs on the left only due to the rivets but found having two tabs and a tight connection helps keep things lined up better. I had one large tab on the right and it would kind of slouch out near the top since I had not secured it up there.1 point
-
I think I am above that second red line as I measured from the second ridge. I'll get some pics posted later tonight with the rivets in for a better comparison.1 point
-
I've never yet had to worry about my bin as it is left with other 501st folks in a secured change area. But if I have a parking lot change from my van I put my car keys on a lanyard around my next under my chest. No problem.1 point
-
Yep, the belt totally covers the rivet. As long as things are in proportion, don't sweat the few mm here or there. Note the red lines in the photos below. You don't want rivets in that range. So, you don't want this: If you're building to Centurion, you'll want to make sure that your rivet placement looks something like this based on your armor size: Post pics of your rivet placement and how things line up on the ab and kidney. I'm sure you're fine, but it would be good to double check!1 point
-
Updated with new images.1 point
-
The frown looks awesome with the extra paint good!1 point
-
Please don’t mind the upside down thermal detonator.... Sent from my iPhone using Tapatalk1 point
-
I’d just like to see how it sits over the ab/kidney and back plate.1 point
-
I just saw this - thank you Dan, most kind1 point
-
Thanks but I got it figured out. really appreciate you taking the time to help me out though!1 point
-
When you’re in Imgur, check the option to “generate links”. For each image you’ve selected, you should then see around 5 link options. Look for the one for message boards and forums. Copy and paste and that link should show automatically in your thread. :-)1 point
-
Whoops - fixed.1 point
-
I got the two small screws that hold the front cover on finally1 point
-
I love these little kits,,,, nothing replaces the real thing but still a lot of fun1 point
-
How did you attach your belt? I'm looking at some velcro at the very front and magnets at the sides, but I'm not sure about the very back as it goes over the back plate, it can't be too snug and I'm not sure what it should attach to. Do you have any pictures of your armor from behind?1 point
-
Ring done. Did a reverse cast and destroyed a coat hanger for the cause.1 point
-
Yeah, the bib is for Heroes only. So no worries there. The neck seals that I have seen, including my own, have a little bit of fabric that extends out from the base. This is mainly so that skin doesn't show when tilting or turning your head. If your shirt has a high collar then you probably wont need it. Here is a link to the thread I used to make my neck seal. They are easier then they look to make. I made mine in maybe two hours. https://www.whitearmor.net/forum/topic/8402-howto-create-a-neckseal/ Things are looking great. Keep it up.1 point
-
Great work! Easily approved!1 point
-
Use a third party host to link images to your posts, I also use Imgur without any issues so far.1 point
-
Wow - what an awesome predicament to be in! I started looking for TK armour back in the early 2000’s and the options were, “not a lot”, “pretty bad”, “slightly less-bad than the other one” etc. These days we have options as good as these!! I think you’ve picked two of the best options available (and done well to avoid one of the worst) and, from the builds I’ve seen, you won’t be disappointed with either. RS has the heritage and the full “worts and all” appearance, whereas TM is beautifully recreated with a slightly cleaner look (still amazing, but less bumps on the cap). I work near SDS and have looked up close at their armour. Erm, let’s not go there. ;-) If I were you, I’d be tempted to look at a few of the build threads on here for both makers and see if you prefer one over the other for people of a similar size and build to you. Daniel, aka “The Swede”, has already built a wonderful TM hero suit and is now working on a TM stunt. They’d be worth a look. Best wishes, Dan Sent from my iPhone using Tapatalk1 point