Leaderboard


Popular Content
Showing content with the highest reputation on 02/13/2018 in Posts
-
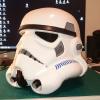
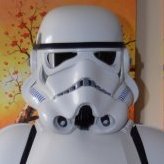
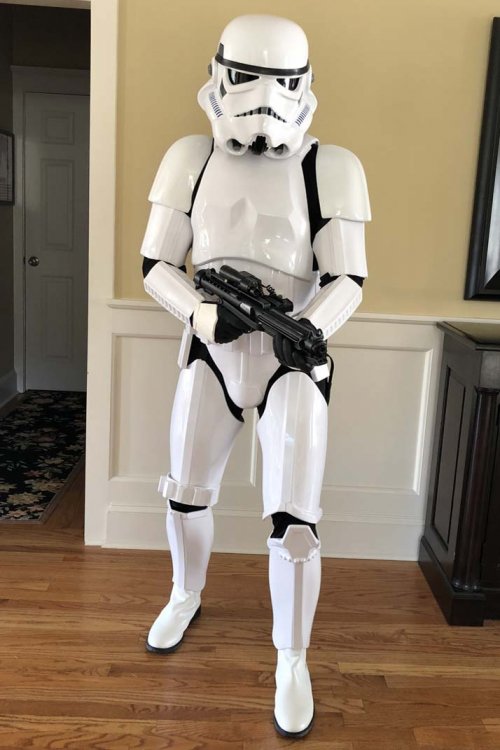
It’s not every day that we get to celebrate a century, but today is that day. Matthew (Mworm1974) TK-11874 is our 800th Legion member to achieve Expert Infantryman status. Please join me in congratulating the 100 troopers who put in the extra effort and time to take their costumes to a higher bar of accuracy and excellence. Well done you! :pint1:4 points
-
Ah, so tapatalk finally did it to me, to me, to me. For those who can relate with me via the 80s3 points
-
Looks like the only thing running away from you is Tapatalk with duplicate posts3 points
-
Well I am on the homestretch… Now it’s a lot of doing little tiny things and waiting. There’s nothing like watching paint dry. I had to hold off painting the main shaft of the gun to fix my screwup on the rear sight. I molded out some green stuff on the back and got it mostly OK, but it’s not perfect. I didn’t have a file with a wide enough pattern, so I used the threads on a large bolt. For the most part that worked OK but the proof will be in the pudding tomorrow when I sand things down and see you how well this maintains its shape. I also decided to leave that other half as is, because it provides a nice mounting point for the scope rail. That’s one thing that led me to believe that I had it right the first time, was because the scope rail fit so nicely and the hole for the scope mount lined up perfectly. Oh well. It’s really difficult to paint in the garage right now though, because it’s about 15°F outside and about 30°F in the garage. I try and paint as fast as I can in the garage and then bring the items inside, but that leads to spray paint smell all over the house. Anyway, here are some photos from tonight‘s progress: Tomorrow I hope to finish sanding down the remaining pieces and paint everything else up. And if I have time, finish up the rest of the mounting. I am also considering going back and doing a couple more coats — now that pretty much everything is painted with satin black, going back over it with charcoal gun metal, and then going back over that lightly with the satin black for a little bit more of a metal finish. It will still be black, but I want it to have more than a one dimensional appearance. I’m not sure if I will get around to weathering the gun much this week, I really just wanted to get it serviceable before my first troop this Saturday. As to the glossiness, I will go back over it when I’m done with a matte clear coat to protect the paint and subdue the sheen a little. I’ll probably also go over it lightly with a light abrasive to scuff up certain areas a little. Sent from my iPhone using Tapatalk3 points
-
Update - Magazine and Clip The first thing I did with the magazine housing was to clean up a few of the edges with "green stuff". I used a drill and dremel to clean out the resin grub screw and installed the actual grub screw from T-Jay's kit. Next I drilled a hole right through the housing so that I could later use a large machine screw to help hold the housing on the main barrel. I also drilled a small opening for a magnet so that I could use a magnet to attach the clip to the mag housing. Right now I've got one magnet in the housing but I may still redo this and add a second magnet for strength. I also made a plastic cover so that the magnet will be hidden once everything is assembled. Then I installed the little thumbscrew thing onto the mag housing. I didn't do anything fancy here like some of the other builds (I'm lookin' at you, Dracotrooper ). I just used 1/2 a nail to provide additional support and glued the button/screw on. Then I started working on the clip. Using T-Jay's parts, I installed a magnet in the inside of the clip, drilled the hole for the LED button on the bottom and installed the foam to push out the LED. Everything was then covered with a plastic plate and sealed with "green stuff." Next came the letters. I really wanted the "OFF" letters on the bottom of the clip. I picked up a letter punch set from Amazon and set out to experiment. I used a dremel to clear out an area for the letters, hoping to use the same "green stuff" trick that T-Jay showcased. I experimented using play-doh. I pressed the letter punches into the play-doh. It was kind of hard getting the right amount of pressure. Too little pressure and the letters didn't show up cleanly. Trying a second time over the same letter wasn't going to work. It's impossible to line up the letter again for a second "press" into soft material. Too much pressure and you got the frame of the punch in the imprint, as well. I sensed this was going to end up taking several attempts. I pushed some green stuff in the opening, and carefully pushed the letters in. I used an "I" for part of the arrow. I wasn't going to be able to do a full "->" arrow and I found it impossible to line up the other parts of the arrow. Well, it ended up that this didn't work that well. After everything hardened and I sanded down the green stuff to make it flush with the surface of the clip, I ended up losing the letters because they weren't deep enough. So I dremel'ed off the green stuff and tried again. The results were better on my second attempt. Then I shot on a coat of primer and I could see that my green stuff wasn't completely flush. A bit more sanding to flatten out the green stuff, and again I lost most of my lettering. Some of this was due to the sanding of the primered surface was filling in the letters. This needed some rethinking....I'll come back to this.... On to the little clip. There is a little clip thing on the magazine clip that is not molded in the Doopydoo's kit. I saw in T-Jay's build that he fabricated one. I set out to do the same. I went to a local hobby store and picked out a small sheet of brass that was 1mm thick. In hindsight, maybe aluminum would have been a better idea as I have now found out that brass is incredibly strong. Even 1mm thick brass takes a lot of effort to bend. Unfortunately I don't have any photos of the fabrication, as I was on a roll. But basically I used tin snips to cut out a rectangle then used a vice and a rubber mallet to bend the sides into a "U" shape. Then went back and forth between a file and a dremel to shape the sides and tip. Once I had this done I cut another small strip for the center portion and rolled it around a small plastic tube that I cut from a pen. This was the result... I also filled in those little rib notches on the side of the clip. I saw Vern mentioned that they shouldn't be there with a cut down clip. Lastly I went back to the lettering. For my third try I went with something different. I took a spare piece of resin from the Doopydoo's kit, in my case the lower clip and I tried using the metal punch directly on the plastic.....no green stuff. Surprisingly, this seemed to work ok. I thought it might splinter from the punch but the letters punched in nicely directly into the resin. So I filled in my letter area again with green stuff, let it completely harden and sanded it smooth. Then, once it had completely dried, I then used the letter punches directly on the green stuff. I think that will be good enough for me. :-) Mark2 points
-
Hi Matt, welcome and thank you for your EIB application. Let's take a look. CRL and EIB Application Requirements: Looks like all the required submission photos have been posted and your armor displays all necessary element as set out in the level 2 CRL. Andrew and I would like to welcome you to Expert Infantry, congratulations. You are trooper #800. Other-Armor Fit/Assembly: In this section we review observations made by your fellow troopers and ourselves. Some observations may lead to suggestions to improve the overall look of your armor. If any suggestion affects any application, it will be listed separately in the above or below sections. Beautiful job on your RS armor Matthew and loving the TDK blaster, very nice. Centurion Suggestions: In this section we prepare you the best we can for Centurion. If there are any areas of concern they will be discussed here. At this time we don't see anything that would hold yo back from directly applying to L3. Thank you for a nice clean build and application2 points
-
I finished up and installed my Hovi tips this afternoon. I think they turned out pretty well. After that I attached the reinforcement strips to the ab plate. Finally, I trimmed my ab button plates with the help of a Billgram. Sent from my iPhone using Tapatalk2 points
-
Congrats on your BBB! If I could make a suggestion, Jason, it would be to tighten up the paint at the top of the vocoder a bit. An easy way to get those curves at the top is to use a "filbert" style artist's brush, which has a rounded tip. Looking forward to the rest of your build!2 points
-
So I joined the up to date world mid last year and went from a 1959 Morris Utility to now owning a 2012 Jeep Patriot, all the mod cons, aircon power steering, automatic trans and so on, a vast difference from my old ute. Managed to get it cheap through a friend who's mother had passed away earlier last year and he just didn't want to see the car any longer, only 60,000 on the clock and still smells new (she didn't pass away in the car if you are thinking that) . Anyway I have some medical issues so money is tight but I wanted to change the license plate to something a little more in line with my hobby. Our local licensing centre (DMV to you US guys) has lots of combinations for private plates, different words, numbers, colours but prices start at $400 and go upwards. OK so a tad out of my price range, then I noticed the state plates had just reached 1GLS, so I came up with a combination that would work and been stalking the license centre since, as you can't reserve state plates for some stupid reason. This morning was my 15th visit and YES that combination was finally available, but I had to drive to another centre to get them, ok another 35 minute drive then another 40 minute wait in queue but these only cost $25 compared to the other $400 and upwards. So I'm a GML and I'm in the 501st (the 1 in front is state required) I know BIG DEAL right it probably doesn't mean much to a lot of you but I'm chuffed and it was cheap So anyone else have a Star Wars / Legion inspired vehicle license plate???????1 point
-
That’s “Awesome”, thanks for your time Tony and Andrew in assessing my kit and my only regret is that I didn’t get involved with the 501st sooner. I actually updated the details at the top and didn’t see the EIB approval at first. The whole journey so far from build to pre approval, garrison approval to EIB has been exciting and a huge learning curve where I have learnt new skills and found a group of awesome people with the same interest. I would like like to thank everyone that’s provided build advice and support along the way as I couldn’t have done it without their help. ”800” what an awesome trooper number to have I actually can’t believe I made it to EIB considering 12 months ago I was thinking what have I got myself into. Thanks again and see you all on the dark side Matt1 point
-
Way to go, Matthew! PM me your address, and I will send you an official 501st Legion car decal. Next up, Centurion!1 point
-
So, new scope rail and more green stuff ordered (thanks Tino) made a little bit of progress tonight. Bit of detail added to the fake bolt and made a start on the power cylinders. Sent from my iPhone using Tapatalk1 point
-
wow, I am so glad you documented your build this well. Its going to greatly help me with my KB props build as well.1 point
-
Many congrats, Matt!! EIB #800 - can’t forget that one. Next up, Centurion. :-)1 point
-
Starting to get happier results. After having a meltdown and panic attack my armor is on the way soon. Should be shipping in next 3-4 days I'd estimate. Lots of members are getting parts in and we are starting to see amazing results. I suppose it was worth the wait I knew it was gonna be awhile but I suppose I was more hopeful of timelines, seems like the yoke, back and ab parts have been a big challenge to lay. Hoping once these first halves (torso, chest, yoke, back, shoulders, butt, and cod) are shipped that rest should be smooth sailing. Still waiting on updates on the biceps, forearms, both legs all the way up (spats to the top) From what I have seen everything is beautiful, amazing and accurate. I'm looking forward to starting my rigging soon and posting in here more often. I'm also almost done with FO Tie Pilot so first order will be well represented from me.1 point
-
Welcome Robert! Best of luck with your build. I just "finished" my AP kit and had a great time doing it. (I don't think you ever truly finish these things - I'm currently upgrading the helmet and electronics and re-fitting some pieces and... you get the picture ). Take your time and have fun with it!1 point
-
Looking good, Eric. Great job on the trimming!1 point
-
The reveal mask, now pretty much done. I just need to finish the greeblies on the neck seal, add the clasps to join the two, then complete the repainting of the rest of the mask (I decided it needed a new paint job). Sewing machine this week so that I can continue with the quilted leather suit and robes. Scratch built the vocoder unit and microphones with found parts and collecting bits from visits to the hardware store; and Lego! Any Lego enthusiasts might recognise some pieces. It's fun hunting around for parts to replicate this piece. It's inspired by the ROTS version, as it's more colourful than the ROTJ one. I ditched the pepakura neck seal and decided to build a better one with craft foam instead. Best find of all - that chin mesh, it's guttering grating, found at Bunnings. That stuff will also go on the mouth piece grill. Supanova (in April) awaits!!1 point
-
New to the Legion Costumes This page describes how a "New to the Legion" costume is added to the membership database. The applicant submits a costume to his/her GML that does not currently exist in the Legion Membership Database. The GML posts the costume to the GML forum, in the New to the Legion / No CRL topic. LMO, DL and GML review the costume and determine whether it is eligible for inclusion. This review includes: Validity of the costume (i.e. Does it meet the character approval guidelines) Is the execution of the costume of sufficient quality for inclusion in the Legion Once the costume is deemed acceptable, the member will be instructed to work with the detachment to create the CRL When the detachment is satisfied with the CRL, it will go to the LMO for review. When the LMO approves the CRL, the new costume will be added to the membership database https://databank.501st.com/databank/Costuming:NewToTheLegion https://databank.501st.com/databank/Costuming:CharacterApproval1 point
-
Nerve racking work for sure.. Excellent outcome.. Sent from my F8331 using Tapatalk1 point
-
I used nylon webbing, Tandy Line 10 snaps and E6000- when I do any other builds with snaps I plan to use the same method. I also used my soldering iron with a pointed tip to make a nice clean hole to put the snap through. Also you'll need to burn the cut edges of the nylon with either a lighter or a soldering iron to prevent fraying. Here's my snapping system, I probably went a little overboard, but it works well for me: I also have a snap connection to each shoulder bell from the shoulder bridge connection, and a snap connection from the shoulder bell to bicep, and bicep to forearm. That way I pull on my entire arm armor in on go on each side- very convenient.1 point
-
So my shins have been the causing me extreme anxiety so I finally decided its time to make armor soup. First I boiled some water on the stove to cook the back plate. Since that worked well, I decided to get the big pot out (just don't tell the wife I used her pot to cook plastic) The shins fit perfectly in the pot and here are the results1 point
-
Thanks for the additional resource! As noted above, I did notch the ears to add that step already so the ear fits well against the face plate and dome sections. However since the lower section of the ear isn't screwed down in the pictures, what you can't see is that the lower section does already fit well, but where my marks are is where that section of the ear makes hard contact on the cheek when it is screwed down. A little rounded trimming will soften that contact and it'll screw down nicely there. It's just where I had to quit for the time being.1 point
-
You will find that trimming the top section will allow the bottom gap to close, some even trim so there is a step in the top of the ear, you will notice the ear sits on the back plate higher than the front. If you look at your trim marks you will only create a gap there, as all of the top of the ear is touching. Although not all images are here this is a great post to have a read through https://www.whitearmor.net/forum/topic/29238-my-helmet-ear-tutorial/1 point
-
Super clean, great work.1 point
-
Hey there Dan - thanks! I used my conference attendee name tag for the styrene and spot putty was dirt cheap. With templates available on FISD, actually got it done [emoji1] Sent from my iPhone using Tapatalk1 point
-
Here is my action shot. Thought I had included it in my original post, but must have forgotten. Looking forward to your recommendations. thanks.
 1 point
 -
Just as an example, not trying to re-invent the wheel, just adding some FOTK1 point
-
Would be great if you could make a post in the FOTK build section with some links to them, much info gets lost in build threads as many don't want to go searching1 point
-
I won't speak for everyone, but I feel like most of the problem does come from a couple years ago and has gotten much better since in my experience. The insinuations about the ANOVOS project, the openly critical nature toward the costume design, etc - there was just a lot flying around for a while. Like I said though, I haven't run into that on FISD in quite some time so I at least feel like things are much better.1 point
-
Just want to say thanks as I've been referring to your thread for my First Order TIE Pilot build!1 point
-
Hi all, I feel an immense sense of accomplishment today as I continued further work on my scratch-build magazine. It's starting to look and feel like the real thing! I installed internal structuring to it and finally shed away the blue tape holding it all together. At this round, I leave behind the magazine cap and latch and will follow up with these additions another time. The assembled panels of the magazine were butt-jointed, (I think that's the term where two pieces are secured without overlap) so I followed through today in applying a coat of putty over the seams and onto the main body - I used Bondo Glaze and Spot putty. It's a thinner, one-part formula that begins hardening in 3 minutes and ready for sanding after 30 minutes. Given how relatively small the magazine is, this was a cost effective, adequate solution opposed to going full Bondo with separate hardener and filler, the Spot putty served it's purpose. Haha, I thought I could apply a light coat to the magazine but with my lack of experience in using it, I ended up laying it down pretty thick; 150, 220, and 320 grit sandpaper came to save me to some degree. Rewarding to see the magazine body with grey primer that's for sure! Mounted aluminum L-shaped supports on two side panels of custom magazine using E-6000 - magnets used to help adhesion. I guess this is practice for when I get working on my armor; whenever that day comes! Set out to glue the panels one by one and test fitted with modified magazine housing as I went Assembled main body of magazine Applied Bondo Glaze and Spot Putty to custom magazine to fill pits, especially on the edges - sandpaper applied to smooth out Various views of sanded bondo spot putty on custom magazine Grey primer applied to sanded custom magazine after bondo spot putty applied Custom magazine with grey primer added - without cap and latch Custom magazine with two coats of grey primer, without cap and latch, inserted into modified magazine housing Main body of custom magazine inside modified housing, before and after Upgraded main body of magazine, inserted in modified doopydoos magazine Ending transmission; until next time friends!1 point
-
I’ve got quite a few things accomplished over the weekend. In no particular order, here is what’s been going on in my shop. Midway through fabricating my TD clips. TD parts trimmed to centurion specs and ready to assemble. Roughed up control plate and mating surface of the tube. e6000 applies and set aside to set up. I decided to take a stab at making internal Hovi tip parts. I decided to ya some of the epoxy putty for this. Here are the Hovi tips with base epoxy trimmed. Also, you can see the metal base plates I’m using for the internal mic to me modeled. Initial forming of my part complete. Primer. Parts painted white and Hovi tips painted. I opted for very slight weathering on the rim of the Hovi tips. I’m going for that shiny new TK look. primer and paint for TD screws. Next, I moved towards trimming of torso parts. No shins needed on AM 2.0!! So easy! I ended up removing about 1.3” from each side of the kidney plate. Next I trimmed the cod and installed a split snap. I’m very happy with the way the ab and kidney fit together! 22mm notches cut. I added a reinforcement plate on the inside of the kidney. Ready to trim Butt plate and add reinforcement strips. Gluing plates with CA glue. Finished produce side view. Edge view of sanded and polished reinforcement plates. All in all, I’d say it’s been a productive cold weekend! Cheers! Sent from my iPhone using Tapatalk1 point
-
1 point
-
Wish I had more of those special photos that would answer that question1 point
-
Lol!! Sun, cold beer, blasters.... holiday is VERY enjoyable!1 point
-
So, I don’t even have my TK id yet and I’m already over at MEPD researching this: Sent from my iPhone using Tapatalk1 point
-
First time in armour, I’m still grinning. Plus I saw the Solo trailer. So that adds to the grin. Sent from my iPhone using Tapatalk1 point
-
Last few things and I’m ready to suit up for the first time. And then the tweaking and upgrading. Anyway, before all that... Installing the dark green lens from trooperbay. By the way, he has a great video on YouTube for this. Fit to the ear screws- I used the top two screws I each side - and drill holes and cut away part for nose. I sanded the edges and polished the whole lens. Added s-trim. Wow, that was harder than I expected. I read some place to cut the piece about an inch too long and cram it into place to hold it together better. This is what I did. I didn’t glue it, so we’ll see how it holds up Done Sent from my iPhone using Tapatalk1 point
-
Oh yeah. So I had to redo my shoulder bridges and I tried to redo the sniper knee. For the shoulder bridges I set up a fancy rig to simulate me wearing the suit. Amazing, right? I pulled the shoulder bridges off. I didn’t back fill the voids so it was recommended I do this. I must say, they didn’t want to come off. But they did. I marked where they were glued for reference later. I’m going to alter them a bit so they better hide the shoulder elastic. I also had some yellow discolouration on the plastic. So I will turn the pieces around to hide this in the back. I did a series of hot baths to fit it better. Once shaped I trimmed some extra off the back. After sanding the trimmed part I cut some scrap abs to fill in the voids and glued. I shaped the front part to I had to cut the piece for this to follow the curve. Then glued into place. There isn’t much to show for the knee. I tried both hot water and the heat gun. Had more luck with heat gun. The tin foil is a precaution. I also trimmed some more from the knee. Rounded the corners. Thanks Sean. And clamps. It isn’t much better than before but the plate is at least better secured now and holds it shape without any extra force. The clamps are overkill, really. Sent from my iPhone using Tapatalk1 point
-
I received my folding stock, front sight housing, front sight pin, bolt handle, and magazine well. Chris, photos do not do these justice. THEY ARE AMAZING!!!! With each piece I own, I get more excited about building your E-11. Thank you for making these.1 point
-
Hehe. I've already clicked 'follow' so I don't miss a beat! ;-) Sorry, you asked for that one...1 point
-
Nicely done. Good, clean lines around the eyes ad teeth.1 point