imperialbrewer
-
Posts
92 -
Joined
-
Last visited
Content Type
Profiles
Forums
Gallery
Articles
Everything posted by imperialbrewer
-
 I get asked questions by newer people in our garrison about building a TK for the first time and look for tips or helpful advice. Well it felt like I was repeating myself a lot so I threw together a blog post to cover a number of topics that I wish I had known more about going into the build for the first time. Some of the topics include commentary on the tools/supplies you'll need measuring trimming gluing armor strapping (a more hybrid approach with both snaps and velcro) shimming and working with ABS paste and painting And as an added bonus, none of the images are hosted on PhotoBucket https://michaeltangen.wordpress.com/2018/10/16/tips-to-make-that-first-stormtrooper-tk-armor-build-a-little-less-intimidating/
-
- 2
-

-
Kidney shimming gone wrong - HELP [emoji30]
imperialbrewer replied to imperialbrewer's topic in Assembly, Mods, and Painting
So here’s where I’m at — I have a similar issue like before where the darkness of the seam seems to come through a bit. If you’ve had this issue, what have you done to fix or conceal the seam? Or is this OK and good enough to fulfill Centrion requirements as far as the shim is concerned? Sent from my iPhone using Tapatalk -
Kidney shimming gone wrong - HELP [emoji30]
imperialbrewer replied to imperialbrewer's topic in Assembly, Mods, and Painting
Thanks everyone. Will be tough to fix that cover strip — used zap a gap so removing it won’t be fun. But thanks for the encouragement! Sent from my iPhone using Tapatalk -
I had just finished up my kidney shimming and was test-fitting my armor when the ABS pasted seam split: Here’s how the supporting shim was constructed: Inside: Outside: And then ABS pasted: ...followed by the whole sanding, polishing routine and repeated until the surface was flush and clean. Any suggestions? Tips? Should I have heated and bend/curve the piece that I shimmed on? Other things I should have done? Sent from my iPhone using Tapatalk
-
ImperialBrewer’s first TK ANH stunt build WIP
imperialbrewer replied to imperialbrewer's topic in ANH Build Threads
Now that I’ve had a few troops under my belt with basic clearance, I am ready to finish tackling journey towards centurion builder. This evening I’ve started the process of shimming up my kidney armor. So far so good. In the process of measuring out my shimming, I did discover a strapping issue that has had my armor out of a little bit of misalignment. I think after I get my armor shimmed up I’ll be able to get a better sense of where I need to fix the strapping. But for now I’m not quite sure. Tomorrow I will get started on filling the seam with a touch of ABS paste, blending it in, and then sanding/buffing. Sent from my iPhone using Tapatalk -
Did you ever figure this out? I’m at this point of figuring out alignment and need more information on this and related issues. Sent from my iPhone using Tapatalk
-
Happy BBB day!! Good luck on the build, take it slow, measure a few times before you trim, and cut slowly. [emoji3] good luck! Sent from my iPhone using Tapatalk
-
The one thing I’d recommend is to shoot for more of a ketchup consistency — not so watery that it runs, but also not so thick that it doesn’t dry up on you right away. I’ve also found it useful to have a small jar of acetone on hand to help blend the paste with the ABS. Sent from my iPhone using Tapatalk
-
Uxorious' first build - the road to 501st
imperialbrewer replied to Uxorious's topic in ANH Build Threads
Thermal detonator screws are flathead, black and rounded: https://photos.app.goo.gl/HZvFmuAVlO5IUuMp2 Sent from my iPhone using Tapatalk -
Giles First Build - Anovos 2018 Stunt
imperialbrewer replied to GilesWoodward's topic in ANH Build Threads
For starters, no return edge on the front of the forearms — aside from it being required for Expert level, it’s a huge comfort thing. The last thing you need is the armor digging in your wrists. Sent from my iPhone using Tapatalk -
Giles First Build - Anovos 2018 Stunt
imperialbrewer replied to GilesWoodward's topic in ANH Build Threads
Welcome and glad to see another new builder out there! Take your time and don't rush into anything and cut slowly and with intent. As far as your back pieces, you want minimal gap between pieces — so while you're getting that all fit out, make sure that your strapping in the back is set so that you have minimal gaps and then the shoulder strapping will be dictated by how your front and back are strapped together. -
Repairing cracked shoulder straps ANOVOS
imperialbrewer replied to rbst's topic in Assembly, Mods, and Painting
First time builder here, but I've had to do major shimming on my thighs and have become intimately acquainted with the art of ABS pasting. I'd start by using pure acetone brushed on to the interior of the cracks and join the two cracked ends together. Hold those pieces together for a few minutes until they're reasonably set. After that point you have a few options I'd reckon. Personally, I'd start off by slathering on ABS paste on the underneath side until the cracks have been sufficiently reinforced. If necessary, you could also superglue small 1mm ABS strips to help stabilize the ends. On the external side is where you'll want to be a bit more delicate on your approach. After you feel the underside has been sufficiently reinforced and repaired, from this point on it's fixing any cosmetic issues. I use more liquidy ABS paste — about the consistent of runny ketchup or mustard, but not so runny that it drips. Lightly fill the cracks and use pure acetone to blend in the paste with the surrounding ABS. Use a paintbrush to carefully blend it in, being careful not to let any bristles get caught in the paste. After you've sufficiently blended it, let it dry and then start gently going over it with sandpaper to blend and smooth it out — from grits 220 all the way up to 3000. I personally use the following: - for rough sanding to smooth things out: 100 to 220 to 400. - once imperfections are smoothed out, repeating cycles of 400, 600, 800, 1000, 1500, 2000, 2500 (dry and wet), 3000 (dry and wet) — inspect, and if necessary lightly glaze on more ABS paste until the crack can't be seen anymore, and then repeat the sanding process. I did this with my thermal detonator — had a crack on it and followed that process for repairing it (the crack used to be on the right side near the lower screw — now it's barely visible that there was any crack at all, just a slight raised shadow):
-
As pictured it was a metallic charcoal black/gray matte finish, but I felt it was a bit too shiny so I sanded back a bit and put down a coat of flat black enamel spray paint. I was going to airbrush it with acrylic instead and put clear coat over it, but the air valve wasn’t working on my brush. Fortunately we had a really nice day (40°F) and was able to paint outdoors. Revised photos: THANK YOU everyone for your advice, shared reference photos, and the tips you’ve shared! I’m sure somewhere along the line I’ll build another E11 (hero level) and pass this onto my son. But for now it’ll be great to have this to troop with! Sent from my iPhone using Tapatalk
-
Sent from my iPhone using Tapatalk
-
Well I am about 99% done save for some paint touchups that I want to go back and do on the blaster. I finished the counter and the scope and I’m relatively satisfied with how they came out. I’m sure I could’ve done better if I had the time and patience to do so, but it’s good enough for general trooping. I may go back sometime and do another E11 build but with more attention to detail and more mods including some electronics and LED lighting. But quite frankly, I just wanted a prop to use for trooping and to help me get through to Centurion clearance. The paint job was very difficult though, because it’s about 20°F in the garage and I basically have to spray paint the gun with the garage door wide open to prevent too many fumes from seeping into the house. And as a result of the arctic temperatures, the paint job doesn’t come out as nicely as I would like. So I will probably rough things up a little bit with a Scotchbrite pad and go back and do some touch up painting with my airbrush. But for a general use prop, I am relatively happy with how it came out. It was a good learning experience for me! .... It seems Tapatalk is not letting me upload photos. I will upload some tomorrow when I have a chance. Sent from my iPhone using Tapatalk
-
Hahahaha hahahaha!!!!! Sent from my iPhone using Tapatalk
-
Looks like the only thing running away from you is Tapatalk with duplicate posts
-
Well I am on the homestretch… Now it’s a lot of doing little tiny things and waiting. There’s nothing like watching paint dry. I had to hold off painting the main shaft of the gun to fix my screwup on the rear sight. I molded out some green stuff on the back and got it mostly OK, but it’s not perfect. I didn’t have a file with a wide enough pattern, so I used the threads on a large bolt. For the most part that worked OK but the proof will be in the pudding tomorrow when I sand things down and see you how well this maintains its shape. I also decided to leave that other half as is, because it provides a nice mounting point for the scope rail. That’s one thing that led me to believe that I had it right the first time, was because the scope rail fit so nicely and the hole for the scope mount lined up perfectly. Oh well. It’s really difficult to paint in the garage right now though, because it’s about 15°F outside and about 30°F in the garage. I try and paint as fast as I can in the garage and then bring the items inside, but that leads to spray paint smell all over the house. Anyway, here are some photos from tonight‘s progress: Tomorrow I hope to finish sanding down the remaining pieces and paint everything else up. And if I have time, finish up the rest of the mounting. I am also considering going back and doing a couple more coats — now that pretty much everything is painted with satin black, going back over it with charcoal gun metal, and then going back over that lightly with the satin black for a little bit more of a metal finish. It will still be black, but I want it to have more than a one dimensional appearance. I’m not sure if I will get around to weathering the gun much this week, I really just wanted to get it serviceable before my first troop this Saturday. As to the glossiness, I will go back over it when I’m done with a matte clear coat to protect the paint and subdue the sheen a little. I’ll probably also go over it lightly with a light abrasive to scuff up certain areas a little. Sent from my iPhone using Tapatalk
-
Awww crap, I screwed that up — and it’s Zap-a-Gapped on there, so it’s not moving anywhere. :\ I’ll have to see what I can do to pry that off and move it around. And yeah, my bad on saying “two screws” — I think I was reading something else in the Completion Kit printed guide that came with the kit that said “two screws” while I was typing this out last night. That makes total sense though, that wider opening underneath tapering to a narrower opening. That should be easy as pie then to get that in there. The one thing that’s been really frustrating with the gun being matte black, is that most of the photos are absolutely miserable from a contrast and visibility standpoint. It’s been very difficult to tell how things should be placed, even with seemingly good quality photos. If the contrast ratio’s not right, it’s really hard to discern how something should be placed properly. Oh well, still a lot of fun to learn all these things along the way. And I don’t know if you’ve read through that exhaustively long PDF on just the power cylinders, yikes — someone sure had a LOT of time on their hands to compile that exhaustive compendium on all the options for arranging the power cylinders. Sent from my iPhone using Tapatalk
-
Looking absolutely fantastic! Sent from my iPhone using Tapatalk
-
How I feel about browsing half the forum threads at whitearmor...
-
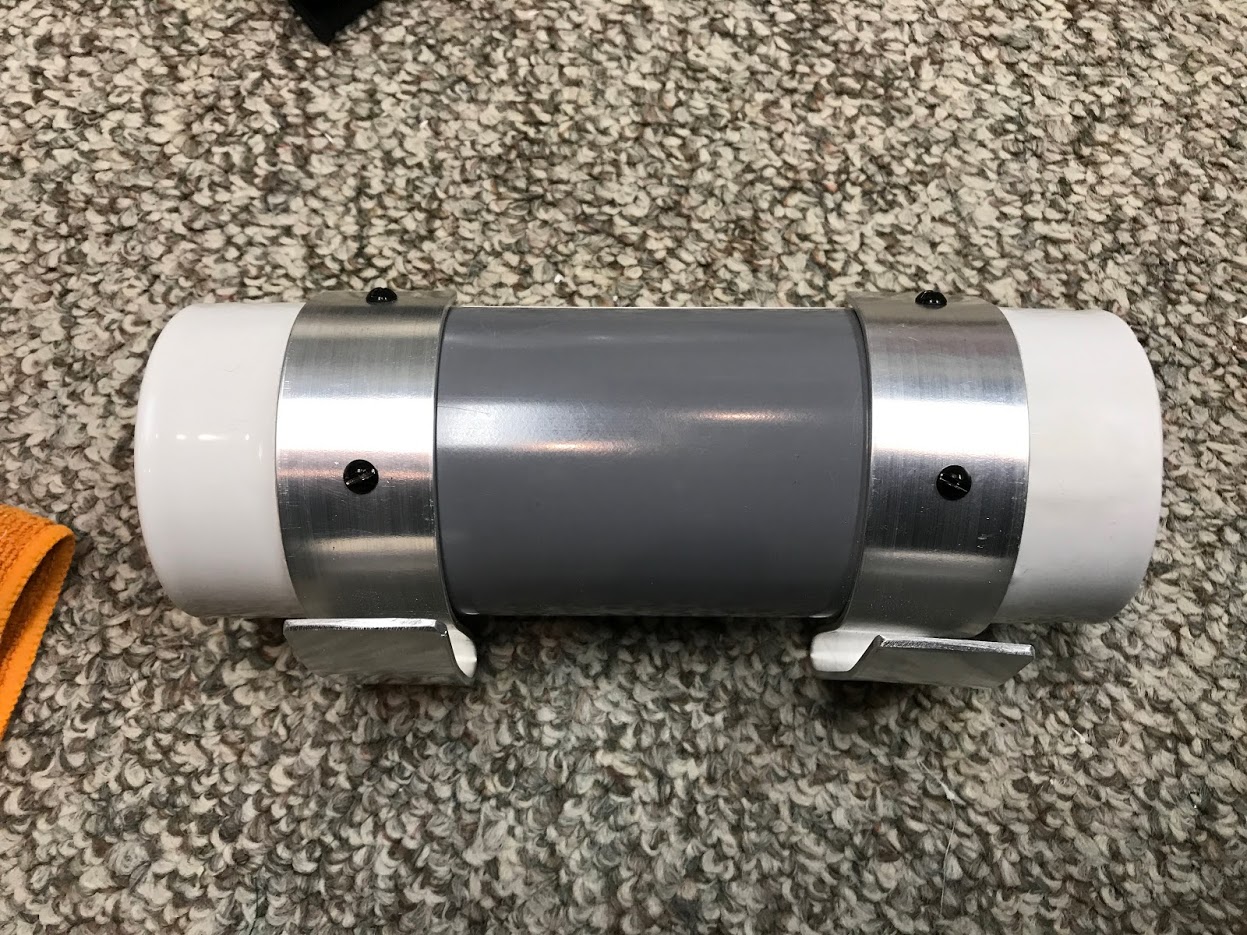
Well, I did a little digging and found some pictures on ebay for what to do with the wires and underneath the power cylinders. I found these photos: But of course… I don’t care about this level of detail since everything is going to be painted matte black anyway. No one is going to see the underside of the power cylinders. I did get a lot done this evening and feel like I am on the homestretch. I have a checklist of about a dozen and a half things left to do and I think it’ll be ready for trooping. One quick question: I have seen references in the completion kit about securing the front of the folding stock with two screws. But I have no clue where. I’ve looked at the folding stock from every angle when it’s against the main shaft and I see no place that makes sense to screw in the folding stock. Where did you guys use a screw to further secure the folding stock? At any rate, here are some more photos from tonight‘s progress. Sent from my iPhone using Tapatalk
-
So I’m perplexed what to do with these insulated wires. I’ve pored over reference photos and the PDFs in the E11 guides and don’t see any detailed photos to guide me. Do they just sorta get tucked in there under the cylinders? Sent from my iPhone using Tapatalk
-
Thanks for pointing these issues out! Got a little overzealous with the grinding on the counter and the folding stock. Will definitely fix those. Sent from my iPhone using Tapatalk
-
This evening I got a lot of little tiny things sorted out. Doesn’t feel like I got much done, but the reality is that all these little pieces will come together a lot faster than I think they will. I also did a dry fit of all of the major components onto the main stock and think this is going to come together nicely. I don’t have any ambitions of making a hero level prop, but that’s OK and in-line with my stunt TK armor. I thought about going back to using the scope parts that came with the little kit, but I found a way that I could get things to work. I used the Green stuff to make a lens stopper in the scope, and will hold it in place from the back end with the black ring that came inside the scope kit. I think it’ll work out nicely! And the little lens will just be glued into the front of the scope. I would have got a lot more finished tonight, but have to stop making noises when everyone else decides to go to bed but me. [emoji13] Here are some photos from tonight‘s work. Sent from my iPhone using Tapatalk