Leaderboard


Popular Content
Showing content with the highest reputation on 11/07/2017 in Posts
-
oh no.. another impossible decision. Its the Orlando Patch submission all over again. lol3 points
-
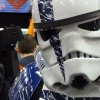
Hi guys It’s been a while since I posted but I have been busy on lots of Helmet projects. I just thought I’d show off the CFO TK helmet line up. First up is the new ANH SET FOR STUN helmet I’ve been working on. This is a prototype test helmet. I’ve managed to capture a lot of the details from the original 3D scan in the vac forms. So you can see the cracks, drips, chips in the paint and even where the tube stripes were painted. Next up is our new ESB mkii helmet cast from the one JoeR used to own. Then we have the CFO JoeR ROTJ helmet. And finally the Oakley helmet. And the full rotj armour. Sent from my iPhone using Tapatalk2 points
-
Great info appreciate it all. Just feel I’m gonna glue wrong and not be able to fix it. Armor is AM version 2.0. From what I’ve seen it’s easier then it looks. I’m hoping it all just fits and I don’t have to trim much but that might be wishful thinking. Right now it’s all still packed. I’m gonna wait until I have a good day designated to just unpack it and take it all in. Patience is my problem, I lack it. I’m gonna do my best though since there is such an investment involved.2 points
-
Hi there stefan; it all depends on your personal build and design goals. If you're going for realism, it's the kit to purchase. Real screen accurate screws beat resin screws any day. Dan and I have certainly benefited from it. I totally agree and recommend T-Jay's set as well. There's nothing like it and well worth the investment. By the way, he's a really pleasant guy to deal with as well. Wish you all the best and look forward to your WIP, no matter what you decide2 points
-
Also, Brian does some amazing scopes. Here's what I did with one of his, for my son's doopy kit Sent from my SM-G920F using Tapatalk2 points
-
Thanks, Tino. I only noticed the chip this morning when I looked back at the photos. I attempted a greenstuff fix this morning but take on board your tip about this being a weak spot. Might look at the top cap mod or even a new, more accurate magazine altogether. :-) Sent from my iPhone using Tapatalk2 points
-
Taking the feedback on board about the TD screw position I made some changes that I hope look more consistent to the original TD http:// by -matthewwormleaton- I have painted the screw heads and filled in the old screw holes with the idea of weathering the TD slightly. The screw at the top of the TD in this photo looks slightly off but in person it resembles the TD in the reference photo.2 points
-
Hello fellow troopers, I picked up an (mostly) unassembled Anovos TK kit a few days ago (it'd been sitting in a box for over a year), and am now in the process of trying to put it together for TLJ premier (or Battlefront II if I can get it finished early!). I am planning on building to Centurion standards "out of the box" to make subsequent EIB/Centurion approvals easier, so please chime in where appropriate if it seems like I'm doing something that'll cause trouble down the road. Also picked up quite a few tools/items for the build: - Flexible hand guards, rivets, and screws from Joseph - White elastic in two sizes for shoulder assembly - Tandy line 24 snaps (to replace el cheapo ones in kit) - Punches and rivet tools - Neodymium magnets - Foam tap for shimming/padding/fitment (if needed) - E6000 - (not pictured) a bunch o' Harbor Freight clamps - (not pictured) sandpaper in various grit sizes, NOVUS polish Also have some mic tip mesh on order, and will be ordering boots and a blaster sometime soon... Let the build begin!1 point
-
Hi guys Have received my Doopydoos E-11 blaster...it only took 3 days to arrive but am only half an hours drive away from Cleethorpes...gonna take a break from my armour to crack on with the blaster. Must admit this is the bit I'm really looking forward to and am most impressed with some of the builds I've seen so far. Thinking of investing in a T-Jay kit?? Any thoughts?? Sent from my Nexus 7 using Tapatalk1 point
-
So the excitement has begun and the armor has arrived. No idea how to do this and no clue where to begin. If anyone can help with some direction that would be great. I’ve watched a few videos and they skip over some things. Just don’t want to mess up and have to redo it all.
 1 point
 -
Starting my Legacy Build got my helmet in yesterday from KWDesigns. I will update my build as I go and any suggestions or help would be greatly appreciated! I’m very excited. Sent from my iPhone using Tapatalk1 point
-
Name: Daniel Melin ID: 99665 Garrison: Nordic Garrison Forum name: jedha-trooper Armor maker: TM (troopermaster) Helmet maker: TM (troopermaster) Blaster: DLT19 diamondstate props Hight: 5'10 Weight: 200lbs1 point
-
Well alrighty then. Thanks. Sent from my iPhone using Tapatalk1 point
-
Congrats on Big Brown Box day, Frank! I know what you are thinking right now... You wait and wait on your kit and then when it arrives you tear into it like a kid at Christmas... that's when the terror sets in. "Holy cow.. I have to put this thing together"? Not to worry, brother. There are literally hundreds of Troopers to help you out and dozens of fantastic build threads you can follow. Hopefully you have all the build supplies you will need on hand. For a complete list, here is a thread that may help: https://www.whitearmor.net/forum/topic/31404-supply-list-for-your-tk-build/ The best thing to do is decide on a place that you will be assembling it. Someplace (hopefully) quiet where you can keep all the parts together in one area. An outside area for letting the E-6000 glue dry is recommended. (It can be pretty noxious). A lot will depend on the strapping system you decide on. There is the "classic" (brackets) or the "snap" (preferred by many). An awesome build thread can be found here: https://www.whitearmor.net/forum/topic/35086-ukswraths-anovos-tk-build/ The biggest thing though comes down to a few things: 1. This is not a race. Think of it as a marathon, not a sprint. (Take your time). 2. Measure twice (3 times) cut once. 3. Research, research, and a little more research. (Study the build threads). 4. When in doubt, ask before moving ahead. 5. Start your own build thread. You can (and should) ask as many questions as you want there. We are here to help you every step of the way, and posting photos will help immensely if you should have any difficulty. (We LOVE photos). 6. Remember that many of us had no experience building armor and were in your shoes (boots) once. 7. There is no such thing here as a "silly" or "inane" question. We truly want you to succeed and become a part of the FISD family, and will assist you wherever we can. 8. Hopefully you are thinking about taking your armor to the highest level, (Centurion). Aiming toward this is easier during your build rather than after, and I promise you it's not as difficult as you think (and well worth the effort). Here is some more info. on that: https://www.whitearmor.net/forum/topic/35371-eib-and-centurion-what-do-these-terms-mean/ Best of luck on your white armor journey!1 point
-
Welcome aboard. We all had that nervous “first cut” moment. But don’t worry, it gets easier and much more fun. :-) I found the videos of Ross Walmsley incredibly helpful for my build. Ask plenty of questions mate - there’s lots of helpful folk around here. :-) Best wishes. Dan Sent from my iPhone using Tapatalk1 point
-
Hey Frank and welcome aboard and no worries, we`re all here to help what armor did you get..hard to tell from the pic1 point
-
We can do that. I still think the external baton attachment should be an all round requirement, but that's just me. Mainly because that's a major characteristic of the R1TK baton. I do like the look of Christian's baton itself, I just feel that if it was attached exteriorly, it would look much closer. Also Daetrin, your requirements are good. Nothing need's to be changed as far as I can see.1 point
-
Now for some updates, lots of progress the past couple of days. I wasn't a fan of the bright white against the noticeably off-white Anovos plastic, so I used a tea bath to stain the belt - came out a bit darker than I'd hoped but still an improvement, I think(?): Painted up the ab buttons: Glued up the left forearm (need more clamps/magnets!): Made up snaps, snap plates, and nylon connectors for the ab/kidney. Snap plates were heated up and bent to match the contours of the armor for better adhesion: Installed the split-rivets-in-snaps - helpful hint, take the thickness of the plastic into account BEFORE cutting them down - thankfully I had enough to finish the ab/kidney (will need another for the cod), as well as the snap plates:1 point
-
I'll have to grab a photo. Good suggestion, unfortunately with lead times I won't have boots to troop in if I wait, so just going to have to cross my fingers that they're close enough.1 point
-
Did Doopydoos neglect to send you your magazine Stefan? It's an undersized, shortened version but nonetheless, should be included in your kit. I didn't see it in your parts picture... Here's my parts picture - see that little magazine next to the magazine housing, curious I don't see yours.1 point
-
Also, I won a set of rivets from justjoseph but didn't end up using them because I'd already purchased a set of them. I'd be happy to pass them on to you, no charge. I'd need to double check when I get home, but should be a set of split rivets as well as single cap rivets for the thigh ammo pack. And re the gloves, non rubber gloves are approveable for EIB. Only Centurion requires rubber gloves.1 point
-
Thanks Reese. Could we not have a few levels of accuracy for the CRL? E.g. L1 allows Christian's design as well. We can simply say that it's a black cylinder approximately x" in diameter and x" long. The holster needs to be black and attached to the belt. @ L2 then we can say that the baton is painted semi-matte and needs to be externally attached to the holster. @ L3 then we can say it is made of metal or wood and has 2 points of attachment, and give the approximately dimensions of the snaps. We can also say that the "holster' is a simple strap of leather x" long looped over the belt. What do you think?1 point
-
Everything looks great the helmet is awesome- very Imperial1 point
-
Wow, what an update! So many love and time is put into details these days. Makes me sad to see some resin chipped off your magazine. If the repair with green stuff does not work here, I would suggest to build that top cap from scratch with a thin ABS sheet. An iron could be used to round those three sides and you could slide it over the resin piece. Does that make any sense? Once your build is completed, that exact area of your magazine becomes the weak spot when putting your blaster on a table. Not sure if green stuff will stand this...1 point
-
I still really want one of those Mk2 helmets, just need to stop the kids spending all my money!1 point
-
Nice build! Saw on FB.1 point
-
Glad I could inspire Dan. Terrific update as I was just contemplating on getting to the end cap next haha, not one bit surprised to see you tackle the resin engraving the way you did, great job!1 point
-
Evening all, I might be a little extra excited about this post. Firstly, I was inspired by another thread (no names, Jesse) to remove and reshape my end cap clip. Neater, rounded edges. Next, the end cap. I marked out the center line and outer perimeter. I couldn’t really find a better tool than the one pictured, however this required quite a steady hand. Essentially, I kept the Dremel static and rotated the end cap, using this Dremel piece like a router. It came out well and the parts are now curing (E-6000 glue). Now, this part required some bravery. I added the LED to the mag clip, then hand drew the “OFF ->”. I very carefully used the Dremel to engrave the letters. I’m surprisingly happy with the end result, which should hopefully show up a little better once painted. Now for a few pics with some of the parts in place. *Note some progress to the Hengstler, and further shaping (thanks, Tino) to the power cylinders. A very rewarding evening’s work. :-) Sent from my iPhone using Tapatalk1 point
-
Wire details on the back of the cylinders looks great. I struggled to get that look but you pulled it off. Yes, Tino’s suggestion to reshape the backplate is a must and glad you tackle that. It would be a waste to leave it as it is with all the effort put in so far.1 point
-
Hello everyone! Today, I proceeded with the End Cap Clip. As Doopydoos comes with a static resin piece, I opted to mash together two separate sources. I used Suitecase Props T-piece along with Tino's aluminum u-channel from his completion set. Here is the original piece Here is the combo of the two separately sourced pieces. Here are some comparison pictures: I decided I wanted the u-channel a bit shorter so I took out my trusty Cobalt hacksaw blade and took off around 2mm. In my estimation, it now looked more proportional against the T-piece. I also rounded off the edges of the u-channel following SMG references (FISD E-11 Blaster Reference: PDF Document Photo Compendium) Here, I would then, following SMG references as well, imprint knurling patterns using green stuff to the bottom of the T-piece. Following, I would use a curved aluminum piece to lever the T-piece for press functionality. 1 /16 " drill bit used to create hole in aluminum piece and on T-piece. A nail was scavenged to get at its head for insert and keep the aluminum piece in place. Initial attempt using JB Weld was unsuccessful. Used Tino's powerful CA glue did the trick. This aluminum strip styled after SMG references as well. I then proceeded to create the two support holes for the pin. Piloted using 1 / 16 " then to 5 / 64 " for the actual hole size. Since I didn't not have a 5 / 64 " pin, I had to shave it down from the 1 / 8 " solid brass rod I had. I inserted the rod to my drill and held it up against my square file. For anyone attempting this, please use ear protection. I found it necessary to examine the filing process closely therefore, putting myself close to the drill motor. Done! I will proceed to add a bit of E-6000 to keep the pin in place. I had thinned out the pin a tad too much. Also, if I ever have to disassemble, I can heat it and get the pin out. Thanks for checking in once again! Have a terrific day!1 point
-
Very nice work on your power cylinders. Although you have already finished the details, it is not yet too late to shape the backplate. Just pushing For painting it makes sense to start with a brush, as spray paint does not properly cover the small areas in the center of this piece. Then finish with spray paint.1 point
-
So I have endeavoured into the art of ABS paste and after reading crickets post more than once I have given it ago. i made up some ABS paste that has the consistency of tooth paste. The shim is pretty strong and I was happy with the joint, as you can see I do have some extra material on the shim to cut off when it’s complete. http:// by -matthewwormleaton- The below image is a bit blurry but you can see the first layer of ABS paste, I did complete several test pieces before working on the actual kidney. http:// by -matthewwormleaton- First round of 80 grit and 120 grit sanding ready for a second layer. http:// by -matthewwormleaton- second layer before any sanding http:// by -matthewwormleaton-1 point
-
Hi all, So, I’ve just finished playing with my power cylinders. Let me start by saying, I’ve used Tino’s work as a guide but I’ve not followed it exactly. So, I know it’s not completely accurate, however it’s a big step up on the Doopy’s part as it was. I had the red wire from Tino’s kit, but needed something to ‘plug’ them into (under the rear of the cylinders). So, I decided to use a straw - yes, a drinking straw. I decided to fill it with green stuff and then plug the wire into the soft green stuff. I used a lighter to slightly singe the ends of the red wire fabric to stop them fraying too much. The parts touching the central capacitors are superglued in place. To add shape to the wire, I used the thin, copper wire that was inside the main wire (that I’d stripped out previously), twisted it together and inserted it back into the wire where needed. Before and after. Hopefully once all painted up it should look super. :-) Sent from my iPhone using Tapatalk1 point
-
Yup. ATA does a lot of orders for ANOVOS replacement parts, e.g. ANOVOS parts that wear out and break. His prices for parts are excellent.1 point
-
I started today off taking inventory of the Anovos-supplied strapping (instructions stink for this, BTW): I'm going with the Velcro for now for some of the connections, such as back/kidney/posterior. I'm going to use the industrial strength stuff (already have some on hand as you can see) - not the Anovos supplied as the glue just doesn't seem to stick to anything. I'll give it a few troops and if I'm not happy I can always remove it and go to snaps all the way. Cut down some split rivets to make snap rivets (my term) as I've seen others do: Then gave them a light scuffing and some paint (I've been using a Rustoleum enamel lacquer spray paint, seems pretty durable): Afterwards I marked out the holes for the ab/kidney where they're going to go, and then added some reinforcement shimming (assume this spot will get the most stress on it, and especially after cutting down my ab plate, better safe than sorry): (forgot to grab a picture of the kidney side, also shimmed, before it got dark) Then it was time to trim up the ab button plates: And finally, sizing/trimming of the forearms!: (Not quite done, but I'm tired and it's dark out) Hoping to wrap up the torso and forearms this weekend and then get started on the biceps/shoulders... then legs, strapping, and (hopefully) trooping!1 point
-
Thermal detonator is finished: Cut down the screws so I can use it as storage (or whatever): Also cut down the ab plate a tad (I'm a little short for a stormtrooper):1 point
-
As it turns out, of course I was overthinking the tops of the biceps. With advice from a local trooper (thanks Phil), I removed the return edge from the top of the biceps and trimmed just enough to level out one side to the other. The shoulder bells are trimmed and ready and, essentially, all that's left to do on the arms is strapping! During the early parts of October, I finished my Rubies blaster conversion: I sanded the body and used Bondo to fill in all holes left by screws as well as any seams between the two halves of the blaster. I then inserted rivets the rear sight and into the front of the blaster at what I presume would be the joints for the fold out stock beneath the barrel. After that, I primed and repainted the body using Krylon flat black for the body and Krylon semi-gloss for the grip. All that was left was to apply weathering. For that, I used metallic paint markers I found at Walmart.1 point
-
Today's focus was on cleaning up/upgrading the helmet. First I cleaned up the corners of the teeth, removed the overspray and repainted them. Meanwhile, I spray-painted Joseph's replacement ear screws (with a rather expensive screw-mounting apparatus!), then installed them. I also removed some of the excessive return edge of the eyes and painted the rims of the mic tips white. I'll replace the mesh with the screen-accurate one once that arrives:1 point
-
Playing some catch up, worked on disassembling the Anovos belt a couple days back: First I put down some painter's tape to help keep the plastic from getting too messed up: Then off came the rivets: And finally I removed the rivet caps... sadly (and I was too busy bleeding to take pictures!) I destroyed two of the three covers during removal, as well as quite a bit of damage to the belt and my thumb. This is a photo after the first round of ABS paste was applied: Afterwards I made some reinforcement strips from a for sale sign and glued/clamped them: That's it for now. Still need to sand/polish the front side, punch holes in the TKittell belt and re-assemble (thankfully I was able to source some replacement rivet covers from ATA).1 point
-
Great submissions so far you guys are killing it!! Sent from my iPhone using Tapatalk1 point
-
1 point
-
Another one:
 1 point
 -
Would obviously need a simpler version (5 or 6 colors) for the patch, but here's my submission:
 1 point
 -
Really good post! One thing I always do at armor parties if there are first-timers there is to start with an overview of the armor and do a full kit up and kit down. Many times this is the first exposure for someone seeing the armor in real life and how it all goes together. I've found this to be a very helpful part of armor parties. I've also started including mini workshops at every armor party with a "guest speaker" from our Garrison. Topics have included costume weathering, sewing, and prop painting/weathering. This has encouraged participation from those not just working on armor, and has led to more information and skill sharing in our Garrison.1 point
-
I'm interested by a Stormtrooper lightsaber, do you know another supplier or can I bought in confidence at Sabreforge ? A second hand can be ok for me if anyone want to sold his own saber please contact me ^^1 point
-
That is a nice One! Where can I get one of these?1 point
-
Ooh... Shiny! Any chance of obtaining the details of the supplier inc. cost etc?1 point
-
Very nice!1 point
-
Nice! Where is it from?1 point