Leaderboard


Popular Content
Showing content with the highest reputation on 07/13/2017 in all areas
-
More trigger frame pictures,, ive got the side plates cut out and attached to my prototype..Ignore the extra hole where the select fire switch is , they are there for me to test with. ill engrave the proper letters in production.2 points
-
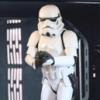
Here I go with my official RS Props TK build for the Vertically Challenged (also known as This TK Comes in a Fun Size). For those of you interested, I am 5'4" and 108 lbs. This is my very first armor build, so please feel free to jump in if you see me veering off course. I’m setting this kit to Stunt, with my eyes on the prize of Centurion. Since this build has many, many pages to it, I created an index so you don't have to wade through all of it if you don't want to. If you want to see the unboxing of my RS Props kit, just keep reading (it's further down the page). Here are the overview of topics so far: Some Things to Know Before You Go Diagram of Where to Cut/Trim for Shorties Making ABS Paste ABS Paste for Small Repairs, Heat Ironing New Thigh Returns ABS Paste for BIG Repairs (not for the Faint of Heart, Short of Time, or Chronically Impatient) Cover Strip Sizes Belt Corners and Ammo Pack Measurements Sizing Down the Chest Rebuilding a Return on the Bottom of the Chest (MUCH easier than using ABS paste, believe me) Recap of Where I Trimmed the Kit on the Torso Reinforcing Shoulder Bridges and Jig for Making New Returns Shoulders Shoulder Bell Trimming Shoulder Bell Fitting Shoulder Trim Points for Short Troopers Reinforcing Shoulder Bridges and Jig for Making New Returns Discussion of Shoulder Bell Shape Garter Belt, Shoulder Snaps Biceps Biceps Making Bicep Hooks Arm Strapping Abdominal Mods Painting Ab Buttons Reducing the Height of the Ab Cutting the Cod! Installing Inner Strapping Brackets Recap of Where I Trimmed the Kit on the Torso Shrinking the Kidney to Fun Size Shorten the Kidney (always remove from the BOTTOM ONLY!) and Rebuilding Returns Kidney/Ab Rivet Placement Kidney/Ab Rivet Placement Continued... More Kidney/Ab Rivet Stuff, Building the Belt, and Countersinking Screws Troubleshooting Kidney/Ab Not Lining Up on the Right Side- GAH! Fixing the Kidney/Ab Misalignment Issue Even More Fixing the Kidney/Ab Misalignment Issue…(The Sequel) Getting the Kidney/Ab Misalignment Thing in Order (The Final Battle) PlastiDipping the Helmet and Kidney/Ab Bracket Creation Kidney/Ab Bracket with Styrene Tab Installed, Discussion of Shoulder Bell Shape ABS Paste for Small Repairs, Heat Ironing New Thigh Returns Kidney and Butt Plates Get Into A Fight (Alignment Issues and Cracking) Detective Work on the Kidney/Butt Plate Connection (what's causing the cracks?!) Kidney and Butt Issues Worked Out Filling Out the Armor Shin Stuff Shin Fitting Shin Trimming for Shorties (Magic) Magnetic Shin Closures Part 1 (initial installation) (Magic) Magnetic Shin Closures Part 2 (magnetic closure improved) (Magic) Magnetic Shin Closures in Action (video!) Sniper Knee Giddy Up! Home Grown Stirrups (not a tutorial) Thighs for the Vertically Challenged Leg Adjustments Leg Adjustments Continued... Assembling the (New) Thighs and Heat-Bending the Belt Sizing the New Thighs and Padding the Lid Installing the Ammo Pack ABS Paste for Small Repairs, Heat Ironing New Thigh Returns Fine Tuning the New Thighs Initial Left Thigh Trimming (not yet there, but dang close) Reworking the Back of the Right Thigh Final Right Thigh Trimming and Spiffy New Returns Using a Heat Iron New Garter Belt Rebuilding a New ANH Notch on the Left Thigh Handy Gloves Getting a Curve on Latex Handguards Love to the Lid Ditch the Brush! Sponge On the Tube Stripes! DIY Fan Bracket (not a tutorial) Sizing the Thighs and Padding the Lid All Together Now Test Fitting It All! And Feedback Is A Good Thing (time to fine tune it all…) Initial Submission Pics! Thank Yous! (My Version of the Academy Awards Acceptance Speech) Advanced Tactics Time for Apply For the EIB Fixes Before Applying for Centurion Time to Apply For Centurion Armor Has Been Built... But There's Always More to Do Displaying the E-11 Mystery Purple Stains Showing Up On the Armor- SOLVED! Test Driving the Kit (All Systems Go!) SOLVED!- E-11 Holster Stretch Issues Field Exercises Reports of Rebel Scum in a Nearby Quadrant (First Outing Away from Base) Star Wars Celebration Orlando 2017 (First Really Big Outing Away From the Death Star) Whew! ****Let the build begin!**** But first, I'd like to share some Star Wars cookies I made with my son awhile back. Because everyone loves cookies. Wookiee cookies are awesome because they're chewie. And yes, I know my TK cookies are not screen accurate. Everyone got a cookie? Okay, good. To the unboxing! I want to mention how awesome of an experience it was to purchase a kit from RS Props. They were professional, courteous, and always highly responsive to my (many) questions. I received my kit in just a little over two weeks after I’d placed my initial order. And that included shipping from the UK to the US! I’ve heard that in the past, RS wasn’t always as responsive or easy to obtain armor from. That was not my experience at all with them. I’d buy another kit from them in a heartbeat. I ordered the 1.5mm ABS kit, and it’s lovely. A nice milky creamy white, complete with all the bumps and lumps you’d expect from it. Someone wrote that they appreciated it when armor has that 'craptastic' look, and I think now I understand what they were talking about. A sanitized, perfectly smooth and symmetrical TK is not attractive to me at all. Now, to open the big big box... I felt a little dizzy with excitement at this point... First, the scent of the contents. An invisible wave of the smell of fresh ABS hit me as I peeled away the bubble wrap. I have found that I enjoy the smell of ABS now after building my first helmet. It smells like... victory! Ah, this is going to take a while to unwrap it all... Twenty minutes later.... Yay! It's all in great shape. You don't need to see all the close up pics of every single piece, right? Very surprised to see that every single piece is LABELED. I've stared at so many armor builds that I think I know what's what, but it's still nice to see labels so I don't have to think quite as much. Also surprised to see that the ears have been pre-marked for shaping. I wish that an additional set of ears was included with this kit though. That's okay, though. I've already built one lid and have overcome my issues with the ears, so I think I'll be okay (knocking furiously on wood). Sweet swag pack inside, too. Love the stickers! I noticed that the color is different than my ATA lid, so here are a few side by side comparisons... The RS is more creamy white, the ATA is brighter. The RS is way more bumpy/lumpy than the ATA, but also has more sharp features. The RS lid is thinner, especially around the area of the mic tips. I will most likely reinforce the inside of this thin area with some ABS paste. I’ll also be plasti-dipping the innards, so that should increase the heft of the bucket overall. And I could be wrong here (because the RS lid isn't finished yet), but the RS lid seems a bit larger than the ATA. Verdict: I really like them, despite their differences! Very glad to own them both. If I have one grumble- and it's a very minor one- it's with the Hovi-Mic tips. They are kind of sloppy. You can see the casting of these is a bit of a mess. You can also see someone's thumb print from the CA glue and extra CA glue drips on the side. I'll probably repaint these. And you can see the CA glue inside the mesh screen in the middle of the tips. I'll poke these out with a toothpick. Again, this is a super minor grumble. You can't really see most of the mic tips once they're installed anyhow. These mic tips wouldn't have stopped me from buying this kit! I'm a very happy soon-to-be trooper! I'm going to need to do a LOT of modifications to this kit to get it to fit my 5'4", 108 lb frame. I’m terrified of this whole process now, actually. I’ve been re-reading Diana’s thread http://www.whitearmor.net/forum/topic/25919-dianas-rs-props-build-anh-stunt which has loads of info for modding an RS kit to a more petite body type. So. Let's do this!1 point
-
I'll just let the pics do the talking (sorry, late night and i'm exhausted after finishing only step 16 of 600 of the Lego Ghostbusters Firehouse for my kids)1 point
-
Name: Jay Piazza Legion ID: TK-69937 Forum Name: Heavy Metal Garrison: Dune Sea Garrison 501st Member Page:http://www.501st.com/members/displaymember.php?userID=21273&costumeID=124 EIB LINK: Height: 6'0" Weight: 205 Armor maker: Anovos Helmet maker: Anovos Blaster: Scratch built Canvas Belt: Kittle Holster: Darman Internal Strapping: TK-1636 Hand Plates: JustJoseph63 Boots maker: TK Boots/Size 11 Neckseal: Anovos right arm trimed Shoulder bells moved closer to cover strap made a new batch of ABS paste, filled seam and sanded. also evened up the line under the belt.1 point
-
Thanks! I kept seeing the Plasti-Dip mentioned over and over, and the benefits seem to be worth the $5 in materials and extra hour of work. The helmet is thin and lets in a lot of light, and this sounds like a good way to cut down on that and dampen some of the echo. Personally, I also love the way it looks--it's what I would expect inside of a stormtrooper's helmet to look like, especially with the electronics added.1 point
-
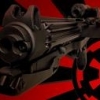
Hot off the press and using the newest TINY display and driver board, Bulldog's M38 scope kit fitted with custom electronics. Everything fits inside the main front collars including a convex lens, red acrylic cover and the display itself. and a quick video... https://youtu.be/ZNMxuq9ewi4 Brian, can you hit my up on PM or FB messenger please, I seem to have lost some of your details! Paul1 point
-
Thank you very much!!!!1 point
-
Congrats Juan! Welcome to Centurion!1 point
-
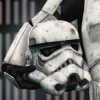
I've been alternating working on the helmet and armor the past few weeks. I started with cleaning up the teeth. Anovos left a lot of extra material between the teeth, so I used small file set to reshape everything and open up the spaces between the teeth. You can see the before (left) and after (right) in the photo below. The eyes also got a quick sanding to smooth out a few places. After sanding, I disassembled the helmet to prepare it for plasti-dip and replacing the brow trim, lenses, and ear screws. The Anovos brow trim was about 1.5" too short, so it will be replaced with one from Trooper Bay (you can see in the top photo the difference in length). The Anovos ear screws are close, but I'm still going to replace them with #6 machine screws. I've also been working on the leg armor. I started with the thighs and after test fitting them with the body armor, decided to only trim the backs. I ended up taking at least 2" off the top of the back pieces. Here's a comparison of the cut vs. uncut pieces (and the final cuts are even deeper than shown here, I just didn't get an updated comparison pic). After getting the thighs trimmed, I added the shin pieces and tried everything on. I'm very happy with the fit and even happier that I started with the body armor first. When I was first cutting out the pieces, I was certain I would need to trim the width and length of the leg pieces, but it turned out that trimming was only necessary on the backs of the thighs. The shins will need some padding to keep them from sliding around, but everything looks proportional. I kept a 1/8" return edge on all of the leg pieces, except for the bottom of the shins (removed completely).1 point
-
Testing.. Testing.. (helmet progress 50%)1 point
-
I get asked that quit alot... Dont see why not .. i did aquire the scope to copy whe n the time comes.1 point
-
You can contact Imperial Gaskets on the forum here for rubber or cloth gaskets. I've heard nothing but good things about them. Personally, I used Geeky Pink's Phantastic Gaskets via FB at the recommendation of a garrison mate and am very pleased with them. She made me a harness to fit it all together as well as a neck seal. Just PM her for details. She is very quick on response and in her turnaround time. https://www.facebook.com/GeekyPinksPhantasticGaskets/ EDIT: Gah! Jayben Kenobi Ninja'd me!1 point
-
Here you go: Imperial Gaskets- Sells Cloth and Rubber Gaskets https://www.whitearmor.net/forum/topic/31019-imperial-gaskets-new-style/ Geeky Pink's Phantastic Gaskets - Sells Cloth Gaskets only https://www.whitearmor.net/forum/topic/40849-i-am-sewing-fabric-gaskets-neck-seals-and-harnesses-fo-and-ot/ My advice is to go cloth. Doesn't hold in the heat as bad and you have more maneuverability. But everyone likes something different!1 point
-
Great info. Can you point me in the direction of whom you ordered for both? Thanks1 point
-
I´m wondering if he may offer the Sterling based rebel-blaster at some day, many basic parts can be used from this Sterling.1 point
-
Congrats Juan and welcome to the centurion rank!1 point
-
Ääääh, definately "no". A good second one, but nothing can compete with the real parts.1 point
-
Me too. This is an awesome E-11. It will be the best available.1 point
-
Can't wait. Can't wait1 point
-
I have both snaps and velcro. The snaps were holding fine by themselves, but adding the velcro makes it easier to put on and quite sturdier.1 point
-
Additional Helmet Detail While I'm still waiting for the actual armour to come in, I toyed around a bit more with the helmet. A new liner that is far more comfortable than the hard hat liner that came with the helmet is now in, the fans are ready to go, and the interior is now tidied up. Here's what I fiddled around with today. I picked up a handful of these motorcycle helmet replacement liners a few weeks ago for some other helmets I was working on. They are amazingly comfortable, so I decided to use this instead of the liner that came with the Anovos lid. Untitled by Taylor Goodson, on Flickr It fits in quite nicely - I use a trio of industrial velcro strips to hold it in against the helmet. Untitled by Taylor Goodson, on Flickr The liners also come with a pair of earcaps, so I installed those as well to get a more snug fit around my head (I've got a relatively small noggin). Untitled by Taylor Goodson, on Flickr I also picked up another set of Henry's Helmet Fans (I used them in my AT-ACT Driver bucket with much success). I had no idea they were now available via TrooperBay, so I snagged a set while shopping over there. Untitled by Taylor Goodson, on Flickr I installed the pair of fans right next to the cheek cutouts with the air directed right toward the lenses to keep them nice and fog free. Because of the angle of the area, the fan would sit blowing air right into the raised plastic portion of the face. I made a little ABS ramp to angle the air flow over that plastic and up to the lenses. Untitled by Taylor Goodson, on Flickr The Henry kits don't come with anything fancy for cable management such as brackets or the like, so I used a bit of plastic conduit to hide my cables. Once everything was in place, I used a bit more industrial velcro to hold down the conduit within the deep rim of the bucket. Untitled by Taylor Goodson, on Flickr Finally, I installed a few velcro strips to hold in my Aker USB power bank to power the fans. Untitled by Taylor Goodson, on Flickr Here's the new interior look to the bucket. Untitled by Taylor Goodson, on Flickr The fans run right up to the lenses and over my face, so that will be nice to keep things a bit cooler. The liner with the ear cups is incredibly comfortable in comparison to the helmet liner, so I'm quite pleased with that. After these little updates, I'm more excited than ever to get to building this thing!1 point
-
Hi Marc. Sorry it took me so long to answer you. I definitely recommend ANY Rubies conversion. The plastic is very easy to work with and with very little effort you can get a great improvement. Mine has become an obsession but you can find around here many threads that with a lot less modding get to a great looking pieces. Probably if I had to start all again I'd do some things differently or even easier. good luck on your mod and if there is anything I can help you out just let me know. I'm here also to learn from all of you.1 point
-
Ooooh! Ooooh! Man, this is one costume that is hard to get right and you are off on a great first step. Usually the weathering is too abrupt, but you are ROCKING IT! Do try to go Centurion on this - we have so few TKC Centurions and it would be great to replace me as the CRL model. Mine was the best of the best at the time, but people can do so much better nowadays.1 point
-
I'll add my vote to the 2 piece. I tried off brands, but personally like Under Armor best. Very comfy and lasts years. Actually, I bought two sets: one heat gear and one cold gear. Why? Sometimes it's hot, and some troops it's cold. Nice to have some options..1 point
-
Many thanks Joseph, much appreciated, you are always so helpful. Will check all these links. Enjoy your weekend.1 point
-
Thank you so much Jon, very helpful. Will check it. Have a nice weekend.1 point
-
Loved this quote: "You have no guarantee they will be in business... in a month the way this disaster is rolling out." Really curious to see if others will follow, or if photobucket goes down now...1 point
-
Just recently, most of our photo links broke and we are currently working to bring back all the content. This might take a while and to provide an interim solution, please check chapter #32 (Downloads). There you'll find a printable PDF with most of the information from the thread. We will update you again, when the issue has been fixed. Sorry for any inconveniences.1 point
-
This is my view on the matter Sent from my Imperial data pad using Tapatalk1 point
-
Found this evidence of the black. https://goo.gl/photos/sKNav3b8GdL3DXBa61 point
-
Tony, if you can provide good resolution front/back photos, we can get the IPM team to clean them up, or Eric may decide to have the LMO team do that. Here is when it was 97% done, but I'm sure you want the one that is 100% done. Also, we'll need text to support it, like: L1: * The vest shall be black. * It shall have 5 lower black pouches, and three upper pouches with white armor plates. * There are three straps total, two that attach to the upper front corners and cross in the back, and one that is attached on the bottom that runs around the torso L2 * Outside two black pouches should have front folding closures. * The three inner pouches hall have two horizontal webbing straps on them. That can be a good start for now.1 point
-
Also you guys can used the vest photos from the build thread if you wish. http://www.whitearmor.net/forum/topic/34011-ukswraths-first-order-heavy-gunner-flyye-vest-modification/ I can provide more detailed pictures obviously if needed1 point
-
Reports arrived that rebel scum had been spotted at a nearby park this morning, so off I went to survey the area. This area of the docks appears clear. I secured this area as well. Off in the distance I heard what I thought were droids. Look sir! Geese! How disappointing. Not a single droid or rebel scum captured today. Trying to look on the bright side, though. The area is secured! So let's party! Just don't lose your balance and fall in the water... My work today is done. Long live the Empire!1 point
-
The CRLs have recently been changed to reflect a number of things, and to set some standards. Are they 100% accurate? In a word, no. I understand your concerns about accuracy, believe me, and I have stated many times before that the pack (as seen in the game) would be extremely difficult for the average Trooper to build if constructed to match the screen caps exactly. If that were the case, none of the packs currently being used by any HWT would be permitted. We work with what we have available, which includes oil pans, cardboard, plastic containers and PVC. We have to allow for the fact that not everyone has access to the same materials, and therefore some minor variations are permitted. There are also other impracticalities to going 100% accurate at this time: Many HWTs use their current armor for "double duty", which gives them the ability (and luxury) to use it as both as that and as a regular TK when the need arises. If the tube stripes and lenses were black, this would be impossible without purchasing another helmet. Besides, no one currently makes black lenses. The same thinking is considered for the black buttons on the ab. If we wanted to get really precise, the following would be mandatory: 1. TDs are not round, but octagons. 2. The thigh ammo pack is not rounded at the bottom of the rear bottom corner, 3. There are no buttons on the ABS belt. 4. The top of the lower cannister has horizontal ribs. The bottom is is smooth and conical. 5. The only 2 colors allowed on the pack are black and bluish gray. The bluish gray is only located on the bottom of the lower cannister, the top cannister, the vents and 4 buttons. 6. The pack frame would need to be at least 7 to 8 inches thick, as shown in the game. 7. The pack would have to have squared corners, not rounded. Canvas MP40 pouches were allowed at first, probably because of the cost factor. In the screen caps, there is a distinct "shine" on the tops. Leather can be shiny and reflect light... canvas can not. The vast majority of packs currently built do not have room for a TD, which is why this is an option. The present CRL states that all pauldrons must be orange for all new approvals. Those with other colors have been "grandfathered" in, the same for those who currently use canvas MP40 pouches. I completely understand everyone's concern regarding accuracy, but again, we have to be practical. Our main goal as HWTs is continuity, and perhaps one day many years from now things will change but for now we have to set some standards while still allowing for a few variations. We are such a small number of characters that I highly doubt that the general public (or even the majority of Troopers) will notice the small inconsistencies. At the end of the day, It's all about getting out there and having fun trooping.1 point
-
Some news from trimming.. Chests are trimmed, but there are some bad trimming from KB props.. And there is another problem.. Yoke doesn't aligns with back because KB props bad trimmed it.. Any solution?1 point
-
yeah boyyyyy!!! Sent from my iPhone using Tapatalk1 point
-
Thanks for that, Luc! I like the look of the returns on the shins, and not having them there would have annoyed me every time I put the armor on. I don't think many would have noticed except for me, but it's one of those details that I couldn't live without. Something I’ve been happy to discover during this build is that Rob and the support team over at RS Props is fabulous. Initially, I had contacted them about the problem with my kit containing two right inner forearms. They were quick to respond and remedy things by arranging to send the correct left inner forearm right away. As I was waiting on that forearm, well, that was around the time when I screwed up my shins. I had put my shins away and decided to work on my shoulder bells instead. There is a pinched area of ABS at the top of the shoulder piece, and I emailed Rob to find out how to cut it down. See? There are no cut lines on it, and I didn’t know where to start. Also, I thought it would be a good idea to ask about ordering an extra set of shoulder straps for my kit. I’ve seen them crack on more than one set of armor (although not necessarily RS armor), so it’s something I wanted to have on hand as backup. At this time, I decided to tell Rob about how I’d butchered the shins. Admitting my mistake to him was humbling, to say the least. Again, I was mortified that I’d made such a stupid error. Here’s an example of what my shins had been hacked down to: Rob emailed me back very quickly with measurements and photos of how to trim the shoulder bells. (For all of you following along, it should be 12" from the bottom of the spine to the trim, then 5" from the edge of the spine to the trim.) Then he told me that he would have everything- shoulder straps, left inner forearm, and two sets of shins- ready to send out the next day. I was confused because he hadn’t mentioned the cost for it all, and I hadn’t submitted any payment. I became concerned at this point. Frustrated, I figured that I would just pay whatever he told me because even if I couldn’t afford it, I still needed it. Oh well. I asked him once more how much to pay for everything and braced for the reply. I was extremely surprised by the response. Rob told me that he was happy to send it all out to me for no charge. He said it was because they want to support their clients with their TK kits, that the people at RS Props are fans first and foremost, and that it’s not all about the money to them. If I hadn’t been sitting in my chair when I read that email, I think I would have fallen onto the floor. Talk about amazing customer service!!! Everything arrived to me safely two days later. That’s two days from the UK to my home here in Georgia. So flippin’ fast! Moving along, I trimmed down my shoulder bells. You can see how much needed to be removed. This was before I sanded them smooth, but you get the idea here. And now I’m making all my returns about 6mm wide. I’m using the super high-tech process called pencil-taped-to-my-finger. I don’t remember where I saw it first used, but it helps to create a fairly consistent line to trace the return before cutting.1 point


.thumb.jpg.94b4530d0ee2f5b042747b027d82c5c9.jpg)