kittyvangogh
-
Posts
32 -
Joined
-
Last visited
About kittyvangogh

Recent Profile Visitors
1,096 profile views


-
EIB Approved! Link to approval thread
-
 All Centurion recommended changes are complete, just need to re-take photos and submit.
 -
Request your EIB Certificate here:
kittyvangogh replied to justjoseph63's topic in Request Expert Infantry Status
Brittany Huff 63088 EIB Letter Andrew http://www.whitearmor.net/eib/certificates/63088-eib.png -
Thanks! I'll make the suggested changes and submit for Centurion ASAP
-
Thanks for the tips, Michael! Looking at the thighs and butt plate, I think the strapping is just a little too tight, so it should be easy to fix if it's an issue. I left a slight return edge on the tops and bottoms of the butt/kidney/back plates (around 1/4 inch), so they are able to butt together. I'm planning to submit for Centurion as well (everything was built with that in mind), so I'll just make a stop at the hardware store and swap out the TD screws. Thanks again!
-
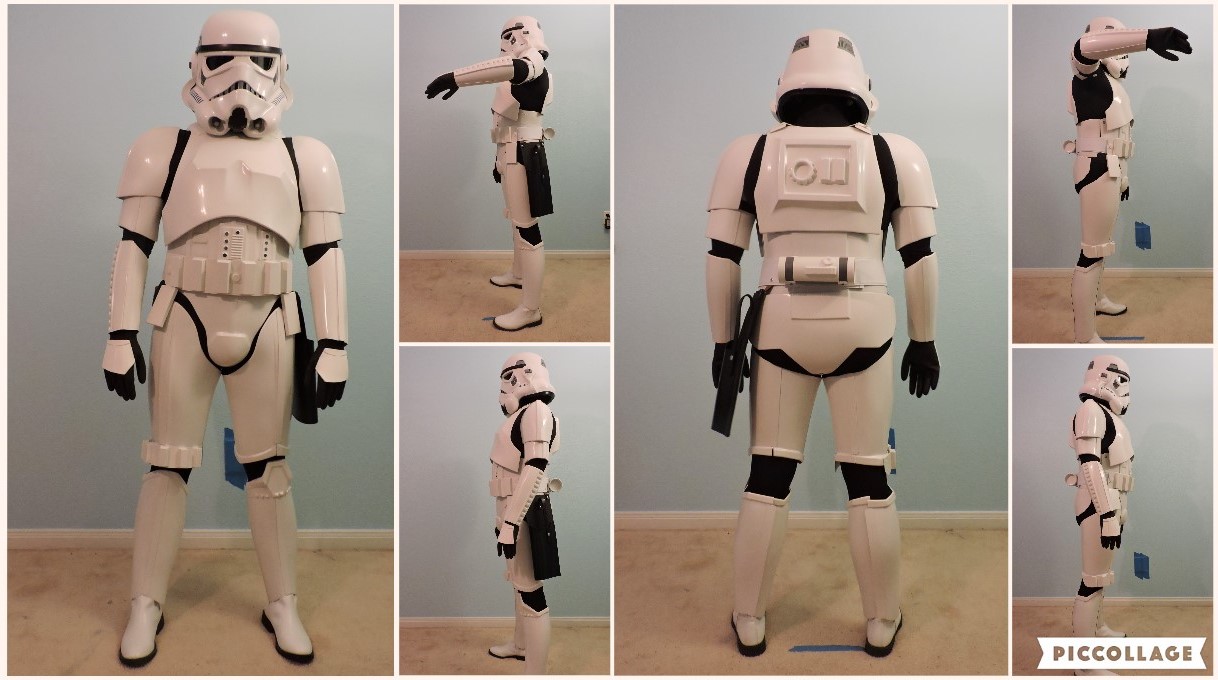
Name: Brittany Huff 501st ID: TK-63088 Member Page: https://www.501st.com/members/displaymember.php?userID=25777&costumeID=124 FISD Name: kittyvangogh Garrison: Star Garrison Mandatory Information Armor Maker: Anovos Helmet Maker: Anovos Blaster Type: Hyperfirm (E-11 & DLT-19) Optional Information Height: 5' 7" Weight: 160# Boots: TK Boots Canvas Belt: Imperial Issue Hand Plates: Trooper Bay (Rubber) Electronics: Fans (Henry's Helmet Fans), Voice (Trooper Talk) Neck Seal: Darman's Props Holster Maker: Anovos Front Back Left Left Detail Right Right Detail Action E-11 Action DLT-19 Ab Detail Strapping Cod-Butt Connection Chest-Back Connection Forearm Return Edge Thigh Pack Attachment - Outer Thigh Pack Attachment - Inner Sniper Plate - Left Sniper Plate - Right Helmet Front Helmet Back Helmet Side Hovi Tips Lens Backlit S-Trim Neck Seal TD Back Belt - Front Belt - Back Details Boots - Left Boots - Right Gloves Hand Guards E-11 Left E-11 Right DLT-19 Left DLT-19 Right Thank you for your consideration!
-
TK-63088 reporting for duty!


-
Requesting access TK-63088 http://501st.com/members/displaymemberdetails.php?userID=25777
-
All of the Level 3 hardware has been set, the belt assembled, and the elastic strapping is installed -- meaning that the armor assembly is DONE! I'll be spending the rest of today sanding sharp edges, cleaning off excess glue, and polishing. Every surface of my work room is coated in ABS dust, so just a friendly reminder to stay safe when building. Hoping to get photos tonight and submit!
-
There are dozens of us! It's been super helpful for staying organized, and gave me something to do while playing the waiting game with Anovos.
-
I spent the week finishing up all of the small details on the armor. I used leftover material from the inner coverstrips to make reinforcing strips for the shoulder straps. Attached the sniper plate to the left shin. I glued the center first, clamped it in place, and then glued the sides. Helmet is finally finished. I installed the new lens from TrooperBay (much clearer and darker than the Anovos supplied one), trimmed reinstalled the frown mesh, installed padding, and mounted the fans (from Henry's Helmet Fans), battery, and wireless mic. The wiring is hidden with some plastic wire wrap I picked up at Harbor Freight. Glued elastic into the shoulder bells. For the thermal detonator I started by installing the end caps (lightly sanded the edges of the tube and heated the caps with a hair dryer). I then centered the panel and glued. I then mounted the metal clips, replacing the Anovos screws with #6 slotted pan-head machine screws (taken from an electrical outlet cover from Home Depot and painted black)--the first photo shows a comparison of the screws (Anovos on the right, replacements on the left). The Anovos drop boxes came unassembled. I started by mounting the elastic loop to attach the drop boxes to the belt (used E-6000 and clamped), and then glued the front and back pieces together (taped instead of clamped). I stared the week feeling like I was only 50% finished, but I'm probably closer to 90% ! I began installing snap "plates" using the BillHag charts. I installed as many plates as I could, but eventually ran out of magnets and clamps. I already had the snap plates prepared (this was done while I was waiting on the armor to be delivered). The double plates are mounted in 2" strips of nylon, with 1" spacing between centers of the snaps, and the single plates are 1" pieces of nylon with the snap centered (I bought a cheap soldering iron to make the holes in the nylon). Edges of the cut nylon were sealed with a lighter to prevent fraying. Snaps are from Tandy (Line 24), and were installed with rubber washers for a better fit with the nylon "plates" (I tested plates with and without the rubber washers, and the washers added a noticeable amount of strength to the setting--no worry of the snaps pulling out of the nylon). Washers can be found on Amazon (https://www.amazon.com/gp/product/B00L1IZF28/ref=oh_aui_detailpage_o00_s00?ie=UTF8&psc=1). I've gotten a lot of comments on how organized everything is, and figured I should share my methods. I am not an organized person, and I knew with how much is involved with this build, I needed to do something to stay on track. The solution -- TRELLO! I've included some screenshots, but basically you can create visual lists and organize everything (To-Do, In Progress, Completed, etc) and move items around as you work on them. Even better, you can create checklists within the individual items. I used the checklists to copy and paste the CRL requirements for each item. I could then check stuff off as I completed it, look through the checklists when I wasn't sure what to do next, and I would have the list up anytime I was working on a piece. The software can take a little getting used to, but it's free and useful for other things as well (I've used it for both work and personal projects). This weekend I hope to finish installing the last of the snap plates, and begin sewing the elastic for the actual strapping (and setting more snaps). I have already marked the locations of the Centurion-level hardware required on the Ab, Cod, and kidneys, so I hope to install all of those hardware pieces as well.
-
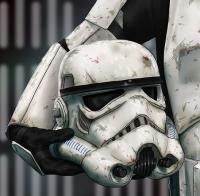
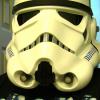
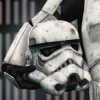
Finished up the Biceps by adding hooks for the shoulder elastic. I cut some scrap ABS into rectangles, taped to a wooden paint stirrer, heated with a hair dryer, and bent to shape. Attached the ammo pack to the right thigh. Used the split rivets supplied by Anovos. I've been waiting for a break in the humidity so that I could plasti-dip the helmet, and finally got one this past weekend. I started by disassembling the helmet and taping around the edges, eyes, and teeth. I used a 1" foam brush to apply the first layer of plasti-dip (no photos, it was hot and I was trying to spend as little time as possible outside). For the second and third layers, I just poured the plasti-dip directly into the helmet and tilted it to get a more even coating (and used the brush in the raised areas). I removed the painter's tape 20 minutes after the last coat was applied (left image), and let it sit outside all day to help with the odor. After 24 hours, I went over the teeth and eyes with an X-acto knife and mineral spirits to clean up any overflow (right image). Helmet is mostly reassembled (still need to put in the new lens and frown mesh), new brow trim installed, and teeth have been repainted. Shins have been fitted and sanded--I'm just waiting on the cover strips to dry (apply inner, wait 24 hours, apply outer, wait 24 hours). I missed taking pictures of the forearm trimming and fitting--I had to remove 1" from the circumference (top and bottom) and was too focused on not messing anything up. They are also at the assembly stage (apply inner strips, wait 24 hours, apply outer strips, wait 24 hours). Some version of this has been going on for the last two weeks. I'm hoping that I'll be ready for at least basic approval by the end of this month. I just finished up my corporate job and I'm back to being self-employed, so I will actually have free time again. Thank you to everyone for the kind words and encouragement!
-
Worked on the Biceps this weekend. They were huge on my arms, so I ended up trimming around 1" from the overall length, and 1/2" from the circumference. Here's a comparison pic of the trimmed piece vs. the original. Glued inner cover strips, allowed to dry, then glued outer cover strips.
-
Spent the weekend finishing up the thighs. Sanded everything smooth and purchased a plastic "no parking" sign from Home Depot to make inner cover strips (I probably had enough scrap ABS to make inner strips, but this was much quicker). Tape the thigh pieces together, add glue to the cover strip, and clamp. Allow 24 hours to dry. Once the inner strips were dry, I removed the painters tape and attached the front cover strips. After another 24 hours, thighs are assembled.
-
Thanks! I kept seeing the Plasti-Dip mentioned over and over, and the benefits seem to be worth the $5 in materials and extra hour of work. The helmet is thin and lets in a lot of light, and this sounds like a good way to cut down on that and dampen some of the echo. Personally, I also love the way it looks--it's what I would expect inside of a stormtrooper's helmet to look like, especially with the electronics added.