Search the Community
Showing results for 'chelsea'.
-
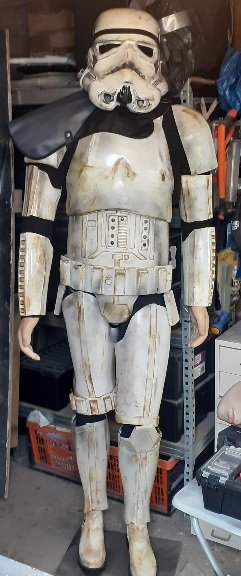
So I found a set of Trooper armor that I had forgotten about after moving house 3 years ago. It's a mix up of ABS, Fiberglass and god know what else but it was not in a good state and cracked discoloured etc. I was going to buy new ABS leg armor as FG is a pain in the an impolite person to work with, but I decided to use it and just heat and shape it to the mannequin. Found a pair of white chelsea boots on eBay, brand new for £11 posted and bought new but unused pauldron for £25. Just hands and gloves left now. Got another helmet and decided to do a sandy. I know the ab plate, and knee piece are not accurate but I can't moan. It's nice when something is saved from being thrown away sometimes. Paintjob isn't the best but for a budget build I'm happy.
- 1 reply
-
- 2
-

-
AM or RT are best for the taller trooper, a few threads of info for you: Boots will a little more difficult for size 16, I would suggest trying to find a pair of Chelsea type boots and recolour white. You could also try Crowprops who do make to order, not sure if he goes up to 16 though https://crowprops.bigcartel.com/product/jhodpur-tk-white-short-boots
-

wip Stormtrooper ANH, RS Prop master.
CallMeMrTibbles replied to The Vegan Stormtrooper's topic in ANH Build Threads
Hi Paul, I'm also vegan, 6'4" in my socks and no helmet, and in the UK. Really cool to see you here. Below are what I used, just to give you some ideas. I got my boots from Asos https://www.asos.com/asos-design/asos-design-chelsea-boots-in-black-faux-leather-with-black-sole/prd/21328697?ctaRef=my%20orders And dyed/painted them white https://www.amazon.co.uk/dp/B000P5H6Z2/ref=cm_sw_r_cp_apa_glt_fabc_5Q3F2XEFAXJN9Y5C8CFG I got my holster from Burkbench (just ask for faux leather) https://www.facebook.com/burkbenchdesigns/ And my neck seal (along with my armour) from RWA. For the blaster I went for a rubber Sheartech e11 https://www.facebook.com/sheartech/ If I have forgotten anything or you have more questions just ask! Finally, I totally understand when you say about being shy and unable to approach people. If we're ever at an event together (I'm sure we will be) it will be a pleasure to meet you, and we can look for the vegan fast food stall together! [emoji1] All the very best with your build, Rich -

wip Stormtrooper ANH, RS Prop master.
The Vegan Stormtrooper replied to The Vegan Stormtrooper's topic in ANH Build Threads
Yeah I just touched base with my armourer from the uk Garrison. And he mentioned that I should buy some black or brown Chelsea boots to paint/ dye white. Sent from my iPhone using Tapatalk -

Diana's RS Props Build- ANH Stunt
AsBlondeAsLuke replied to AsBlondeAsLuke's topic in Build Threads Requireing Maintenance
Adam, so good to hear from you! My trooping buddy! It's funny as I had the opposite problem in the beginning. My hand guards were almost sand trooper beige and my armor looked whiter by comparison. You can see this in the pics we took together up above the Golden Gate Bridge. This bugged my OCD to end until I figured out a very simple solution. When I polish my Chelsea boots, I also give the hand guards a light coat of white shoe polish. It worked wonders. I continue to "polish" my handguards to this day. https://imgur.com/a/FcNyJ2e -

BlueBoxFromSpace ATA ANH Stunt (first build)
BlueBoxFromSpace replied to BlueBoxFromSpace's topic in ANH Build Threads
Haven't had time to post lately... So here's an update dump. Here's where we're at with the belt. I still need the holster. I was originally going to try to make one but I think I'll just buy one instead. I also ended up switching out the snaps for Chicago screws. So much easier. I don't know why I didn't do that from the beginning. I think I was just resisting buying another type of fastener for some reason. I'm also going with velcro for now to hold it belt in place on the armor. I'll probably switch to snaps eventually though. I started the TD. After a lot of sanding to get the caps to fit, I painted it with just a grey primer for now. Is there a specific color and finish for the TD? The pics I've seen look like it has a slightly glossy finish. I also finally glued on the Ab button plate. You can also see here the velcro for the belt. I finally mustered the will to continue on with the shins. For me this was one of the most challenging parts of the ATA kit so far. The right shin wasn't bad but the left shin had some issues with the fitting. This is apparently a common thing with this kit. I think a lot of people solve this with either a hot water bath or heat gun to reshape it a little bit. I'm not comfortable with either of those techniques yet so I just made it work the best way I could. I decided to go with velcro for the closure method on them. I felt like that was the easiest in this case. It's a little hard to see here but this shows the difference in the ankle sizes. The one on the left is the right shin and vice versa. You can also see some Velcro on the inside of the ankle. I'm having the issue of my shins popping off of my boots and I'm trying out some ways of keeping them on. Speaking of the boots... I got some cheap black Chelsea boots on amazon and painted them white with some spray paint thats for painting car interiors (vinyl, fabric, and leather). And it immediately started cracking... lol. I like the way it looks though. I'm just not sure how long it's going to stay on. Hopefully long enough for me to get a proper pair of boots. Also you can see where I added some Velcro to keep the shins in place. So I think all I have left for the armor part is finishing the TD, getting a holster, putting the ammo belt on the thigh, and adding the sniper plate to the shin. As far as the sniper plate goes I marked out some guide lines for where to cut. Do these look good? And how much edge gets left underneath? (Don't mind the line there. ) I feel like I'm almost there and I'm getting excited. I'm just super nervous about moving on to the helmet... -

[75] TK42413 Chopper857's Troop Diary
Chopper857 replied to Chopper857's topic in Field Training Exercises
Right time to pull my finger out and get this updated, using my UKG record following on from albert hall troop Been trooping Kylo in 2019 so TK has eased off will do some pic collages to add as well 07 July 2019 Star Wars Wedding ~ BRENTWOOD (Stormtrooper: ANH Stunt) 04 July 2019 Lisa William's Celebration of Life ~ FELTHAM (Stormtrooper: ANH Stunt) 30 June 2019 SEVCVC Annual Classic Car Run ~ Southend on Sea (Stormtrooper: ANH Stunt) 22 June 2019 Summer Fete ~ MALDON (Stormtrooper: ANH Stunt) 07 June 2019 Dreamnight ~ COLCHESTER (Stormtrooper: ANH Stunt) 18 May 2019 Mitchell's Miracles Fundraiser ~ ROMFORD (Stormtrooper: ANH Stunt) 04 May 2019 Star Wars Wedding ~ STANFORD-LE-HOPE (Stormtrooper: ANH Stunt) 10 April 2019 GOSH Ward Visit ~ LONDON (Stormtrooper: ANH Stunt) 24 March 2019 MCM Comic Con: Birmingham ~ BIRMINGHAM (Stormtrooper: ANH Stunt) 23 March 2019 MCM Comic Con: Birmingham ~ BIRMINGHAM (Stormtrooper: ANH Stunt) 13 February 2019 GOSH Ward Visit ~ LONDON (Stormtrooper: ANH Stunt) 13 January 2019 London Taxi Drivers' Mad Hatter's Party 2019 ~ LONDON (Stormtrooper: ANH Stunt) 27 December 2018 The Best of John Williams ~ LONDON (Stormtrooper: ANH Stunt) 12 December 2018 Henry Allen Trust Hospital Visit (Stoke Mandeville) ~ AYLESBURY (Stormtrooper: ANH Stunt) 25 November 2018 MCM Comic Con: Birmingham ~ BIRMINGHAM (Stormtrooper: ANH Stunt) 24 November 2018 MCM Comic Con: Birmingham ~ BIRMINGHAM (Stormtrooper: ANH Stunt) 27 September 2018 Funeral ~ LONDON (Stormtrooper: ANH Stunt) 22 September 2018 Star Wars Wedding ~ WORTHING (Stormtrooper: ANH Stunt) 15 September 2018 GOSH PICU Past Patients Party ~ LONDON (Stormtrooper: ANH Stunt) 01 September 2018 Invasion Colchester ~ Colchester (Stormtrooper: ANH Stunt) 28 August 2018 Hospice Visit ~ CHELMSFORD (Stormtrooper: ANH Stunt) 28 July 2018 London Film and Comic Con ~ LONDON (Stormtrooper: ANH Stunt) 22 July 2018 Wings And Wheels ~ UPMINSTER (Stormtrooper: ANH Stunt) 21 July 2018 #TOGETHER ~ LONDON (Stormtrooper: ANH Stunt) 15 July 2018 Upwards with Downs Fun Day ~ HARLOW (Stormtrooper: ANH Stunt) 05 July 2018 UCLH event to celebrate 70th Anniversary of the NHS ~ LONDON (Stormtrooper: ANH Stunt) 01 July 2018 SEVCVC Annual Classic Car Run ~ Southend on Sea (Stormtrooper: ANH Stunt) 30 June 2018 Chipfest 2018 ~ WITHAM (Stormtrooper: ANH Stunt) 24 June 2018 NSC - Return of the Garrison 2018 ~ LEICESTER (Stormtrooper: ANH Stunt) 15 June 2018 GOSH Eid Party/Present Delivery ~ LONDON (Stormtrooper: ANH Stunt) 10 June 2018 Rayleigh Trinity Fair ~ RAYLEIGH ( Stormtrooper: ANH Stunt) 08 June 2018 Dreamnight ~ COLCHESTER (Stormtrooper: ANH Stunt) 19 May 2018 Let's Rock the Moor 2018 ~ MAIDENHEAD (Stormtrooper: ANH Stunt) 06 May 2018 1st Weald Brook Scout AGM ~ BRENTWOOD (Stormtrooper: ANH Stunt) 14 April 2018 Salute 2018 ~ LONDON (Stormtrooper: ANH Stunt) 09 April 2018 Forward Facing Memory Making Day ~ BRIGHTON (Stormtrooper: ANH Stunt) 01 April 2018 Heroes and Villains ~ BASILDON (Stormtrooper: ANH Stunt) 17 March 2018 MCM Comic Con: Birmingham ~ BIRMINGHAM (Helper/Spotter) 15 March 2018 Music From The Movies ~ IPSWICH (Stormtrooper: ANH Stunt) 16 February 2018 GOSH Birthday Ward Visit ~ LONDON (Stormtrooper: ANH Stunt) 07 February 2018 GOSH Ward Visit ~ LONDON (Stormtrooper: ANH Stunt) 01 February 2018 Star Wars Funeral ~ BEDFORD (Stormtrooper: ANH Stunt) 14 January 2018 London Taxi Drivers' Mad Hatter's Party 2018 ~ LONDON (Stormtrooper: ANH Stunt) 16 December 2017 Dark Santa ~ COLCHESTER (Stormtrooper: ANH Stunt, Helper/Spotter) 14 December 2017 Star Wars: Last Jedi Cinema Appearance (ODEON) ~ LONDON (Stormtrooper: ANH Stunt) 02 December 2017 Chelsea Childrens Hospital Xmas Party ~ LONDON (Stormtrooper: ANH Stunt) 24 November 2017 Secret Nuclear Bunker Sleepover ~ BRENTWOOD (Stormtrooper: ANH Stunt) 19 November 2017 The Dream Factory Childrens Christmas Party ~ WALTHAM ABBEY (Stormtrooper: ANH Stunt) 18 November 2017 MCM Comic Con: Birmingham ~ BIRMINGHAM (Stormtrooper: ANH Stunt) 10 November 2017 Brentwood Theatre Film Nights - Star Wars: The Force Awakens ~ BRENTWOOD (Stormtrooper: ANH Stunt) 05 November 2017 FanZone Comic Con: Grays ~ GRAYS (Stormtrooper: ANH Stunt) 29 October 2017 MCM Comic Con: London ~ LONDON (Stormtrooper: ANH Stunt) 11 October 2017 GOSH Play in Hospital Week Visit ~ LONDON (Stormtrooper: ANH Stunt) 30 September 2017 Scout/Guide Star Wars Night Hike ~ MUCH HADHAM (Stormtrooper: ANH Stunt) 30 September 2017 Castle View School Open Day ~ CANVEY ISLAND (Stormtrooper: ANH Stunt) 24 September 2017 M&S Bluewater Macmillan Coffee Morning ~ GREENHITHE (Stormtrooper: ANH Stunt) 17 September 2017 Dollie-Raie's Celebrity Fun Day ~ Essex (Stormtrooper: ANH Stunt) 15 September 2017 Star Wars Funeral ~ BECKENHAM (Stormtrooper: ANH Stunt) 10 September 2017 Parc-Essex Charity Day ~ BRAINTREE (Stormtrooper: ANH Stunt) 02 September 2017 Invasion Colchester VII ~ COLCHESTER (Stormtrooper: ANH Stunt) 26 August 2017 Sainsburys Romford Launch in aid of the Dream Factory ~ ROMFORD (Stormtrooper: ANH Stunt) 19 August 2017 Heroes Of The Empire Premiere ~ LEICESTER (Stormtrooper: ANH Stunt) 27 July 2017 Starlight Summer Party ~ LONDON (Stormtrooper: ANH Stunt) 23 July 2017 Upwards With Downs Funday ~ HARLOW (Stormtrooper: ANH Stunt) 21 July 2017 Chelsea and Westminster Children's Hospital Walk Visit ~ LONDON (Stormtrooper: ANH Stunt) 19 July 2017 Great ormand street Wards visit - London Stormtrooper ANH stunt 15 July 2017 star wars charity convention - Romford Stormtrooper ANH stunt 01 July 2017 Great Ormand street ECMO party - London Stormtrooper ANH stunt -
ESB TK WIP - UKG - first build - hoping for centurian
CallMeMrTibbles replied to CallMeMrTibbles's topic in ESB Build Threads
First thing I tackled was the boots. I don't wear leather, and finding suitable boots was a challenge. Got some synthetic ones eventually which my UK armourer was happy with. https://www.asos.com/asos-design/asos-design-chelsea-boots-in-black-faux-leather-with-black-sole/prd/21328697 I think I maybe rubbed down (with nail polish remover) a bit too hard. It took A LOT of coats of dye to cover them, but maybe that'll be a good thing in the long run. Got good coverage, even on the elastic, and just had to tidy up where the top meets the sole with some gloss white and matt black enamel paint. I know that'll chip off quite quickly as it doesn't flex, but I can keep touching up if needed. Sent from my SM-A715F using Tapatalk -
How come they are both dirty in the same spot? It kinda looks like the First Order TK helmet. Yes! I hated that they gave them FO boots! It didn't make any sense. They gave shore troopers chelsea boots. Why not give the TK's chelsea boots?
-
I've been lurking in these forums for a while, planning to start a build, but didn't want to pull the trigger on the armor yet without knowing for sure if there are any approvable boots out there. (I've read about how unreliable Gio is and I am not getting burned by a shady seller) Are painted/dyed elastic panel chelsea boots approvable? I've seen a few people in these threads make great looking boots doing this but haven't seen for certain if they have been approved that way. The CRL says no zips or buckles but has no mention of an elastic panel? I can add the strip up the front myself, just wanted to make sure painting a boot like this: https://www.amazon.com/Womens-Vegan-Leather-Chelsea-Boot/dp/B018T2NIKO/ref=sr_1_4?s=apparel&ie=UTF8&qid=1487870315&sr=1-4&nodeID=7141123011&keywords=flat+chelsea+boots would be OK. Thanks for any help! Looking forward to getting started soon!
-

TK Boots, up again
sharkbait replied to captsafe66's topic in Boots, Soft Parts, and other Accessories
To my knowledge, TK Boots, Imperial Boots, and the "Chelsea" or "Jodhpur" style, and I think they generally only come in black so you'd have to paint or dye them with leather paint/dye. There's probably a handful of random boots that fit the bill out there too, but those are the main ones. I've also heard that the slightly taller ones work best so that your shins don't ride up. I'm looking into Imperial Boots, but it looks like they also got backlogged (waiting on an email reply) and according to their site, aren't taken new orders until "Early October" and as far as I can tell it's now early October, but it didn't mention how long the potential wait would be once orders were open again. I'm looking for my first pair too, we have bad timing with all those waiting on their Anovos kits! If I hear back from IB I'll post again. And if you find any let me know. Here's from the CRL on boots. They're all basically the same base (except the Concept Stormtrooper). And it also depends a little on what level you'll go for. ANH Hero/ANH Stunt: Boots For 501st approval: Boots are above ankle height and made of white leather or leather-like material. Small U-shaped elastic sections on both sides of the ankle. Flat sole with a short heel. No buckles or laces. Jodhpur/ Chelsea-type boots or an equivalent style is acceptable. Elvis or Mariachi boots are not allowed. For level two certification (if applicable): There is no seam present on the front of the boot. ESB: Boots For 501st approval: Boots are above ankle height and made of white leather or leather-like material. Small U-shaped elastic sections on both sides of the ankle. Flat sole with a short heel. No buckles or laces. Jodhpur/ Chelsea-type boots or an equivalent style is acceptable. Elvis or Mariachi boots are not allowed. For level two certification (if applicable): There is no seam present on the front of the boot. Boots are lightly scuffed ROTJ: Boots For 501st approval: Boots are above ankle height and made of white leather or leather-like material. Small U-shaped elastic sections on both sides of the ankle. Flat sole with a short heel. No buckles or laces. Jodhpur/ Chelsea-type boots or an equivalent style is acceptable. Elvis or Mariachi boots are not allowed. For level two certification (if applicable): There is no seam present on the front of the boot. Boots are lightly scuffed. For level three certification (if applicable): Boots have a white sole. Painted soles are acceptable -
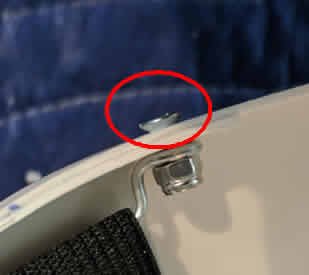
I've been working on installing Mr. NoStripe's brackets. I've reinforced all the connection spots with an extra piece of ABS that I glued in place with regular superglue. One of those popped loose last night and I'm wondering if its because CA glue is like that, or if its because its about 30 degrees Fahrenheit in my garage and the cold is making it weak. But that's not my question. Question 5: When I went to install my first screw, I saw that I have this head hanging out in space looking stupid. I see the same thing in UKsWrath's tutorial so I know its not just me, but is that screw head screen-accurate? I can't tell on the reference photos of screen-used armor I've looked at. Did they use a machine screw like this and leave it sticking out like that? We aren't really working with enough material to countersink it, but maybe a pan-head screw would look better? Ultimately just an aesthetic thing, but its eating at me... Question 6: I have wide feet. I checked with TK boots and they don't have anything close to my size. Imperial Boots specifically says their boots are 'narrow fit' and it sounds like they take months to deliver anyway. I'd be just as happy ordering a wide-fitting Chelsea boot and fixing the color myself. My question has to do with the seam on the side of the boots. I'm having trouble finding any wide ones with the exact same seam as seen in the CRL. The CRL doesn't specify anything about the seam on the side. Does that side seam matter for Centurion approval? I'm looking at these boots: https://us.asos.com/asos-design/asos-wide-fit-chelsea-boots-in-black-leather/prd/8192254 Would those work a) for Centurion approval and b) are they tall enough that the shins would not get hung up in them?
-

AP Armour - Trimmed - ANH Centurion - First Build Thread
magni replied to Mr_Fahrenheit's topic in ANH Build Threads
Great job so far! Helmets coming along nicely! When I started I did the painted Chelsea boots. Movie accurate and a complete pain in the bantha. After a couple troops they looked dingy and already showed wear. New boots were needed. I bought my first pair from IB and I never would look anywhere else. They wrap around your ankle snug. Which helps big time for shin creep!. TK's looked great but like Chelsea have a larger ankle opening. You won't be disappointed with IB. Like Joseph said, order in wave and shipping is quick. Ordering one size larger is a must. Your 10.5 is a tough call for you. 11's would fit but how much room and 12"s might be to loose. Decisions, Decisions Good advice is grab your boots and undersuit now. They're essential in the sizing /fitting aspect of it. Keep up the good work! -
As Mike has now sold the armor used for the initial TFU Stormtrooper CRL I will start a new thread so we can carry on, thank you once again Mike "SolidScrafty" TK80494 for starting the CRL and good luck with your future projects. Updates from the TKC have been brought over as well as a few things moved for basic approval, as the TFU Stormtrooper is lightly scuffed / battle worn which is a major difference between it and a OTTK it should be requirement for basic approval. Assembly can be either overlap or butt/join/coverstip as per TKC CRL Google drive CRL images https://drive.google.com/drive/folders/16RvrDvfdKSEtVPmMp1FMWih2e3Z-ZqUX?usp=sharing Build thread here https://www.whitearmor.net/forum/topic/50096-tfu-tk-build-85421/ Previous CRL in progress is here https://databank.501st.com/databank/Costuming:TK_TFU Description: Stormtrooper - The Force Unleashed (TFU) Prefix: TK Detachment: First Imperial Stormtrooper Detachment Context: The Force Unleashed Stormtroopers fanatically loyal to the Empire and impossible to sway from the Imperial cause, they wear imposing white armor offering a wide range of survival equipment and temperature controls that allow the soldiers to survive in almost any environment. Stormtrooper, The Force Unleashed Model TK-85421, Photo by Glen Rhodes General Construction Notes Assembly can be either overlap or butt/join/cover strip methods. All Armor parts are weathered, lightly scuffed, battle damaged. Weathering must match visual references. See Stormtrooper: TFU Weathering for more information. Images to be added to the weathering section. Required Costume Components The following costume components are present and appear as described below. Helmet Traps (trapezoids on dome of helmet) and tears (area beneath the corners of eye lenses) are grey with a black outline. Rear traps and tears have vertical black lines. Lenses are flat material, green in color, sufficiently dark enough to obscure the costumer's eyes. The “ear” bars have three or four bumps and are grey or painted grey, with a black outline. Painting the bumps with rank stripes (highlighted) in black is optional. Ears shall have a black horizontal anchor-like detail on each side of the ear bar. Frown is painted grey and does not leave the teeth area. Eight total teeth on the frown are cut out. Tube stripes are medium blue, numbering between 9 and 16 per side with the curve bends extending backwards. Vocoder (vertically ribbed chin detail) is painted black. Aerators/Hovi-MIX tips (cylinders on either side of the vocoder) are black or painted black. Tears, traps, and tube stripes may be hand painted, decals, or decals that replicate hand painted. Mesh may be used behind the frown to obscure the face of the wearer. Note: The helmet is accurate in detail and proportion to official references. - Many commercially available helmets or those considered disproportionate in size or shape are ineligible. OPTIONAL Level two certification (if applicable): Ears shall have three screws per side, one above and one below the ear bar and one at the base of the helmet. Ear bars have four bumps only, not three. Traps/tears and tube stripes shall have the correct ANH TK details Correct Aerators/Hovi-MIX tips are present. Screens used shall be of a wide type mesh, with the rim of the mic and the inside white or painted white. OPTIONAL Level three certification (if applicable): Ear bars shall have only one bump painted in black (rank stripes). Neck trim shall be of an s-type profile rather than a u-type profile. S-trim join is on the rear of the helmet Tears/traps shall be hand painted or use decals that emulate hand painted (with correct ANH TK details). Ear screws shall be slotted, flat topped, countersunk and painted white. The vocoder must be integrated into the helmet, and not a separate piece. Neck Seal Black with horizontal ribs, fitted to the wearer, and extending from the base of the neck to conceal the entire neck. Undersuit Black non-textured material, either one-piece or two-piece construction with no visible zippers or logos/designs. Shoulder Straps These shall be securely mounted in front and may free float in back. OPTIONAL Level two certification (if applicable): No visible rivets are allowed. Shoulder straps shall not have large flat tabs on the ends, they shall be ribbed 100%. OPTIONAL Level three certification (if applicable): Shoulder straps have dark weathering on both front and rear of the straps. Shoulder Armor One on each shoulder. The shoulder bells are considered effectively symmetrical; they may be worn interchangeably on the left and right shoulders. OPTIONAL Level two certification (if applicable): Shoulder bells have a slight outward curve with square corners not rounded. No lower elastic straps across the biceps. OPTIONAL Level three certification (if applicable): Upper Arm Armor Biceps are fully closed. OPTIONAL Level two certification (if applicable): OPTIONAL Level three certification (if applicable): Forearm Armor Forearms are fully closed. OPTIONAL Level two certification (if applicable): No return edge on the inside of the front of the forearm is allowed.: OPTIONAL Level three certification (if applicable): Gloves Black in color, made of either rubber, nomex, leather, or leather-like material, with no visible straps or logos/designs. The fingers are enclosed, non-textured. OPTIONAL Level two certification (if applicable): Gloves shall be rubber or rubber like chemical gloves in black. OPTIONAL Level three certification (if applicable): Hand Plates Roughly pentagonal in shape, the hand plates are mounted securely over the back of the glove. As an alternative to plastic, these may be made out of latex or latex-like material. OPTIONAL Level two certification (if applicable): Hand guards shall be latex or latex-like, painted white, affixed to rubber gloves: OPTIONAL Level three certification (if applicable): Chest Armor Chest plate overlaps the abdominal plate. A white flexible U shaped gasket or molded lip shall be present around all edges. OPTIONAL Level two certification (if applicable): Fabric or elastic strip connecting chest to back shall be either black or not present. OPTIONAL Level three certification (if applicable): Back Armor Back plate contains a "O II" design. A white flexible U shaped gasket or molded lip shall be present around all edges. OPTIONAL Level two certification (if applicable): Inner recessed plate corners have black detail/weathering. There is a small silver screw (can be painted or decal) in the middle bottom of the inner recessed plate. OPTIONAL Level three certification (if applicable): Back plate shall have no, or minimal overlap of the kidney plate. Abdomen Armor Ab plate buttons shall be all black. Ab plate button detail shall be inverted compared to ANH/ESB. The left vertical row of ab plate buttons contain five buttons (fifth button must align one button higher than the top button of the larger button plate). A white flexible U shaped gasket or molded lip shall be present around all edges. OPTIONAL Level two certification (if applicable): There shall be no split rivet or brad visible on the crotch tab of the ab plate. OPTIONAL Level three certification (if applicable): All buttons on the ab plate are the same size and color and are visible (not covered by the belt). There are 2 rivets on either side of the ab, approximately 5/16"(8mm) diameter which are lined up with the ones on the kidney. Approximate placement of the rivets is: 25mm from the top edge and the bottom is 25mm above the top of the fabric belt and 20mm from the side seam, painted white. Kidney & Posterior Armor A separate kidney/butt plate is not allowed - the kidney and butt plate shall be combined/fused to a single plate/one piece. A white flexible U shaped gasket or molded lip shall be present around all edges. The crotch tab of the butt plate area may or may not have visible snaps. OPTIONAL Level two certification (if applicable): There shall be no visible snaps, rivets or brads on the crotch tab of the butt plate tab. OPTIONAL Level three certification (if applicable): There are 2 rivets on either side of the kidney, approximately 5/16"(8mm) diameter, these are lined up with the ones on the ab, approximate placement of the rivets is: 25mm from the top edge and the bottom is 25mm above the top of the fabric belt and 20mm from the side seam, all painted white. Belt Belt face is made of plastic (TK ammo belt). The soft belt proper is tightly woven nylon/cordura like/style material or material with a tightly woven nylon/cordura like/style covering. Size is 2.25" (57mm) to 2.5" (64mm) wide. The color is white to off-white. The drop boxes are white and dangle from the sides of the plastic front belt (ammo belt) via white straps and are aligned with the end of the ammo belt. The belt may be longer than standard ANH/ROTJ with square buttons positioned close to the end of the belt. OPTIONAL Level two certification (if applicable): Leather and vinyl are not accurate. There are two square buttons, one on each end of the plastic ammo belt. There should be no center square button or rivet, it is not accurate. OPTIONAL Level three certification (if applicable): The corners of the plastic ammo belt shall be trimmed at a 45 degree angle. Square buttons are positioned approximately 5-10mm from the end of the belt Drop boxes are closed in the back. The belt proper shall have (eight total) white rivets. Two rivets close to each side of the thermal detonator, and two rivets approximately an inch away from the edge of the ammo belt (The rivets form a rectangular pattern) and are painted white. Game ROTJ https://databank.501st.com/databank/File:TK_rotj_detonator.png Thermal Detonator (A.K.A. O2 canister) attaches to the center back of the belt. Detonator consists of an all grey cylinder, without silver stickers or silver paint. The cylinder is between 2” (50mm) and 2.68"(68mm) in diameter with white end caps on each end. The white control panel pad faces upwards, with the controls/round washer style detail closest to the right end cap. The total length is approximately 7.50" (190.5mm). The thermal detonator is attached via metal or metallic-appearing clips, approximately @1" (25mm) wide. The thermal detonator may be either ROTJ or the "game style" version. The ANH/ESB style is not allowed. OPTIONAL Level two certification (if applicable): Thermal detonator belt clips are positioned with little to no gap between the clips and the end caps. OPTIONAL Level three certification (if applicable): Only "game style" thermal detonator can be used. Thigh Armor Thigh armor shall be closed in the back. The ammo belt shall be installed on the bottom of the right thigh. OPTIONAL Level two certification (if applicable): The thigh ammo belt is not rounded off like ANH OPTIONAL Level three certification (if applicable): The thigh ammo belt shall be positioned on top of the lower ridge as seen in official references. The thigh ammo is glued and has no rivets. Lower Leg Armor Greaves close in the back. The trapezoid knee plate (sniper knee plate) is affixed to the left greave and may have two visible brads or rivets securing it to the greave. OPTIONAL Level two certification (if applicable): The sniper knee plate is glued and has no rivets. OPTIONAL Level three certification (if applicable): Boots Boots are above ankle height and made of white leather or leather-like material. Small U-shaped elastic sections on both sides of the ankle. Flat sole with a short heel. No buckles or laces. Jodhpur/ Chelsea-type boots or an equivalent style is acceptable. Elvis or Mariachi boots are not allowed. OPTIONAL Level two certification (if applicable): There is no seam present on the front of the boot. OPTIONAL Level three certification (if applicable): Optional Accessories E-11 Blaster (ESB) Based on a real or replica Sterling sub-machine gun, scratch-built, or a modified commercial toy Stormtrooper blaster. OPTIONAL Level two certification (if applicable): Folding stock is placed in the closed position. No ammo counter shall be present. D-ring mounted on the rear. Sterling based blasters have the correct M-38 or M-19 style scope. The M-19 scope is preferred. No power cylinders on the magazine housing. Scratch-built, resin cast, Hyperfirm rubber cast blasters shall have a total of 6 T-tracks on blaster (leaving the lowest row on the magazine housing side uncovered). If using the Hasbro E11 toy blaster, it is modified to have the correct number of T-tracks (6 total), with a lower row of open vent holes on the magazine housing side. This is accomplished by covering the pre-existing rows of holes with T-tracks, then grinding off the lower integrated T-track on the magazine housing side, and drilling a new row of holes in its place. OPTIONAL Level three certification (if applicable): Hasbro / Rubies blasters are not allowed, even conversions. The blaster may have minor weathering or base metal exposure however, T-tracks and grips shall have the appearance of black plastic. E-11 Blaster (ROTJ) Based on a real or replica Sterling sub-machine gun, scratch-built, or a modified commercial toy Stormtrooper blaster. OPTIONAL Level two certification (if applicable): Folding stock is placed in the closed position. No ammo counter shall be present. D-ring mounted on the rear. Correct style scope. No power cylinders on the magazine housing. Scratch-built, resin cast, Hyperfirm rubber cast blasters shall have a total of 7 U shaped channels on blaster (all holes on barrel shall be covered). If using the popular commercially available Stormtrooper blasters, you shall grind off the T-tracks and replace them with U shaped channels and cover the open rows of holes (total of 7 U shaped channels in all). Correct greeblies on the left rear area shall be present (door catch and two "hammers"). OPTIONAL Level three certification (if applicable): Folding stock shall be in the extended position. Hasbro / Rubies blasters are not allowed, even conversions. The blaster may have minor weathering or base metal exposure however, T-tracks and grips shall have the appearance of black plastic. SE-14R Blaster The SE-14R blaster may be carried. It shall have a correct scope if carried in lieu of the E-11 for informal events. OPTIONAL Level two certification (if applicable): OPTIONAL Level three certification (if applicable): Lightsaber (The Force Unleashed) The hilt is Graflex style or has the characteristics of the Graflex, (reference Luke Skywalker's lightsaber from ANH and ESB). If the lightsaber has a blade, it may be one of the color blades used in the video game, The Force Unleashed. The choice of blade colors are: Black, Blue, Green, Gold, Purple, Red and Yellow. Note: Double blades, small Yoda style lightsaber, or inexpensive non-FX Hasbro Lightsaber toys are not allowed. OPTIONAL Level two certification (if applicable): The hilt shall be made to reference Starkiller's lightsaber (as seen in The Force Unleashed). OPTIONAL Level three certification (if applicable): If the lightsaber has a blade, it may be one of the color blades used in the video game, The Force Unleashed. The choice of blade colors are: Black, Blue, Green, Gold, Purple, Red and Yellow.
-
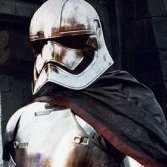
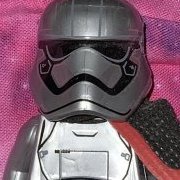
TLJ Captain Phasma CRL Thread
FunkyAmazon replied to Daetrin's topic in Captain Phasma - TFA and TLJ
The boots appear to be a Chelsea boot, similar to these stormtrooper boots shown on the 501st page, but in black. https://databank.501st.com/databank/Costuming:TK_anh_stunt the FO side zip boots are definitely different. They do not have the pronounced separation between the heel and toe. They have the flat sole that is more like a platform. See those below https://databank.501st.com/databank/Costuming:TK_-_First_Order The FO TK side zip boots are not what Phasma wears but she may be wearing the earlier version of Chelsea type TK boots with no zipper and the elastic panel. The other similarity to those boots is the slight point. They are not round nor pointed, something in between. -
 Description: Stormtrooper: The Force Unleashed Prefix: TK Detachment: First Imperial Stormtrooper Detachment Context: The Force Unleashed For 501st membership only the requirements in black need to be met. FISD Defines additional, optional levels of costuming excellence. In the page below, requirements for Level 2 "Expert Infantry" are listed in blue. Requirements for Level 3 "Centurion" are listed in red. Please visit the FISD web site for a full description of these standards. Special Notes: Visit the Frequently asked questions page for information on the Rubies Supreme Stormtrooper costume. Blasters are not required for legion membership per our weapons policy. The armor parts shall be made from one of these types of materials or like materials: White fiberglass, ABS (Acrylonitrile Butadiene Styrene), HIPS (High Impact Polystyrene), or Polyvinyl chloride (PVC). FX armor may not be used for Level 3 approval. FX helmet is no longer permitted for new approvals. Helmet Traps (trapezoids on dome of helmet) and tears (area beneath the corners of eye lenses) are grey. Rear traps and tears have vertical black lines. Lenses are flat material, green in color, sufficiently dark enough to obscure the costumer's eyes. The “ear” bars have three or four bumps and are grey or painted grey, with a black outline. Painting the bumps with rank stripes (highlighted) in black is optional. Ears shall have a black horizontal anchor-like detail on each side of the ear bar. Frown is painted grey and does not leave the teeth area. Eight total teeth on the frown are cut out. Tube stripes are medium blue, numbering between 9 and 16 per side with the curve bends extending backwards. Vocoder (vertically ribbed chin detail) is painted black. Aerators/Hovi-MIX tips (cylinders on either side of the vocoder) are black or painted black. Tears, traps, and tube stripes may be hand painted, decals, or decals that replicate hand painted. Mesh may be used behind the frown to obscure the face of the wearer. Note: The helmet is accurate in detail and proportion to official references. - Many commercially available helmets or those considered disproportionate in size or shape are ineligible. Helmet and paint/details is lightly scuffed (battle worn), but not weathered like a Sandtrooper (TD). OPTIONAL Level two certification (if applicable): Ears shall have three screws per side, one above and one below the ear bar and one at the base of the helmet. Ear bars have four bumps only.Not three. Traps/tears and tube stripes shall have the correct ANH TK details Correct Aerators/Hovi MX tips. OPTIONAL Level three certification (if applicable): Ear bars shall have only one or two bumps painted in black (rank stripes). Neck trim shall be of an s-type profile rather than a u-type profile. Tears/traps shall be hand painted or use decals that emulate hand painted (with correct ANH TK details). Ear screws shall be slotted, flat topped, countersunk and painted white. The vocoder must be integrated into the helmet, and not a separate piece. Neck Seal Black with horizontal ribs, fitted to the wearer, and extending from the base of the neck to conceal the entire neck. Undersuit Black non-textured material, either one-piece or two-piece construction with no visible zippers or logos/designs. Shoulder Straps These shall be securely mounted in front and may free float in back. Shoulder straps are lightly scuffed (battle worn), but not weathered like a Sandtrooper (TD). OPTIONAL Level two certification (if applicable): No visible rivets are allowed. Shoulder straps shall not have a large flat tabs at the ends of them, they shall be ribbed 100%. OPTIONAL Level three certification (if applicable): Shoulder Armor One on each shoulder. The shoulder bells are considered effectively symmetrical; they may be worn interchangeably on the left and right shoulders. Shoulder bells are lightly scuffed (battle worn), but not weathered like a Sandtrooper (TD). OPTIONAL Level two certification (if applicable): Shoulder bells have a slight outward curve with square corners not rounded. No shoulder bell straps across the biceps. OPTIONAL Level three certification (if applicable): Upper Arm Armor Biceps are fully closed. Biceps are lightly scuffed (battle worn), but not weathered like a Sandtrooper (TD). OPTIONAL Level two certification (if applicable): No shoulder bell straps across the biceps. OPTIONAL Level three certification (if applicable): Forearm Armor Forearms are fully closed. Forearms are lightly scuffed (battle worn), but not weathered like a Sandtrooper (TD). OPTIONAL Level two certification (if applicable): OPTIONAL Level three certification (if applicable): No return edge on the inside of the front of the forearm is allowed. Gloves Black in color, made of either rubber, nomex, leather, or leather-like material, with no visible straps or logos/designs. The fingers are enclosed, non-textured. OPTIONAL Level two certification (if applicable): Gloves shall be rubber or rubber like chemical gloves in black. Hand Plates Roughly pentagonal in shape, the hand plates are mounted securely over the back of the glove. As an alternative to plastic, these may be made out of latex or latex-like material. Hand plates are lightly scuffed (battle worn), but not weathered like a Sandtrooper (TD). OPTIONAL Level two certification (if applicable): OPTIONAL Level three certification (if applicable): Hand guards shall be latex or latex-like, painted white, affixed to rubber gloves. Chest Armor Chest plate overlaps the abdominal plate. A white flexible U shaped gasket or molded lip shall be present around all edges. Chest armor is lightly scuffed (battle worn), but not weathered like a Sandtrooper (TD). OPTIONAL Level two certification (if applicable): OPTIONAL Level three certification (if applicable): Fabric or elastic strip connecting chest to back shall be either black or not present. Back Armor Back plate contains a "O II" design. A white flexible U shaped gasket or molded lip shall be present around all edges. The back plate is lightly scuffed (battle worn), but not weathered like a Sandtrooper (TD). OPTIONAL Level two certification (if applicable): OPTIONAL Level three certification (if applicable): Back plate shall have no, or minimal overlap of the kidney plate. Inner recessed plate corners have black detail/weathering. There is a mall silver screw or paint/decal in the middle bottom of the inner recessed plate. Abdomen Armor Ab plate buttons shall be all black. Ab plate button detail shall be inverted compared to ANH/ESB. A white flexible U shaped gasket or molded lip shall be present around all edges. Ab plate is lightly scuffed (battle worn), but not weathered like a Sandtrooper (TD). OPTIONAL Level two certification (if applicable): OPTIONAL Level three certification (if applicable): There shall be no split rivet or brad visible on the crotch tab of the ab plate. The left vertical row of ab plate buttons contain five buttons (fifth button must align one button higher than the top button of the larger button plate). All buttons on the ab plate are the same size and color and are visible (not covered by the belt). There are 2 rivets on either side of the ab, approximately 5/16"(8mm) diameter which are lined up with the ones on the kidney. The top rivet is 25mm from the top edge and the bottom is 25mm above the top of the belt and 20mm from the side seam, painted white (measurements are approximate). Kidney & Posterior Armor A separate kidney/butt plate is not allowed - the kidney and butt plate shall be combined/fused to a single plate/one piece. A white flexible U shaped gasket or molded lip shall be present around all edges. The crotch tab of the butt plate area may or may not have visible snaps. Kidney/Posterior Armor is lightly scuffed (battle worn), but not weathered like a Sandtrooper (TD). OPTIONAL Level two certification (if applicable): The kidney and posterior shall both be either ANH (straight corners) or ROTJ (rounded corners). OPTIONAL Level three certification (if applicable): There shall be no visible snaps, rivets or brads on the crotch tab of the butt plate tab. There are 2 rivets on either side of the kidney, these are lined up with the ones on the ab, the top rivet is roughly 25mm from the top edge and the bottom is 25mm above the top of the belt and 20mm from the side seam, painted white. Belt Belt face is made of plastic (TK ammo belt). The soft belt proper is tightly woven nylon/cordura like/style material or material with a tightly woven nylon/cordura like/style covering. Size is 2.25" (57mm) to 2.5" (64mm) wide. The color is white to off-white. The drop boxes are white and dangle from the sides of the plastic front belt (ammo belt) via white straps and are aligned with the end of the ammo belt. The belt may be longer than standard ANH/ROTJ with square buttons positioned close to the end of the belt. The belt material is lightly aged (battle worn), but not weathered like a Sandtrooper (TD). Belt face(TK ammo belt)and drop boxes are lightly scuffed (battle worn), but not weathered like a Sandtrooper (TD). OPTIONAL Level two certification (if applicable): Leather and vinyl are not accurate. There are two square buttons, one on each end of the plastic ammo belt. There should be no center square button or rivet, it is not accurate. OPTIONAL Level three certification (if applicable): The corners of the plastic ammo belt shall be trimmed at a 45 degree angle. Square buttons are positioned @10mm from the end of the belt Drop boxes are closed in the back. The belt proper shall have (eight total) white rivets. Two rivets close to each side of the thermal detonator, and two rivets approximately an inch away from the edge of the ammo belt (The rivets form a rectangular pattern) and are painted white. Game ROTJ Thermal Detonator (A.K.A. O2 canister) attaches to the center back of the belt. Detonator consists of an all grey cylinder, without silver stickers or silver paint. The cylinder is between 2” (50mm) and 2.68"(68mm) in diameter with white end caps on each end. The white control panel pad faces upwards, with the controls/round washer style detail closest to the right end cap. The total length is approximately 7.50" (190.5mm). The thermal detonator is attached via metal or metallic-appearing clips, approximately 1" (25mm) wide. The thermal detonator is lightly scuffed (battle worn), but not weathered like a Sandtrooper (TD). The thermal detonator may be either ROTJ or the "game style" version. The ANH/ESB style is not allowed. OPTIONAL Level two certification (if applicable): Thermal detonator belt clips are positioned with little to no gap between the clips and the end caps. OPTIONAL Level three certification (if applicable): Only "game style" thermal detonator can be used. Thigh Armor Thigh armor shall be closed in the back. The ammo belt shall be installed on the bottom of the right thigh. Thighs are lightly scuffed (battle worn), but not weathered like a Sandtrooper (TD). OPTIONAL Level two certification (if applicable): OPTIONAL Level three certification (if applicable): The thigh ammo belt shall be positioned on top of the lower ridge as seen in official references and is not rounded off like ANH. The thigh ammo is glued and has no rivets. Lower Leg Armor Greaves close in the back. The trapezoid knee plate (sniper knee plate) is affixed to the left greave and may have two visible brads or rivets securing it to the greave. The AM greaves (shins) shall be on the proper legs, with a new cover strip. The cover strip edge shall be facing the inside of the leg. - Note: There is a manufacturer defect with the AM greaves (shins) that may cause you to wear the them improperly. Please see the Tutorial titled :"AM armor shins: the proper way to assemble and wear", on whitearmor.net Greaves are lightly scuffed (battle worn), but not weathered like a Sandtrooper (TD). OPTIONAL Level two certification (if applicable): OPTIONAL Level three certification (if applicable): The sniper knee plate is glued and has no rivets. Boots Boots are above ankle height and made of white leather or leather-like material. Small U-shaped elastic sections on both sides of the ankle. Flat sole with a short heel. No buckles or laces. Jodhpur/ Chelsea-type boots or an equivalent style is acceptable. Elvis or Mariachi boots are not allowed. Boots are lightly scuffed (battle worn), but not weathered like a Sandtrooper (TD). OPTIONAL Level two certification (if applicable): There is no seam present on the front of the boot. OPTIONAL Level three certification (if applicable): Optional Accessories E-11 Blaster (ESB) Based on a real or replica Sterling sub-machine gun, scratch-built, or a modified commercial toy Stormtrooper blaster. OPTIONAL Level two certification (if applicable): Folding stock is placed in the closed position. No ammo counter shall be present. D-ring mounted on the rear. Sterling based blasters have the correct M-38 or M-19 style scope. The M-19 scope is preferred. No power cylinders on the magazine housing. Scratch-built, resin cast, Hyperfirm rubber cast blasters shall have a total of 6 T-tracks on blaster (leaving the lowest row on the magazine housing side uncovered). If using the Hasbro E11 toy blaster, it is modified to have the correct number of T-tracks (6 total), with a lower row of open vent holes on the magazine housing side. This is accomplished by covering the pre-existing rows of holes with T-tracks, then grinding off the lower integrated T-track on the magazine housing side, and drilling a new row of holes in its place. OPTIONAL Level three certification (if applicable): Hasbro blasters are not allowed, even conversions. The blaster may have minor weathering or base metal exposure however, T-tracks and grips shall have the appearance of black plastic. E-11 Blaster (ROTJ) Based on a real or replica Sterling sub-machine gun, scratch-built, or a modified commercial toy Stormtrooper blaster. OPTIONAL Level two certification (if applicable): Folding stock is placed in the closed position. No ammo counter shall be present. D-ring mounted on the rear. Correct style scope. No power cylinders on the magazine housing. Scratch-built, resin cast, Hyperfirm rubber cast blasters shall have a total of 7 U shaped channels on blaster (all holes on barrel shall be covered). If using the popular commercially available Stormtrooper blasters, you shall grind off the T-tracks and replace them with U shaped channels and cover the open rows of holes (total of 7 U shaped channels in all). Correct greeblies on the left rear area shall be present (door catch and two "hammers"). OPTIONAL Level three certification (if applicable): Folding stock shall be in the extended position. Hasbro blasters are not allowed, even conversions. The blaster may have minor weathering or base metal exposure however, T-tracks and grips shall have the appearance of black plastic. SE-14R Blaster The SE-14R blaster may be carried. It shall have a correct scope if carried in lieu of the E-11 for informal events. OPTIONAL Level two certification (if applicable): OPTIONAL Level three certification (if applicable): Lightsaber (The Force Unleashed) The hilt is Graflex style or has the characteristics of the Graflex, (reference Luke Skywalker's lightsaber from ANH and ESB). If the lightsaber has a blade, it may be one of the color blades used in the video game, The Force Unleashed. The choice of blade colors are: Black, Blue, Green, Gold, Purple, Red and Yellow. Note: Double blades, small Yoda style lightsaber, or inexpensive non-FX Hasbro Lightsaber toys are not allowed. OPTIONAL Level two certification (if applicable): OPTIONAL Level three certification (if applicable): The hilt shall be made to reference Starkiller's lightsaber (as seen in The Force Unleashed). If the lightsaber has a blade, it may be one of the color blades used in the video game, The Force Unleashed. The choice of blade colors are: Black, Blue, Green, Gold, Purple, Red and Yellow. UPDATED 24/9/2020 gmrhodes13 UPDATED 28/9/2020 gmrhodes13
 -
After pining over this character for nearly five years, I have finally committed to building my own set of armor. This will be my very first armored costume, so I’m quite nervous about it. Depending on who is measuring me, I am about 6’ tall (give or take an inch), so the prospect of portraying a tall character like Captain Phasma is something I am really looking forward to doing. I chose to do The Last Jedi version simply because I like the bright chrome look over the weathered version. Pieces of my costume: Helmet: Shawn Thorsson (first run, 2015) Armor Kit: KB Props (on order) Boots: Dr. Martens Flora Chelsea Boots Neck Seal: Geeky Pink’s Fabric Gaskets: Geeky Pink’s Rubber Gaskets (for EIB): ??? Belt: ??? Undersuit: ??? Cape: Sewn by me I’m still in the early stages of building this costume, so my first steps are to prepare the helmet, order everything else I need, and start on my cape. I do plan to eventually submit it for EIB status, so I am not cutting any corners along the way. This is going to be fun, I think. Terrifying, but fun.
-
I see this topic come up a lot and I have not seen a comparison so I thought I would do one. Please keep in mind that my knowledge on this subject is limited and I do not have any experience with OT TKs. So the obvious… Rogue One TKs are more detailed than OT. As far as I know, all the OT TKs were vacuum formed in High Impact Poly Styrene (HIPS). This process requires a buck (mold) that heated plastic is laid over then sucked to the buck by vacuum. This is a fast and efficient method of mass producing these costumes; however, the trade off is that all detail is minimalized and designed so that the formed plastic can be removed without damaging the buck. For this reason, parts like the helmet and forearms are formed in parts rather than one solid object. Consider an ANH forearm, the rectangle details are not very well defined. There are 2 parts to the forearm. One part has the rectangles and the other does not. The two parts are glued together and then cover strips of plastic are used to hide the seams. Rogue One TKs are were not vacuum formed. I have heard (although I do not know for sure) that the RO TKs were injection molded. This process requires a 2 or more-sided mold that is completely closed off then heated liquid plastic is injected into the mold. Once the plastic is cured, the mold is opened, and the parts removed. This process allows for thicker and more detailed parts. So both the OT and the RO stormtroopers armor are made from plastic but the RO version is thicker and more detailed. Yes there are differences between ANH, ESB, and ROTJ TK’s but for the most part, the process of making the armor was the same. RO, Solo, and some of The Mandalorian TKs were made to the RO standard. Another consideration in comparing the two types TKs is the methods of assembly and strapping. There is a ton of reference material on how the OT TKs were assembled. There are very specific requirements in the CRLs as to what type of snaps, straps, Velcro, and rivets are used and how they are used. Oddly enough we have less information about how the RO TK is assembled and strapped. One of the best sources I have found for RO TKs is the images from Celebration Europe 2016. In these images we can see Velcro in various places as well as some sort of plastic hook lines connecting the shoulder bells to the biceps. Regardless, the 501st CRLs for RO TKs does not specify how the TK is strapped as long as the strapping is not visible with the exception of the drop boxes and the thighs. It would be awesome if someone who has some contacts with LFL could get some more detailed information and pictures since there is no reason for this information to remain secret this long after RO, I digress. Additionally, there are significant differences in the soft parts of the costume. OT TKs have a neck seal and a black one or two-part undersuit. The undersuit has no detail and most of the people I know who have OT TKs wear under armor. The gloves were rubber military chemical gloves and the boots were slip on brown chelsea boots dyed white. RO TKs have a undersuit that has ribbed fabric at most of the joints and the neck seal. The top shirt has hex mesh in the armpits and the ribbed fabric runs from the top of the neck seal to mid chest. The ribbed fabric must be stitched between the ribs. The boots are the same as the FO boots with a flat sole and side zipper. The gloves are also the same as the FO; although they are all black with leather patches and gridded fabric similar to a mechanics brand glove. Lastly, the OT Tks had holsters and their E-11s are slightly different from the RO E-11. RO TKs did not have holsters. I suspect that it would be difficult to holster the E-11 with a tac-light on the side of it. So lets look at some comparison pictures. These were taking at the ROSW premier. On the left is a member of my Garrison (TK 41808) in his RS Prop Masters ANH Stunt. On the right is me (TK 20980) in my Jimmiroquai RO. Initially, we look very similar; however, closer inspection reveals the level of detail, shape, construction in each part. So, let’s start at the top and work out way down. The helmet: On the left is an OT TK from ANH, on the right is my ROTK helmet. One of the most talked about parts of the helmet is the infamous eye bump. Look at the right eye on the OT helmet, notice the bump along the bottom of the eye just left of the nose? That is the eye bump. All of the bucks for the OT helmets were hand sculpted and it is unclear if this bump was in the original buck or if it is a result of the vacuum forming process; however, what we do know is that the helmets are not symmetrical. RO helmets are symmetrical and although some people swear, they can see the eye bump, I do not see it on the RO helmet. Moving on, the frown is more pronounced on the OT helmet. The number of visible teeth is also an issue. There are images from ANH that show between 6 and 10 teeth. RO helmets have only 7 individual teeth backed by a dark grey mesh. Another difference is the height of the brow trim above the eyes. The brow trim on the OT helmet fits on the edge of the top dome and is adjustable. I believe the proper gap is about ¼” while the gap on the RO helmet is about 1/8”. It is unclear if the brow trim on the RO helmet is actually separate or painted on. On my helmet it is molded into the helmet and I painted it. I should note that is on of the things that must be modified on the Black Series helmet to make it CRL compliant. The gap on the black series is closer to an OT gap. Lastly, the V-coder on the OT helmet is a molded part that is painted. On the RO helmet, the V-coder is a separate part and there must be a visible gap at the bulbous part of the V-coder and the helmet. Looking at the sides of the helmets, the OT tear traps are a simple depression that is painted. The vent lines are painted as is the black outline. The same is true for the temple boxes, although there are no vent lines in the temple boxes. On the RO helmet, the tear traps are also depressed; however, there is a raised portion in the center that is painted grey and the vent lines are cut out (engraved) in this raised portion. I suspect on the screen used helmets the depression is painted black and the raised portion is a glued in part that has the vent lines cut out. On my helmet, I cut the vents out completely and backed them black breathable fabric. The temple boxes on the RO helmet also have a raised portion that is painted grey and just like the OT, there are no vent lines. I have seen a gap between the end of the brown trim and the top of the ear cap on some OT helmets. On the RO, the brow trim comes past the temple box and terminates at the center of the ear cap. There is no gap between the brow trim and the ear cap and the brow trim terminates at an angle. The OT ear caps have visible flat head pan screws (3 of them) and the CRLs require them. These screws actually hold the helmet together connecting the front and back halves and attaching the ear caps over the seams. On the RO ear caps, the screws (2 of them) are molded in and are non-functional. Additionally, the ear bumps on the OT helmets are different. The RO ear bumps are all the same and a very different design from the OT. The outer circle of the ear cap as well as the ear bumps are more detailed and defined on the RO helmet. Lastly, the blue tube stripes on the OT helmet is either a decal or painted on. On the RO helmet the tube stripes are completely cut out and for the screen used helmets, they were backed with blue painters’ tape. On my helmet I backed the stripes with a blue breathable fabric. The back of both helmets are very similar. On the OT helmet the rear boxes are more trapezoidal rounded in the corners, the box is a depression that is painted grey and again the vent lines are painted. On the RO helmet, the boxes are more rectangular and again they are depressed with a raised portion that is painted grey with vent lines cut out. Again, I believe the screen used helmets had a depression that was painted black and additional parts with the vent lines cut out was painted grey and glued in place. On my helmet, these vent lines are cut out and backed with a black fabric. On the black series helmet, there is a battery box and speaker that must be modified for approval. Although the shape of both helmets are very similar, there are some minor differences. The RO helmet looks thinner overall. On the black series I had to extend the jaw line about 1.5” to fit a proper RO V-coder. The Hovi mics on the RO are exactly the same as the ANH Hovi mics with white interiors and the proper mesh screen. The lenses on the RO are also the same as the ANH lenses, green. If you are considering a ROTK, there are several options for helmets available to you. The least amount of work would be a Jimmiroquai helmet and the largest about of work would be modifying a black series helmet. I have a tutorial for the modifications I recommend in the RO thread. I do not recommend attempting to convert an OT helmet to a RO helmet, but I guess anything is possible. Next, I will be comparing the upper torso and arms. Thanks for the interest.
- 46 replies
-
- 11
-
-

TK - new hope Chelsea boots PU Leather ?
Tedi67 replied to Tedi67's topic in Boots, Soft Parts, and other Accessories
Hi , thanks for your reply, the boots I require really need to be Faux leather for ethical reasons, I will see if I can find some passable Chelsea boots ( to dye white) that are made from PU leather. thanks again -

Roukie 1 Request TK Pre-Approval (850 Amor Works)
TKSpartan replied to Roukie 1's topic in Request TK Pre-Approval
Oh Yes, for Basic your Chelsea boots are ok. I don't think velcros issue to be a problem for approval, but it depends on your GML. Let's see the result. Good Luck mate!! -

Roukie 1 Request TK Pre-Approval (850 Amor Works)
Roukie 1 replied to Roukie 1's topic in Request TK Pre-Approval
Thank you TKSpartan. I thought, white coloured Chelsea Boots would go for the basic approval? I´ll give your idea fixing the shins with velcro a try. Thanks for the hint. TBH I didn´t pay enough attention to the velcros on the biceps and tigh. I hope this will not be a reason not to get the approval -
It depends on how "screen accurate" you want to be, Jose. The originals were painted Chelsea style boots, and some like the beat-up look of them which I think adds to their charm. However, I think most of us prefer the pre-dyed version from the manufacturer (like IB).
-
Hi Brian, I think they're ok according to the CRL and here you can see an original Boot to compare. The only issue I see is that the Shaft section to be a little wide and could be difficult to fit into the shins. jus take it in consideration. Boots Boots are above ankle height and made of white leather or leather-like material. Small U-shaped elastic sections on both sides of the ankle. Flat sole with a short heel. No buckles or laces. Jodhpur/ Chelsea-type boots or an equivalent style is acceptable. Elvis or Mariachi boots are not allowed. OPTIONAL Level two certification (if applicable): There is no seam present on the front of the boot. Boots have a black sole