TK bondservnt
-
Posts
7,196 -
Joined
-
Last visited
-
Days Won
5
Content Type
Profiles
Forums
Gallery
Articles
Everything posted by TK bondservnt
-

Thermal Detonator paint color
TK bondservnt replied to Rezablad3's topic in Assembly, Mods, and Painting
grey pipe does not work. the goal is to color match your helmet's setup. testors for decals humbrol for hand painted. any hobby shop or trooperbay.com -
Thermal Detonator paint color
TK bondservnt replied to Rezablad3's topic in Assembly, Mods, and Painting
testors 1138 grey if you're using decals on the helmet. or humbrol admirl grey #5 look on trooperbay.com -
helmet mountain! a collection of helmets
TK bondservnt replied to TK bondservnt's topic in Hard Armor (General Discussion)
cmon troops keep em comin! -
it's always better to just get some flat bar. you have here the maker of things kit? is that right? looks nice! pay attention to the details for painting up a blaster, and are you going weathered? or new?
-
I cut my snap plates from a strip, and drill the hole in a vise 5 at a time. I've even used leather and quick grip glue for snap plates on hips.
-
e 6000 needs duct tape covering the back of a snap. it will create heat and melt the armor if any glue touches the back. I make snap plates out of large rectangles, not squares. snap in center, tape on back glue at the edges. the key to using e-6000 is that it's removable and cleans up. on abs if you get a bubble, or a glue run, or need to apply more, it can be removed from the parts you'll see. it also polishes away with NOVUS plastic polish. some troopers use 'crazy' glue, but that type of glue can become brittle over time and if you're going to use the suit a lot I'd go with the more flexible and forgiving e-6 the whole assembly is a lot stronger with inner strips, and outer strips at the fronts of the legs and arms.
-
Material for snap plates question.....
TK bondservnt replied to Solcar23's topic in Assembly, Mods, and Painting
cover the back of the snap with duct tape. if glue touches a snap it creates heat. -
billy mounts the hengstler a little far back. push it forward a little.
-
some of the front end looks a little loose. there are some issues with the finish on the front end. can I get that in inches?
-
how long is the blaster total length?
-
Any major problems before I apply?
TK bondservnt replied to Wiggleplum's topic in Build Threads Requireing Maintenance
it's interesting that the thigh power cell area is mounted above the normal mounting point. like this on the TKC and INC game models... -
Question about shin build [*AP]
TK bondservnt replied to Beren's topic in Assembly, Mods, and Painting
at the back of the shin you'll want to put a cover strip on the outside edge this adds material to cover the join at the back. this cover strip should overhang at least 1/2 way, or even more if you need a larger shin. you can make it anywhere from 1" to 1.5" wide. use 4" of velcro at the top back, and use 4" velcro at the bottom the back of the shin will align under pressure from the velcro. line the shins up at the top and take off the small return edge directly at the top front. if you need to you can make your shins wider by butt joining them wider than 1" at the fronts. -
Original Strapping Sizes?
TK bondservnt replied to TK_LEPER's topic in Boots, Soft Parts, and other Accessories
there have been kits available. they show the elastics and fittings. -
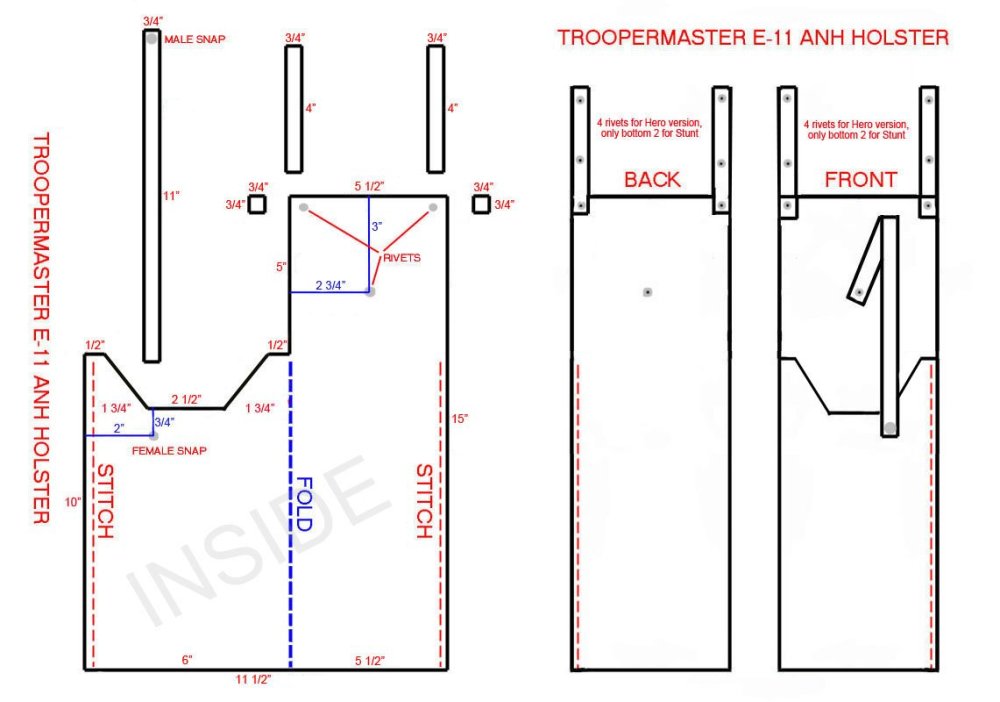
New holster design
TK bondservnt replied to gazmosis's topic in Boots, Soft Parts, and other Accessories
that's sure my friend... but I was speaking about the sci man holster on screen! happy trooping the new year! -
TK-8541 Requesting ESB Centurion Status[25][TM*]
TK bondservnt replied to FIVE's topic in Request Centurion Status
looks like he made it! -
New holster design
TK bondservnt replied to gazmosis's topic in Boots, Soft Parts, and other Accessories
if you compare the sci man holster on screen, and the photo. it's apparent that the straps were dyed black after the armor left the set. if you look closely at the photo shown of the belt the thermal detonator has black lines painted on it. even the body of the T det is black. ========== black straps on this belt above black lines on T det- showing painting by a previous owner- or by someone off set. and tan straps on the belt on screen. as shown below on holster 2 ---------- -
HEAR HEAR!! 2012... heeerrreeee we come...
-
Daetrin's TKC, courtesy of Dashrazor
TK bondservnt replied to Daetrin's topic in Stormtrooper Commander
more photos@! -
New holster design
TK bondservnt replied to gazmosis's topic in Boots, Soft Parts, and other Accessories
put tan straps on it. ditch the black ones. screen accurate. you could always add the little black stripes and the black patterns to the T det\ and you could add the black abdomen buttons and the black spots on the forearms but that's not SA. -
New holster design
TK bondservnt replied to gazmosis's topic in Boots, Soft Parts, and other Accessories
is that my holster zoinks scoob!~ TM saved the day again. -
New holster design
TK bondservnt replied to gazmosis's topic in Boots, Soft Parts, and other Accessories
I see your work. but your cut is completely incorrect according to the closeup evidence of holster 3 --------- holster 1 and holster 3 are TM2 mod. sci man is 2. holster 3 does not have a cut like you're showing. TM's pattern is the best around. and with a few simple cuts it can be exactly like holster 3 -
TM 2mm abs Hero build[*TM]
TK bondservnt replied to crafty's topic in Build Threads Requireing Maintenance
I want one! -
ok... where can I get some capacitors... I want to buy a set of 3.
-
lovin this!
-
New holster design
TK bondservnt replied to gazmosis's topic in Boots, Soft Parts, and other Accessories