


gmrhodes13
-
Posts
31,219 -
Joined
-
Last visited
-
Days Won
1,070
Content Type
Profiles
Forums
Gallery
Articles
Everything posted by gmrhodes13
-

TK-24576 Requesting ANH-Stunt EIB Status (RS) [886]
gmrhodes13 replied to HSM76's topic in Request Expert Infantry Status
Congratulations and welcome to the EI ranks trooper -
Hello and welcome aboard, looking forward to the build progress, good luck
-
Hey what's my arm doing on there
-
Nice work, hope those V tabs work, it's helped a few of my guys locally
-
Hi mate I posted some info in the other thread you posted in, here it is again in case you missed it: No you can't have that on an angle, the kidney plate and also the butt plate is sitting too high and needs to come down it shouldn't be overlapped by the backplate, this would help with the angle, but if you brought it down far enough to align with the ab section you may find you end up with a big gap between the kidney and backplate, you may have to add some shim material to the back plate to reduce this gap, but I'd try bringing it down to see exactly what gap there would be first. Here are a few threads on adding shims to kidney/ab which may be of help https://www.whitearmor.net/forum/topic/30448-adding-kidney-shims-for-larger-troopers/ https://www.whitearmor.net/forum/topic/29077-adding-the-kidney-shim-not-bad-but/ For level 3 you would have to blend in the join lines too, here is a how to make abs paste https://www.whitearmor.net/forum/topic/42866-how-to-make-abs-paste/ Pinched this from another build to show how the sides should align
-
I found I had to add some Velcro behind the spats just to stop them riding around. Good luck, hope you manage to squeeze in before it’s locked
-
Paint will make a difference as others have said, but if you still aren't happy with some of the teeth openings you could always tape them from behind and then lay on it's back, add some ABS paste on the openings you aren't happy with, once dry (at least 24hrs) sand on the front, using different grades of wet and dry sandpaper up to a 1200 or ultrafine, once you have the front sanded you can then go back and file out the centres. A great thread on making ABS paste here
-
Stormtrooper Commander CRL
gmrhodes13 replied to ukswrath's topic in Hard Armor (General Discussion)
No you can't have that on an angle, the kidney plate and also the butt plate is sitting too high and needs to come down it shouldn't be overlapped by the backplate, this would help with the angle, but if you brought it down far enough to align with the ab section you may find you end up with a big gap between the kidney and backplate, you may have to add some shim material to the back plate to reduce this gap, but I'd try bringing it down to see exactly what gap there would be first. Here are a few threads on adding shims to kidney/ab which may be of help https://www.whitearmor.net/forum/topic/30448-adding-kidney-shims-for-larger-troopers/ https://www.whitearmor.net/forum/topic/29077-adding-the-kidney-shim-not-bad-but/ For level 3 you would have to blend in the join lines too, here is a how to make abs paste https://www.whitearmor.net/forum/topic/42866-how-to-make-abs-paste/ Pinched this from another build to show how the sides should align -
Lorelei's 5'4" ATA ANH-S Centurion-Hopeful Build
gmrhodes13 replied to TheLorelei's topic in ANH Build Threads
We have a rule locally, if you hit 20 pages you have to buy everyone an icecream Storing your holster with a tin or tube inside can also help, I applied a little heat to mine which also helped to keep it a little more open. And in case the holster its too light and flaps around in the wind you could always try this: -
Nice work, came out a treat, I've seen some TD helmet images which show they actually painted grey over the original TK helmet stripes, may be something that may interest you. Just the black lines around the traps look a little wide compared to screen used, not sure if you've used this as reference but some nice photos there http://www.starwarshelmets.com/original-ANH-Stunt-Stormtrooper-armor-helmets.htm The only other thing is the base (olive) color still looks very clean, perhaps some scuffing or charcoal dust may dull that. Once again I must say you've done a very nice job, I'd be happy to show this on my shelf, something I may have to look at doing when I have some spare time, well done.
-
A.J. Hamler Requesting Pre-approval Review (AM)
gmrhodes13 replied to A.J. Hamler's topic in Request TK Pre-Approval
Nice work, the close on new member applications starts 1st February through until 19th February, so you may be able to just squeeze in if you are quick. You can still sent your application to your GML, at least get some feedback even if the last of the paperwork can't be finished. A nice clean build and I think you will have any problems with approval, good luck -
JeklynHyde's RS Prop Masters, ANH Stunt Build
gmrhodes13 replied to Jeklynhyde's topic in ANH Build Threads
Occasionally a little heat is needed to adjust the angle of the edges which will come in to contact with the cover strips, you'll notice they are angled at the moment. Glue your front facing sides first and wait for the glue to fully cure before trying to glue the opposite sides and with force they should come down and curve the sides a little more. -
Looking forward to seeing some fully kitted up photos
-
I tend to buy my snaps, elastic and Velcro online, I prefer the heavier industrial types, they are thicker and stronger and especially with the elastic it doesn't stretch as much. For snaps I used to use Birch brand but recently I've purchased from eBay in bulk and they have worked out fine. It's either purchase local if you can find any or online, unless you buy really cheap flimsy items then I'm sure you'll be fine.
-
Great news, looking forward to seeing those BBB's soon.
-
Nice work trooper, a couple of things you could address to really make it above and beyond Appears your side plates are overlapping in some photos, makes the side rivets look to have different spacing from the edges. Looks like you have a little more material you could take off your small ab plate, appears to be curved on the edges You may need to post some other photos of your sniper plate from the side, the DL's do like to see the alignment of the sniperplate to shin. Good luck with approval
-
Comlink question...
gmrhodes13 replied to justjoseph63's topic in Boots, Soft Parts, and other Accessories
Can just make the clip out in the following image Mine with clip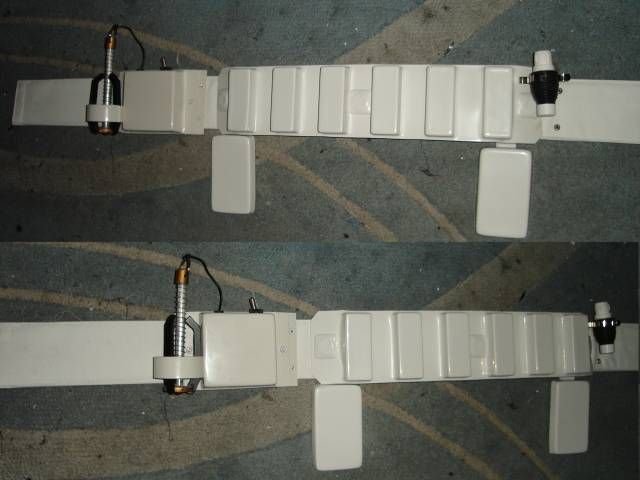
-
Nice work, just watch some of your armor spacing next time you kit up, thigh gaps and rotation, knee plates, spats should be below the black ovals, ab section looks a little low, if you could bring this up it would also bring up the cod giving you a little more room for movement. Good luck with approval
-
Lorelei's 5'4" ATA ANH-S Centurion-Hopeful Build
gmrhodes13 replied to TheLorelei's topic in ANH Build Threads
It's those niggling bits that can take some time but I'm sure you will breeze through, looking the part -
Digz Graavz First Build - ANH Stunt from AP
gmrhodes13 replied to Digz Graavz's topic in ANH Build Threads
And you can always go larger if needed, ideally you add to the rear as that's not seen very often -
Digz Graavz First Build - ANH Stunt from AP
gmrhodes13 replied to Digz Graavz's topic in ANH Build Threads
Arms front and back 15mm Thighs front and back 20mm Shins front 20mm, rear 25mm -
Comlink question...
gmrhodes13 replied to justjoseph63's topic in Boots, Soft Parts, and other Accessories
His helmet was a Stunt until Luke put it on then it was a Hero -
Joseph has a nice supply list here
-
TK-24576 Requesting ANH-Stunt EIB Status (RS) [886]
gmrhodes13 replied to HSM76's topic in Request Expert Infantry Status
Nice work, a couple of things you could address next time you are kitting up is you have a large area of glove showing, you may want to drop those forearms a little to reduce this. There is some overlap of your ab over the back plate on the side photos, also on the other side your rivets aren't aligning. You could also drop your thighs a little, they appear to be just touching on the back photo, will help when walking to have a little more of a gap there, will also reduce the large area of black at the back of your knees. The bottom blue button on the large ab plate seems to have a lot more paint on it comparted to others, I'd suggest removing a little of the paint. Nice work, good luck with approval
