gmrhodes13
-
Posts
31,219 -
Joined
-
Last visited
-
Days Won
1,070
Content Type
Profiles
Forums
Gallery
Articles
Everything posted by gmrhodes13
-

11057 Requesting Pre-Approval for my FOTK
gmrhodes13 replied to TK11057's topic in Request TK Pre-Approval
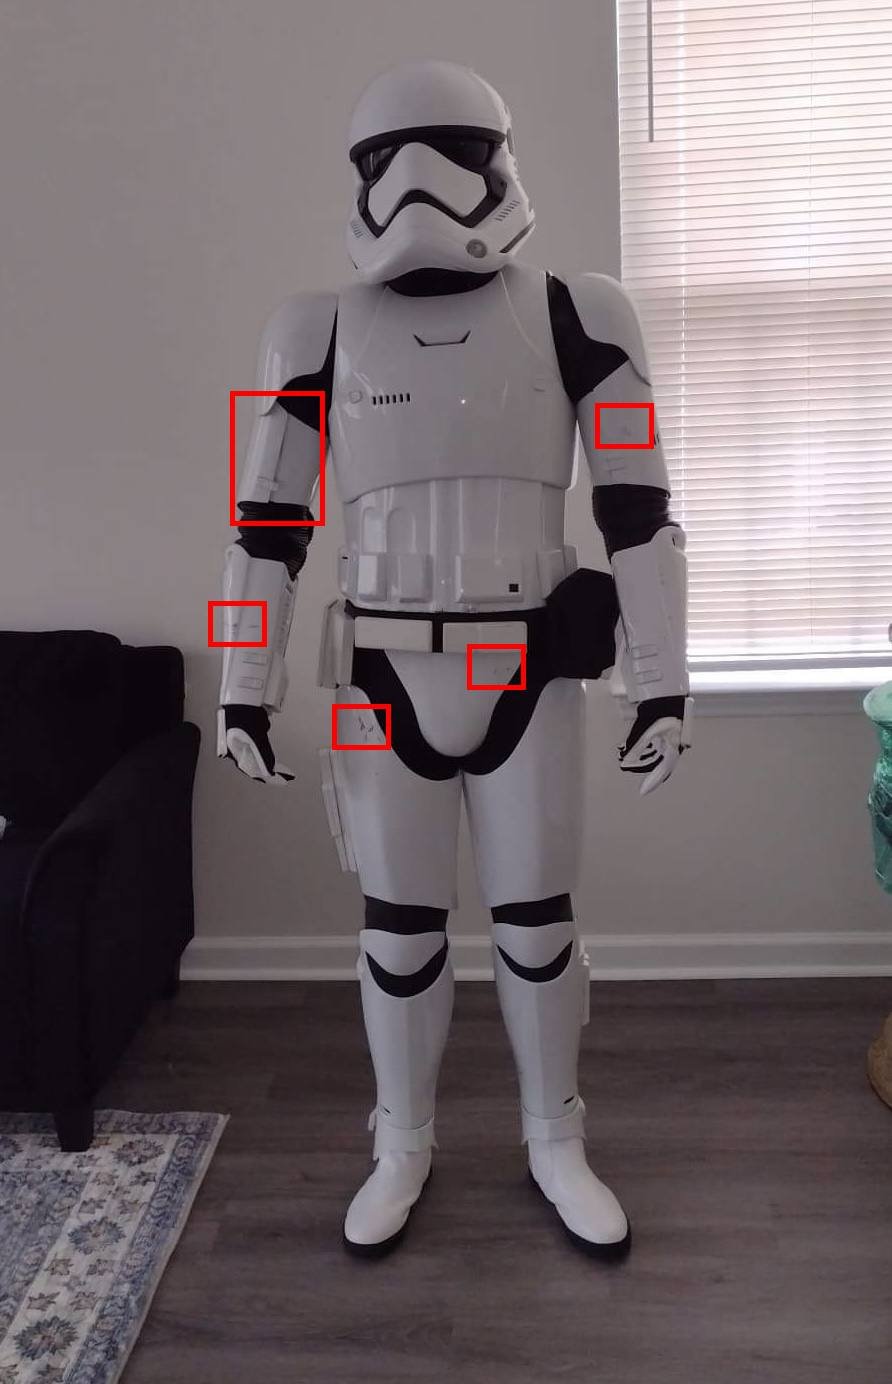
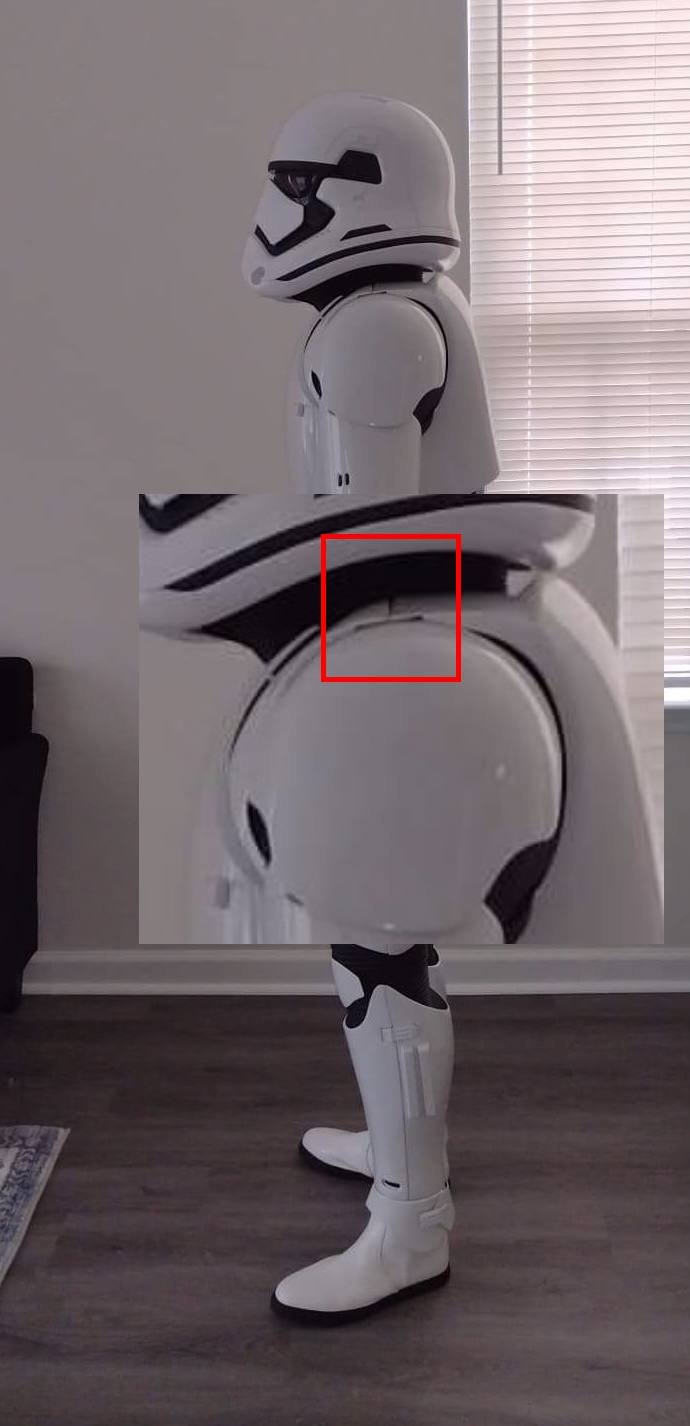
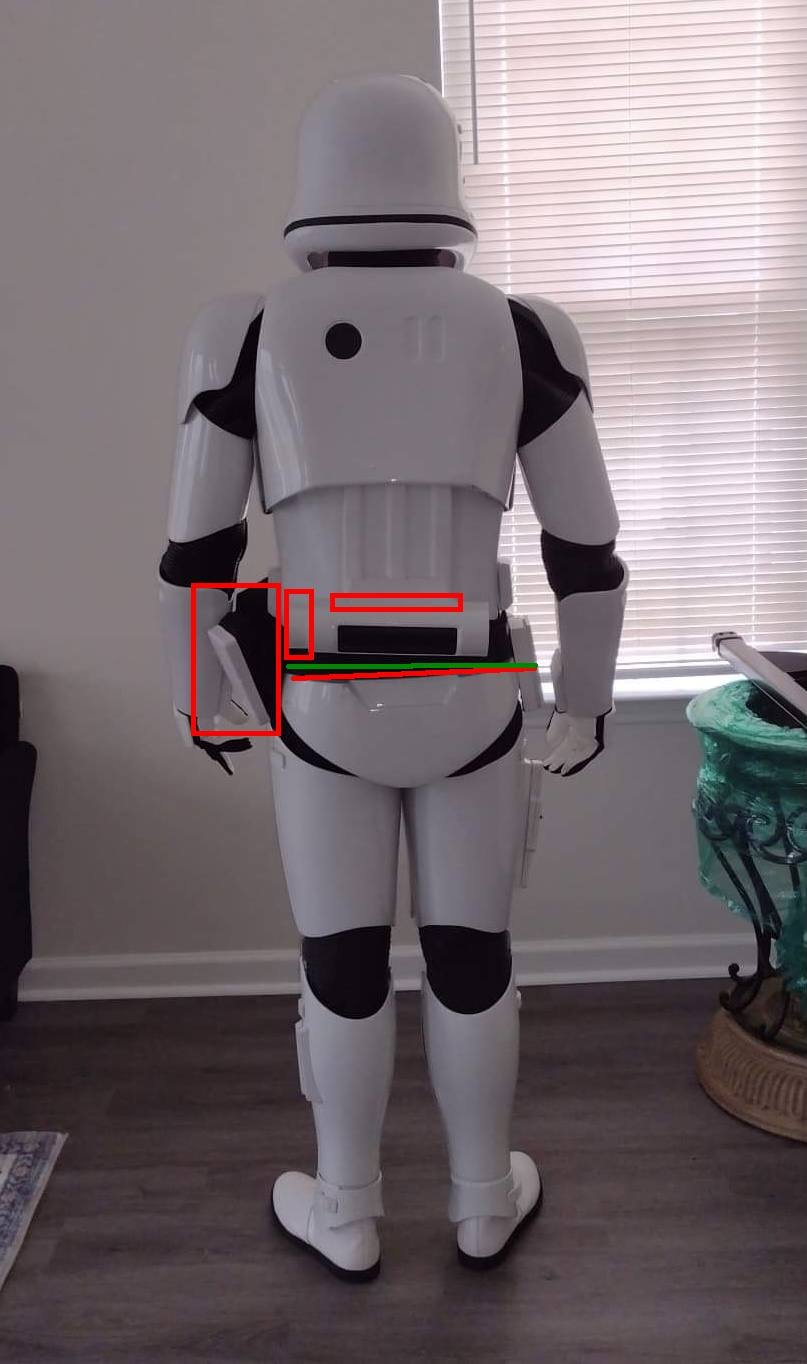
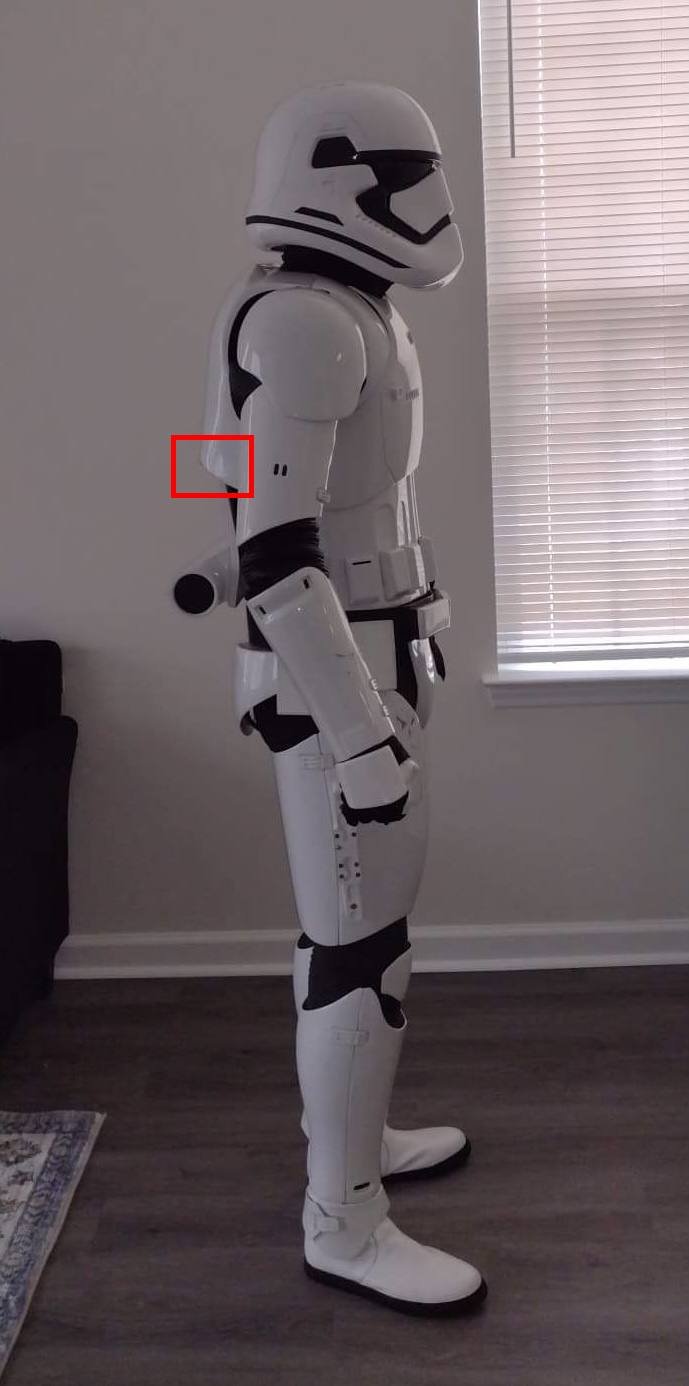
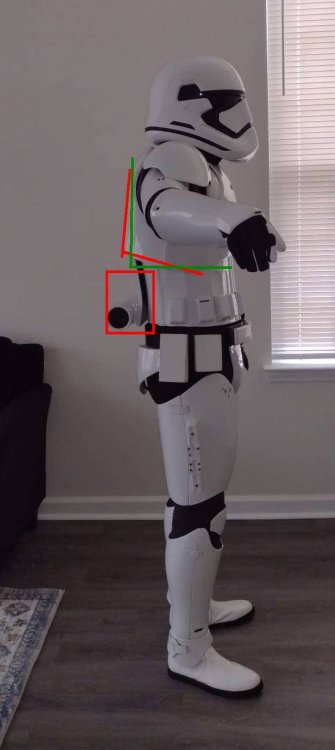
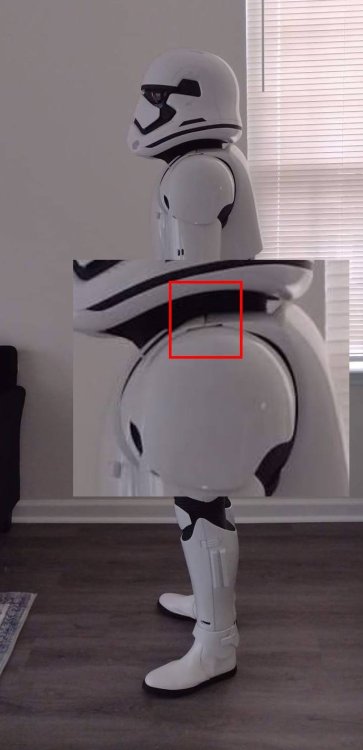
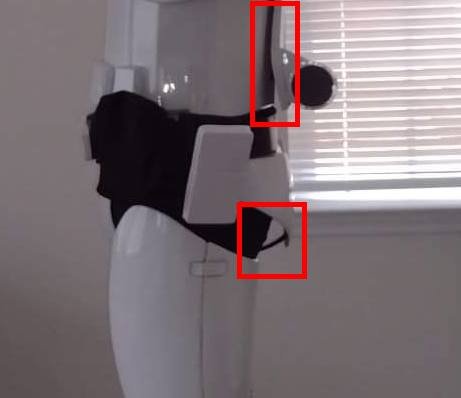
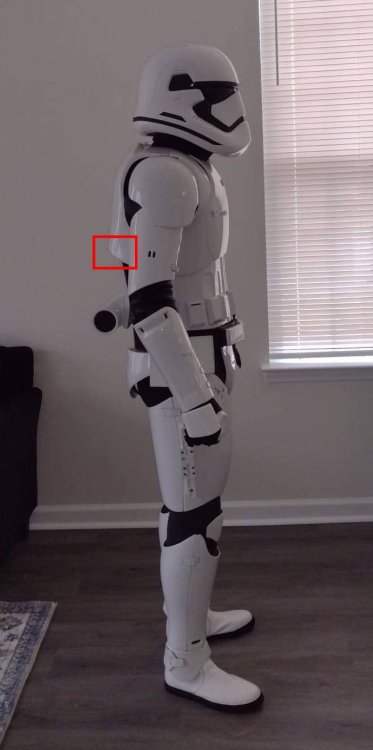
Nice work trooper, FYI if you use the "direct link" your images should show in your thread Your right arm bicep appears to be open, normally these are glued as they don't need to be opened when putting them on your arms. You have quite a few dark marks on the armor, some GML's may pick this up, I find using some auto polish can get rid of most marks. Could be my eyes or the photo but your belt boxes look a different shade of white? There is also some bunching of the gaskets at your elbows, I added some loops of elastic to the cuffs of my gaskets which helps keep them tight when putting on. Your left shoulder bell appears to have a gap between it and the back/yoke, should match the other side. Your detonator is not flush with your back, note the detonator on the right side trooper in image below. Back/yoke looks to be pushed backwards which will leave a gap between it and your detonator, you may be able to adjust this. You are also missing the black strip on the left side of the detonator. Butt plate looks to be on an angle compared to your back, this could be what is making your belt pouches/boxes to be on an angle, note the left is pretty noticeable, adding some stiff foam to the inside of the pouch can help. There is also some bunching of your gaskets, note between biceps and bells. You have a hinge/join between the chest and yoke/back, this is how Anovos made their last FOTK armor BUT it is not screen correct, this should be glued, filled and painted, note the reference below Appears to be a large gap under the butt plate, you can see your elastic strap, not sure if you could pull the butt plate in more. Detonator gap on this side also. I think that's about it for the moment, but I've only had one coffee so far today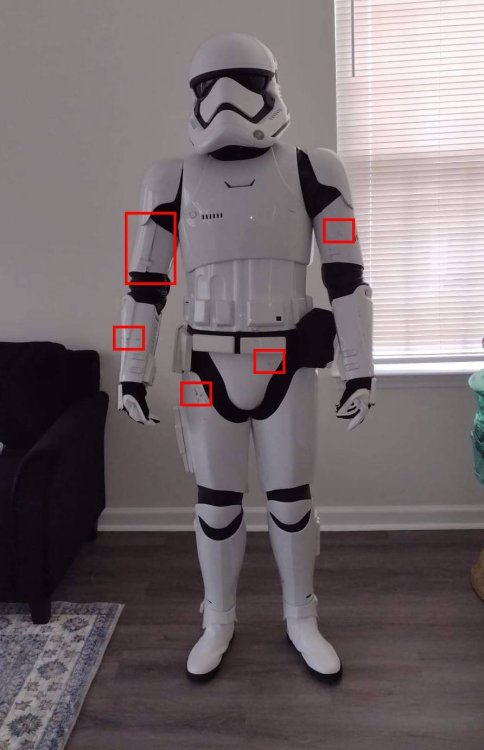

-
To finish off I like to use a block of wood with sandpaper wrapped around to tidy up the lines, works well for the belt and knee ammo strip too
-
Looking better, only thing apart from (as you said) cleaning up a couple of lines, is the masking line in the grey, it is pretty noticeable, perhaps the DO's @Deployment Officer Team will chime in with their thoughts
-
Here are some references. Ideally 1 large tab and 4 to 5 smaller tabs, but you can have less. NOTE: As seen in the photos below, there are no large tabs on the rear of the shoulder bridges. This is not specifically mentioned in the CRL, but removing them is highly recommended if possible.
-
Dead Post Links & Broken Photos, How You Can Help
gmrhodes13 replied to Sly11's topic in Forum Help & Support
Costuming and Builds Original Trilogy and Anthology (501st Approved) ESB Stormtrooper Page 4 Completed - gmrhodes13 Page 3 Completed - gmrhodes13 Page 2 Completed - gmrhodes13 Page 1 Completed - gmrhodes13 SECTION COMPLETED -
Tim’s first time build (RS Prop Masters ESB TK)
gmrhodes13 replied to TrickyT81's topic in ESB Build Threads
Most use Trooperbay ESB decals, unfortunately site appears down at the moment https://trooperbay.com/ can view on his Ebay store https://www.ebay.com.au/sch/i.html?_dmd=2&_dkr=1&iconV2Request=true&_ssn=trooper_bay&store_cat=0&store_name=trooperbaycostumingsupplies&_oac=1&_nkw=esb decals To apply you can use warm soapy water, a modelers trick from years gone by but it does take some time to get all the water pushed out from under the decal. -
Hello and welcome aboard, ChrisThePRopGuy as been working on some 3D files available but to my knowledge nobody has been approved with them This thread may also be of help
-
Dead Post Links & Broken Photos, How You Can Help
gmrhodes13 replied to Sly11's topic in Forum Help & Support
Costuming and Builds Original Trilogy and Anthology (501st Approved) ANH (Build Threads) Page 2 Completed - gmrhodes13 Page 1 Completed - gmrhodes13 SECTION COMPLETED Revisiting due to recent updates - broken link/images not to be touched not done yet in progress completed authors to correct revisited / broken links (Command Staff) (Extended Staff) Communications Center Announcements - Looks to be complete Forum Help & Support - Complete New Recruits Getting Started - Read this First! FISD Guidelines - Andrew 501st and Detachment Access Requests Andrew New Member Introductions - Andrew older posts will be relocated to archives Newly Approved Members - Sound Off! Enlisted Barracks Off Topic Field Training Exercises 501st & Detachment Members 501st General Discussion 501st For Sale/Trade Detachment Only - General Discussion - Election Archives - not to be touched - Poll Archives NA - not to be touched Detachment Merchandise - Trading Cards Events Fire Team Area Advanced Tactics TK Pre-Approvals - TK Pre-Approval Questions & Discussion - Request TK Pre-Approval - Glen Expert Infantryman Program - FISD Expert Infantryman Badge (EIB Requirements - Request Expert Infantryman Status - not to be touched FISD Centurion Program - FISD Centurion Requirements - Request Centurion Status - not to be touched FISD Master Armorer Program The Replica Section Imperial Commissary - Danny For Sale/Trade (Personal Items Only) - For Sale - Archive Ongoing Sales & Project Runs eBay Armor Armory Hard Armor (General Discussion) Assembly, Mods, and Painting - Tutorials, Tips and HOWTOs - Templates and Blueprints Boots, Soft Parts, and other Accessories Electronics for Helmets / Blasters 3D Parts and Technical - 3D File Depository - 3D Printer owners - 3D CAD Designers and Tinkerers FISD 3D Contributor Program The Foundry - Armor and Prop Making Costuming And Builds Original Trilogy (501st Approved) Archive area setup by Andrew for costume build threads https://www.whitearmor.net/forum/forum/241-build-threads-requireing-maintenance/ - Authors to correct here or archive Rogue One - Rogue One Build Threads Costuming and Builds Original Trilogy and Anthology (501st Approved) Anthology/Remnant - Anthology variant Incinerator and Artillery Build Threads - Remnant Build Threads ANH (Stunt and Hero) - ANH Build Threads ESB Stomrtrooper - ESB Build Threads ROTJ Stormtrooper - ROTJ Build Threads First Order Battle Group Costuming and Builds First Order (501st Approved) -TFA Stormtrooper >TFA Build Threads > Garrison Titan FOTK Build Area -TLJ Stormtrooper >TLJ Build Threads -TROS STormtrooper >Rise of Skywalker Build Threads -Captain Phasma - TFA and TLJ >Captain Phasma Build Threads -Captain Cardinal >Captain Cardinal Build Threads - Captain Cardinal > Captain Cardinal Build Threads CRL's and check lists Quick access Weapons of the First Order Quick find resources Gallery & Research Costuming and Builds - EU (501st Approved) Heavy Weapons Trooper - HWT Build Threads Stormtrooper Commander - TKC Build Threads The Force Unleashed Stormtrooper - TFU TK Build Threads Incinerator Trooper - INC Build Threads Sky Trooper Relocated to archives as no longer Det costume. - SKY Build Threads Death Trooper - Death Trooper Build Threads Battlefront DICE Shocktrooper Star Wars Rebels - Rebels TK Build Threads Concept Armor - Glen - MQ Build Threads Legacy Stormtrooper (Joker Squad) - Legacy Stormtrooper Build Threads Weapons Locker General Weapons Discussion BlasTech E11 - ANH BlasTech E11 to check, some images still missing - ESB BlasTech E1 - ROTJ BlasTech E11 - TKC BlasTech E11 - R1 BlasTech E11 BlasTech SE-14R BlasTech DLT-19 MiniMag PTL Missile Launcher, T-21, RT-97C (MG-15) BlasTech DC-15A and DC-15S TK Lightsabers Flamethrower (Plasma Rifle) Recon (non TK 501st approved) Kasyyyk Stormtrooper Other 501st Costumes Other Non-Approved Star Wars Costumes Non Star Wars Costuming Imperial Embassies /Danny Ayuda en español Unterstützung auf Deutsch Praesidium Italica 银河帝国中华大使馆 Section Française 日本語 Kiosk Русскоязычный форум Recasting Discussion Recasting Discussion ---------------- -
Looking good, can make a difference when wearing an undersuit so make sure you do final check wearing that
-
I found it's better to use a permanent glue, E6000 still has some flex and the crack can open again. A 2 pack permanent glue or JB weld has worked for me as I've tried both. Also make sure you rough up both areas with coarse sandpaper so it gives the glue something to grip to.
-
Dead Post Links & Broken Photos, How You Can Help
gmrhodes13 replied to Sly11's topic in Forum Help & Support
Costuming and Builds Original Trilogy and Anthology (501st Approved) ANH (Build Threads) Page 5 Completed - gmrhodes13 Page 4 Completed - gmrhodes13 Page 3 Completed - gmrhodes13 -
I feel ill
-
Dead Post Links & Broken Photos, How You Can Help
gmrhodes13 replied to Sly11's topic in Forum Help & Support
Costuming and Builds Original Trilogy and Anthology (501st Approved) ANH (Build Threads) Page 8 Completed - gmrhodes13 Page 7 Completed - gmrhodes13 Page 6 Completed - gmrhodes13 -
Hello and welcome aboard, for sandy's head over to MEPD Here is a great thread which may be useful You can find the costume reference library here for all 501st costumes https://databank.501st.com/databank/Costuming:CRLbyname Good luck with the research
-
Boots for Revan
gmrhodes13 replied to JustBelieve's topic in Boots, Soft Parts, and other Accessories
That's really a question for the Flagship Eclipse as it's their costume and they will have the more up to date information from the CRL. At times text and photos don't always match so asking at the specific detachment should give you the correct information https://www.theflagshipeclipse.com/forums/index.php?/forum/80-darth-revan/ -
Not actually a FISD meme but does hit the mark for the 3D printing community

-
Correct, also make sure you rough the surfaces with sandpaper before applying glue, will give the glue something to hold on too. Also note try not to get any glue on the snaps when applying them, some in the past have had reactions between the snaps and glues which causes heat, I have never encountered this though, be a good idea just to do a test one first You can also recess the snaps so they aren't raised
-
Either way is fine, I prefer mine trimmed and clean, does give you a touch more viewing area in the inner corners.
-
ATA ears are quite thick so you could do to trim them down a little more. The offset cut out is in one if the links I posted above, and it works
-
Dead Post Links & Broken Photos, How You Can Help
gmrhodes13 replied to Sly11's topic in Forum Help & Support
Costuming and Builds Original Trilogy and Anthology (501st Approved) ANH (Build Threads) Page 11 Completed - gmrhodes13 Page 10 Completed - gmrhodes13 Page 9 Completed - gmrhodes13 -
It can be hit and miss with color matching but it's definitely worth a try. You can have either 3 or 4 holes trimmed, most have 4 for Stunt and only 3 for Hero version. Some references A great wegsite for references http://www.starwarshelmets.com/original-ANH-Stunt-Stormtrooper-armor-helmets.htm
-
TK66007 Reporting for Duty!
gmrhodes13 replied to TK Monkus's topic in Newly Approved Members - Sound Off!
Congratulations once again trooper, looking forward to seeing many more trooping photos -
Approved 5-01st day 2022 and Trooped!
gmrhodes13 replied to MCPOLara's topic in New Member Introductions
Congratulations once again trooper -
Looking forward to seeing your BBB photos when it arrives.
-
Be very careful using a heat gun, can take some practice, I normally have a few pieces of wood handy, flat and curved depending what I want to shape, one pieces on either side, it helps to hold and smooth areas while they cool. If you just heat you may find the plastic begins to sag as it's loosing the tension of the heat vacforming. Some use a hot water bath which is a little less heat. Here's a couple of color comparisons, and note these colors can change even with the same maker, they are affected by color change from manufacturer.