gazmosis
-
Posts
4,043 -
Joined
-
Last visited
-
Days Won
23
Content Type
Profiles
Forums
Gallery
Articles
Media Demo
Everything posted by gazmosis
-

TK-50541 Requesting ANH Stunt Centurion Status [SDS][181]
gazmosis replied to anderche's topic in Request Centurion Status
Wow! Thank you so much for your application for Centurion. Let's not delay any further and get to it. CRL and Centurion Application Requirements: The only pic that was missing was the cod/butt plate attachments. However, I can see both male snaps and the cod rivet in the interior strapping shot. Your armor is displaying all the required details to earn the Centurion badge. Congratulations and welcome, Andres!! Other-Armor Fit/Assembly: Your really did a great job and the little adjustments pulled your armor up one more level...literally. Your rear trap vent line adjustment and all painted details, your holster straps, the from button plate (still not sure if they were separate in your EIB but they are correct here) Your belt position is perfect, and your blaster is on point! Thank you also for providing the shots that make certain all your armor construction was butt jointed and NOT overlap as is seen in many SDS builds. A very well earned badge indeed!! Thank you!!! -
Hey there Carlos! Thank you for this very creative build and your application to Expert Infantry! Let's have a look!! CRL and EIB Application Requirements: There is one critical photo missing from your application: the action shot. This is the pic that I enter you into the database with. Please post this!! Other than that, your armor does contain all the necessary requirements to achieve EIB but I cannot enter you until I have that pic. Other-Armor Fit/Assembly: It really looks like you have all your "Is" dotted and your "Ts" crossed. You did a wonderful job merging parts from three different armor makers to create one fantastic set. Centurion Suggestions: The final accuracy is the responsibility of the trooper although I try to spot and mention the points needed. I hope nothing pops up in your application but right now I see nothing holding you back. Nice work but please get that pic posted right away.
-
There is no defined measurement. If I was to give you a guide point, it would be the center hinge point of the rear sight.
-
TK16084 - Requesting RotJ EIB Status [CFO][496]
gazmosis replied to KaitoTrooper's topic in Request Expert Infantry Status
Hello Mr. Premm and thank you for your application to Expert infantry. CRL and EIB Application Requirements You have a small group of pictures missing from the required photo checklist. If the photo is not present but the detail can be seen elsewhere, I usually let that go or ask to post it later but there are several missing here: I need an "arms up" shot of your left and right side so I can see side detail, I need a rear shot of your helmet, I need a pic of the wrist opening of your forearm and just because I can't see it clearly, can you provide a pic of the bicep strap inside the shoulder bells, please? So far, your armor has all the correct details for EIB. I just need to see the details in those photos I asked for and we can move forward. Other-Armor Fit/Assembly: In this section I will go over observations from your fellow troopers and myself. If these observations should lead to suggestions for corrections or adjustments, I will point out if those adjustment would affect an application and be required to change. Typically with ANH/ESB applications, forearm return edge shots are not required for EIB. A shorter CRL can be a benefit and to combine the overlap construction with the no return edge feature seemed a no brainer to combine. Just one less thing to keep track of. Fortunately, you have such a good build that there really isn't much to list here. Great work! Centurion Suggestions: As much as I try to spot and point out everything, Centurion applications are much more detailed and may show something not seen here. The ultimate accuracy is the job of the trooper. I would like to see a new body shot with a little padding under those shoulder bells. One of the defining features of the RotJ suit were the flaring shoulder bells. The next point will unfortunately require a little repair. Your pack on the lower right thigh needs to have the rivet mounting point in the upper corner of the pack. You have it in the middle on both sides. Pop rivets are ok here, they just need to be mounted properly. I am opening myself up for a bit of schooling here. Please provide info if I am mistaken regarding this. Your front sight on your blaster does not look like any front sight I have seen before. Here is what I am most familiar with seeing:. There is a big difference in these compared to yours: Please show me a reference photo of a blaster with your type of sight. Get on those photos for the EIB application so we can move you forward!! -
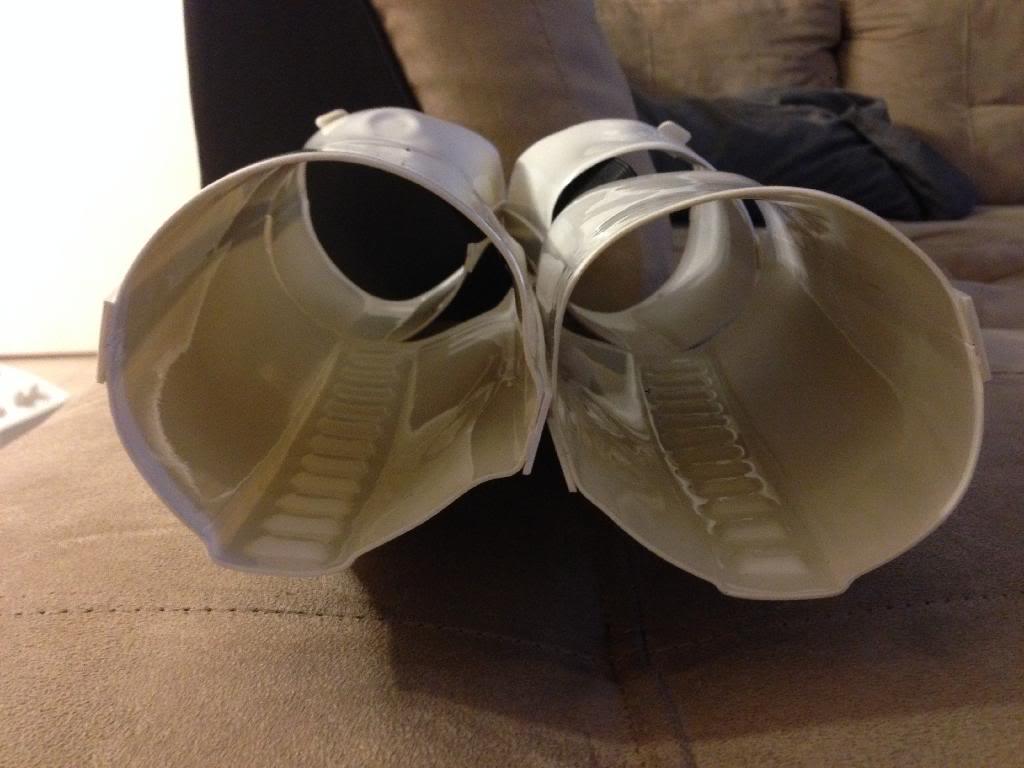
Thermal Detonator Construction Dimensions ?
gazmosis replied to Artshot's topic in Assembly, Mods, and Painting
Your end cap thickness should be a little closer to 20 mm the control panel width (side to side) is perfect and front to back is perfect the gap between the control panel and end caps should be about 12 mm all together your total leng should be around 187...just as you have. (in that ball park) The belt clips should be 2mm thick X 27mm wide aluminum -
Re-shaping the general shape of a part is possible with hot water, however you mentioned re-making return edges. Hot water will never heat the plastic enough to make the plastic mold able to bend into new-return edges. Ultra hot sources like a heat gun or a propane torch on the lowest possible setting should be tried only if you have experience!! A hobby iron works the best for return edges. The temp can be controlled and it can be don precisely to a pre-determined bend point.
-
The other main difference is the color. The 1.5 is sharper in detail but it has an off white color to it. Troopermaster himself feels this is closer to the color of the original costumes. The 2.0 is brilliant white and shiny.
-
Richard's ANH Stunt 2 mm [TM]
gazmosis replied to VulpX's topic in Build Threads Requireing Maintenance
Boy are you going to enjoy this build. That 2.0 is nice plastic that makes a nicer trooper!!! Awesome -
Ok THIS IS JUST NUTS!!!! Are you kidding me!!?? Way to go, Charles. CRL and EIB Application Requirements: All required photos have been submitted. You may add deathtrooper to your growing list of costumes that have earned EIB. congrats!! Other- Armor Fit/Assembly: I can't find too much to mention in this section. For those who might be asking, gore is not required for this costume. If a trooper wanted blood, it would have to emulate dried blood and not gushing out or wet. Sometimes less is more. Fabulous work on that helmet. I know it's hard sometimes to destroy a perfectly good helmet, but this was worth it!! Great prosthetic work behind the crack openings and with the hands. Centurion Suggestions: Although I try to spot and mention all that I can, the final Centurion accuracy is up to the trooper. I know who you bought your armor off of and the history of it. There are two things that jump out at me regarding Centurion Status however. You will unfortunately need to do a little side shim work to get those shims down to level with the armor surface. Lastly, you will need to heat up a nail or something to knock in the protruding center of the thermal detonator round area. This should look like a donut . Fantastic work and just in time for Halloween!!!
-
TK-24976 Requesting ANH Stunt EIB Status [ATA][495]
gazmosis replied to gusynet's topic in Request Expert Infantry Status
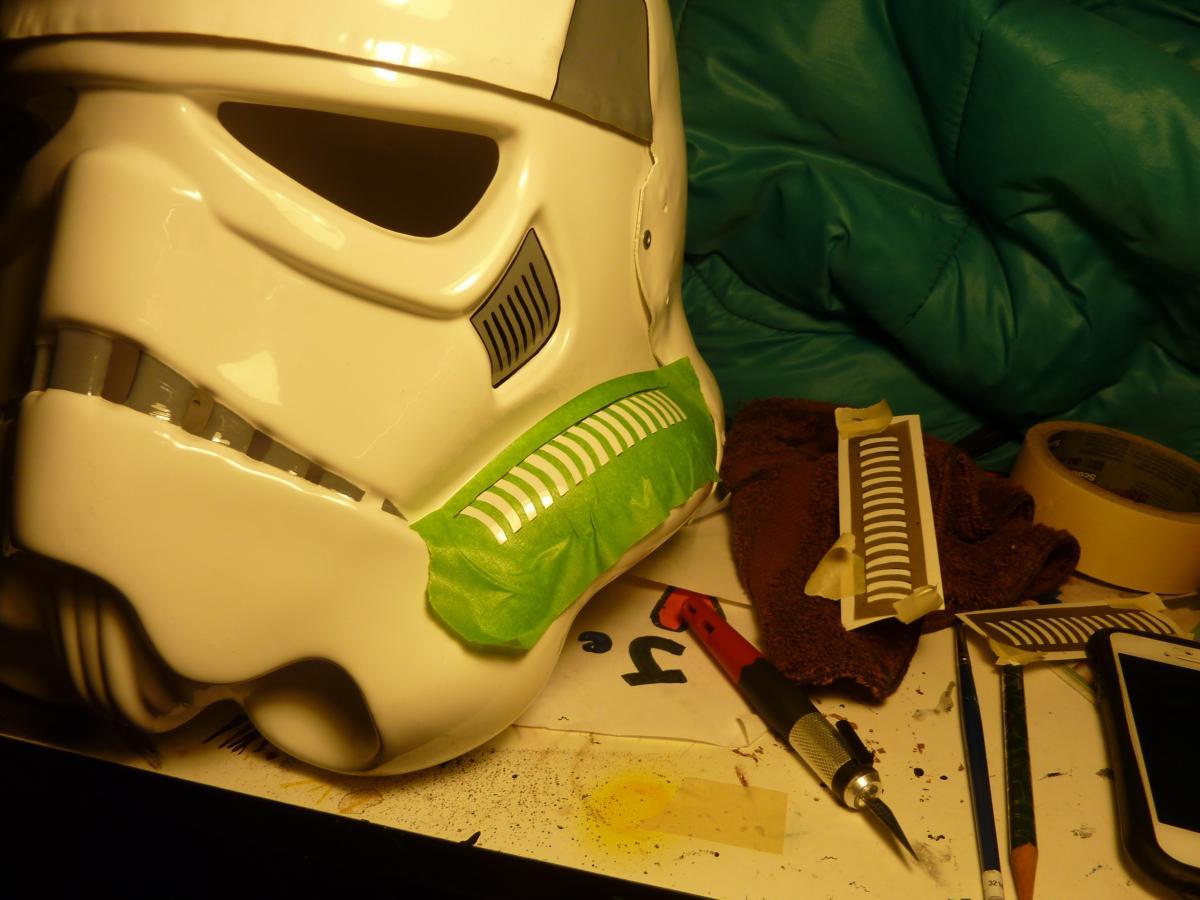
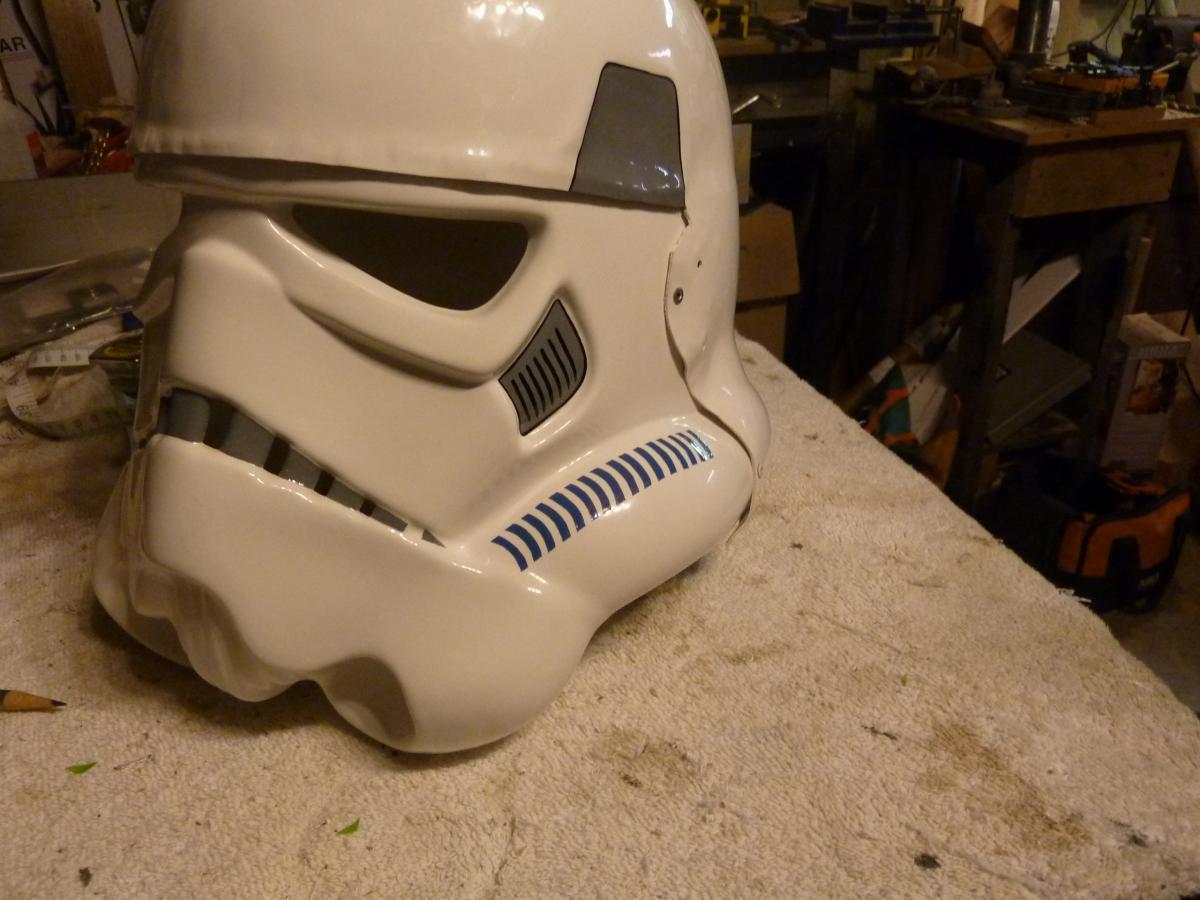
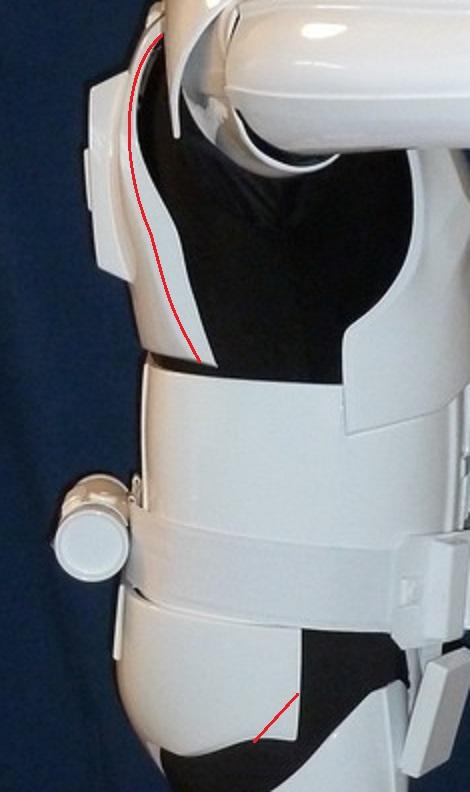
Hello Josè!! Thank you for your application to Expert infantry. Let's have a closer look at your armor. CRL and EIB Application Requirements: All required photos have been posted. Your armor contains all the required elements to qualify for EIB. Congratulations and welcome to Expert Infantry!! Other-Armor Fit/Assembly: In this section, we will discuss observations made on your armor. I will specify if any changes or upgrades to your armor would be required. There should be a special costume name like "Muscletrooper" or "Enforcer Trooper". You would be the lead trooper. I want to be on your team!!! As for your armor, you have a wonderful build. You have fit this armor to your larger frame very well and it actually looks balanced. Great job. A couple things I noticed: First, I like to see the drop boxes from the belt around 12 mm thick. Yours look to be a bit thicker than that. Second, your center button plate is trimmed out perfect to the edges of the stage. I like to see these just shy of the stage it is glued to but it looks good. Please see the section below for further comments: Centurion Suggestions: I try to see and point out as much as possible, but the ultimate accuracy of the Centurion armor is up to the trooper. I sure hope to see a Centurion application from you. I do need you to adjust a couple things on your helmet, though. I commend anyone who takes on the task of hand painting the details as you did. In a rare occasion I see a detail that, although handpainted, may stray from the original appearance a bit too much. There are two things I would like you to change. First, the outlines of the trapezoids and tears below the eyes should be the same thin line like you have on your ear rank bar areas.Now, because of the size of the dome, the outlines of the traps look acceptable. However, in the tear areas, the outline is a bit enthusiastic. Compare to the original paint. I promise, if you take your gray paint and thin that outline just by half, you will see how much better you will like it. The next issue are your tube stripes. You did a nice job painting them, however, they are located far too low down the cheek. As you see on the screen used helmet, they need to be placed about a pencil width away from the face on the cheek. I can see you are talented with a paintbrush. I believe these will be easy fixes for you. If you want to make them a bit more even and the overall process go easier, do a screen shot of the templates from this thread:http://www.whitearmor.net/forum/topic/14867-tube-stripe-masking-templates/ I paint mine this way now. I place a large piece of masking tape onto the area to be painted and make sure it is completely smooth. I draw a dark line a pencil width away as my placement guide. I tape the template in place and trace out the stripes with a fine sharpie. I then cut out each stripe carefully with an exacto knife. This is what it looks like before paint: And after: The key is making sure the tape is completely smooth before painting . Lastly, the gap on your left side needs to be completely eliminated in your Centurion photos. Congratulations on your EIB accomplishment.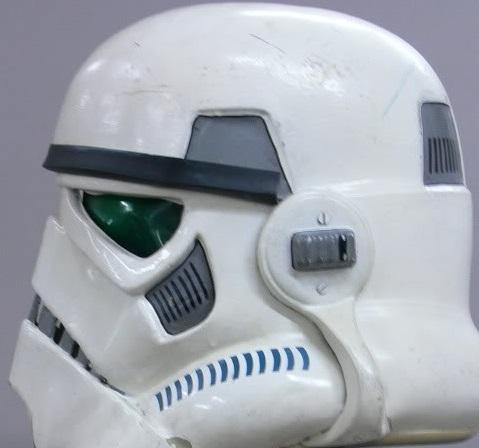
-
TK14469 requesting ANH Stunt EIB status [RS][494]
gazmosis replied to Darth Raveen's topic in Request Expert Infantry Status
Hey Sascha!! Thank you so much for your application for EIB. Let's take a closer look!! CRL and EIB Application Requirements: You are only missing photo but not a critical one. the cod and butt plate attachment. Please take this picture and edit it in so we can see it. As for your armor, it contains all the necessary details required for EIB. With that, I congratulate and welcome you to Expert Infantry!!! Other-Armor Fit/Assembly: This section is to discuss observations made by myself and fellow troopers. If any suggestions for correction or improvements are made I will specify if they are required in the Centurion Section below. Thank you for letting us see this work of art. Karin mentioned the natural weathering and that hits the nail on the head. Very nice!! The only comment I can drum up is in regards to your belt and holster straps. I will make further note of this in the Centurion Suggestions section below. Typically, the holster is mounted much closer to the end of the plastic waist belt. I also like to see the rivets mounted a little lower. However a repair here would ruin your belt and most likely require a replacement as the mark and hole from the first rivets could not be removed. It is fine but please check below. Centurion Suggestions: Although I try to see everything, the ultimate Centurion accuracy is up to the trooper. Since the cod/butt attachment wasn't seen, please make sure there is no paint on any of the male snaps or the split rivet. If possible, I'd like you to take your Centurion application pictures with a better quality camera if possible. It is just a shame to showcase your incredible armor with grainy images. Going back to your holster straps......they are REALLY long. you need to only have around 25 mm of strap showing. This is an easy adjustment for you I am sure. Thank you again and wonderful job!! You must make your Garrison proud! -
TK 42131 requesting INC EIB status [AM2]493]
gazmosis replied to yoshix's topic in Request Expert Infantry Status
Hi there, Johan! Thank you for your application to Expert Infantry. Let's have a look!! CRL and EIB Application Requirements: All required photos have been posted. Your armor contains all the necessary requirements to qualify for EIB. Outstanding work and awesome details. I know this wasn't easy. Other-Armor Fit/Assembly: Your build was a topic of discussion as was your source. It is admirable that you went to the extent as you did to follow the reference photos taken from the video game. However, the game reference shots were made well before and in no comparison to what we see in today' s graphics. This explains the misplacement of certain details that you repaired and displayed lower in you application specifically on your thigh pack. There was a mention regarding the control panel on your thermal detonator. This was also discussed. If the thigh pack needs to be lowered, why not have the proper ROTJ details on the Thermal Detonator? The control panel was felt to be something that could be exclusive to the INC Trooper and so the plain panel will be accepted. I do have one more point that I would like to bring up regarding your thermal detonator in the Centurion section below. Centurion Suggestions: Although I try to spot and mention as much as I can, the ultimate Centurion accuracy is up to the trooper. Please make sure that if you decide to apply for Centurion, that your full body shots are re-taken to show the corrections you have made. Although you showed your thigh pack lowered, it still needs to display the proper rivet placement and the rounded lower edge. In further regards to your thermal detonator.....first, thank you for NOT creating the gray box that the game trooper image shows between the TD and the belt. However, your thermal detonator should have the belt clips that come under then up to the control panel in the front as seen here: Rubber /flexiblehandplates will also be needed. Well done again, Johan!!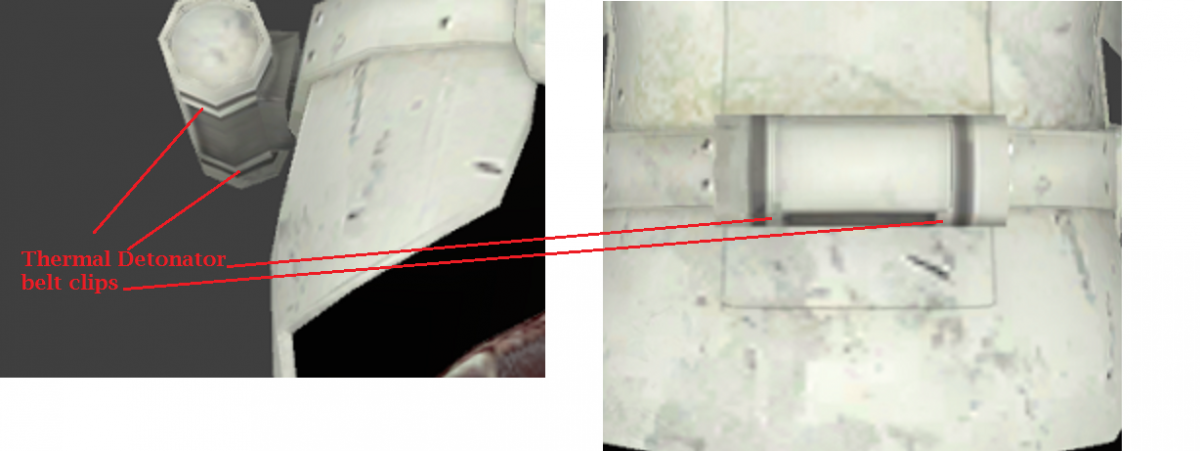
-
minimal return edge on the bottom and sides. Keep a more prominent return edge at the top against the kidney.
-
TK-46700 Requesting ANH Stunt EIB status [ATA][492]
gazmosis replied to Nacho's topic in Request Expert Infantry Status
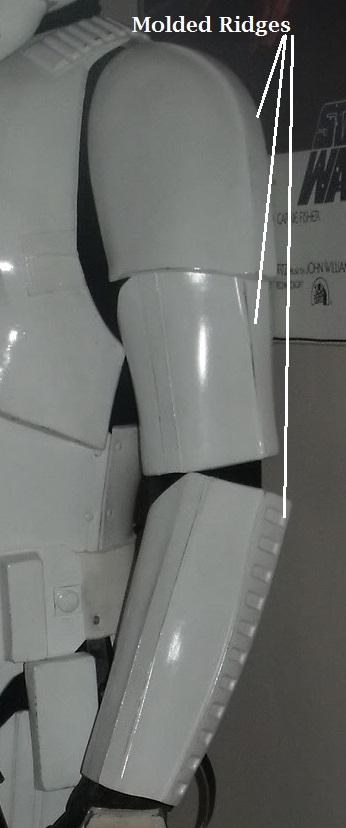
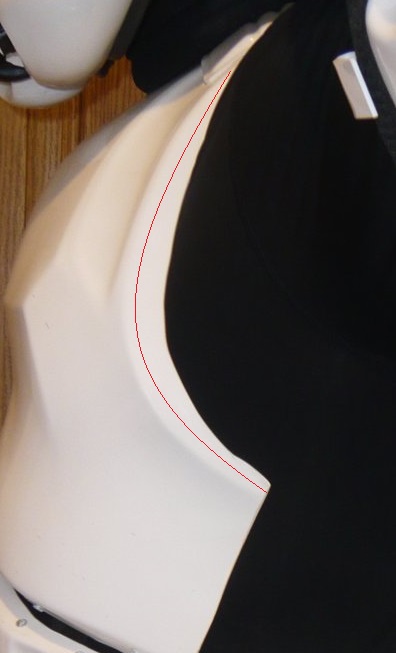
Hey Dave!! Thank you for your application for expert infantry!! Let's not delay this further and get to it. CRL and EIB Application Requirements: All required photos have been submitted. Your armor contains all the necessary element needed to qualify for EIB. With that, I congratulate and welcome you to Expert Infantry!! Armor Fit/Assembly: This section is reserved for the observations of myself and your fellow troopers. Suggestions to change certain things may also come up. If any of these changes would be required, I will specify those in the Centurion section below. First off, nice clean build!! Well thought out and well executed. Thank you also for providing us with a shot of you and your weapon. This pic with your weapon is the one that will be added to the EIB data bank. The thing that separates EIB from basic approval is a weapon. If you can sew or know someone who can, I would strongly suggest to trim down the excessive overlap you have on your cloth belt. It just makes for cleaner appearance to your armor. I know that the right forearm is less than perfect on the ATA kit but your seems a little big still especially in the wrist. I see in your "arms up" pic that the molded ridge your cover strip sits on is larger than the cover strip. These should be the same so there is room to take this down for a more comfortable fit. I can appreciate your thigh situation. Although it is ideal that the thighs be worn higher, when you just can pull them up any higher it limits this. ATA thighs are not the roomiest thighs either. Nice work on the hand painting of your helmet details. I like to see the black outlines of the tears and traps a bit thinner but nice work on that challenge. I see you already tones down the gold on your Hyperfirm blaster. Centurion Suggestions: Although I try to spot and point out everything, the ultimate accuracy for Centurion is up to the trooper. Please make sure you re-take your full body pics with the following two changes: #1 the gap on your right side needs to be eliminated and the outer edges of your drop boxes should align with the outer most edge of your waist belt.Well done and congratulations again! -
AH PVC pipe...without it the world would collapse in turmoil!!!
-
The joke is: Stormtroopers on a motorcycle are the safest...they can't hit anything!
-
Taking a Blowtorch to Armour?
gazmosis replied to essbeestuff's topic in Hard Armor (General Discussion)
Both RS props and Troopermaster are UK based -
TK-46700 Requesting ANH Stunt EIB status [ATA][492]
gazmosis replied to Nacho's topic in Request Expert Infantry Status
A weapon for basic approval is not required, however, for EIB and higher accuracy badges, it is. I will need you to post pics with both your armor and your weapon. I will do a full review once those are posted. -
TK-24419 Requesting ANH Stunt Centurion Status [SDS][180]
gazmosis replied to cuacpato's topic in Request Centurion Status
Thank you, Jordi, for trimming the forearms out and providing the pics. It is most ideal to see BOTH rivets attaching the thigh pack in the upper corner like you have on the one side, but........ Congratulations!! -
TK 91101 requesting ANH Stunt EIB status [AM2][491]
gazmosis replied to Skypig's topic in Request Expert Infantry Status
Your build slipped by me. Everything is in line now so congratulations!!!! Please make sure that if you apply for Centurion that you show no pics of the old thigh pack. -
TK-24419 Requesting ANH Stunt Centurion Status [SDS][180]
gazmosis replied to cuacpato's topic in Request Centurion Status
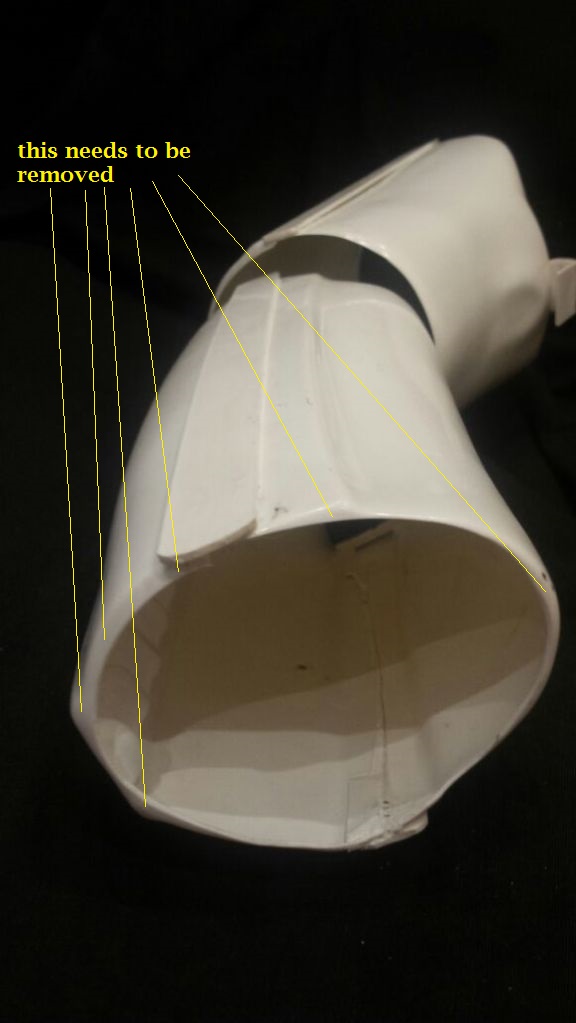
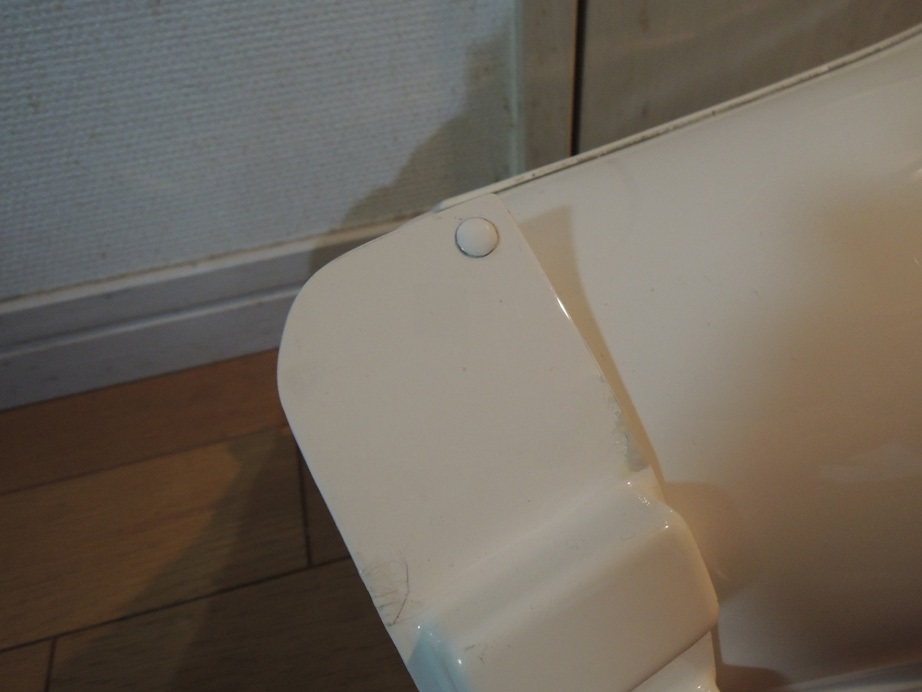
Ok Jordi! Thank you for your application for Centurion!! I appreciate all your hard work so let's get to it! CRL and Centurion Application Requirements: I need a couple things updated with your application. First, I need a picture showing the full back side of both drop boxes Next, the application requires a picture of your thigh pack attachment points on your lower, right thigh. These pictures should be from the side showing the rivets. As for the details on your armor. Thank you for catching that cover strip on your thigh back. I will need you to trim all the return edge out of the wrist openings of the forearms as I have marked here:. When done, they should look like this: Other-Armor Fit/Assembly: I am so sorry you had that break in your armor. It is much appreciated, though, that you did the hard work and provided the pictures to make sure you had butt joints rather than overlapping as commonly seen in SDS armor. Nice work on getting that Doopy upgrade for a blaster!! Those points I mentioned above won;t take any time. Get on that so I can approve your Centurion armor!!
-
TK 91101 requesting ANH Stunt EIB status [AM2][491]
gazmosis replied to Skypig's topic in Request Expert Infantry Status
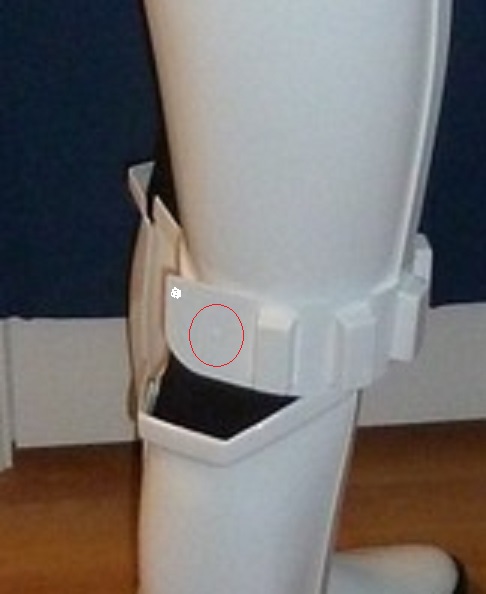
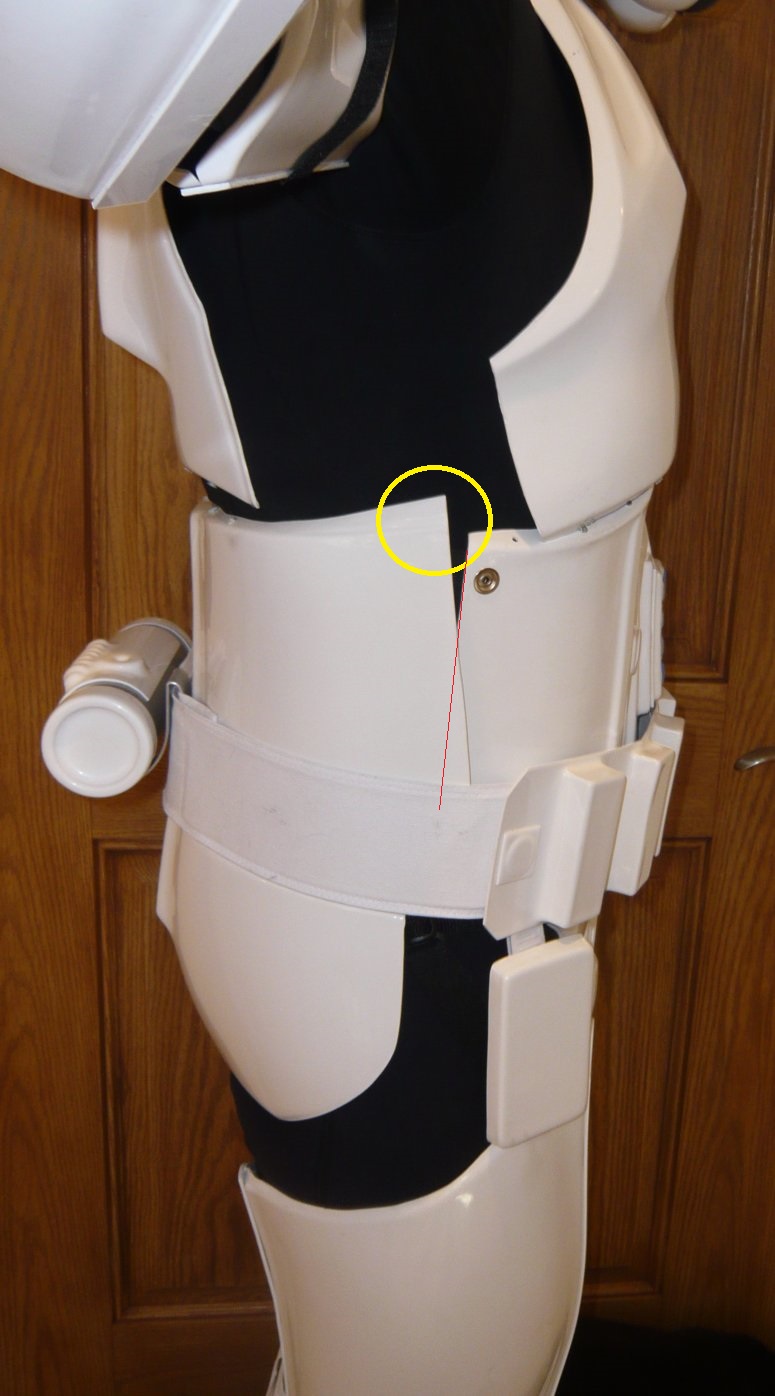
OK OK!! First off, thank you, Mike for your EIB application. Obviously much to go over here so let's get to it!! CRL and EIB Application Requirements: Although one pic was technically missing (cod/butt attachment) this is clearly seen. all other required photos have been posted. There is one point on your armor that will need to be repaired before we can go forward with the EIB badge. You did great in repairing your thermal detonator. The requirement is "little to no gap" between the clips and end caps and on a thermal detonator any more than a little, is just too much as you first had it. Nice work!! But the issue is on your thigh pack. This needs to be trimmed down so that the upper corner of the pack is even with the back corner of the molded ridge on the bottom of the thigh. Then the speed or split rivet is to be installed in the upper corner like this. Unfortunately, you have it mounted directly in the center (red circle). I marked in white where the proper location needs to be. There will be a little ABS paste work needed to repair the hole, but it's small and an easy enough fix. Other-Armor Fit/Assembly: In this section I will go over the observations of your fellow troopers and and ones I have made. Sometimes a suggestion for a change is made. If these changes would affect any application, I will specify that requirement and/or have it listed in the Centurion section below. Let's start with your great build. This armor was made for muscle troopers as yourself. You did a great job fitting this to yourself. Stay away from Vader, though. You might be taller. Spectacular ab button painting. Nice work on that Hasbro conversion and removing the proper T-track from the lower magazine side. How in the world are you keeping your lens visor attached?? Your fellow troopers had some good points so I will go over those things now. There seems to be a bit of focus regarding your belt. I will further mention your drop boxes in the Centurion section below. Your overall belt position is fine, though. As long as the belt is resting against or slightly overlapping the button plates (as in the screen grab) it is fine.The only time I request adjustment here is when there is a visible gap/droop in the belt away from the button plates Which you do not have. I would, however, add another attachment or a little more glue at the top securing the strap better so it doesn't pull away from your belt . As for the centering, that seems to only show on the shot where the belt is on the table so no need for concern there. Now the center button plate itself. First, you are not being a jerk. It's perfectly fine to question everything. We are on your side. ANYHOO!!! Since I don;t have a photographic memory, I went back and looked at my comment as presented by Tony. I didn't mention the flashing on the outside (or lack there of) as a violation just a concern regarding if this is trimmed off you have no gluing surface. You have obviously found a way to make it work so as long as there are no huge gaps on the sides, it fine with me. As for the AM brow...yes I have seen it have some droop in the front. A lot. I cannot say from experience why this is but I have seen builds where it's not there. If people like the low brow......you like low brow. I have used the post construction trimming of the brow under the trim but this will never be a required step. My own suggestion. This JUST came up on a recent application regarding excess return edge on the back and that annoying corner on the butt plate by your hip. It would benefit the look of your armor to trim those back. Here are my suggestions: WHEW!! Centurion Suggestions: As I try to spot everything, final centurion accuracy is up to the trooper. I am sure we will see a centurion application from you. There are a couple things that nee upgrading before you can do that. First, you will need a Sterling based blaster. You will ned to incorporate the kidney notches on the lower front corners of your kidney plate Re-mentioning your drop boxes, they need to be positioned so the outer edge of the boxes align with the outer vertical edge of the belt. Please make sure this appears in your Centurion full body photos. Regarding full body photos, please re-take the back shot to include your repair on the Thermal Detonator. Since I couldn;t see your crotch rivet, just make sure there is no paint on it. Take care of that thigh pack rivet location and trimming first and the rest will come later!! Great work!

-
Lord Of Fairies- ATA Build thread
gazmosis replied to LordOfFairies's topic in Build Threads Requireing Maintenance
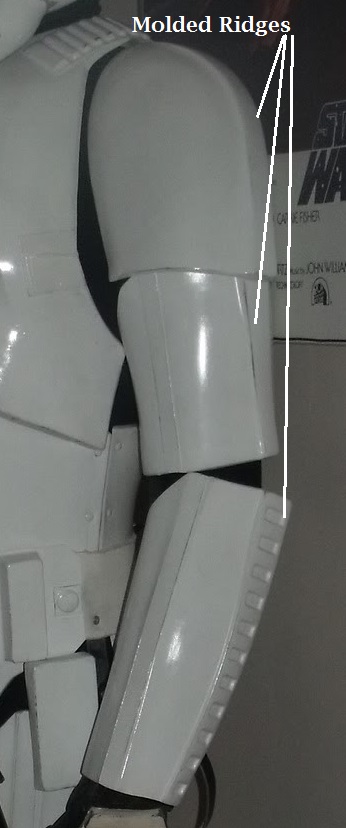
If your forearms allow it, the molded ridge that the cover strip sits on should be as wide as the cover strip itself. You can take alittle more out of the inside curve of the forearms if it helps it fit more comfortably. There is no need for a return edge as you have left. -
precise power cylinder placement?
gazmosis replied to BlayneFitz's topic in General Weapons Discussion
I would keep it towards the outer edge of the magazine well. Sometimes if they are too close to the receiver tube, they get knocked off it you try to holster your weapon -
TK14421 requesting ANH Stunt EIB status [ATA][490]
gazmosis replied to LaserBrain99's topic in Request Expert Infantry Status
Mr. Dan!! Thank you for applying for Expert Infantry!! Let's have a look at your armor!! CRL and EIB Application Requirements: All required photos have been posted and your armor displays all necessary details to qualify for EIB. With that, I would like to congratulate and welcome you to Expert Infantry!! Note: Left side gap between the kidney and ab is the maximum allowable gap for EIB. Other-Armor Fit/Assembly: In this section, I will discuss observations made by both your fellow troopers and myself. should any of these observations require changes, I will list those in the Centurion section below. First off, nice over build. Solid! Good incorporation of the original strapping brackets. The troopers out there are sharp. There are a few things they brought up which I agree with as well as a couple things I noted. First, you have quite a bit of return edge on the portion of your chest under your arm. Although return edge should be present here, it should not be as enthusiastic as you have it. I have made a recommendation in red here: The best guide to proper bicep position is the molded ridges in the shoulders, biceps and forearms. All 3 ridges should align. The gap bewteen your belt and the drop boxes was brought up. Although it is most popular to see these right up against the belt bottom as Steve pointed out, I will accept gap here that is about the width of a pencil like you have it. Finally, just for aesthetic purposes, you should probably mix up some ABS past to fill in those holes left from your first mounting position of your ab brackets. Sorry those didn't align with the chest ones on your first attempt. Centurion Suggestions: Although I try to see and point out everything, the final Centurion accuracy is up to the trooper. It would surprise me to NOT see a Centurion application from you. I'd like you to make a couple adjustments prior to applying to bring your armor to that stellar level. First, I agree that your ab buttons are a bit large. Though the buttons should be there, they should should not take center stage and draw your eye to them. Reducing them to around 12 MM (1/2 inch) will make them appear less cartoon like. If you dip a bush in alittle thinner, dab off the excess, you can massage the edges until the paint begins to come off. Clean the brush often and you will be there in no time. You will need to remove all side gap. Because of the overlap you have on the right side (I will touch on that more in a second) you have the room to shift your kidney to make this seam come together. I would replace the left side elastic with nylon so you don;t get the stretch unless a shift in the kidney and a belt tightening will do it by itself. I would like to see this overlap aligned better to create a single, vertical seam rather than overlap. And doesn't that corner (circled in yellow) eat into your ribs?? OUCHIE!! While you are working on the kidney, you will need to incorporate the kidney notches at the lower front corner. This could be just a slight adjustment in wearing them, but please make sure in your Centurion photos that your shoulder bells are up closer to your shoulder bridges. Lastly, Hyperfirm has always been enthusiastic when it comes to weathering their scopes. A tiny tube of acrylic black paint will tame the gold to make it more believable. Congratulations again!! These little adjustments should take you much time at all. You are a talented trooper and this will look incredible when you are finished.