gazmosis
-
Posts
4,043 -
Joined
-
Last visited
-
Days Won
23
Content Type
Profiles
Forums
Gallery
Articles
Everything posted by gazmosis
-

DD STORMTROOPER E-11 COMPLETE ANH E-11 BLASTER KIT
gazmosis replied to gregnz's topic in ANH BlasTech E11
DONT THESE PEOPLE GET IT!!!!!!?????? Dammit! You sell out EVERY TIME!!!!! MAKE MORE!!! DROP OTHER CRAPPY ITEMS AND START MAKING THESE KITS BY THE TRUCKLOAD!!! -
Front Sight Mod on a Doopy Doo's resin kit - added realism
gazmosis replied to Squimspickle's topic in ANH BlasTech E11
Love this so much! -
Are you saying they are missing? I know the belts were made from a rubber ribbed floor runner
-
All return edges average 1/4 inch(6 mm) but can be up to but not much more than 3/8 inch (9 ish mm) Chest: bottom edge against ab. Sides but taper down as you get closer to shoulders. Minimal to none around neck. Back: bottom against kidney. Sides but taper down as you get closer to shoulders. Minimal around neck. Kidney: top, bottom and slight in kidney notch. None on sides. Butt: all sides Ab: top under chest, lesser return edge around cod area. None on sides Shoulders: none on edge against chest. Return edge against arm. Biceps: minimal to none. Some leave return edge some remove it all together. Forearms: none at wrist opening even up into the square indent ridge. Minimal to none at elbow side. Your choice Thighs: return edge on tops and bottom. Shins: return edge on top. None against boots.
- 10 replies
-
- 17
-

-
Chart for Paint codes for helmet and buttons
gazmosis replied to TKDMAC74's topic in Tutorials, Tips and HOWTOs
Go with the humbrol French blue. It's a better color in my opinion -
digitalkid56's: My FIRST TK build (AP Armor)
gazmosis replied to digitalkid56's topic in Build Threads Requireing Maintenance
Ah the smell of fresh plastic!!! -
It's still bothering me that no updated in regards to the molds or even a prototype shot has been released. Greatest plastic on the planet means nothing if the items made out of it are garbage.
-
Warning, evade this seller!
gazmosis replied to Ghoulcinder's topic in Hard Armor (General Discussion)
Only 3 piece???? Armor master??? -
TK-99988 Requesting ANH Stunt Centurion Status [ATA][165]
gazmosis replied to YESSRAM's topic in Request Centurion Status
Very nice, Yessid!!!! Very nice. You look so much better, balanced and together! Well done and congratulations on your new Centurion armor!! At some point, I would definitely look into some ABS paste work to make the seams between the main armor and your side shims a little less obvious. Even if it is not the most perfect ABS paste work, it will show much less. -
Scootch's ANH Stunt Munchkin Build
gazmosis replied to Kathryn's topic in Build Threads Requireing Maintenance
Nothing on any helmet is the same. Especially the ears. The bottom one is the right ear as you look at the helmet. Keep in mind, you shouild only be trimming out 4 teeth on the face. I know there are 5 tooth holes, but there were very few 5 tooth troopers. When you paint your frown, paint up to the 5th opening, leave a gap at the indent and continue the point just past it. -
It's always fun to have a body cast of yourself around. It's really expensive to make an actual body cast but making a poor man's mannequin out of duct tape is always an option.
-
I think it might be a little more involved than that. Any snap set consists of a male and female side. Each side consists of two parts that need to be set together either by a squeeze setting tool or a hammering setting tool. Either way, the post that goes through will be mushroomed withing the male or female portion permanently setting the snap in place.
-
If they sell it in the UK it might be the best choice. Contact Mark from CFO. He'll tell you where to get it.
-
New DoopyDoos E11 with T-Jays finishing kit
gazmosis replied to Twnbrother's topic in Build Threads Requireing Maintenance
The magazine should actually go in a little further. There are little "corners" on the backside of the clip and on the front side of the magazine. Both should be right up against the magazine housing. You can either dig more out of the housing or trim a little off the mag -
IT is very common for troopers to have this weapon. Keep in mind that if you are ever going to go for the top accuracy badge (Centurion), these are not allowed. You must use a Sterling based blaster. The Hasbro based blaster is accepted for EIB, but the lower most row of t-track on the magazine side of the gun needs to be removed and replaced with the proper sized holes.
-
The cover strips should fall REALLY close to the following widths: Biceps/forearms 15 MM (5/8 inch) Leg fronts 20 MM (3/4 inch) Leg backs 20-25MM (3/4-7/8 inch)
-
ATA Fit and Finishing Strips on arms
gazmosis replied to tugle's topic in Assembly, Mods, and Painting
3/4 (20 mm) is for the leg fronts -
ATA Fit and Finishing Strips on arms
gazmosis replied to tugle's topic in Assembly, Mods, and Painting
All ATA armor has the one weird shaped bicep. You can re-shape it with a hair dryer or by immersing it in hot water. As for the cover strips 5/8 or 15 mm is what you should be shooting for on both forearms and biceps -
Templar 726 Death Trooper Build
gazmosis replied to Templar726's topic in Build Threads Requireing Maintenance
You are a friggin Picasso!!!!! Really, though! Amazing! -
Templar 726 Death Trooper Build
gazmosis replied to Templar726's topic in Build Threads Requireing Maintenance
DAMN Dude!!!!! -
Marks Troopermaster 2mm ANH Hero build
gazmosis replied to Mcott65's topic in Build Threads Requireing Maintenance
Get ready for pleasure. What a great suit this is to build! -
TK 66668 Requesting ANH Stunt EIB Status [AP][469]
gazmosis replied to MechaPumpkin's topic in Request Expert Infantry Status
Standing next to Frankentrooper anyone seems short. Hey there, Dan! Thank you for your application to Expert Infantry. Let's look at your armor!! CRL and EIB Application Requirements: Although a bit scattered, all required submission photos have been posted. Thank you, Dan, for taking the initiative to look through the list and post the proper pics. Nice follow up! As for your EIB requirements, the side gaps are the limit as to what is allowed. I will take your word as well as my judgement that they are no larger than the 12MM (1/2") All in all, you armor represents all necessary elements to qualify for EIB. With that I would like to congratulate you on your new "Expert Infantryman" status!! Other-Armor Fit/Assembly: This section is where I will summarize observations of both myself and your fellow troopers. If any upgrades are suggested, they go toward the best final look of your armor. If these changes affect any application, I will list that separate above or below this section. As was stated, the AP armor that has come in lately has been mind blowing. I am sad I didn't get to see this up close like Franken.....(sorry) Eric. Well done all around. Solid build, great lines, attention to detail. The whole package. If I was to suggest any improvements or adjustments it would be to the black trim lines surrounding the details on your helmet. I love to see hand painting. I commend anyone who takes this on and you did a great job. With a brush or toothpick moistened with thinner, the uneven section of your lines can be evened out providing a crisper detail in the crowning jewel of this armor. By the way, nice undersuit! What is that?? Diver's suit? Centurion Suggestions: Although I try to see everything, the ultimate Centurion accuracy is up to the trooper. The side gaps seem to be the only thing I notice that would hold you back. You mentioned that they did close. If that is an issue, I would switch over to nylon webbing instead of elastic for both sides of your torso. Congratulations again!! -
TK 68911 Requesting ANH Stunt EIB Status [AM][468]
gazmosis replied to tjr2d2's topic in Request Expert Infantry Status
YES YES YES YES Thank you!!! Typically, I can tell if there is a "D" ring even without a straight on shot like you just provided. Please forgive me if I could not. And I wear my glasses when I do these!!!! Anyway, CONGRATULATIONS, Tom!!! Welcome to EIB!!! -
The armor itself if built properly will be 501st acceptable. Almost any armor is 501st acceptable. But mostly it's how it is assembled that decides whether or not it is accepted.
-
TK 14014 Requesting ANH Stunt EIB Status [AP][467]
gazmosis replied to riddeth's topic in Request Expert Infantry Status
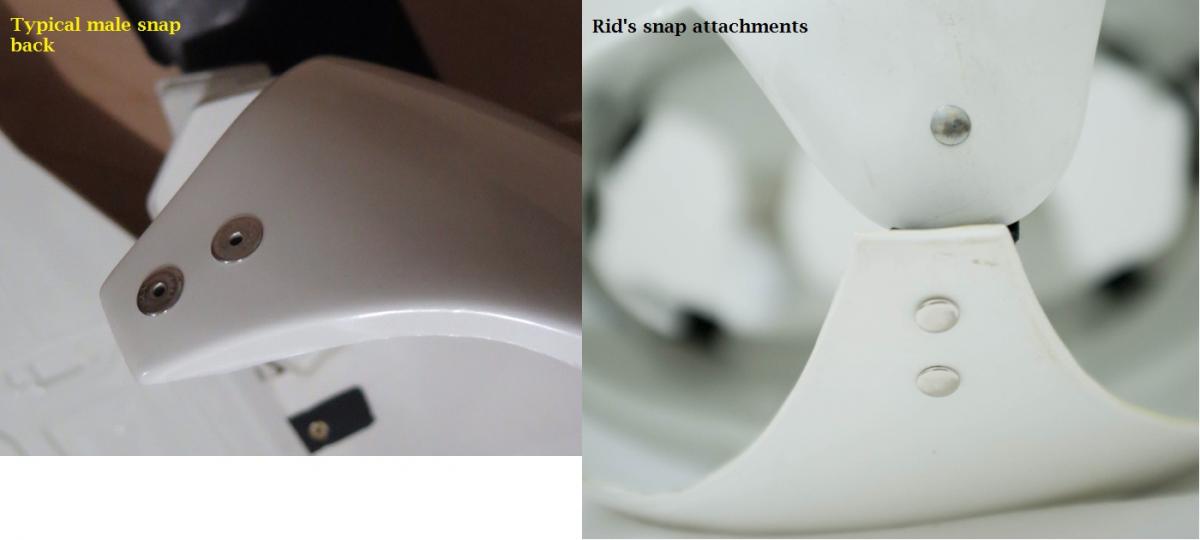
Hey Rid: Thank you for your application for EIB!! Let's look at this awesome armor! CRL and EIB Application Requirements: Thank you for getting that action shot uploaded. Sometimes pics are left out but a review can still move forward. If an action shot is left out, you can't be entered into the database without it. ALL required pictures have been posted. Your armor meets all necessary requirements for EIB. Congrats on this awesome example of what AP can be taken to...and on receiving EIB!!! Other-Armor Fit/Assembly: n this section, I will review observations made by your fellow troopers as well as by myself. These may lead to suggestions for improvements to the final look of your armor. If any of these improvement affect the outcome of any application, they will be specified in the above or below sections> Because it's worth mentioning again, bang up job on this armor. It was custom tailored for you and fits you to a tee!!! Solid seams and attention to detail are really the icing on this TK cake! YUM!! There was earlier mention of your thigh pack which Germain pointed out as nothing to be concerned about. Even if it was hanging totally down, it would only be mentioned to secure it a little higher and wouldn't affect any application because it is attached properly. If someone was to put a gun to my head about an adjustment/improvement it would be to your helmet frown. The vast majority of standard "Stunt" troopers had the paint extend up to then past the 5th tooth indent. I just like that look. Outstanding work! Centurion Suggestions: Centurion requires a much more detailed set of photos showing details not seen completely here. Although I try to note as much as I can, ultimate Centurion accuracy is the responsibility of the trooper. It is obvious we are going to see a Centurion application from you. There are two changes I will ask you to make prior to applying. First is the tape on the back of your drop boxes. I don't care that you used this but because of the vast color difference, it really stands out when wrapped around the sides. Please either glue your elastic down or trim the tape so it doesn't show on the sides. Next are the male snaps on the butt plate crotch attachment.The correct hardware is something that has always been supported in Centurion applications. Pop rivets are not allowed, paper brads for side rivets...etc..... The only thing that ever gets let by is split rivets used to attach the thigh pack rather than speed rivets. This is because from the outside it looks the same. Here is the comparison: Before you apply, I'd like you to switch out the snap back so they look like male snap backs and not split rivets. Thank you for this outstanding bit of work!!! Congratulations!!!