gazmosis
-
Posts
4,043 -
Joined
-
Last visited
-
Days Won
23
Content Type
Profiles
Forums
Gallery
Articles
Everything posted by gazmosis
-

TK-7586 requesting ANH Stunt EIB status [NE] ANH 2nd
gazmosis replied to ZacMuleer's topic in Request Expert Infantry Status
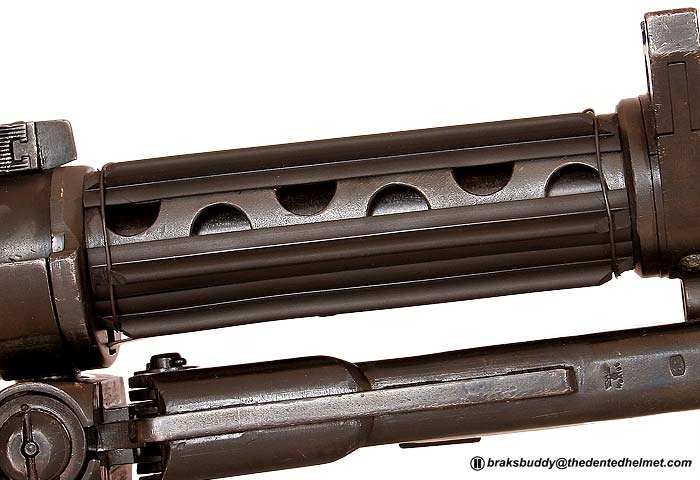
What's up, Mr. Dan!!! Thank you for your application for Expert infantry!! Let's rock this! CRL and EIB Application Requirements: I would like to see a mare complete pic of your interior strapping and a close up of your abdomen details. I can see you button configuration in other shots, but if you could add it to your application, it would complete it. Other than that, your armor contains all the required elements for EIB. With that, I would like to congratulate and welcome you to Expert infantry!! Other-Armor Assembly/Fit: In this section, I will review observations made by your fellow troopers as well as my own. If any suggestions for adjustments are suggested, I will let you know if any would be required that might affect your next application. First off, very nicely done overall construction. The armor seems to be well fit and very comfortable as well as looking great. I know there was some mention of your thigh pack on your lower, right thigh, It is fine in my opinion. I usually like the rivet to be a bit closer to the corner, but you are in that general area so it is all good. You do have a bit of extra return edge on the sides of your back plate that could come down a bit but no hurry on that. I know how much you took off already. The only other thing that is only a comment to bring up your accuracy if you wanted to is to install the little wires that go around the barrel of your DLT-19 at the front and rear of the T-Tracks like this: Centurion Suggestions: As much as I try to spot the things that might affect a Centurion application, the trooper is ultimately responsible for their armor's accuracy. Apply. I just don;t see anything that might affect your application. Make sure we can see the elastic on the back part of your shoulder bridges. Well done all around!!
-
TK-74614 Requesting ANH Stunt Centurion Status [AP][193]
gazmosis replied to Teekay YYC's topic in Request Centurion Status
And you were hiding such a nice seam under there! Nice work!! I now wish to congratulate and welcome you to Centurion!!! -
TK-74614 Requesting ANH Stunt Centurion Status [AP][193]
gazmosis replied to Teekay YYC's topic in Request Centurion Status
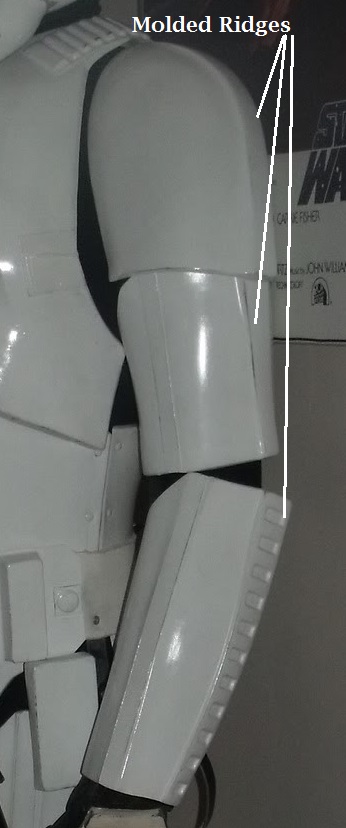
Well this application thread has been full of discussion! Thank you, Jaydon for your Centurion application. Let's get to it. CRL and Centurion Application Requirements: All the required photos have been posted. There is one thing that I will need you to correct before we move forward with your application. There was some discussion regarding your thighs so I went back into your build thread to see how you went about them. I will discuss them further in a bit. Anyway, in the close-up of your finished thighs, I noticed the cover strip on your left thigh extended all the way down over the molded ridge at the bottom. This was mentioned in your thread and you mentioned getting conflicting opinions on this. Well, the cover strip ridges never extended past the molded ridges at the bottom of the thighs in the front or the rear. They always ended AT the ridge.Ignore the rivets. Anyway, if you just take a sharp blade and be very careful, you can trim that little portion off and we are good to go since all other aspects of your armor qualify for the Centurion badge. Other-Armor Fit/Assembly: First, I am very glad you posted the updated pics showing the eliminated gap on your sides. This is a prominent Centurion feature so I am pleased you followed up on that. Thank you. Let's go over a few things mentioned by your fellow troopers, and I will ad my own thoughts her as well. Going back to your thighs, I just don;t see how they can be raised much more. Yes you have a bit of a gap between your thigh tops and your ab's leg opening, but this just goes to prove that these suits are not one size fits all. We are all made a little different. I want to commend you again on your painted details on your helmet and ab buttons. Nice work! Great upgrades on your blaster!! Just a thought on a future project. Most of the time, counter mounts are made to coincide with the bolts that attach the scope to the scope rail. Because your attachment hardware for your counter mount is located in between the scope feet, you would need a new rail but that is no big deal to fabricate. It would make for a much cleaner look with no extra bolts on your rail. I would also look into a better fitting undersuit that does not gather so much at the elbows. You have a dynamite set of armor. You are one small cover strip clip from your badge. Get that done so we can celebrate!!! -
The elbow side of the forearms are kind of left to creative interpretation. You can cut the left on the match the right one, you can take that little bit of return edge out of the one with the curve for more comfort against your skin. Just make sure to line up the elbow sides when joining the halves. Don't sweat the wrist side too much as you can hone that when you ara done to make it perfectly even as seen here:
-
TK-30514 Requesting ANH Stunt Centurion Status [RS][192]
gazmosis replied to Saifai's topic in Request Centurion Status
Hey there, Christian!! Thank you so much for all your hard work and your application for Centurion. Let's get to it. CRL and Centurion Application Requirements: All required photos have been submitted. Your armor has the required elements to qualify for Centurion. With that, I would like to congratulate and welcome you to Centurion. Other-Armor Assembly/Fit: I like the way you fixed that uneven top of your right thigh. I see you also got hold of a new thigh pack on the bottom of that same thigh. Well done!!! Nice work. Also, is your re- installation of your side rivets to the proper location. The original rivet locations were improperly located so that when the elastic was connected between them, a really severe mis-alignment of the ab and kidney resulted. Note the top:The proper re-installation of the rivets corrected this issue.Looks like the way it should!!! Beautiful job! It is always nice to have a spare blaster lying around and why not a Sterling conversion!!?? You might want to think about getting SOME level of paint on there. You don't want that baby rusting away. Now, regarding your shoulders and how they are falling down on your shoulders. Boy, this can go either way. but in your EIB, application they seem to be much closer. You mentioned above that it might be the way you had your shoulders connected to your biceps but aside from the elastic that is on your shoulder bell across the bicep, I don;t see any other connection. Regardless of the size of your shoulder, the shoulder bell should be positioned up very close to the ribbed bridges. The only two reasons I have seen this happen is the bicep hooks are pulling them down or the space between the shoulder bridge and shoulder bell on the elastic at the top is too long. Since you don't have bicep hooks, I would go with you just have too much strap between your shoulder bell and the bridges. All that aside, your Garrison should be proud to have you among them. Congratulations on all your improvements!! -
TK 88118 Requesting ANH Stunt Centurion Status [AP][191]
gazmosis replied to HansDC's topic in Request Centurion Status
THAT is what I am talkin' about!!! IT just makes me so excited to see what a huge difference something like that makes. Welcome to Centurion, Trooper!! Welcome!! -
TK 88118 Requesting ANH Stunt Centurion Status [AP][191]
gazmosis replied to HansDC's topic in Request Centurion Status
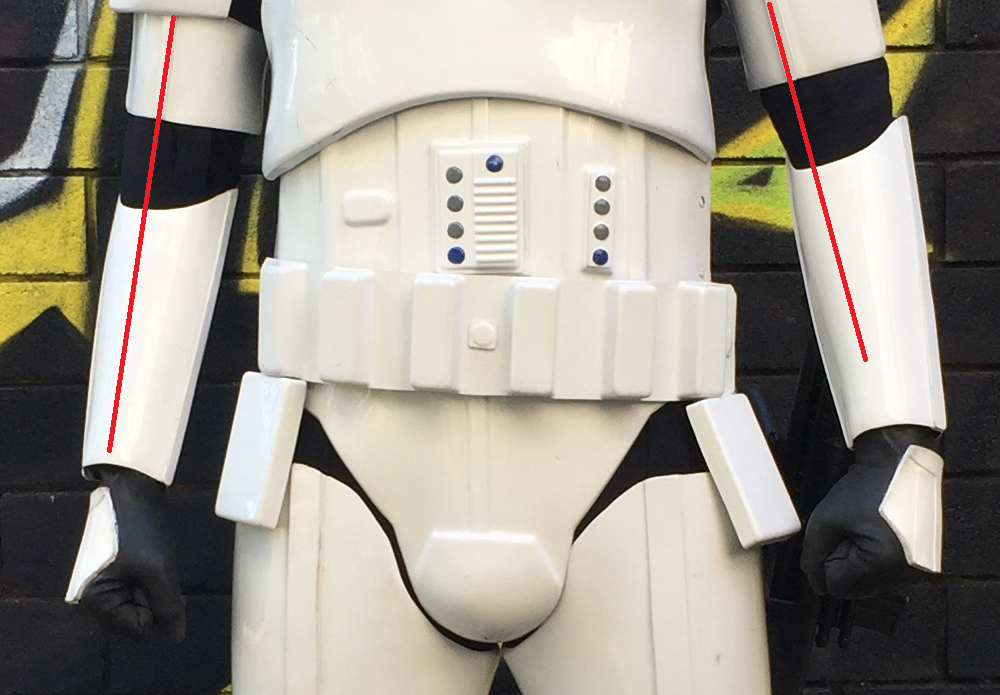
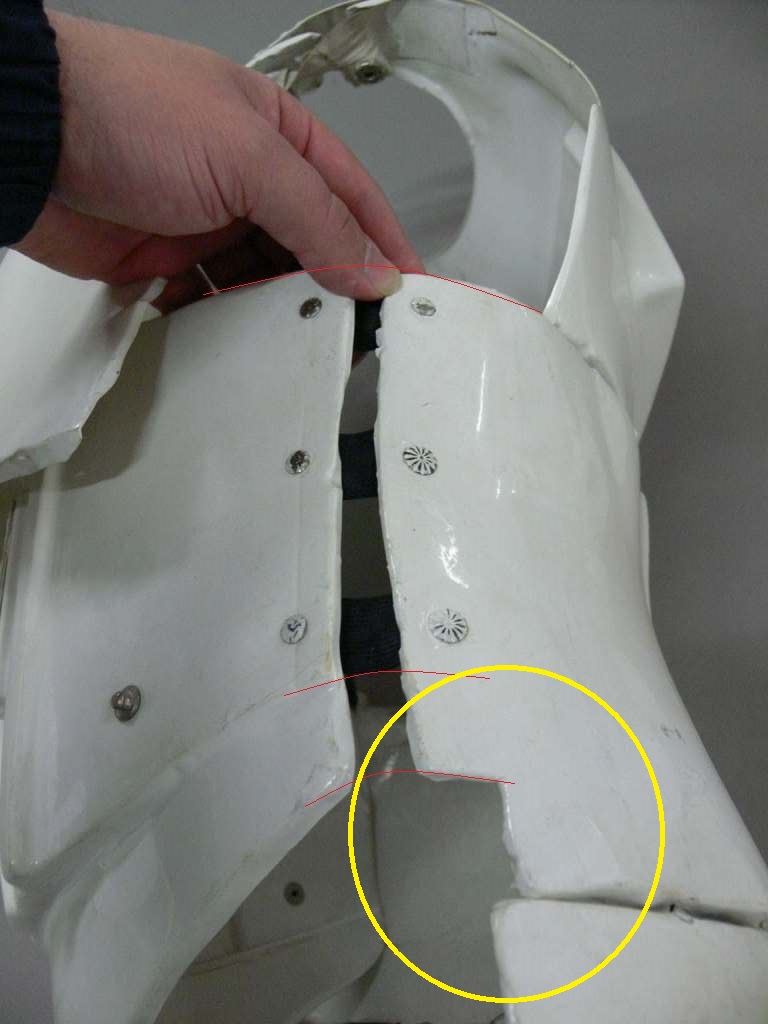
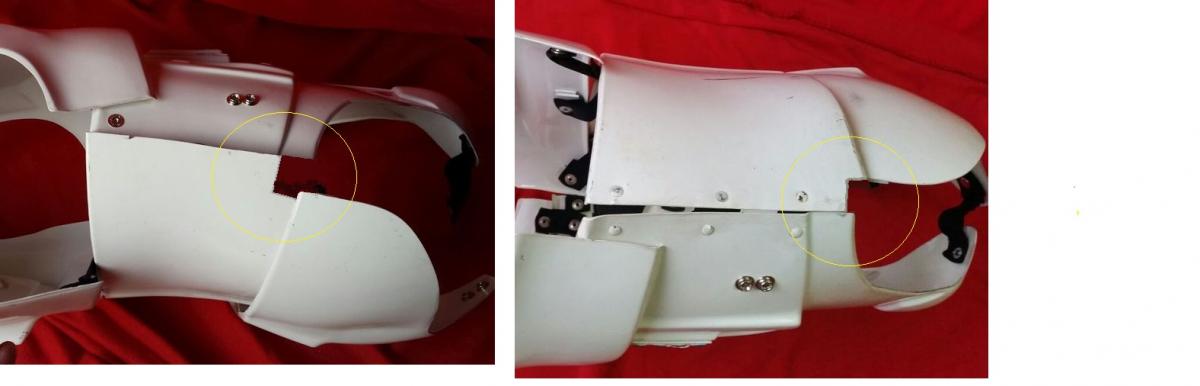
Hey Hans! It has been a long time but you are finally here! Let's get to it!! CRL and Centurion Application Requirements: All the required photos have been posted. There is one minor change that I would like to see done on your armor before I assign your badge. The details on a set of armor are important to a Centurion application. So is the wearing your armor in the correct manor. I never split hairs if something is off by a little bit or slightly out of position, but you have your forearms strapped to your biceps. Which will always put them out of position. In this picture, the way your fists are, the cover strip ridge should be aligned with the cover strip on the bicep. When aligned properly, the molded ridge on the shoulder, the bicep, and the square indented ridge on the forearm should all align like this: The way you have it now, I can't imaging you don't have problems bending your arms. When you re-position them, you will also notice the gap close up between your bicep and forearm as I mentioned in your EIB application. This is an easy fix that will take you no time. Other-Armor Fit/Assembly: Just so you know, the "action shot" is only necessary for an EIB application. As for the concern regarding the split cod, it is allowed. I need to commend you on the fine work you did to repair your thigh backs. Well done!!! This repair gave balance to the back of your armor. Just make this one repair and the badge is yours.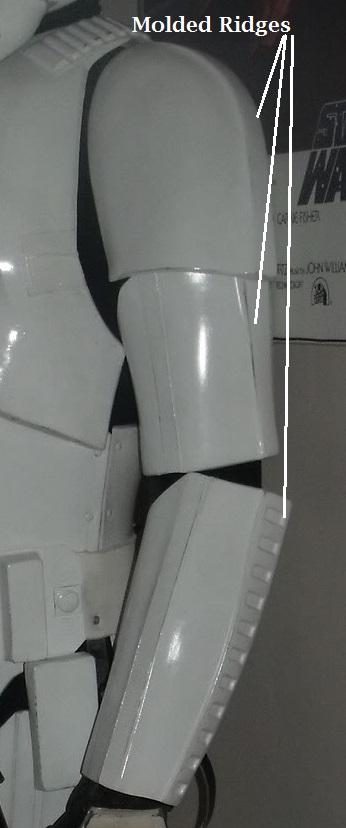

-
TK 21814 requesting ANH Stunt EIB status [AP][500]
gazmosis replied to 68Brick's topic in Request Expert Infantry Status
Hey Brad!! Thank you so much for your application to Expert Infantry. Let's wait no longer and get to your armor!! CRL and EIB Application Requirements: Only one picture is missing and that is of your ab details but the nice, clear resolution of your other photos show this in clear detail. After reviewing your other photos, I am pleased to announce that your armor contains all the necessary elements to qualify for Expert Infantry. Not only have you officially received the EIB badge, but you are EIB recipient #500!!!!!!!! CONGRATULATIONS!!!! Other-Armor Fit/Assembly: In this section we will cover observations made by both myself and your fellow troopers. Sometimes these observation may lead to suggestions for changes and improvements. We all just want you to look your best. If ant changes are required or affect any application, I will specify that below. First off, very nice overall build. and fit. Your arm and leg pieces are well assembled and your detailing is right on. You should be very pleased with the paintwork on your helmet. Nice work. I had all sorts of information regarding the research I did in looking at past threads where there was extra gap between the thermal detonator clips and the end caps. However that was all made pointless because you ROCKED the repair!! I also ant to commend you on your shim work to give you a bit of extra room on your sides. I would think that a little ABS past, white E6000, or even some white caulk could make that seam completely disappear. I'm jealous of your blaster. Great weapon!! Centurion Suggestions: As much as I try to spot everything that would affect an Centurion application, the ultimate accuracy is up to the trooper. It seems obvious that you have Centurion in mind. There are two things that need to be changed before we can move forward. The first things the back to kidney gap. Too much gap here has just as much concern as too much overlap. In your case, the gap here is more than what I would consider minimal. Your backside is on the right compared to another set of AP: The next thing I want to discuss is your holster. I looked back at AP applications going back almost a year and don't see a holster from AP that has all the stair step details in the front pouch. I e-mailed Mark to ask him about this, but the long and short of it is the holster pouch is not something that is just a free will design and should be kept to the upside down trapezoid as it has always appeared similar to this. Also, please make sure that any full body pics contain all the repairs and adjustments you have made. If it means taking a new set of pics, that would be best. Congratulations again on your achievement of Expert Infantry!!!!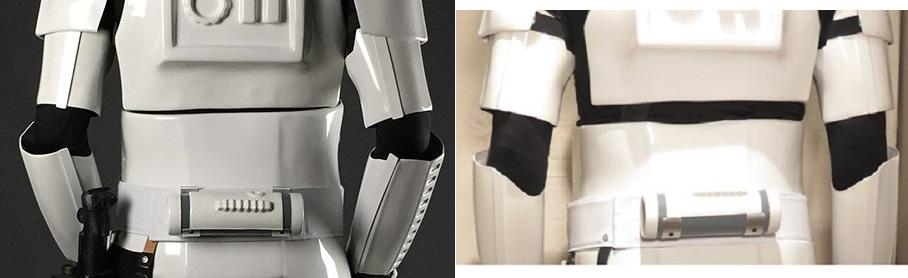
-
+1 on the advice! Great armor for the bigger trooper
-
Welcome to the party, Sir!!! Congratulations!
-
TK-30000 Requesting ANH Stunt Centurion Status [RS][190]
gazmosis replied to edwinfabian's topic in Request Centurion Status
Now you HAVE to admit how much better and balanced that makes your helmet!!! Outstanding job, Edwin!! Congratulations on your complete, Centurion armor! -
Ok so thoughts on this E-11?
gazmosis replied to Kal's topic in Build Threads Requireing Maintenance
There are only something in the neighborhood of 300,000 doopy doo build threads on here. I'm sure you can steal some tips from those -
Bogan's ANH TK Stunt Build (NE)
gazmosis replied to bogan25793's topic in Build Threads Requireing Maintenance
You will not be disappointed with this armor. Nice stuff. Your armor is coming from the same chaps who make Armor Master(AM). Although the top half of your armor is different from AM, the legs are the same. I just posted a thread on how to alter the thighs to look more accurate if you desire to go that route.http://www.whitearmor.net/forum/topic/32932-am-thigh-re-shaping/ -
Ok so thoughts on this E-11?
gazmosis replied to Kal's topic in Build Threads Requireing Maintenance
I have see this kit many times before. It's from an outfit in Canada. One of my main complaints with this is the rear sight is way too tall and they mount it backwards. The little serrated edges should face the rear of the weapon. With the sight being so tall, it makes the scope rail way too tall off the main receiver. -
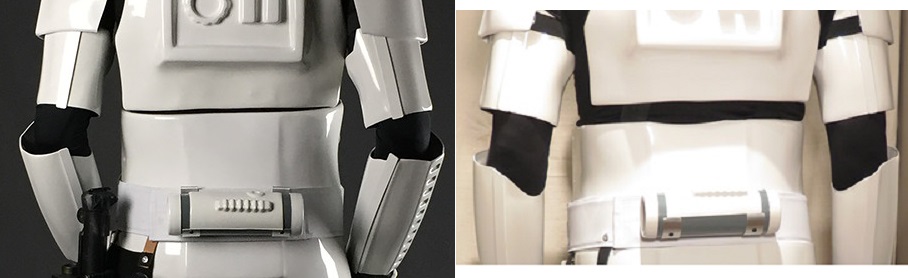
Hello Lucho!! IT's great to see that you have applied for Centurion! Let's take a look at your armor! CRL and Centurion Application Requirements: There are a couple of items that need to be changed before we can move forward. First, please look over this list:http://www.whitearmor.net/forum/topic/22605-centurion-application-photo-checklist/ and make sure you have a photo for everything on this list. next, thank you very much for trimming your belt boxes down. They look SO much better. However, I still need a photo of the backs to make sure you used actual box inserts and not just flat covers. I looked at your EIB application and this is not shown there either. Next, Your armor is required to have the small notches on the lower, front corners of the kidney plate against the ab as seen on this screen used armor: I took the pics of your torso and drew in where they should approximately be. Lastly, I had mentioned back in your EIB application regarding the gap between your back and kidney plates. It might just be the way you are standing but in looking at your interior strapping picture, the straps that connect your back and kidney are very long. There should be close to no gap or minimal at best. Other-Armor Fit/Assembly: Troopers are always looking out for other troopers. We want you to look your best so sometimes suggestions are made from observations.. I will discuss those here. You have a great overall build and a great fit. Great detailing and paintwork. I do like to see the trapezoids on your helmet cap have the tops a bit less square and more rounded. Congratulations on great hand painted details. The only other suggestions I have is to, at some point, trim the excess overlap you have on your belt. The adjustments I have listed in the top section should take you no time at all. Make those and we can move forward with the Centurion award!


-
Hydration cannot be laterally compared or applied to every human being. Several factors contribute to one's ability or lack of ability to remain hydrated. Physical wellness, physical fitness, and body type are among a few. We as humans in todays world rarely drink the correct amount of water per day as required to achieve the term "hydrated". For us and what we do, in the armor we do it in, this is really important. Some individuals who are physically fit and exercise with great regularity have an efficient body that is trained to adjust to extremes for short periods of time. Others are not so lucky. The equation is easy; in order for the body to remain at a constant temperature, it will react to whatever the outside influence that is attempting to disrupt that. If you are becoming too cold, the body shivers. If you become WAY WAY too cold, the body will draw blood away from all extremities (arms and legs) to and keep it at the center to protect vital organs. With heat, it's summed up in one word; sweat. The evaporation of sweat from the body cools it down. As long as there is enough fluid to create sweat, the body will adjust to the heat it is exposed to. In order to ensure this will happen during your time in armor, you need to already have this fluid present in your body which is why hydrating the night before is so important. "What if my troop is later in the day? Can't I hydrate in the morning?" When you are drinking great quantities of water over an extended period of time, the body can only absorb so much water. Some is absorbed but a lot gets processed and kicked out in the bathroom. This is not what you want happening while you are on a troop!!! 20 oz. of water per hour for 5-6 hours will guarantee that your body will be hydrated down to a cellular level for your troop the next day. Yes you will be in the bathroom a lot towards the end, but you will be ready the next day. Just lay off the coffee and other caffeinated drinks that actually force fluids out of you.
-
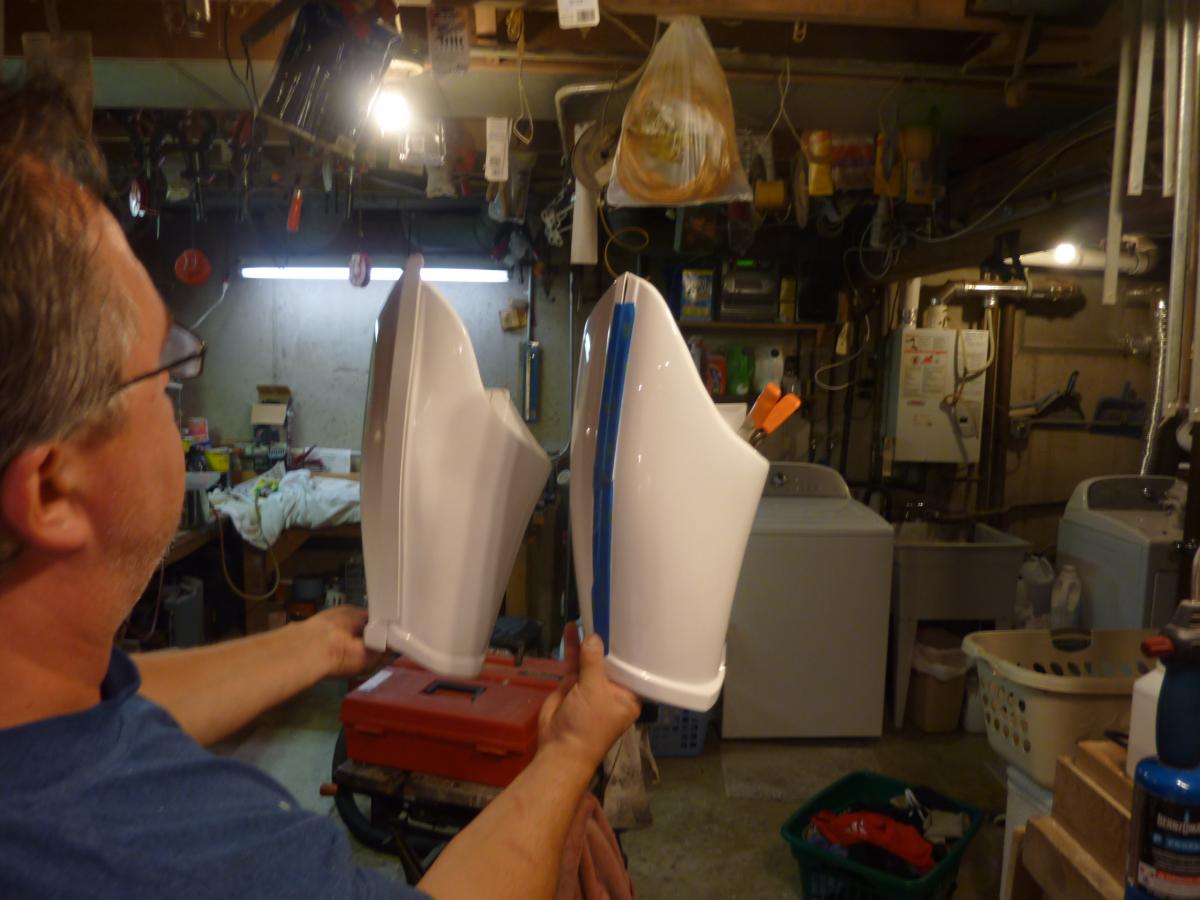
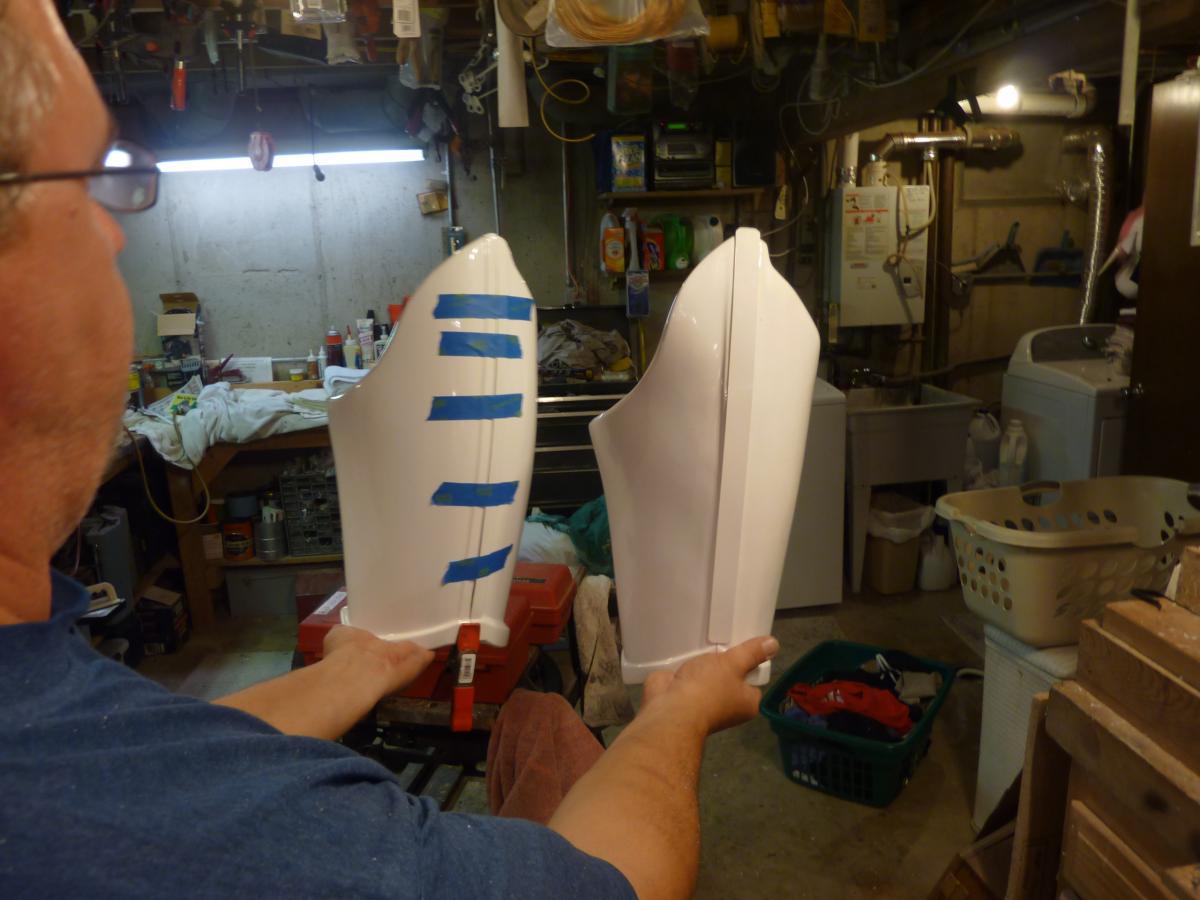
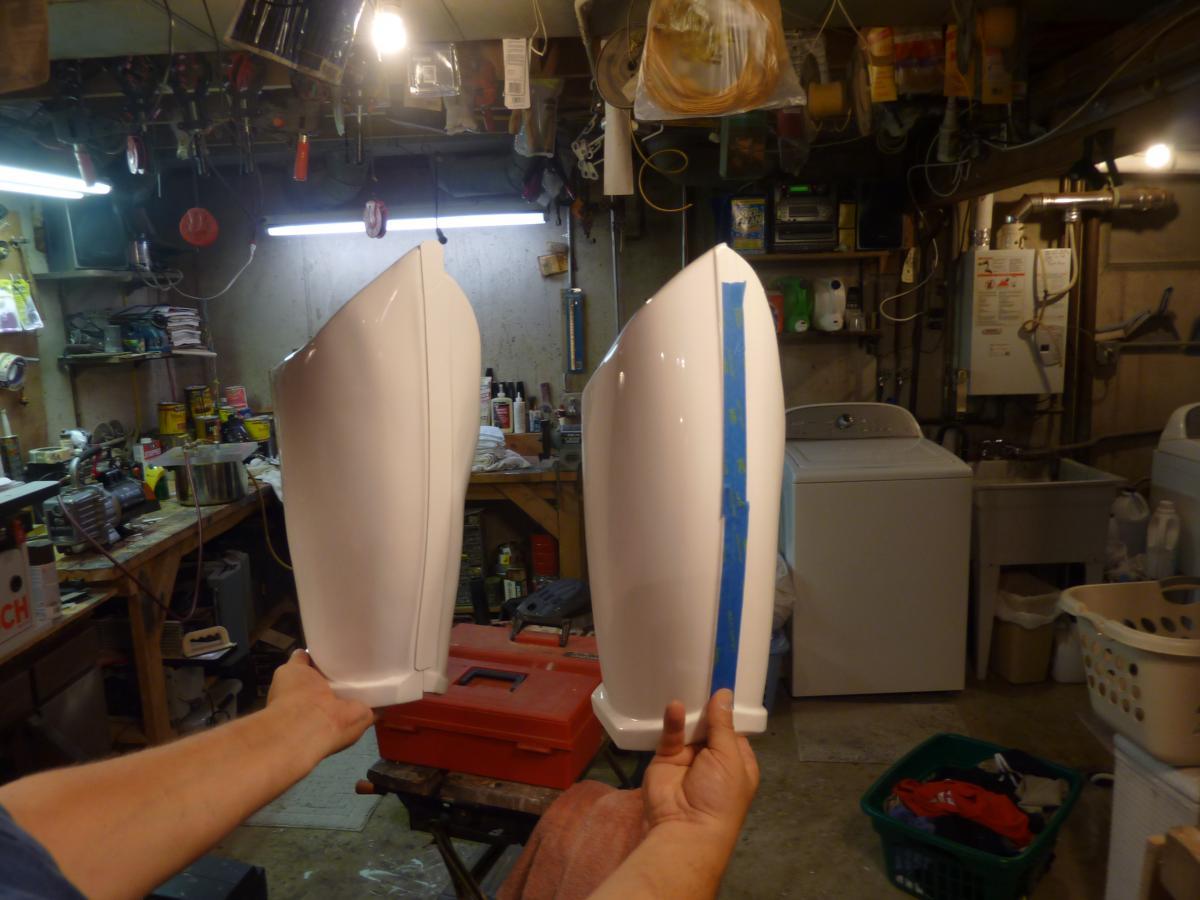
Oh my gosh, thank you guys! Here are some additional pics of the finished thighs. Newly shaped AM thigh is on the right.

-
This is also largely depended on which armor maker you choose. Some don't offer that service.
-
TK-74614 Requesting ANH Stunt EIB Status (AP)[499]
gazmosis replied to Teekay YYC's topic in Request Expert Infantry Status
Yes it would. -
TK-30000 Requesting ANH Stunt Centurion Status [RS][190]
gazmosis replied to edwinfabian's topic in Request Centurion Status
Alright Edwin!! It has been a while, but thank you for your application for Centurion. Let's get right to it. CRL and Centurion Application Requirements: There is one picture that is missing but the detail can be seen. The picture that is on the Chest and Back Connections refers to the white strap that goes over your shoulder connecting the two plates. It can be seen. Keep in mind, part of what we encourage people to do is to look their best. Some suggestions we require are only to make sure your armor looks its best although the point may not necessarily be listed in the CRL. In your EIB application, the rank bar areas were mentioned on your helmet. Helmet details are some of the most important because it is the first thing our fans look at. I would like to see the rank bar areas painted consistent on both sides with the rectangle neatly outlining the "bump" area. Everything else is in line. Just make this one adjustment and you are there. Other-Armor Fit/Assembly: In this section, suggestions to further improve your armor are provided by your fellow troopers and myself. Thank you for including the corrected picture of your right side. Nicely done!! The only other thing I would make a tiny adjustment on is to smooth out the curves on your thigh pack and find some less coiled wires for your power cylinders on your blaster. Neither are required, just suggestions. Fix up that rank bar area and Centurion will be yours. Great overall work!!!!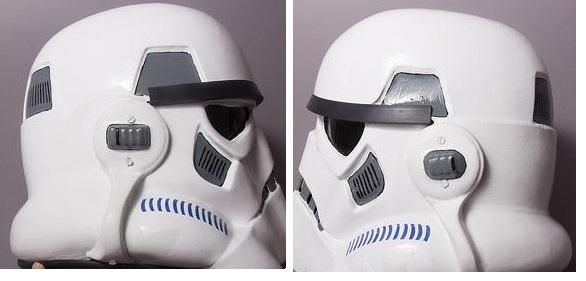
-
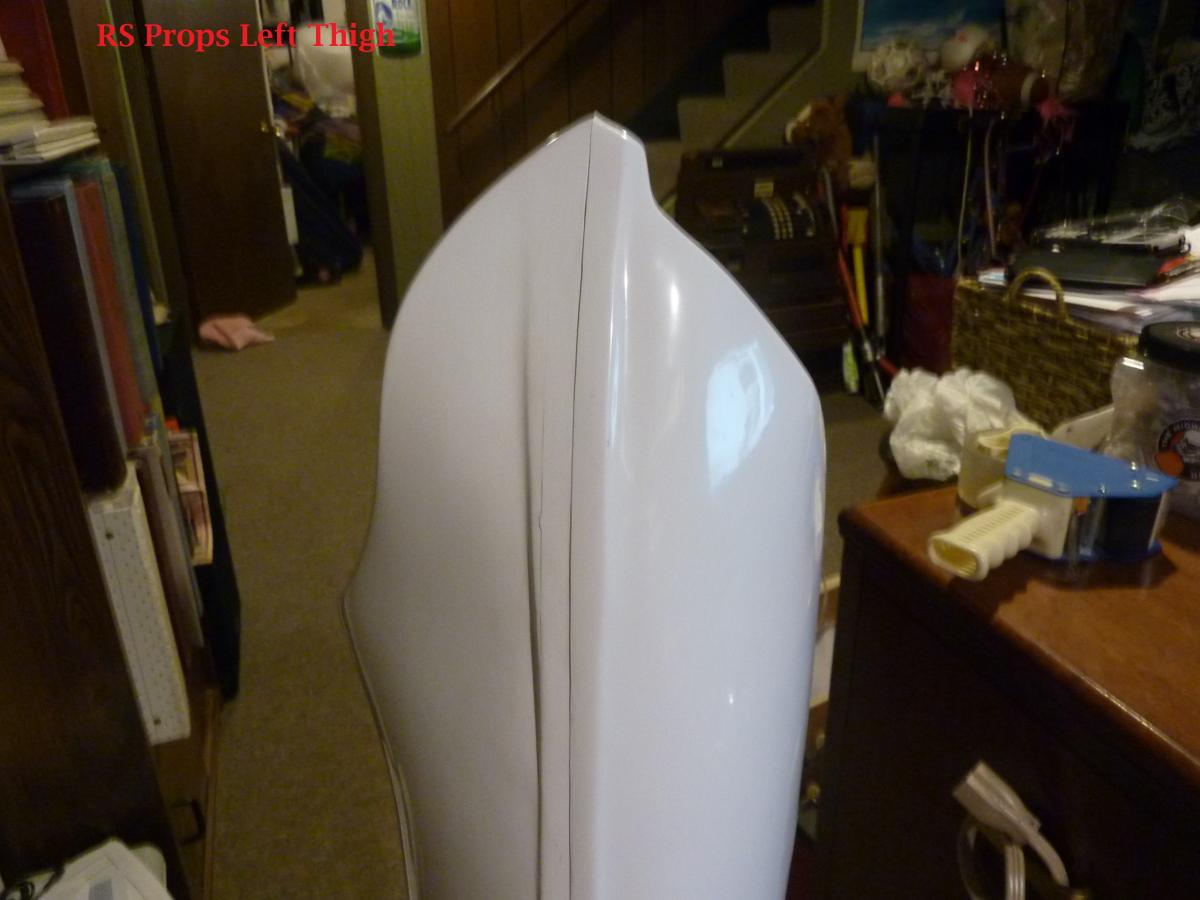
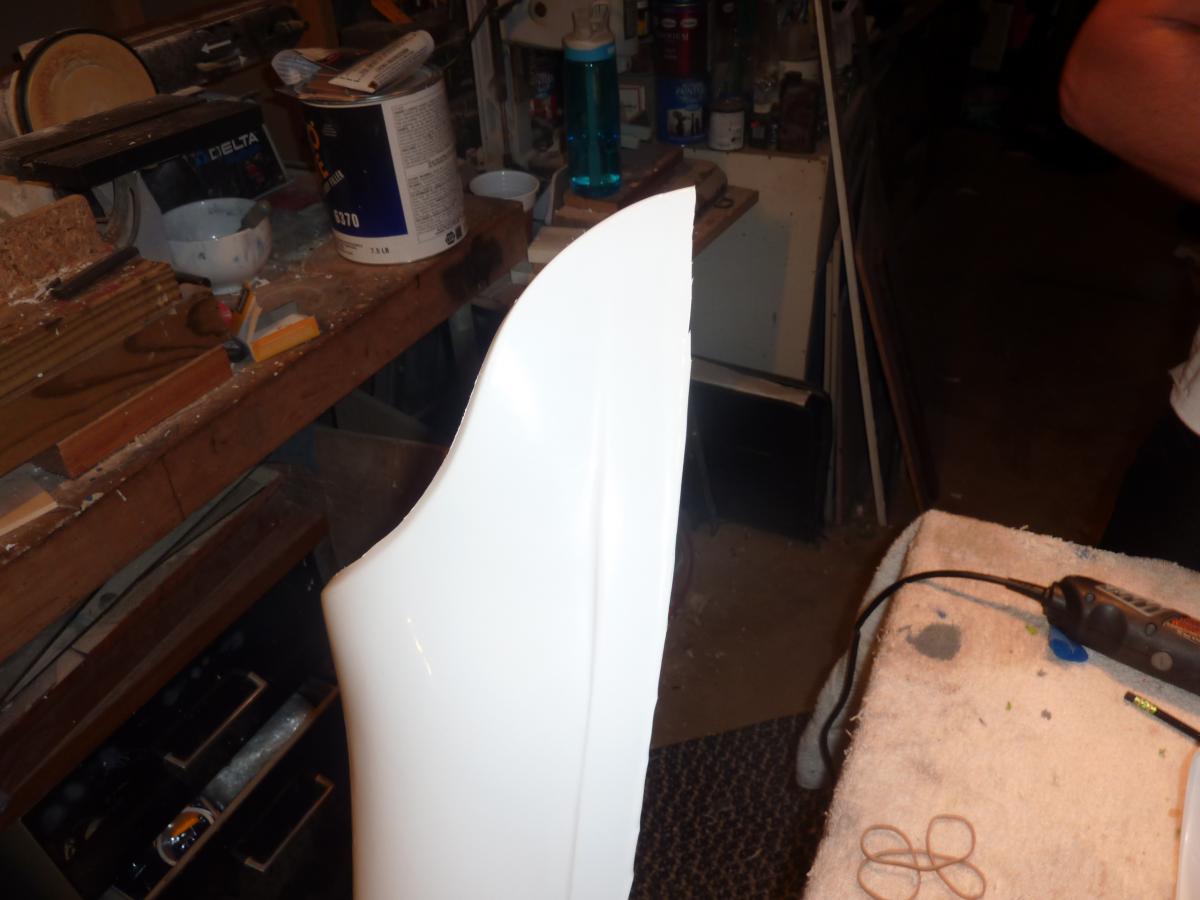
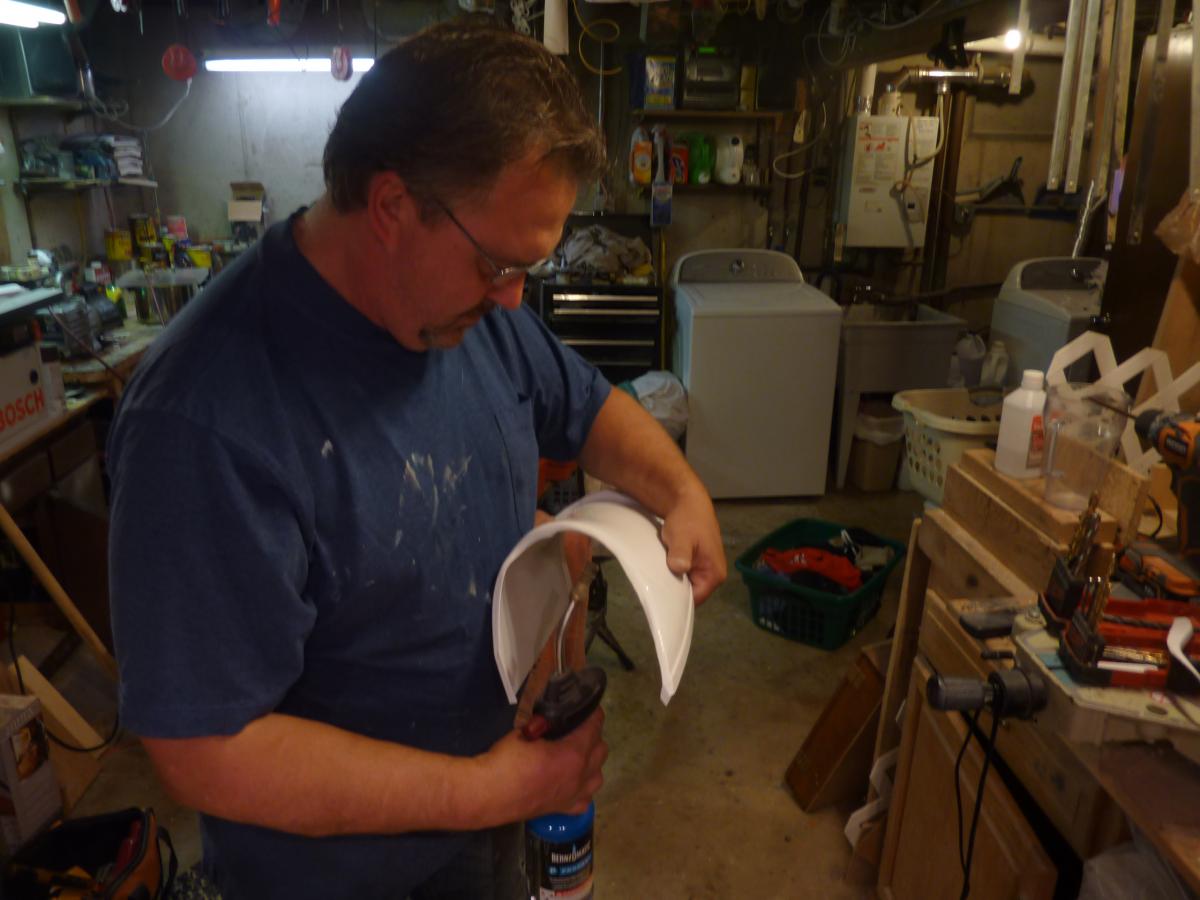
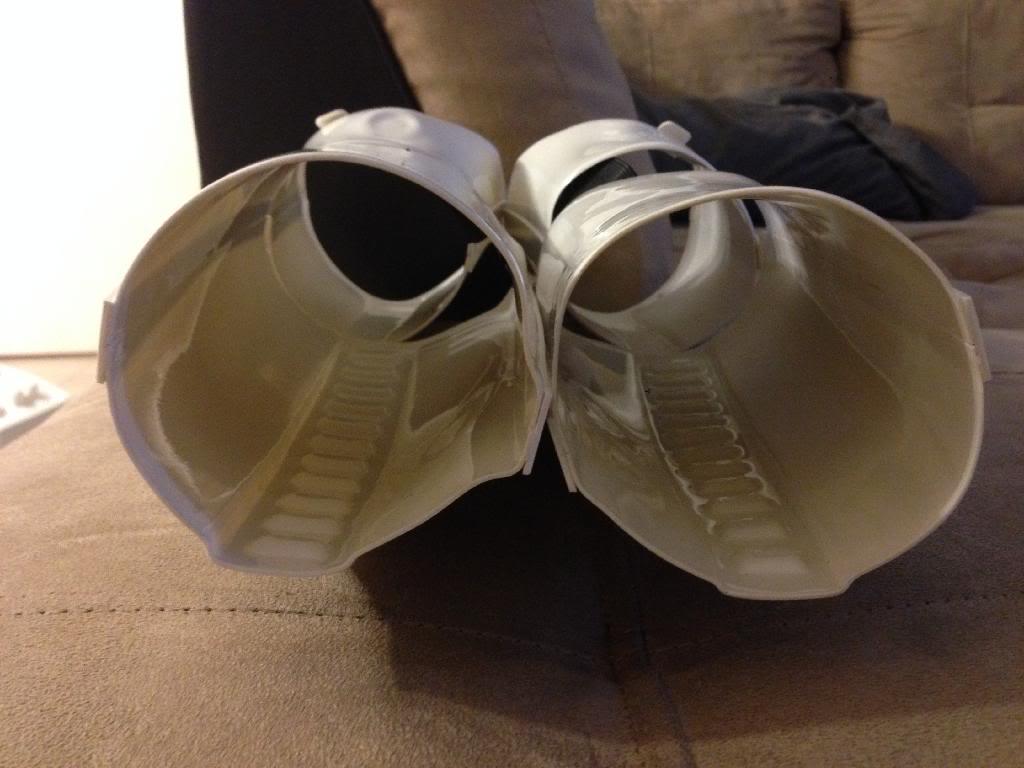
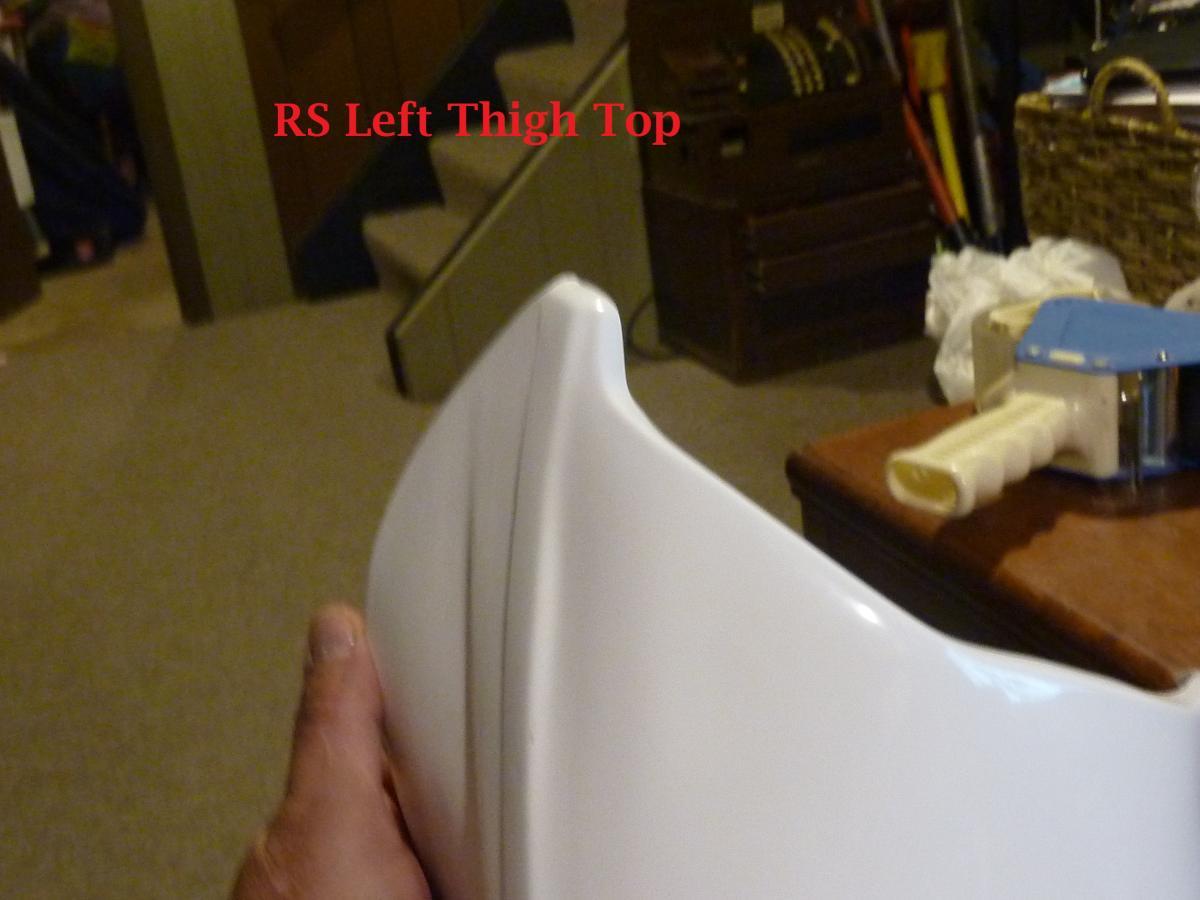
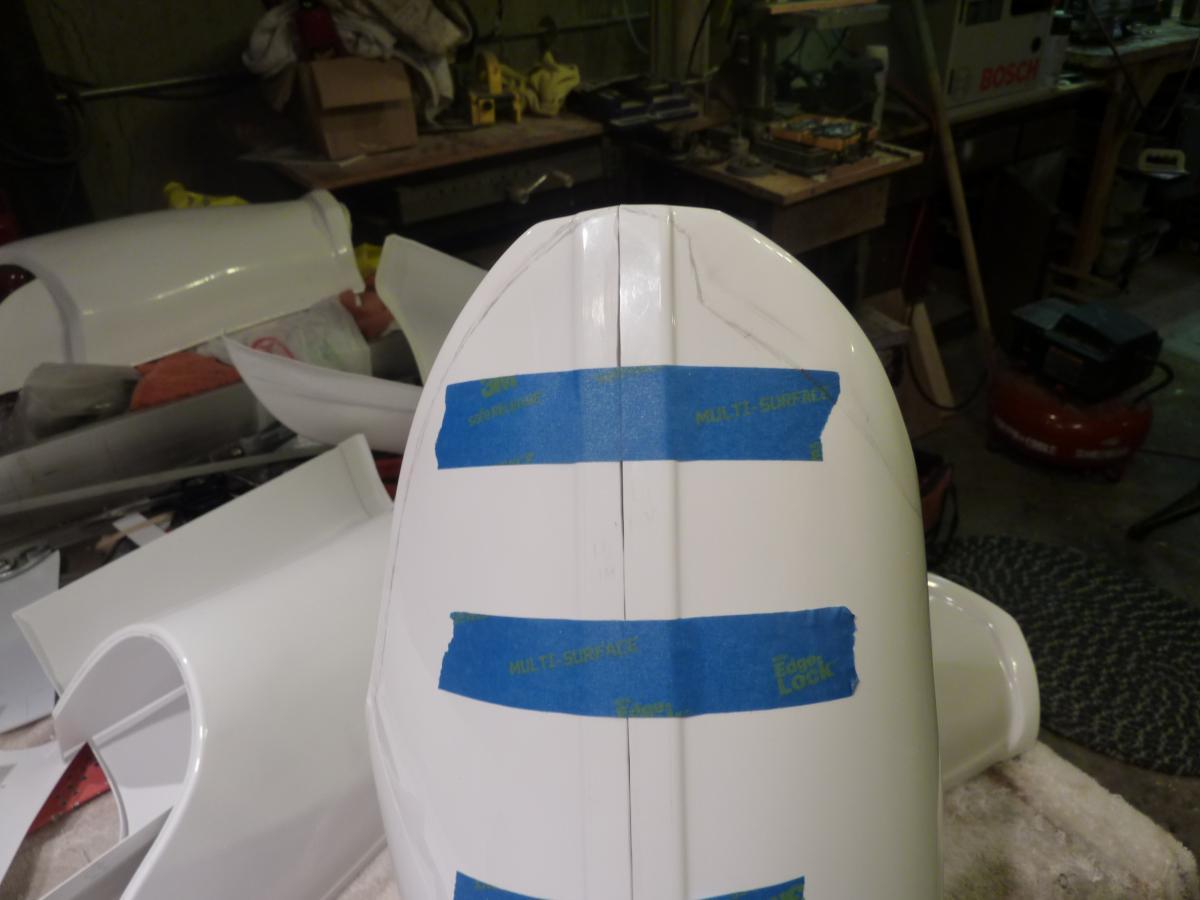
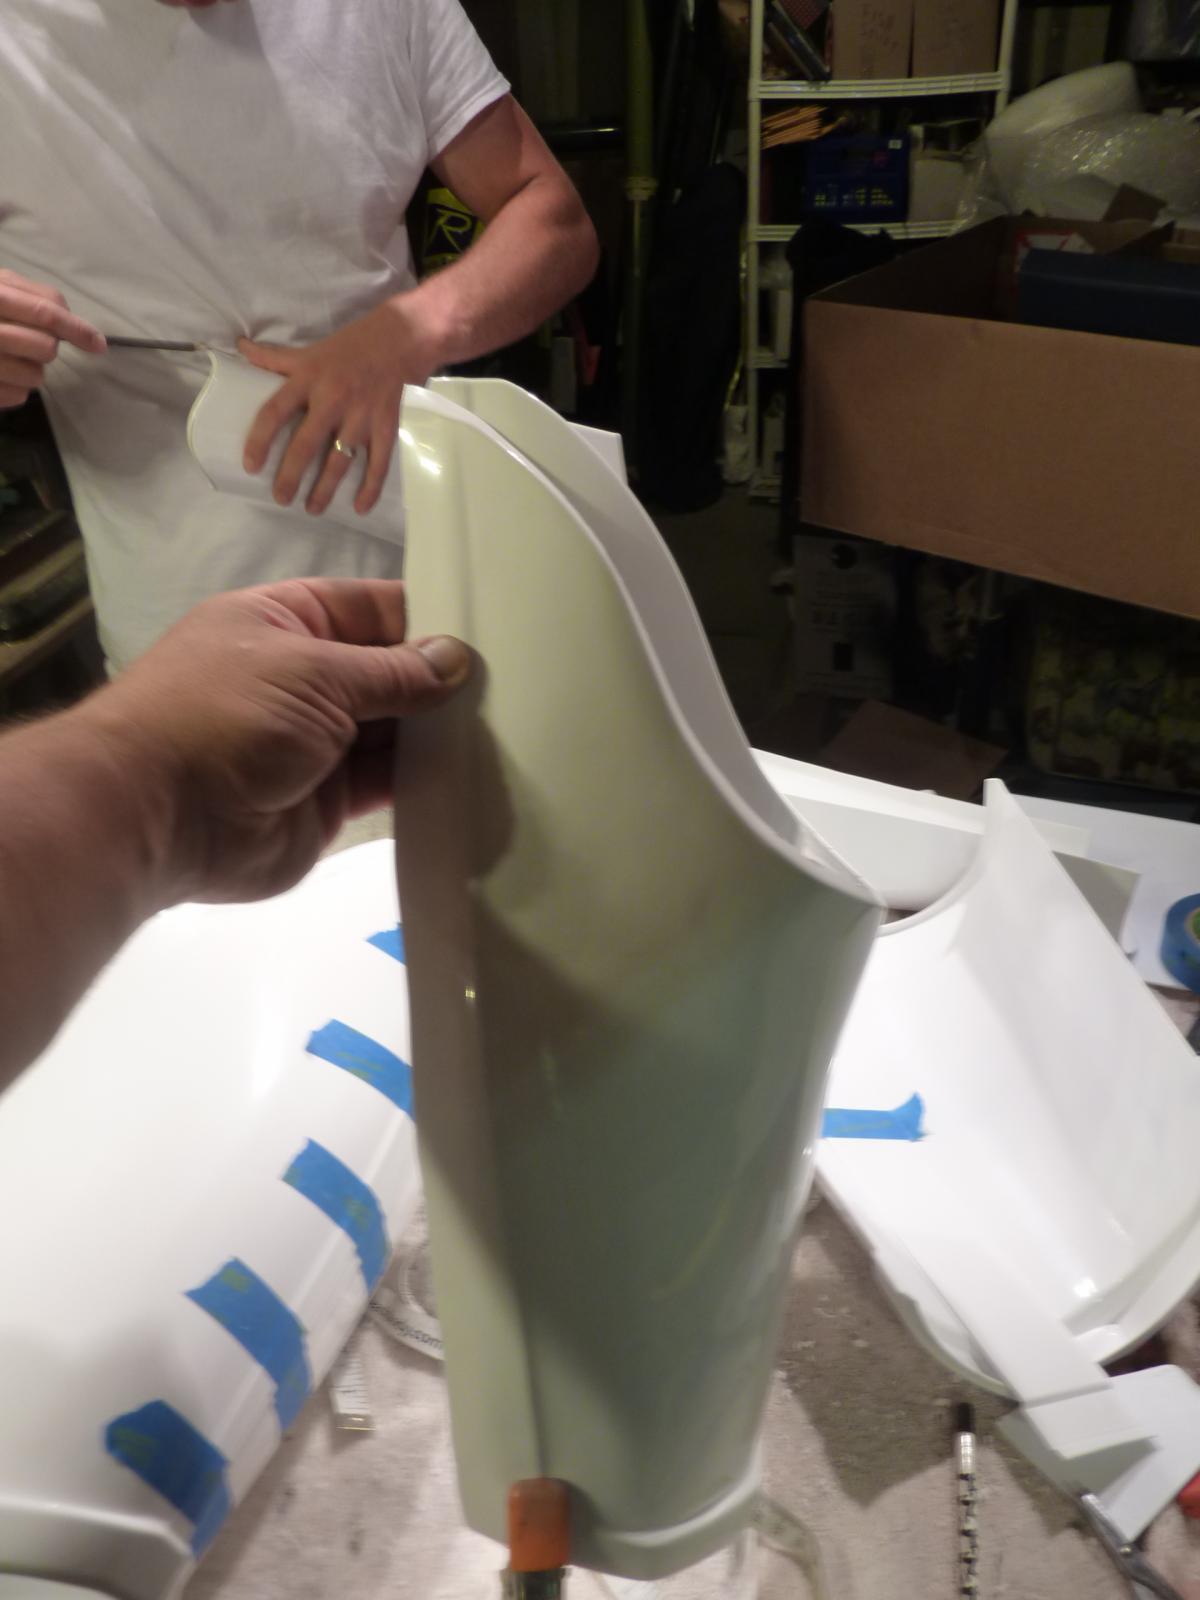
Hey Troopers!! Armor master has made great strides in recent months to improve the look of their armor so more kits come EIB and Centurion ready out of the box. One thing that has bugged me about AM kits are the thighs. When cut and trimmed, the top of the thighs have a generous flat spot on top:. Now it wasn't until a fellow future Garrison mate, Chris Ward, asked me for assistance on his suit and when I found out he had AM thighs I rubbed my hand in anticipation begging him to have a crack at re-shaping them to look more accurate. Here is the inner left of an RS thigh. This is my goal. The first thing was to make sure I had enough thigh to play with. I just happened to have a set of RS Props on hand and placed one half on top of the AM thigh aligning the cover strip ridges. I made sure the bottom was matched and as you can see, there was plenty of room for adjustments at the top: After tracing the lines, this was the pattern I was going to follow. What I found was that the adjustments were only necessary in the front and sides. The trace pattern blended perfectly into the back. I trimmed out the pattern leaving about 1/2 inch (12MM) to use as return edge. I planned to fine tune the look later. Now when it came to heating the plastic to create the return edges, the hobby iron was JUST TOO SLOW!!! You can't turn it up past 2 1/4 because it will melt the plastic on contact rather than heating it though. AM plastic is really sturdy stuff. I set my propane torch on the lowest flame possible and worked in 2 inch increments. I heated both side evenly and the plastic will just become soft and not warp or melt out of shape! The other cool thing is that the plastic stays hot longer allowing you to mold it without too much waviness. Anyway, all went well and Chris now has much more accurate thighs. All pics are side by side with RS thighs.


-
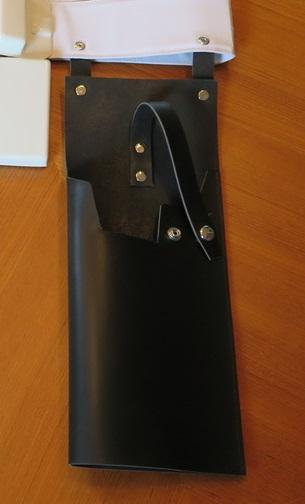
Several members of my Garrison made cases out of inexpensive vinyl and sewed an Imperial logo patch on it They just made the loops big enough to fit around their belt
-
Well, you started with the right kit. You are so going to enjoy this build no matter how much or little time you donate to it. Do your research on other TM builds to help you visually find your way through it
-
looking good so far. Getting used to your dremmel is something that comes with time. I saw that you went a bit enthusiastic on the lock opening on the folding stock. You might want to invest in some "green stuff" as it is being called. Modelers putty is what it is really called. This has corrected thousands of mistakes, mold bubbles, and even created details not present on the doopy kit
-
Most of keeping your brow trim in place has to do with how the helmet was constructed in the first place. If the cap and face are fitted together with the brow trim in place and the fit is made where there is no gap along the brow line, it will stay in place on its own with no adhesive. Yes it can droop due to handling but all and all the pressure will keep it in place