gazmosis
-
Posts
4,043 -
Joined
-
Last visited
-
Days Won
23
Content Type
Profiles
Forums
Gallery
Articles
Everything posted by gazmosis
-

TK31713 - Requesting ROTJ EIB Status [CFO][489]
gazmosis replied to K@nne's topic in Request Expert Infantry Status
Hello Christoph!! Thank you for you application to Expert Infantry!! Lets take a look at your armor!!! CRL and EIB Application Requirements: All required photos have been submitted. After careful review of these photos, your armor was found to contain all the required elements required for both RotJ armor and EIB!! With that, I would like to congratulate and welcome you to Expert Infantry!! Other-Armor Fit/Assembly: RotJ armor doesn't come across these pages all that often. This, Christoph, is what fans of this armor wait for!! Well detailed and better built, this is a stellar example of this film's armor. This is the section that goes over observations that myself and your fellow troopers have made. Sometimes these observations may lead to suggestions for changes. If these changes affect any application, I will make you well aware of them. The only thing mentioned was your cheek strip decal was peeling and it is really up to you how you want to deal with that if you do at all. I do have a couple small suggestions: First, I would look into getting an undersuit that fits a little better in the arms. You have a lot of material bunched up and a better fitting suit will give this area a sleeker look. I am a huge fan of the thin, pinstriped outlines around the traps and tears. Granted, your are all decals, the ear rank bar areas still need painting. Typically, I would mention the thick outline you have and to see it a bit thinner but I have seen other RotJ screen used lids with this thick outline so I won't mention it in this case. The only other I would clean up is the roundness to the front of the left shoulder bell. It could be rounded off just a little more to balance with the right one. By the way, outstanding work on that very complex blaster. Just awesome!! Centruion Suggestions: Although I try to spot and mention everything I can see, the final centurion accuracy is up to the trooper. The only thing that I think would improve your armor is to dab a little white paint onto your thigh pack rivets and your sniper plate rivets. Though present, and not a CRL requirement to paint them, subtle is a good approach here. Congratulations again!!!! -
TK-44678 requesting ANH Hero EIB status [AM2][488]
gazmosis replied to Kredal's topic in Request Expert Infantry Status
Hey Josh! Im back at it here after vacation and settling down. Thanks for addressing those side gaps especially on your right side. They are where they need to be to pass EIB. Congratulations! Between your shin resizing, your butt trimming and side gap reducing, your Centurion apllication should be stellar. Just make sure if you do all these, your full body shots reflect all your adjustments. Congrats again!!! -
Helmet rivets tips and hints.
gazmosis replied to Whiteley.m's topic in Assembly, Mods, and Painting
Wherever rivets are sold, the backing washers are also sold -
Helmet rivets tips and hints.
gazmosis replied to Whiteley.m's topic in Assembly, Mods, and Painting
Fittingt He cap to the face is one of the most important steps to giving your helmet that balanced look. Make sure you do this fitting with the brow trim in place. What you are going for is NO gaps in the brow line between the face and cap. Small rivets are fine here but don't use them first. Drill a hole the size of the rivet in the center of the curved portion of the cap in the ear area on both sides. Make sure your brow trim is on the cap the way you want it. Center the cap onto the face. I always use the upper corner of each eye opening aligned with the front of the temple trapezoids. Once centered, decide how high you want the brow to sit or how much face is showing above the eyes. Once you have all this set, mark the face through the hole you drilled in the ear portion. Drill out that mark. Instead of a rivet, use a screw and nut for now. This will allow for easy adjustment if you need it. Once the screw is installed, this will allow you to free up,both hands to make suret you gat brow is tight across the face. Once the cap is pulled tight, check that it is even across the face, centered, and at the height you want. If all is good, Mark the second hole on the other side and secure with another screw and nut. If you are off slightly, you can move the hole location but do it in the face where it won't be seen. You can also trim the brow line slightly to perfect the alignment. Once all of this is set, pull out one screw and rivet it down. Make sure you use a backing washer on the inside! Repeat on the other side. I always install one more on either side to keep the face and cap from hinging. This is important when trimming your ears. -
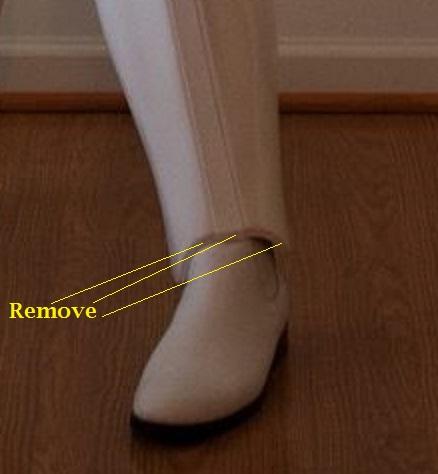
CA Boots are OK for basic approval, however, if you are looking to achieve a level of higher accuracy, you will need to switch out to a type of boot that does not have a seam in the front. TK Boots, Imperial Boots, or painted Chelsea, Jodhpur, or bass amsterdam horseriding boots (no built in spur on the heel, please!) is what you will need.http://www.amazon.com/Bass-Mens-Amsterdam-Ankle-Boot/dp/B003TFEVN0
-
Best way to paint a helmet without using a template?
gazmosis replied to Whiteley.m's topic in Assembly, Mods, and Painting
Hey Michael: Kudos to you for going after this!! Awesome!! The black outlines are daunting for anyone. Karin hit in on the head when it comes to a fine brush but not all fine brushes are created equal. I have been handpainting my details since I started and I have found that short bristled brushes fan out and you end up with a very uneven line. Long bristled brushes(20mm or so) are the ticket. Like these.A good quality brush is also beneficial. Add a drop or so of thinner to your gloss black paint to help it flow better. Not too much, though! When you dip the brush into the paint, you will have a drop of paint settle to the tip. make sure to dab that off. Grab a scrap of ABS and draw some straight lines with a pencil and practice until you can retain the width of the line with a single stroke. Then go for it on the helmet. NO COFFEE OR CAFFEINATED DRINKS!!! -
Looking for Shoulder Bells
gazmosis replied to Irish501st's topic in Hard Armor (General Discussion)
http://www.whitearmor.net/forum/topic/11538-the-various-types-of-armor-and-where-to-find-them/ Check out MTK or ATA for replacements. AP might be a source as well. -
Another little girl bullied for liking Star Wars
gazmosis replied to gazmosis's topic in Announcements
Please take a look if you haven't heard!!! http://www.501st.com/forum/viewtopic.php?f=11&t=87569&p=1101988#p1101988 Layla was a true hero!! Thank you once again to our own Brian Robinson for being custodian of the armor and making sure it reached its destination safely and to all the members of Garrison Tyranus for making this happen for her. Most of all, credit goes out to all the members of the FISD who's donations, building efforts and care made this program what it is and made it possible. -
A really nice affordable helmet build is from ATA or MTK (trooperbay)
-
Where to put holes for hovi mic?
gazmosis replied to Mcott65's topic in Hard Armor (General Discussion)
Im assuming you are talking about where in your helmet to mount them. You basically want them centered in the indented part and you don;t want them at any extreme angle pointing upwards or downwards. You can hold them up to the helmet until you like the placement, then mark the where the screw shaft touches the back of the indent. Then just match the other side. -
Where to put holes for hovi mic?
gazmosis replied to Mcott65's topic in Hard Armor (General Discussion)
the holes for the mounting screws in your hovis or the holes in your helmet? -
2mm helmet with 1.5mm armour
gazmosis replied to Whiteley.m's topic in Hard Armor (General Discussion)
There is a noticeable difference between the two TM plastics he uses regarding color. Just so you know -
Plastidip dries very rigid when applied thick. Trying to do ANY trimming after it is applied is just not practical. Build your helmet, then dis-assemble and apply the spray. However, if you want to "coat" the inside and impregnate it with cheesecloth, this must be done after primary construction. Keep the lens install for last.
-
Original stormtrooper armor?
gazmosis replied to kurt.0206's topic in Getting Started - Read this First!
Every time I hear about "original Stormtrooper" and his claims that his molds are from the original molds makes me furious. A business based on lies is just not the way to go. -
The armor is ready to be built to 501st specs. The easiest way to assure this is to review the CRL and make sure to plan your build to them
-
As long as they have the screen you'll be fine. The outside should be a matte or semi gloss black
-
The only blasters in ANH that were labelled as "hero" blasters were the actual blank firing weapons which this clearly is not. Yet another example of sellers on Ebay that will say anything to get someone to open their wallet or swipe that card
-
trooper96's E-11 Project
gazmosis replied to trooper96's topic in Build Threads Requireing Maintenance
http://shop.hobbylobby.com/products/yellow-plastalina-modeling-clay-553388/As for a slicone safe clay, you can get that through smooth on if you are ordering your molding and casting materials. IF you want to buy some in advance, hobby lobby offers Plastalina. the link is at the beginning. For silicones, oomoo or mold max types are both good with no need to vacuum degas them -
trooper96's E-11 Project
gazmosis replied to trooper96's topic in Build Threads Requireing Maintenance
If you are going to try to attach the usable parts to separate pipe, it will be necessary to remove them from the old receiver tube. I am doing a similar project now but plan on joining the plasma cut parts like the front muzzle and rear sections to a new steel receiver tube. Anyway, separating the usable parts from the old receiver is your first challenge. Find someone with an oxy-acetylene torch. This will generate the heat you will need to melt the braising that is used to connect the parts to the receiver. Propane or map gas will just not generate enough effective heat. Do not do this over carpeting or anything can can't get damaged. When your part reaches the correct temp, it will just fall off. There are three sections you WILL have trouble with. First is separating the folding stock hinge point. You would think this would be easy but think again. you cannot grab the sides at the hinge points and pull. It WILL bend and distort in the center because of how thin it is. When you heat any of these parts, the braising will become visible as it melts. It looks gold. For the hinge point, Have a set of pliers on the old receiver tube and when it gets hot enough, bend that in half without touching the hinge point. The sides will come off easily, its the little positioning nub that you will have a problem with. Once bent in half, you will need to keep heat on the assembly while twisting the nub loose from the receiver tube. Yes, you will need to grab onto the hinge point eventually, just don't bent it ata ll. Why this is so difficult I don't know. Everyone I spoke to about this went through the same thing. The two parts you will have trouble with are the front muzzle and the rear cap locking ring. Keeping the heat even and hot enough to keep the braising liquefied is the issue here. This really is a two man job. When the parts come off, don't rush to dip them in water. Let them cool on their own. YOu don't want to warp them. Media blasting is the best way to get them clean. but a good wire wheel treatment and still brake cleaner will work as well. Since you are not re-welding any if the parts, it's not imperative to remove all the braising which you will see on the parts as a gold plating. You should grind it down if it is very bumpy -
TK-44678 requesting ANH Hero EIB status [AM2][488]
gazmosis replied to Kredal's topic in Request Expert Infantry Status
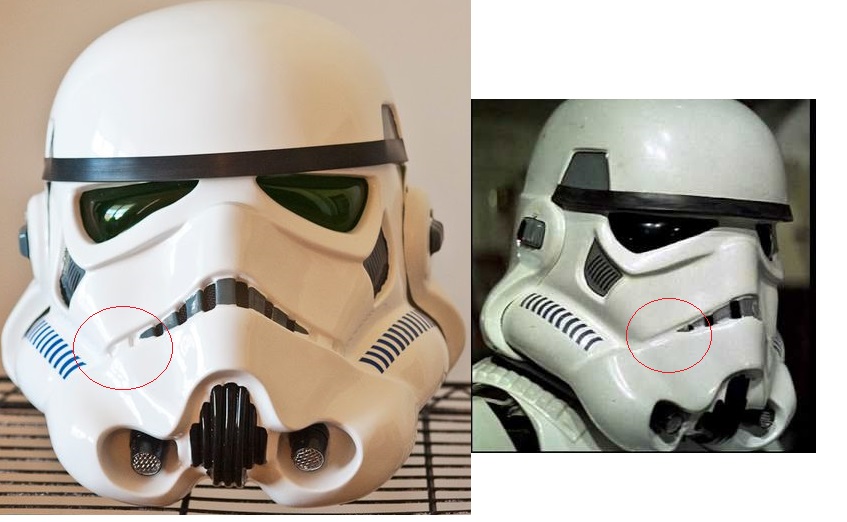
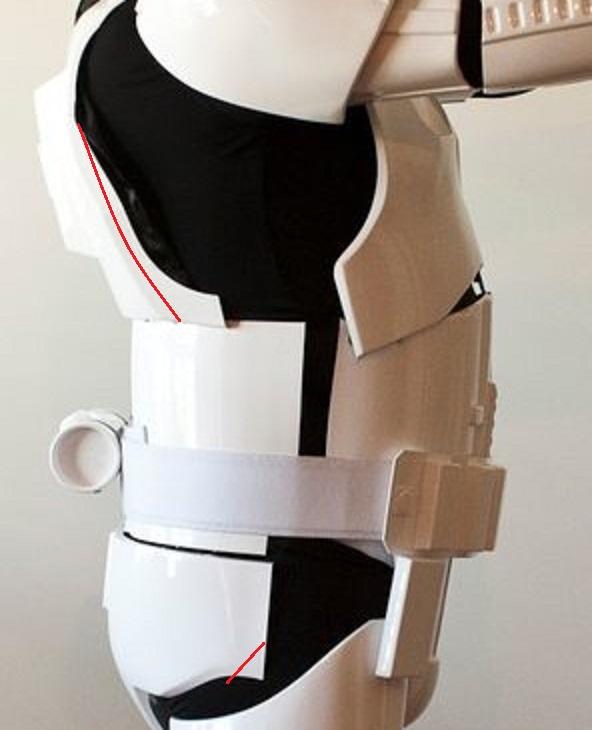
Hey there, Josh!! Thank you for your application to expert infantry! Let's take a look!! CRL and EIB Application Requirements: All required photos have been posted. I have a couple issues facing me that you seem to have solved at least one. First is the gap between your chest and ab. To be truthful, this should have been asked to be addressed for basic approval. There should be no gap here and the chest should completely overlap the top of the ab plate. Like I said, you seem to have addressed the overlap issue but I would go back and replace that elastic strap between your ab and chest with nylon webbing to make sure that will never move. The second issue I have is with the gap on your right side. This gap should not really exceed a 12mm (1/2 inch) separation. PLEASE CORRECT ME IF I AM WRONG, but your separation seems to start at one inch(24mm) on the bottom and only get larger towards the top. I have never been one to split hairs when it comes to a few mm + or - a suggested measurement. But double the suggested number is a bit much. Please confirm this for me before we go further. Other-Armor Fit/Assembly: In this section I will go over observations from both myself and your fellow troopers. Sometimes these observations lead to suggestions for changes or adjustments to improve the overall look of your armor. If any of these changes would be required, I will mention that specifically. From the dimensions you provided, you are one of what I like to call our "enforcer" troopers. Or the muscle. This comes with its own set of challenges that you built around nicely. Your overall construction of your suit is very nice. This one is about details. I have already mentioned that side gap, but somewhere along your adventures I would consider trimming that corner off the buttplate. This actually curves down a bit and shoud really be trimmed at an angle (I will post a picture with this and other trimming suggestions below) I do want to compliment you on your outstanding blaster. Well done and I love your weathering technique. In regards to the "Hero" element of your armor: The "hero" helmets were not just 3 tooth stunt helmets. They were completely different sculpts. For this reason, I would consider either filling in or with a heat iron , massaging out the 4th and 5th tooth indents on the AM face. These are a bit enthusiastic and deep. Anything to make them a bit less subtle would be an improvement. Here is a side by side showing yours VS. a screen used "hero": I don't have a lot of experience with the AM helmets. What has bothered me about them is the droop in the brow in the center angling upward on the sides. I know the low brow is stereotyped with the hero, but many of the hero helmets did not have the low brow. I just wish that could be made to be straighter across. Ok...rant over. Centurion Suggestions: As much as I try to spot everything, the ultimate Centurion Accuracy is up to the trooper. I hope to see a Centurion application!! Before you do, I will need you to check into a couple things. First, I will need you to re-take any full body shots showing the gap between your chest and ab. While we are on gaps, your side gaps will need to be eliminated. You have quite a bit of needless extra material on the side of back plate under your armor. In this picture, I show where this should be trimmed as well as what I mentioned earlier about trimming the butt corner: I want to discuss your calves. Truthfully they look way oversized. The return edge at the opening on the top can be reduced by half all the way around and even tapered to nothing in the rear. IF this was affecting how you sized your calves, this will be a revelation. Once that is removed, keep your dremmel or your scissors in hand and remove the return edge on the bottom of the calves against the boots. Once that is removed, put on your boots and get a helper. Have that helper sit on the floor behind you and squeeze the calf closure together. I promise you, there will be a silly amount of overlap there. Have your helper squeeze until snug, then back it off until it is comfortable but not too loose. Then mark a line down the center of your calf making sure that mark is on both halves. when re-trimmed along those lines, and the cover strip re-installed, you will have sleeker, better fitting calves that will add a punch to your armor's appearance. After trimming, if the calves fit great but the adjustment caused them to flare open, you might want to tie them with twine and give them a hot water bath. Please double check that side gap and if it is large, see what can be done about reducing it so I can issue you the EIB badge! Great work as a whole though, Josh!!!!
-
TK42174 Requesting ANH Stunt EIB Status [AP][487]
gazmosis replied to BIGDEAL's topic in Request Expert Infantry Status
Hey Phil! Thank you so much for your application for EIB. Your hard work has paid off so let's take a look!! CRL and EIB Application Requirements: All required submission photos have been posted. Your armor and blaster contain all necessary elements to qualify for EIB. That said, I would like to congratulate and welcome you to Expert Infantry!! Note: although Phil does have side gaps present, they are within allowable standards. Other-Armor Fit/Assembly: In this section I will go over observations made by both myself and your fellow troopers. Sometimes suggestions for adjustments and improvements are made. If any of these are required, those will be mentioned separately. You have done a great job! Any Garrison would be proud to have you representing them. We are proud to see your hard work and attention to detail pay off. Great adjustment to the back/kidney gap. For your Centurion pics, stand up really straight to eliminate all that remaining slight gap. If I was to make and "gun to my head" comment, it would be that you were slightly aggressive with the trimming of your belt corners. The vertical, outermost edge of your belt should roughly match the top to bottom width of the canvas belt. It is not extreme enough to require a change. Consider getting a little silver paint to weather your blaster a bit even if its around the edges and in the area around the trigger group. This really adds depth and realism to your weapon. As for fit, you have done an outstanding job but your thighs jump out at me as seeming a bit big especially around the knee. Now your rear cover strip is a bit thin (it should be coming in at around 20-25 mm wide) so it might be an opportunity to fix both. If indeed you have a lot of extra room around the thigh bottoms and can separate the seam, have a helper squeeze the halves together until they are snug against your leg, then back off slightly until comfortable. This should be felt the entire length of the thigh from knee to hip. If there is room to accomplish this, it will give your armor a sleeker appearance and increase its bad a** look! Centurion Suggestions: Although I try to spot as much as possible, the ultimate Centurion accuracy is up to the trooper. Your side gaps are allowable for EIB but will need to be eliminated for Centurion. If the elastic on the side is being stretched here you might want to consider a change to nylon webbing or just breathe out and tighten your belt. Make sure you have the rear drop box inserts as AP does not include them. Great work again, Phil!! Congratulations!! -
Alright, Liam. This is it in a nutshell. You want affordable stormtrooper armor that looks good but will fit your 11 year old body and your 11 year old budget. There are kits available that might fit you. However, there is VERY LITTLE on this sight that would be considered affordable from an 11 year old's perspective. That small persons kit will run you about $400 delivered and that does not include all the extras you will need which can add up to an additional $200-$400. Please don;t just drop money on a budget suit you might find on Ebay. Think about the fact that most adult suits like the ones found here are designed to fit someone 5' 8" and up. If you are not that tall, the suit will require major modifications. This website focuses around the 501st Legion. We are required by the 501st to make our costumes "appear as close to the original costumes in person as they appeared on screen". We do not take shortcuts here and know that our hobby is an expensive one. If I go onto a Ferrari website and say "Hi guys! I am looking for a great looking, great running, fast Ferrari really cheap" I am not going be very lucky in achieving my goal. Because that kind of thing just doesn't exist. A "cheap Ferrari is still $80,000.
-
Grab your folks and get some white craft foam
-
Starrfox's AP ANH Stunt Build (WIP) - Portland OR
gazmosis replied to Starrfox1's topic in ANH Build Threads
Exact is work but are not heavy duty enough for me. I have always used a razor knife for control but when cutting the cover strips with a long straight edge, make sure to clamp the straight edge to the plastic sheet. This will keep it from wandering and screwing up the cut. Also, whenever a blade of any kind, you will be left with a very slight raised edge along the cut line. If you don't remove this your strip won't sit flush to the surface. -
Another little girl bullied for liking Star Wars
gazmosis replied to gazmosis's topic in Announcements
Absolutely, Joe! And whether you are a trooper or not, a support card is an awesome gesture.