gazmosis
-
Posts
4,043 -
Joined
-
Last visited
-
Days Won
23
Content Type
Profiles
Forums
Gallery
Articles
Everything posted by gazmosis
-

Peters RS ANH-Stunt
gazmosis replied to Action Jackson's topic in Build Threads Requireing Maintenance
Great work, though!!! I'm sure you turned into a kid again when you first suited up completely!!! -
There are no 501st laws that say you HAVE TO let someone hold your weapon. IF you want, you can "help" a little fan hold it by holding the front portion while they hold the pistol grip or vice versa.
-
-
It is a sad reality, but sometimes kids can be so mean to one another. Thankfully, this detachment came through a few years back to help little Katie Goldman by building her a Stormtrooper suit with all the trimmings and made her dreams of becoming a Stormtrooper come true. The armor served its purpose again by helping heal the emotional wounds that were caused by bullying the daughter (Allison Jorgensen) of our former LCO. Now it has come to our attention that little Layla Murphy of Norfolk, Virginia is going through the same thing. The armor will have its chance to serve its purpose once again! The armor has been shipped to our own Brian Robinson (tkrestonva). He will then hook up with the local Garrison to help this little girl suit up. The GCO in that area has already been notified. Her address is on this link should anyone want to send her a card or other means of support. http://www.501st.com/forum/viewtopic.php?f=11&t=87569 Thanks to all who came together originally to help make this program available to little troopers all over!!! You guys are heros!!!
- 37 replies
-
- 10
-

-
Can I make my own armor?
gazmosis replied to MarioMareo's topic in Getting Started - Read this First!
IT's kind of unclear what exactly you are asking here. Don;t get me wrong, we are here to help. If the title of your post leads to the idea that you are planning to make your own armor, you WILL spend a heck of a lot more than $500 before you even have a helmet let alone the rest of the suit. Trust me, if you spend the money and properly assemble a suit from one of our armor dealers here, you will meet up with your local garrison, go to an event, have one little boy or girl look up at you and smile and suddenly the money you spent will have little to no meaning. -
TK 24419 Requesting ANH Stunt EIB Status [SDS][486]
gazmosis replied to cuacpato's topic in Request Expert Infantry Status
VERY NICE WORK!! No w I can congratulate and welcome you to Expert Infantry!!! -
TK-11157 Requesting ANH Stunt Centurion Status [MTK][177]
gazmosis replied to Altair's topic in Request Centurion Status
HI there, John!! Thank you for this great Centurion application! Let's not waste any more time and get to it!!! CRL and Centurion Application Requirements: All required photos have been submitted. This armor set contains all the required details needed to qualify for the Centurion badge. With much pleasure, I both congratulate and welcome you to Centurion!! Other-Armor Fit/ Assembly: In this section, the final look of your armor will be discussed through observations by myself and your fellow troopers. I am loving MTK more and more. Sets like John's add fuel to that fire. This is just splendid. Just nice, detailed work all around!! There was mention of the Dave M decals looking a bit too perfect. The only part of that decal set that can really be compared to that are the temple traps. The rear trap outline curves and swoops a lot especially at the bottom, The outline of the tears are bit wonky and the vent lines within the tears are very "hand painted" looking. Though the rear vent lines are pretty straight, they were like that on the originals as well. The tube stripes that come with that set also jump around a bit especially towards the frown. One of my main concerns I originally had with this armor was the extra width on the rear cover strips. I can see from the fit of the thighs that there is no extra room to take these down and from the gap in the pic shown, this was necessary. I am not requiring a change here, but an option for people dealing with this in the future is the use of an inside connection strip. Typically, this gap is only at the top as in the case with yours. You have also used an inside strip but what can be done is to cut a strip and place it onto the connecting strip to occupy the low spot between the thigh halves. the cover strip can be glued to this center fill portion rather than the outside edge. This was the cover strip can be cut to be almost exactly the width of the gap itself. Now this will only work should we be talking about a few MM to be covered. Any wider and I would suggest shimming with some ABS paste work. There will always be difference to me between marginally wider cover strips and ones that are more than 30 or 40 Centimeters. Shims should be considered if your strips are running that wide. The fact that John kept the calf closures the same as the rear thighs balances that out. Congratulations again!! It would be an honor to troop beside you!!
-
Peters RS ANH-Stunt
gazmosis replied to Action Jackson's topic in Build Threads Requireing Maintenance
Nice work!! A couple things that jump out at me right off the bat: You are wearing the forearms on the wrong arms. There is a molded ridge that the cover strip sits on that runs from the elbow to the wrist. That should be on top. Second is the huge amount of overlap on your calf closure...especially on your right calf. I would have someone make a mark straight down the center of your calf and make the seam there instead of on the side like it is. The shoulder bells could be a bit closer to your ribbed shoulder bridges. Lastly, the cover strips on your legs look a little thin to me. Especially in the back. For someone as thin as yourself, I can see if a 25 mm strip in the back would look a little wide but yours look more like 15 mm wide. 20 is usually the standard width here. On a suit with a hundred different things to look at, these few items are nothing. I am jealous and wish I could fit into RS!!! Congrats!! -
TK 21271 Requesting ANH EIB Status [TM][485]
gazmosis replied to Guffe10's topic in Request Expert Infantry Status
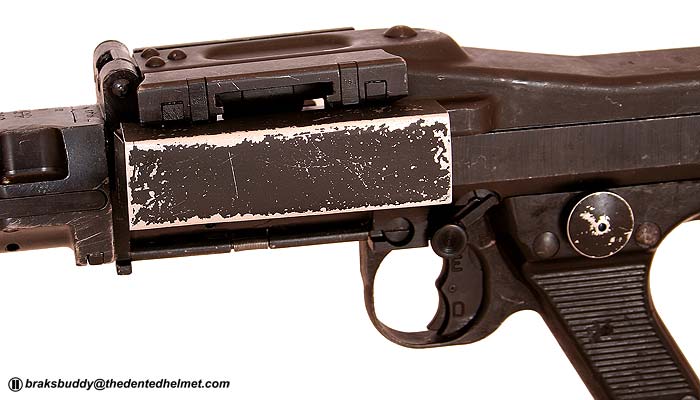
Hello Torben: Thank you for your application for Expert Infantry. Let's look at this build!! CRL and EIB Application Requirements: All required photos have been posted. Your armor has all the required elements to qualify for EIB. With that, I both congratulate and welcome you to Expert Infantry!! Other-Armor Fit/Assembly: In this section I will usually discuss observations made by both myself and your fellow troopers. If any of these observations lead to changes or corrections that are required, I will specifically mention that. Well, another stunning set of TM! Well built and well detailed. I do need to mention that your side gap is the maximum allowable space. I'm not going to split mm's here. More on that in the section below. I haven't really seen any examples of biceps being too low. Many screen TK's had their biceps fall below the shoulder bells as they weren't even attached to anything. Your biceps do appear to be resting at a strange, downward angle. I am not sure if you have a strap under there that is too short or why they are sitting so oddly. I would look into this just so things don't look out of sorts. Don't those long helmet screws jab into your face or head??? They are only brass and snap off very easy with a pair of metal shears or tin snips. Don't use a rotary tool as the heat will melt your ears. Very impressive BFG!! (more on that below as well.) Centurion Suggestions: As much as I try to spot everything, the final Centurion accuracy is up to the trooper. I would be very surprised if we didn't see a Centurion application from you. There are a couple things you will need to adjust before applying, though. First, you will need flexible white or painted latex handplates. In regards to the gaps on your sides, all this gap will need to be removed. I'm actually surprised that you have any but if the sides are being slightly stretched out you might want to switch out the elastic for nylon webbing or just breathe out and tighten your belt a lot. This gap elimination must be displayed in your application. A split rivet will need to be installed on the cod portion of your ab.You can see it clearly displayed on this set of TM armor. Next, you have a lot of overlap of your back onto your kidney. The back plate needs to be postioned so that there is a single seam between the back and kidney. Lastly, although your DTL-19 is awesome, the screws that are in the middle of the ammo feed cover box should not be there. See pic: You can use some putty filler or something similar to cover these. Congratulations again on your EIB achievement!!
-
Go get a Dremmel tool and start trimming!!!!!
-
TK 24419 Requesting ANH Stunt EIB Status [SDS][486]
gazmosis replied to cuacpato's topic in Request Expert Infantry Status
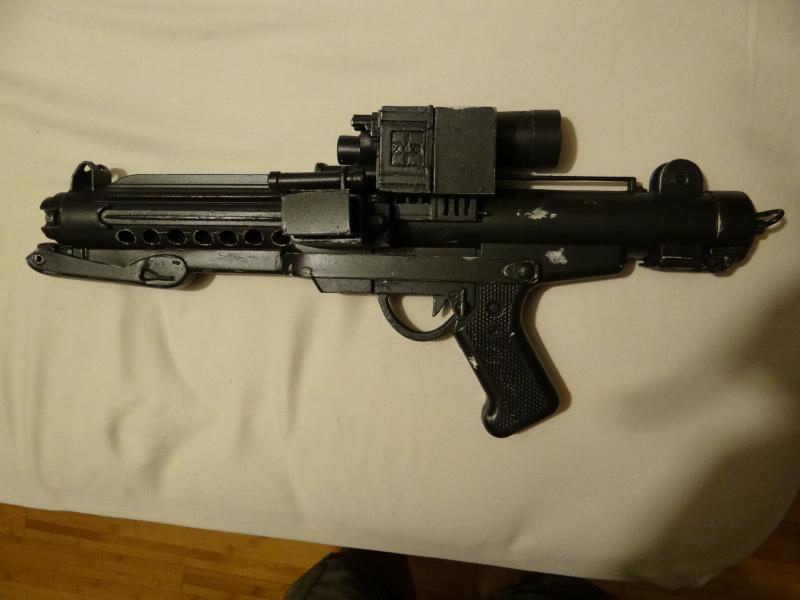
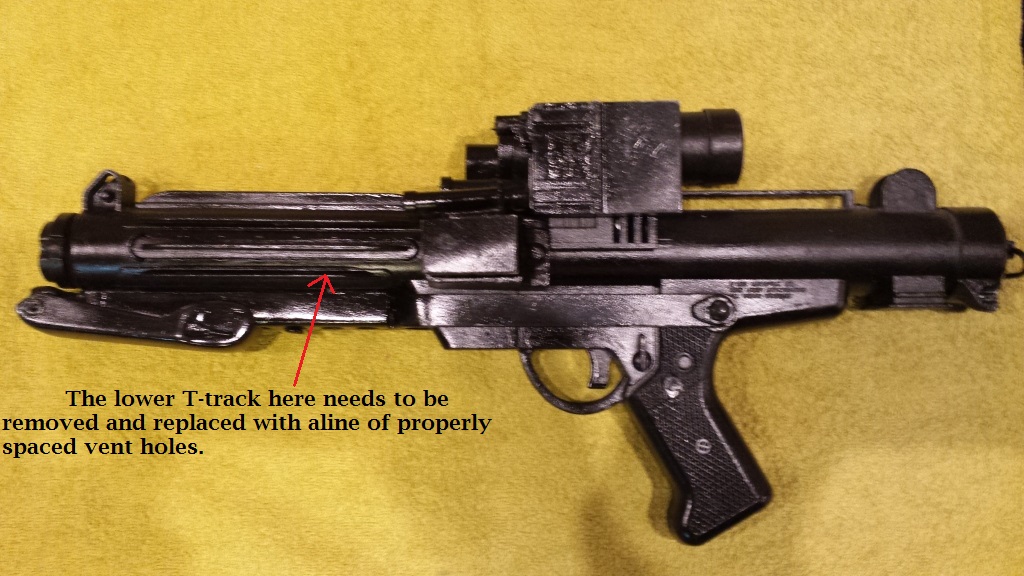
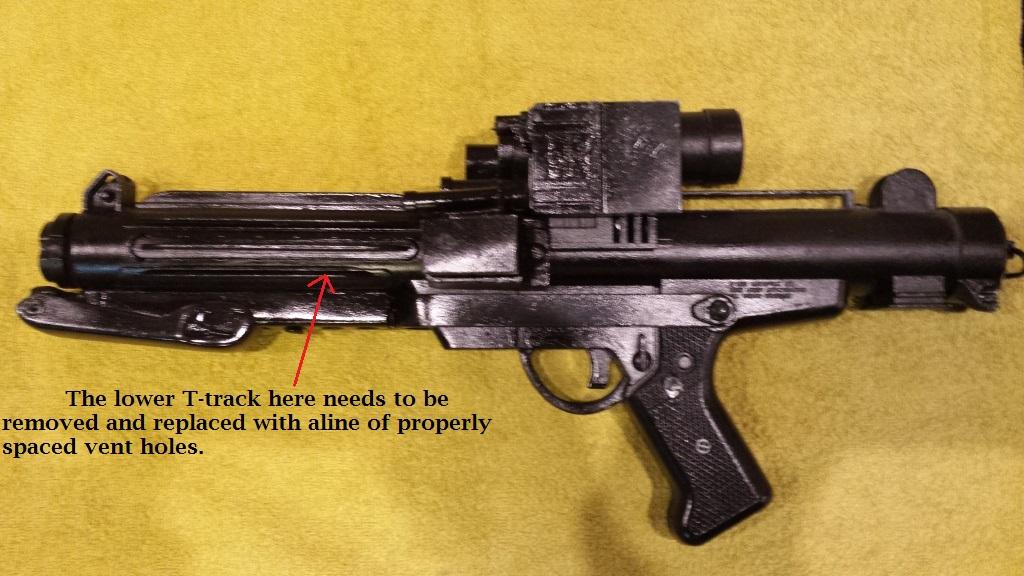
Hi Jordi!! Thank you for your application for Expert Infantry!! I see you have joined many in your Garrison with the SDS armor. Let's take a look! CRL and EIB Application Requirements: All submission photos have been posted. Although your armor has everything needed for EIB, your blaster will need one change before I can go forward with your badge. The lower T-track on the magazine side of the blaster will need to be removed(ground down) and holes drilled in its place. This is your blaster: Here is what your should look like after the change: Once that is complete, the badge is yours. Other-Armor Fit/Assembly: In this section, I will talk about observations regarding your armor. IF these observations require a change or repair, I will note that in the Centurion Suggestions section. You have done a nice build. Your Garrison should be proud to march beside you! Great work in making your own neck seal and holster. Neither is an easy thing to do. If there was anything I would improve on, it would be to slightly increase the size of your ab buttons. They should measure right around 12 mm. I think at some point, I would go back and re-size your right thigh. In your full body shot, it looks much larger than the left one and in your back picture, you can see a lot of extra room around the knee opening of the thigh. If this is taken down a bit, your armor will look sleeker and better balanced. Centurion Suggestions: I do my best to spot things here, but the ultimate Centurion accuracy is up to the trooper. It would be great to see a Centurion application from you but there are a few things that will need changing before you can do that. First, your Hasbro blaster will need to be upgraded to a Sterling based blaster. I noticed that you have no snaps holding your waist belt in place. This is causing a large amount of droop in the front. The top of the belt needs to be resting against or slightly overlapping the bottom of the button plate. The Kidney notches as seen circled in this pic needs to be added: The cover strips on your calves and left thigh cannot extend over the raised molded ridges at the tops of the shins or the bottom of the thighs. They need to stop right before the ridges like this. I like your handpainted details, but I would like you to change a couple vent lines on the rear traps. The vent line pattern was the shape of the trapezoid itself. The lines were never all parallel. IT should look like this when done: Lastly and most important: I will need you to post some clear shots of the joints on your armor. I tried to copy one of your pictures that shows one of your biceps and a forearm and it looks like the bicep was constructed with the seams overlapping rather than butt jointed. SDS armor has had a problem with this. IF any of your joints are made with overlapping parts, they need to be re-done with butted joints to be eligible for Centurion. Get on that blaster mod so I can get you your EIB badge!!!

-
July 2015 Newsletter - Brian Muir Edition
gazmosis replied to Holnave (evan_loh)'s topic in The Newsletter Archive
Thanks to everyone involved not only in the making of the newsletter, but to those making the news!- 26 replies
-
- 1
-
-
- newsletter
- july
- (and 1 more)
-
Look forward to your progress!!
-
TK-51978 Requesting ANH Stunt EIB Status [AP][484]
gazmosis replied to Racasey06's topic in Request Expert Infantry Status
Hello Ryan and thank you applying to join the ranks of other EIB quality armor!! Let's have a look!! CRL and EIB Application Requirements: All submission photos have been posted. Your armor contains all the necessary elements required for EIB. Congratulations and welcome to Expert Infantry!! Other-Armor Fit/Assembly: In this section I will go over observations made by your fellow troopers as well as my own. Sometimes these observations may lead to a suggestion for a repair or adjustment. If these are required, I will list those in the Centurion section or they would have been listed above. First off, nice work on your overall build. It looks well planned and executed. I know that those side shims were a challenge. I will touch more o those below. Great work with the proper Hasbro conversion. The correct T-track was ground off the mag side of the gun and replaces with a line of vent holes. The only thing that catches my eye with the side shims is the slight way they stick out visible from the front. Now there is a bit of side overlap which could be the culprit when tightening your belt. If not, people have to remember that we as humans don;t have flat sides. We are round. Your shim should really be slightly curved as well. I wouldn't get anywhere near them with a flamed heat source or even a heat gun because the possibility of even heating is not very good. I would create a hot water bath out of something you can immerse the sides in. Once heated for a few minutes in the hot water, it should be able to be lightly manipulated over something like a paint can or rolling pin. If you can change the direction, even slightly, it will probably take that flare out. Last mention is about your thermal detonator. Although there is not required type of hardware to use here, typically, the screw head should sit flat against the clip surface. Those raised, tapered heads just might get caught on something. If you are REALLY feeling funky, you could increase the clip width to 1 inch rather than 3/4! Centurion Suggestions: Although I try to spot everything pertaining to Centurion, the ultimate accuracy is up to the trooper. I would be surprised if we DIDN'T see a Centurion application from you. There are a couple things you will need before applying. - A Sterling based blaster to replace the Hasbro. -Painted latex or flexible handplates -The decals on your helmet tears and traps will need to be replaced by the "handpainted look" ones or you could handpaint your own details. -The notched in the bottom , front corners of the kidney -Your left shoulder bell could be brought up closer to the shoulder bridge. -While we are talking about those, they should be mounted evenly on the chest. Either position you have them is fine, they just need to be even and balanced left to right. Do not fear the paste!! The advice you received is good! I would like to add a couple of things, though: Mix the past in a jar with a seal-able lid like a babyfood jar. Acetone evaporates very quickly. you want to minimize this. Second, let the acetone do the work to break down the ABS into a paste. You will need to incorporate the material together initially, but too much mixing can make a bubbly mixture. Go slow. Layer by layer. Don;t try to kill it all in one pass. Take your time. We will be here. Congratulations on your EIB!!! -
TK-26113 Requesting ANH Stunt Centurion Status [ATA][176]
gazmosis replied to Zarlon's topic in Request Centurion Status
Hey there, Kyle: Thank you for your Centurion application not that anyone was surprised to see one. So let's get right to it!! CRL and Centurion Application Requirements: All required submission photos have been posted. ​Both your armor and your weapon exhibit the required details to qualify for Centurion. Thank you for making sure all the correct pictures showed what they both should and should not have (unpainted rivets on sides and knee pack in your EIB application) All that said, I would like to congratulate and welcome you to Centurion!!! Other-Armor Fit/Assembly: In this section we will discuss any last observations made by myself and your fellow troopers. sometimes small details make a big difference. Your work that you did tweeking the final look of your side seams and belt position just bring everything together. Your hard work both paid off and is well appreciated. Clever idea with riveting the waist belt, canvas belt, and drop box elastic together. Nothing will ever move out of place that way! There was a comment regarding the hardware on your thermal detonator belt clips. For those troopers seeking the ultimate level of accuracy, the original hardware consisted of flat, pan head, black, slotted screws. It is great to see those but certainly not required. It's nice that you went the extra mile, Kyle. I am not going to hijack the thread here but I need to make a point about the submission pics. One of the required photos is of the wrist opening of the forearmS.. Please always include both forearms, Troopers!!! Congratulations again!!! Now get out there and troop that Centurion armor!!!! -
---------------
-
Looks very nice so far! Any idea on a price yet?
-
MMMMM coffee beans!
-
Your ab button plates concern me. The center plate needs to have the flat flashing on the sides as a gluing surface and the ($) button plate needs to be flat next to the buttons themselves. See pic here:The 4 button plate is still fixable but the other one might need a replacement unless you can find a good way to attach it flush from the inside.
-
If you can get them on and off, they're good
-
TK-11157 Requesting ANH Stunt EIB Status [MTK][483]
gazmosis replied to Altair's topic in Request Expert Infantry Status
Hey John! Thank you so much for your application for Expert Infantry! CRL and EIB Application Requirements: All required submission photos posted. Nice application and great pics! Thank you. Your armor demonstrates all the necessary elements required for EIB. With that I both congratulate and welcome you to Expert Infantry!! Other- Armor Fit/Assembly: In this section I will summarize observations made by myself and your fellow troopers. Sometimes these observations lead to suggestions for changes or adjustments. These are to improve the final look of your armor but if any are REQUIRED, those are usually listed in the above and Centurion Suggestion sections. First thing I wanted to mention is the fine overall work you have done with this armor. Any trooper would be proud to wear such nicely built and nice fitting armor as this. Well done! HOLY SNAPS BATMAN!! I don't think your interior strapping is going anywhere. Nice blaster, too! I have a little concern regarding the extended cover strips on your biceps. Not this is wrong, I would just hate to see them get snagged on something and torn off or worse broken. I believe you have the hand painted decals, correct? If not, your paintwork is some of the best I've seen. Centurion Suggestions: As much as I try to spot everything I can, the ultimate Centurion accuracy if applied for, is up to the trooper. There was mention regarding the XL cover strips on the thigh backs. Ultimately, it is preferred to have these at 25 mm (1 inch) max width. Can you provide me with a pic of the inside of your thigh so I can see the gap you were required to cover? If these can be taken down at all, it would be a huge improvement. the last thing I would like you to verify is the overall length of your thermal detonator. It looks long to me. Here is how things shold measure out: Your proportions in regards to your end caps and the space between the caps and control panel look great. IT's your control panel that looks really long and that would affect the overall length of the detonator. Congrats again!!!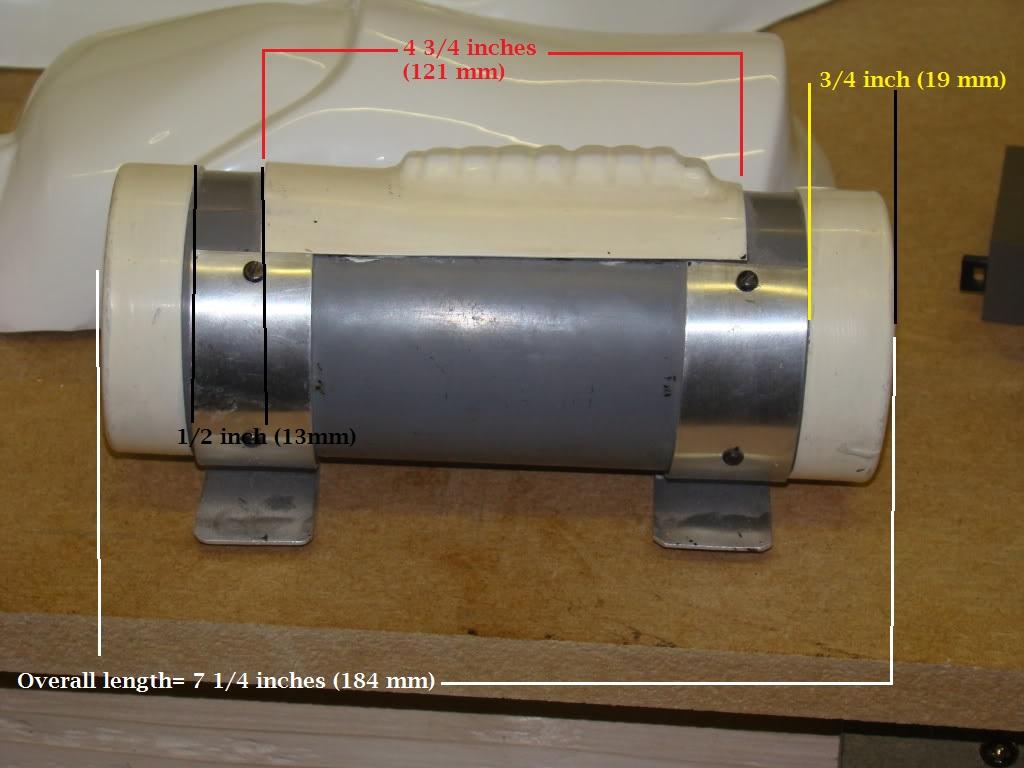
-
Very nice!!! I take it you are going sandy??
-
TK 15359 requesting ANH Stunt Centurion status (AP)[175]
gazmosis replied to Somatophylax's topic in Request Centurion Status
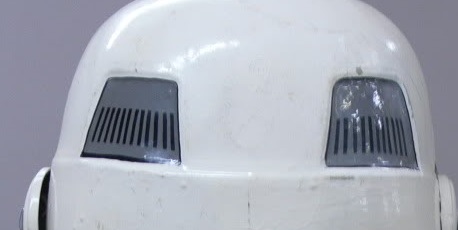
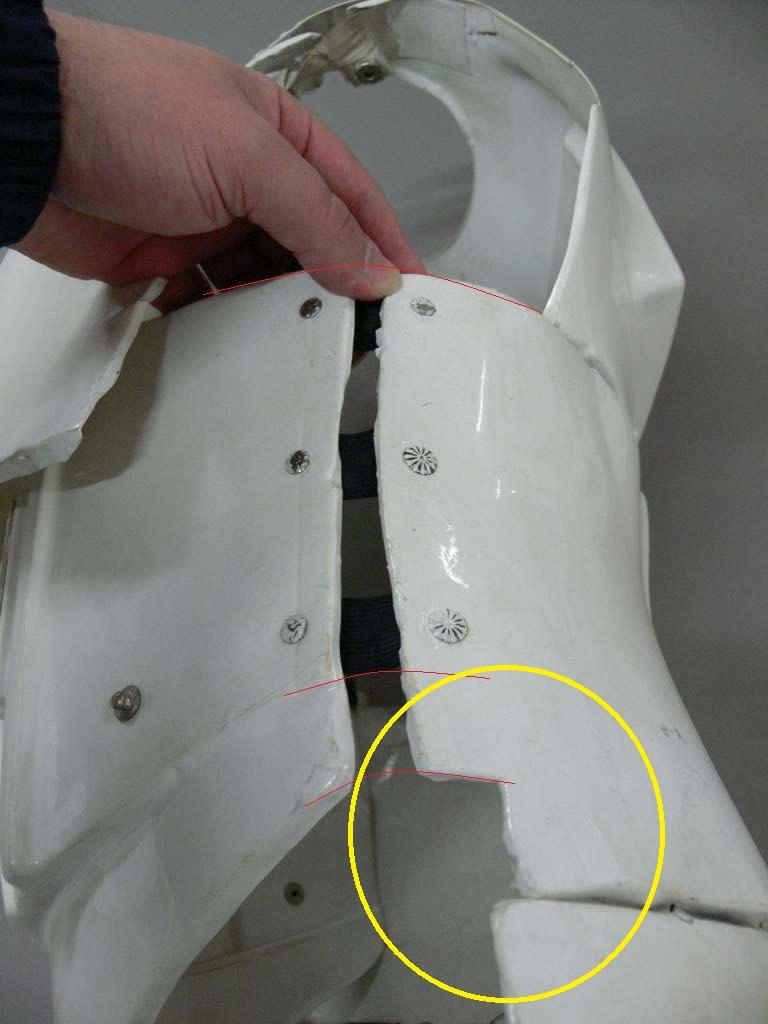
Hey Stephane! I know about the suspense. I was on a family vacation this weekend and not at my "station" as I like to call it. Anyway, thank you for your Centurion application. Complete and thorough. Thank you. Let's look at everything! CRL and Centurion Application Requirements: It was noted in the EIB application the excessive gaps between the back and kidney plates as well as both side seams needed to be addressed. Although the back gap was not eliminated, I do consider this gap to be minimal and acceptable. The side gaps have been sufficiently addressed. All other aspect of your armor meet the requirements to qualify for Centurion. That said, I would like to congratulate you on earning your Centurion badge! Other-Armor Fit/Assembly: Usually, there isn't too much to go over here except to summarize any observations I or your fellow troopers might have. Not too much going on here! Great overall work! Very nice!! I noticed that you got your blaster from the same guy Spycee did, Your rear sight is on backwards as well. The serrated edges should face the rear of the blaster. I did notify Mark from AP to let his guy know. Hopefully his next round will be facing the right way. I will usually make a "put a gun to my head" comment as well. If there was one thing I'd like to see you do at sometime in the future is to re-paint the tear areas under your eyes. As they are, they hold the shape and detail typically seen and that is fine. They are a bit small, though. On any helmet, there is a valley between the walls of the tears and the bottom of this recessed area. Using a pencil, the shape will just appear by itself as a pencil guides its way in this valley. I highlighted the area I am referring to. This is just so you can see but your pencil will show you the REAL lines. Great job again.Your Garrison should be proud to troop beside you!!!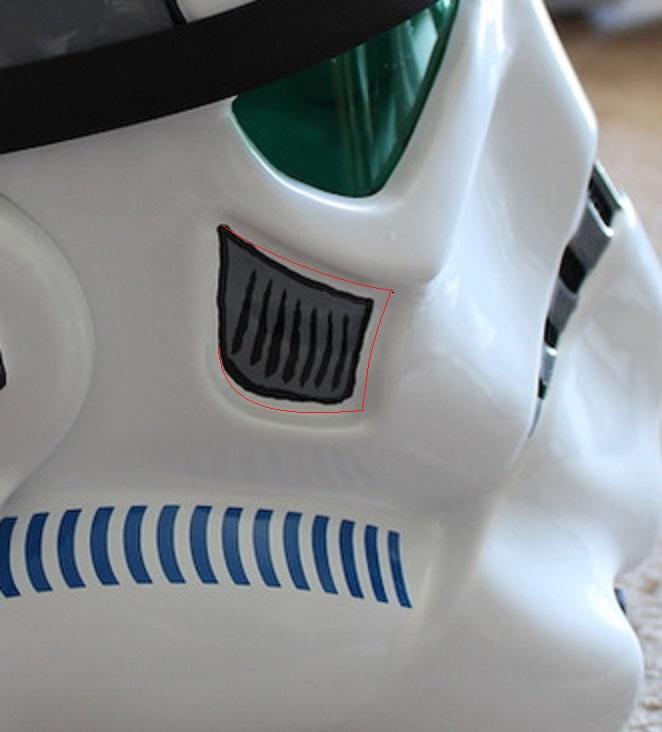
-
Kit's are from Mike at Trooperbay. However, he prefers for people to contact him at: [email protected]
-
Helmet mold mods to achieve Centurion
gazmosis replied to Elumusic's topic in The Foundry - Armor and Prop Making
Hey Jeff: You are on the right track here. What is most important that you are doing is side by side comparisons with the acrual helmets because that is what you are trying to duplicate. You have an artist's eye. I can see that in the details you already had in the pre-adjustment shots of the helmet. What I always fall back on as a way of determining how close something is to the original, is rapidly looking back and forth between what you have and what you are trying to achieve. Your eye will pick up any differences however subtle. This is how I came to the determinations about your rank bar areas being over sized and the tears below the eyes being a bit out of shape. With what you have done already, especially by adjusting the frown and adding the 5th tooth indent, you are very close. Everyone realizes the effort, skill and money it takes to prepare molds for pulling. I can't wait to see your final products as it comes out of this.