gazmosis
-
Posts
4,043 -
Joined
-
Last visited
-
Days Won
23
Content Type
Profiles
Forums
Gallery
Articles
Media Demo
Everything posted by gazmosis
-
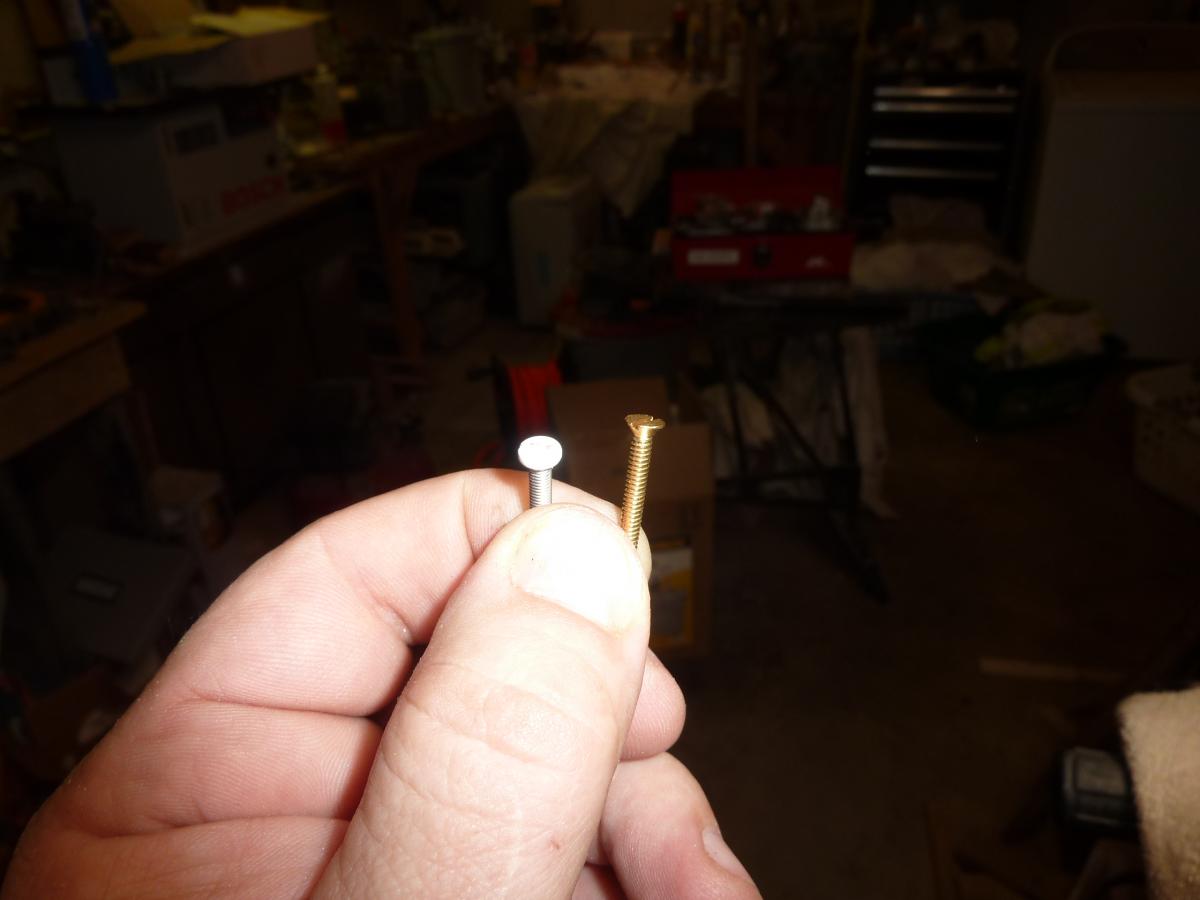
Another tip.....the correct screws for your thermal detonator are available on your helmet. Although you will need to paint them black, you can swap out the ear screws for the proper 4-40 brass tapered head machine screws. Also, your gap between the belt clip and the end caps are a bit enthusiastic. They should be right up against the caps. The ear screw is on the left and the replacement is on the right That pic doesn't show it too well but trust me the ones on your helmet are the correct ones

-

Magma Build - Help please :-)
gazmosis replied to krazytrooper's topic in Tutorials, Tips and HOWTOs
I wouldn't start the ears until you have the cap and the face married. The way the ears are trimmed can differ when moving the ears even a little. Start by establishing your brow position. Make sure your brow trim is installed while fitting the cap to the face. You want it tight fitting across the brow line. Make sure the cap is centered by aligning the front of the temple traps with the upper, outer corners of each eye. Drill your center mounting hole on the ear portion of the cap in advance so when you find your desired browline position you can mark it right away. MARK ONE SIDE AT A TIME. After marking and drilling the one side, use a screw and nut to temporarily secure it. With it tightened, pull the brow across tightly and mark the opposite side. Drill and secure that. Check your position and make sure your brow is level across. If not, you can undo the screws and adjust the holes in the face. they will be hidden. Once all is good, then you can rivet everything in place or some makers include a screw. I suggest installing an extra rivet on the cheek tube to keep things from moving. -
TK-24637 Requesting ANH Stunt EIB Status (SDS)[528]
gazmosis replied to Hades's topic in Request Expert Infantry Status
Great work!! The only thing I see that might affect your EIB application is the lack of a rank bar on the ear portion of the helmet. You will need rubber handplates should you decide to go Centurion. Nice work!! -
Drools
-
I looked at the rivet covers closely and they don;t seem to be glued down outside of the round portion. Perhaps the cover is glues to the rivet?? I have never had much luck prying off rivet covers without damage happening somewhere
-
It's not bad although in the past the rear sight is way too tall and has been mounted backwards. I wonder if that was fixed along with the latest upgrades?
-
I kinda wish the belt was uncompleted. That cloth belt looks very flimsy. The potential exists for major damage if you tried to pop off the rivet covers to replace the belt with something a little more stiff.
-
This will be a day long remembered!!! Awesome work!!!
-
Very nicely done!!
-
although for approval the rivet covers (as these are known as) are not looked at too carefully, stick with the ones on top. They are more like the ones in the film. However, sand down the profile of the square area. The originals were just small, coin sized disks that were vacuformed over so the the surrounding flat, square area was just the thickness of the plastic sheet being formed.
-
AM 2.0 Armor Build in Ohio
gazmosis replied to rduda's topic in Build Threads Requireing Maintenance
Typically, the overall width of the waist belt and the power pack that goes on the lower right thigh are trimmed almost down to the raised boxes. It would be a good deal of work to change this on your waist belt considering all the careful work you have put into that but the thigh pack can still be trimmed down. Nice job so far!M -
I love watching stuff like this develop
-
Color painting a Stormtrooper Armor
gazmosis replied to tk21994's topic in Getting Started - Read this First!
Please PLEASE take the prep of this seriously. Unless the proper amount of time is given to the primer to bond to the armor surface, it will begin lifting (or crinkling) upon the application of the top coat. 2 things have worked for me: Apply the primer to all parts and let cure at room temp or better for 7 days minimum. After 7 days, sand if you wish then apply all planned coats 10 min apart. OR......... apply primer, wait 15 minutes then apply top coats with no more than 10 minutes between coats. -
I would just deal with the extra black space between your shin top and thigh bottom. The white knee cap will lessen the appearance of this black area. I would not have those kind of cahones to cut a shin in half and try to join parts with that amount of molded details in it.
-
This is supported in the opening attack on the village. Just before landing, the film shows them lined up in the transport. Every helmet is at a different height.
-
the fact that someone told someone that they made it is just a lie. Rubies Costume company made this
-
If using CA glue, it is helpful to get the insta-set that is available. One drop on your glue application will instantly harden it and keep it from running. IT also sets the parts instantly making moving on to your next part that much quicker.
-
TK 81477 Requesting ANH Stunt Centurion Status [NE] [ATA] [205]
gazmosis replied to CWard's topic in Request Centurion Status
You look fantastic, Chris. Well done! -
sorry, Paul...I didn;t know if you had that to offer right now
-
Contact Walt Bonger. He makes it.
-
Kidney plate is not symmetrical, do I trim?
gazmosis replied to Faolain's topic in Assembly, Mods, and Painting
Don't concern yourself with that. If you are going to trim anything from that area, cut in the kidney notch then the point will be moot. You can see it here just below the lowest rivet on the kidney plate. This is a picture of screen used armor.
- 1 reply
-
- 1
-

-
There was a limited run of FO armor sets from Anovos released in 2015. Other sets from other makers are currently in development. New FO stormtrooper customers will need patience.
-
http://www.whitearmor.net/forum/topic/16744-leather-e-11-holsters-35/ You can also contact TK Bondservnt for his quality holsters or if you want a thicker leather, rigid holster, seek Gazmosis those are a little more expensive, though
-
TK-71823 Requesting ANH EIB Status [AM] [521]
gazmosis replied to GunnerD's topic in Request Expert Infantry Status
Yes AM has updated their chest and back to be more accurate. This looks like their "NE" line of armor which they sold a while ago. Nice work on this!! Great attention to detail. There is some extra return edge you have on your back and sides that could be evened up but that's for a later date. I would look into reducing the diameter of your biceps. They are HUGE on you. This is a comfort thing, though.