Leaderboard


Popular Content
Showing content with the highest reputation on 01/11/2020 in all areas
-
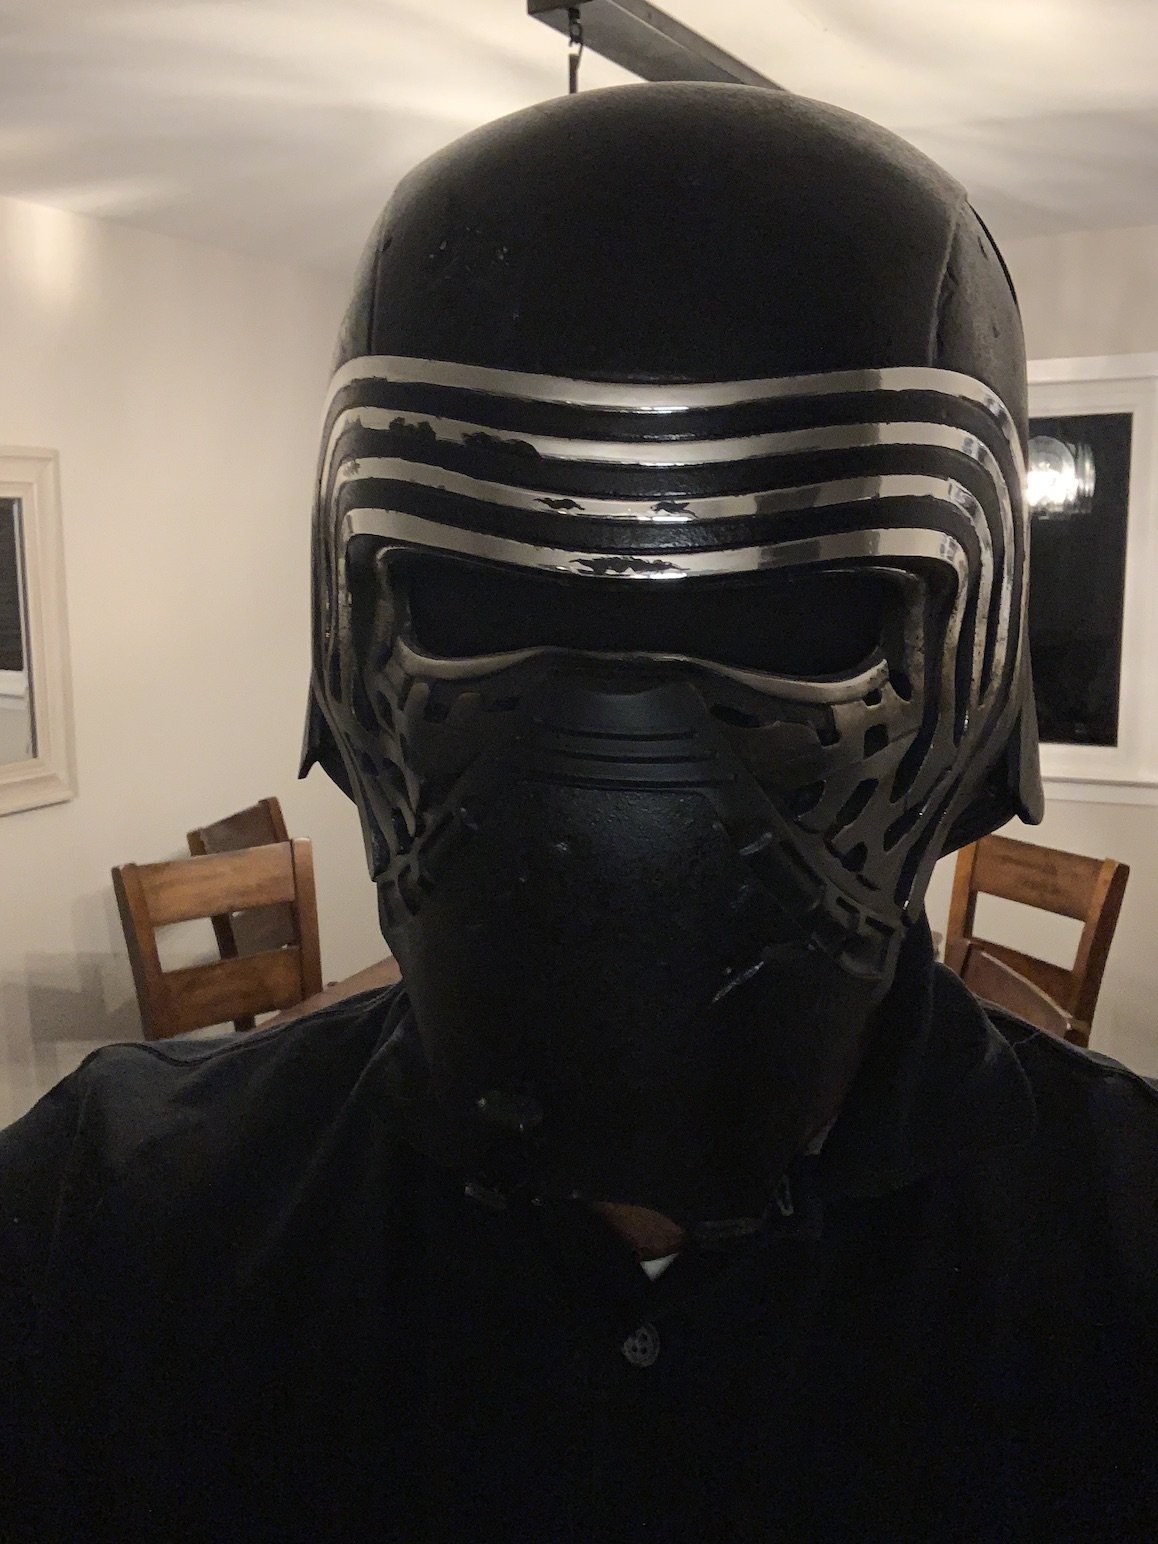
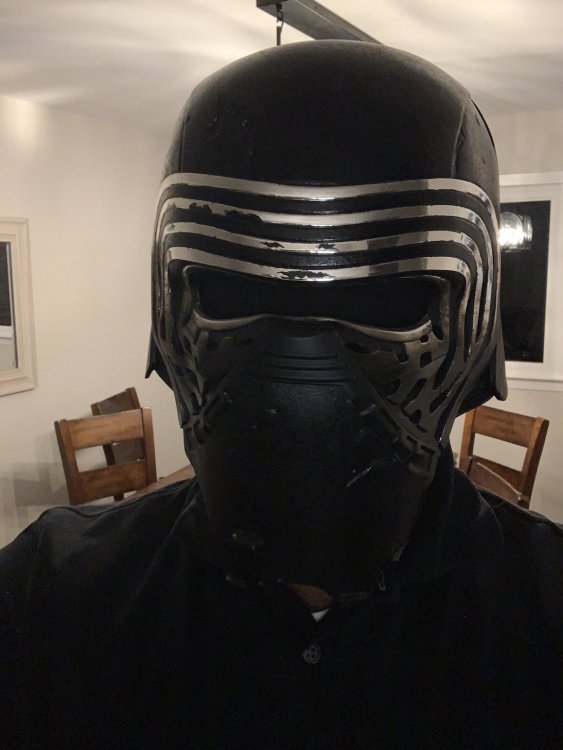
Yes I can confirm that the Kylo helmets are shipping as I finally received mine today. I am not saying my faith in Anovos is completely restored but at least one of my outstanding pre-orders (FOTK kit being the other) is FINALLY in my hands. Kylo Ren helmet is really nice!
 5 points
 -
Damn - beat me to it! Truth - can't wait to see it Reece - lead the way!!!!2 points
-
That's why I propose that we apply it to only EIB or Centurion, as it's too subtle for basic, but incredibly crucial to the accuracy of higher ups. However, I have applied bondo and sanded it to a perfect finish on my bucket for very cheap, and it works wonders. I'll update my HOWTO thread this weekend showcasing this.2 points
-
Thanks so much to everyone for their suggestions for making your Trooper more Christmassy. We had the big Christmas Fare “Yulefest” in Ireland and I have to say, I think I looked fabulous! Ho Ho Ho!
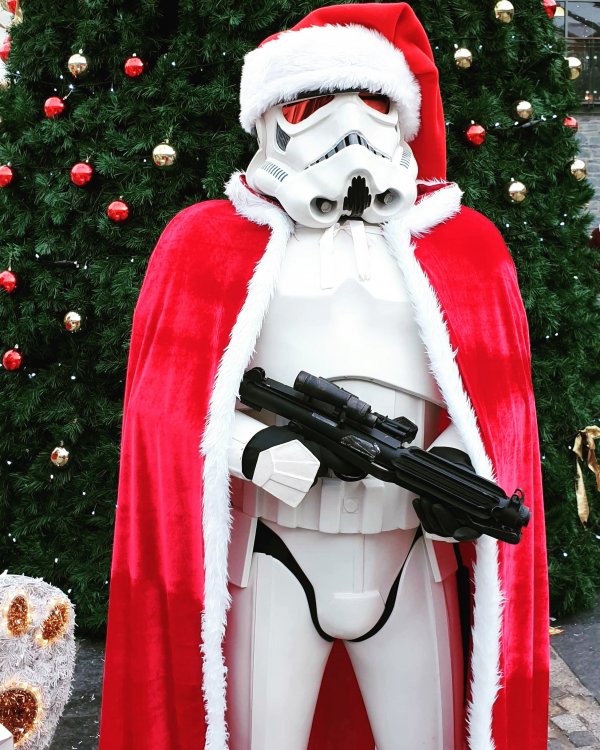 2 points
 -
Hello and welcome aboard, check out some other build threads as well as EIB and Centurion applications, also use the reference gallery, don't forget the CRL's (costume reference library) great images you can refer back to while building. There is also the Reference Image Depository here: Here is a great supply list:2 points
-
Thanks to a great friend, Derrek (DDay), I was able to obtain some nice sterling smg parts. Thank you billions Derrek! His kit paved the way to a whole new era of E-11 kit building and these parts were the backbone of his endeavors. Also these parts are in fact the exact ones seen in the Blaster Reference Photo Compendium. Some parts I have added to the lot recently for alternative molding choices and some to replace (the bolt). I am honored to be the next caretaker and hope to see what new life I can add to them. Another special thanks to Aaron (Usaeatt2) as he was instrumental in bringing each piece to its full glory. He put a ton of work into making these parts ready to mold part for part. He also helped guide me on a number of things with these parts like how to remove the D ring from the end cap undamaged. His knowledge on these parts has been invaluable and deeply appreciated. Here is what I have in total: (Some parts missing from the photo as they were being molded. Some smaller pins/springs and parts are missing and I will replace at a later date. The only main part I do not have yet is the barrel) Over a 2 week period during the midnight hours of my summer break I was able to make molds of the parts. Hoping to test them out soon. Unfortunately I had to leave the parts back home to avoid breaking any international laws. TSA actually upheld the box of molds and it was forwarded to me a few days after I got back to Japan. Luckily there is not offense to send silicone gun part molds abroad. So for now I will cast what I can with the molds and also create sub castings as my master molds for future castings until I get back to the US in the future. This is just a test and see project so hopefully the results will be good. Already there are amazing other resin blaster kit/part makers like RA Props (http://www.stormtrooperblaster.com/the-stormtrooper-blaster-project.html) and Doopys is not a bad option if you successfully get one, but since casting the resin scopes I have always wanted to try my hand at casting real sterling parts. I am not expected these to be extremely clean castings. These will be fairly raw with potentially lots of areas to fill or sand. No pressure pot to use as well so that puts a cap on what I can achieve as far as total quality goes. Stay tuned for updates in the coming weeks.1 point
-
Fantastic job on the shoulder placement, Jonas! Removing the return edges on the bottoms of the shoulder bells would reduce the gap between the bells/back plate a bit. The cover strip alignment on the biceps/forearms could not be better, Textbook work, sir!1 point
-
Very interesting thread, great looking results already Brian! Looking forward to very accurate folding stocks without all the hollowing out and reconstructing/shaping effort! Judging by the quality of your scope casts these sterling parts are going to be nothing short of awesome!!!1 point
-
You will all be proud to know on this day, 12 years later, I've ordered Jims kit and will begin my journey to become a TFA First Order stormtrooper! I will of course share my journey in a build thread! For the First Order!1 point
-
We can definitely help you out with this, James, but pictures really are worth a thousand words. Try to add detailed and full shots of the area, as well as the strapping you currently have. At 5'11, you shouldn't have any trouble getting them to line up, and we will help you make it happen!1 point
-
I appreciate the gif there, no need to be harsh about it. I'll try to attach that to the original post. I'm not sure what the argument is about, the point is that something is being pointed out that was hard to show in the past, but now am able to bring it to light.1 point
-
Thank you Vuki, done for you sir. Could you please number your troops so its easier to keep track rather than having to count them1 point
-
Good work Reece, How to guides are exactly what we need to make things that seem hard to many, easier to understand and more achievable. Its a great start.1 point
-
OP Post #2 Thanks guys for the encouragement, kind words, and helpful insights! I'm perhaps as excited about this part of my Legion journey as my actual TK armor build! By the way, be forewarned that this post is picture-heavy, and is formatted to best display on the computer web browser view of this forum. So I did something bad—or not. One single GarageBOSS 16qt oil pan came back in stock for the clearance price at Walmart, so I purchased it... along with the normal 12.5pt version AND the Midwest handle-less pan. Now I can literally compare them all side-by-side, and as previously alluded to, I may simply make several versions of the pack with the three pans. Below are the comparison photos. Note that the pan without the handle (to be added later) is the Midwest, the one with the circle cutout is the mid-sized 12.5qt, and the largest one is the 16qt. The last two photos are with the smaller and larger pans laid with the standard mid-sized. I also found several more pull handle options to add to the Midwest pan (a need which makes it a more pricey option than the other pans), and purchased the SouthCo one from the Walmart marketplace since I believe it most resembles those in the Battlefront games. Below are some other handle links for reference. Note that several vendors sell what appear to be the same handle as the one I purchased, shown larger in this first image. Click on the later three photos for links to the purchase websites. Purchase links to the "boxy" handle above: Walmart | Grainger | Bisco | Zorro Moving on. I've been on a purchase spree this past week, and have ordered two sets of MP40 LEATHER pouches, an orange pauldron from Trooper1, two sets of Popit container sets, and the button box bumpers from Amazon. With help from several forum members I came to the conclusion that I'd need to resort to an international purchase for the leather MP40 pouches, and having had good experiences on Aliexpress in the past, I went that route. If all looks well when they arrive in three or so weeks I will post the seller and item link I used, and several (aka many) photos. As for the Popit boxes, I was literally about to click and finalize the purchase on Amazon when I thought I'd do one last google search and came across the Popit Shop website. Fortuitously, they had the 6 container stackit set in stock, priced cheaper than Amazon, and the new user coupon code "MYFIRSTPOPIT" netted me an additional 25% off and free shipping! A single set was going to be $14.99 shipped, so I decided to get two sets to give me a margin for error and to use on the extra backpacks I might make. I never knew I could be so excited about a food storage container manufacturer's website. Interestingly enough, my order arrived in two days via Amazon, so there must be a Popit / Amazon partnership. Before I get too much further and lose some readers — QUESTIONS! Which of the four largest Popit containers should be used? Based on Ukswrath's 2nd thread, it appears that the button panel should be the Xe 041 (6.6" x 4.75"), the vent panel the Xe 051 (8" x 5.6"), and the right arched panel the Xe 061 (9.1" x 6.6") container. If that's accurate, then I'd be using the first three boxes in the photo above, but with my plan to angle the front of the arched box, I may consider using the Xe 062 box—the fourth one in the photo—which has the same length and width dimensions, and is simply deeper/taller than the Xe 061. That extra depth with enable me to cut off the top and create a new angled surface. What are the preferred primer and paint brands and colors you all use for your backpacks? Always prime before main coat, correct? Any clear sealant on top of it all? I'm going with the 1" nylon for the backpack straps; what are your preferred purchase sources for the material? Radio bottle cap question; see notes several paragraphs below. Be prepared to overthink little plastic cylinders. To continue, I've also started a reference guide folder for my HWT build, and so far it contains printouts of the CRL and some reference guides and images. I will also be adding some backpack, T-21, and DLT-19 build threads and instructions. The OCD part of me has been pushing to find flat-topped 2" PVC end caps for the antenna tube, rather than cut off the rounded tops of some caps and leave the tube end open. Thus far my search has yielded the following, and I believe the last two are likely the same product (click the images to navigate to the purchase websites): Similarly, I've been pondering what type of caps to use as the knobs on the radio, and have secretly been eyeing all the caps on every type of vessel present in our house (shhh, don't tell my wife). At first I thought these small 16oz naglene bottle caps would be perfect, with their deep-grooved outer edge and the circular disc on top, but alas they are too wide at 2-5/8". Then I found these Dr. Brown's baby bottle caps in a three-pack for less than $3 shipped on Amazon, and they seem to fit the bill perfectly with the ridges on the outside and the recessed interior. I'll know whether or not they're the proper size ratio after I print out a radio box template. Cap dilemma continued after these first images. Ukswrath's thread says to use 2-1/4" caps, but Joseph's spec thread diagrams indicate that the height of the small window which houses each knob is only 2" tall, and that the knobs should be 1.5". I've seen in multiple threads the use of "milk caps," which I believe would be closer to 1.5" figure. Should I simply choose once I've laid out my framing template on the photo box? @justjoseph63 - It looks like you use something like this (also first photo below) in your CRL photo, correct? Here are some additional options I've found. Yes, I've spent far too much time researching bottle caps. Click the images for links to the purchase websites. Here are some additional items I've been collecting for my builds, including an excessive amount of black button bumper pads, the 35-count wipes container (the caps are now clear, not colored, so no green or yellow showing if the tube gets scratched!), and a nalgene hopefully for the top portion of the siphon funnel. I have so many old bottles needing new purpose in life. Time to serve the Empire. Finally, as far as purchases go, I jumped on these spare ABS parts for this build. Specifically I got the main belt (for a dedicated HWT) and the shoulder bridges to use on the antenna tube. I know I'll need to make three buttons for the belt, so I had Mark send me some ABS scraps which I will use to fashion into buttons. My plan is to use @Cricket's Step 1 procedure on her magnetic calf closures thread to create the raised round area on the square cutouts. Can anybody tell me the dimensions of the square and round portions? If not, worst case I measure the ones which will arrive with my ATA armor. I've also been browsing old HWT pre-approval, EIB, and Centurion request threads, and I've been quite shocked at the lack of consistency which existed a decade ago. Most of the builds appeared to be Sandie packs, and Troopers seemed to have different interpretations and a lot of latitude. No wonder the DOs created the General Guide for packs and updated the pack CRL. Here are some of the more recent threads which I poured over: Charles (Templar726) | Tony (ukswrath) | Shawn (CrookKnight) Dave (PBTrooper) | Derek (DZFireMedic) | Jim (Engineering trooper) Sarah (Alay) | Christopher (Chewy) | Randy (magni) For your viewing pleasure, here is one of the old, non-standard, crazy ones: JBOD70 3D Printing So I have a friend who has the ability to print in PLA, but I don't think it will be realistic to utilize that route, so I'm wondering if Shapeways might be a good solution for any random 3D printing I may need, particularly related to my BFG scratch builds. I know a lot Troopers on here have your own printers, but can anybody speak to their experiences using Shapeways or other 3D print services? To conclude, I guess I need to go to Home Depot to pick up some power conver... I mean, this stuff: 2" antenna tube (24") Nibco 2" PVC hub caps Black sticky floor tiles pine lumber for T-21 and DLT-19 scratch builds PVC pipes, adapters, and connections for blaster builds PVC for my thermal detonator (no, I will not wear this as a HWT) There were several other sections I wanted to add to this thread, but it's lengthy enough already. So until next time, heavies, take care. Quote Responses: Randy - I'm definitely going to make the angled arch box, and if my GLM frowns upon it I'll spin up a backup box, which I may make from the get-go anyway. I had already looked BMW and other German and UK vehicle plan, to no avail. With the pans being such a disposable item, even ECS Tuning, who took over brand legacy for BavAuto doesn't have them. I probably could have searched deeper into Euro options, but I figure that shipping might be a bit prohibitive to the US. Joseph - Thanks for the tip on the floor tiles. I will also be experimenting with cheap cutting boards for protecting the photo box. I also like your idea for the placement of the straps in the recess of the oil pan, and I'll definitely be getting screw head covers. Thanks, too, for pointing me to Anthony's T-21s. Those are a bit out of my price range, but I may see if he'll sell me just some of the cast parts. Shawn - If my floral vase cone doesn't work, I may take you up on your 3D print template offer. Thanks!1 point
-
I had a few minutes this morning, so I took advantage of them to get something simple done. With the Chest and Back armor connected and the Shoulder Bridges glued and positioned to my liking, I was able to take my Shoulder Bells and figure out where the elastics and snaps needed to be glued in order to have them nearly touch the Shoulder Bridges (I left a little tiny space for reduced rubbing). I tested the positions by using the same magnets I do when gluing to hold the elastic to the Shoulder bells and try everything on before committing to gluing. Here's one Bell glued up (showing the inside and scrap ABS to spread the magnet force): And the other from the outside: I will probably try to post a shot of the assembled Chest-Back-Shoulder Bell combo tomorrow. I was really happy with how everything lined up. Just didn't have time to snap a photo until I was done gluing. -Dana1 point
-
Hi! I just finished to upload my troops. Requesting profile update. Thank you. https://www.whitearmor.net/forum/topic/48621-60-tk-25010-trooping-log/1 point
-
You could shave a bit off the bottom of the shins to give you a bit more room. Make sure you do the bottom and do a small amount at a time. It might take you forever to get the right size but it’s better then going too far. Sent from my iPhone using Tapatalk1 point
-
I see the Mandalorian helmets are landing too! Sent from my iPhone using Tapatalk Pro1 point
-
I’ll give it a shot man, cheers! From memory I was hesitant to remove any more material off the bottom of the ears as there just didn’t seem to be enough of it! Of course I 100% admit to making many mistakes when I first trimmed this. So now (with what I feel is greater knowledge, and dare I say skill) I’m just trying to make things as right as I can1 point
-
It could mean your GML (garrison membership liaison) has not added FISD as a detachment to your profile or you have not visited the forum in over 12 months, you will have to contact him/her to add affiliation, then it should show as pending. Usually before legion elections pending affiliation is updated but sometimes some get missed. Once you are showing as pending you could contact the FISD DL Sarah @Alayand ask for a manual update, then you will be able to vote for the detachment in legion elections.1 point
-
Latest Test Casts- slow progress, no time to work at night much but managed to test the parts seem below. The main stock wishbone frame still has a few trapped air issues but think I can solve that. The end cap was getting me worried as I could not cast one decent one after 4 attempts. Finally figured out a way to get the trapped air out.1 point
-
Recent Test Castings- Some parts still coming out of the molds a bit rough looking. Grip came out the best so far. End cap had some bubble issues. Bolt is good but wish I molded it so the cocking handle holes were more sunken. They will need to be drilled out. Hope for more to come later this week (folding stock parts) Grip- Grip with Trigger assembly- Bolt, Magazine Housing and magazine Front nozzle section and end cap1 point
-
First test cast with some old resin. Not bad so far. Still some practice needed to reduce trapped air.1 point