Leaderboard


Popular Content
Showing content with the highest reputation on 10/17/2022 in Posts
-
6 points
-
There's always chance for one more4 points
-
4 points
-
Reasons why I haven't applied for Centurion yet: A ) after a troop, I need to repaint the rivets B ) after I've repainted the rivets, I troop By the time I apply for Centurion I'm gonna have used up my white paint4 points
-
4 points
-
Thanks for the inspiration just now Also, it was about time that I made another meme with a TK in it4 points
-
Name: Adam Wolf Height: 5'11" Weight: 148 lbs Armor: AP Helmet: AP Blaster: Denix / Blaster Factory / Self Boots: Imperial Boots Canvas Belt: AP Hand Plates: Rubber (AP) Electronics: Ukswrath (Hovi-tip Speakers, Hearing Assist, & Fans) Neck Seal: Darman's Props Pauldron: Trooperbay Ammo Pouches: Ebay seller Luckyline1945 (full leather) Pack: Garageboss / Self 501st armor link: https://www.501st.com/members/displaymember.php?userID=34307&costumeID=122 Pack Build Thread: EIB Thread: Full Body Photos: Front Back Right Right Right side detail (pack painting/weathering removed as requested, strap fixed as requested) Left Left Left Detail (strap changes shown) Previously shot EIB Trading Card Action Shot Armor Details: Cod/Posterior connection. Shoulder bridges (hidden when suited up, so I did these pix) Other shoulder bridge Shoulder bridge rear (also hidden when suited) Ammo pack knee and split rivets Sniper knee front and support Sniper knee sides Wrist opening Ab buttons Butt - Kidney connection Interior strapping Shoulder/bicep strapping Helmet Details: Front Left Back Right Interior and lens color S-trim (currently glued in place, so I'm resubmitting my original Centurion photo of this piece) Vocoder and Hovi Tips Ear screw detail right Ear screw detail left Accessories: Neck seal and thigh garter Pauldron and chest pouch Pauldron weathering, pouch attachment snaps, and foam filler. Belt and pouch front (New belt created for HWT, still AP sourced) Belt and pouch rear Belt and pouch detail (hopefully) showing alignment. Pouches have foam filler. Rubber gloves Boots Pack Front Base - Garageboss Button box, Vent box, Tombstone box, radio knobs, and drop siphon are all printed in ABS. All lines sanded and smoothed with acetone. Wipe box - Meguiars Radio box - plastic junction box with laser cut acrylic fascia Mortar tube - PVC with AP shoulder strap and TD end caps. Pack Rear with updated painting Tube close up showing weathering removed from the support pieces and rivets painted. Blaster: Right Left Details. Base - Denix metal replica (18 lbs) T-tracks - Blaster Factory Disk - Blaster Factory Right Side Cover Plate (small): Blaster Factory (printed) Left Side Cover Plate (large): Self fabricated (aluminum U channel) Thank you for your time, consideration, and helping me build the best armor I can build!3 points
-
One? I'll raise you two It's 1:20am, what am I even doing?2 points
-
And you can continue with every single Photo, detail and fix etc etc etc2 points
-
This guy... again?! Good luck Adam, not that you need it!! Looks awesome!!2 points
-
My first troop as a TK and also my 100th troop with the 501st. Sent from my SM-S908U using Tapatalk2 points
-
Great to see our future troopers already helping other future troopers!2 points
-
I’ve just finished my 3d printed version using a BS lid. It was a lot of work, mostly as no one else has really built it. The files for some sections have been updated as well If I were to do it again I would know the pitfalls and be able to make life easier2 points
-
Other than the lid and pauldron, all 3d printed on my CR-10s2 points
-
I actually stumbled upon your earlier today! Excited to see some more updates, and ill certainly be referencing it during my build!2 points
-
I am building an amor kit from MTK too!! I got mine a couple weeks ago. I am almost 6 foot with boots and rather “built” for a female (176 lbs i workout everyday) so far it’s fitting amazing. My build thread is sub par and lacking pictures but I’m working on adding more. keep us updated on yours!2 points
-
Went to the local church’s trunk n’ treat. Mostly hung out with friends and messed around in costume. Was pretty fun.2 points
-
For those aiming for higher levels of approval with ANH Hero armor, please be aware that the CRL for Expert Infantry has been updated, specifically for the Hovi mic tips. The update is an addition to the present requirements and the new ones are shown below in bold font and underlined: "Correct Aerators/Hovi-MIX tips are present. Screens used shall be of a wide type mesh. The rim of the mic may be weathered, and the inside raised area painted white. Interior sides shall be painted black, mesh can also be painted black". The reason for these updates is for better screen accuracy, as there is overwhelming evidence that the vast majority of the Hero helmets seen in the film were painted in this way. As noted, the mesh may be painted black but this is not a requirement at any level.2 points
-
1 point
-
ok Mr Wolf, you're on the line now , @chemi will be with you as soon a possible. Great work with the fixes.1 point
-
Great news, happy dance No really easy part for your first cut, make sure you measure twice and cut once, when in doubt check with our gallery sections Personally I started on the Detonator I thought that would be an easy piece, just check your measurements
 1 point
 -
He just keeps turning up. And getting dirtier every time.1 point
-
Hi Mark, and THANKS for your SECOND submission for ANH Stunt EI (and your patience)! CRL and EIB Application Requirements: All required photos have been submitted, and on behalf of the entire D.O. staff we are pleased to welcome you to the rank of Expert Infantry. Congratulations! Other-Armor Fit/Assembly; In this area we review observations made by your fellow troopers and the DO team. Some observations may lead to suggestions to improve the overall look of your armor, and please keep in mind that we consider both text (CRL) and pictures (screen caps/reference images) when reviewing submissions. You have a great looking set of armor there, Mark, but there is a little fine-tuning you could do to make it look even better! Not sure what happened with your Anovos armor, but I think you will find that AM is sturdier. All that being said, let's get started, brother! Starting with the vocoder, we would like to see the paint on the tops of the arches more symmetrical and the lines crisper. This is really easy to do using a small Flilbert (rounded end) style brush and should take less than 10 minutes. Reference images In looking at the photos below, the gap between the front of the right shoulder bell and the chest plate is pretty wide and should be closer to match the left. Adding some bicep straps would take care of this. In the first pic below, your right shoulder bell is riding higher than the left one. BUT, in the rear shot they are perfectly aligned. I think this is because your right shoulder was raised, so something to consider when you apply for Centurion. It looks like your hand plates are about to pop off, so adding some E-6000 (NOT CA glue) around the edges would keep those rascals in place. The gloves also seem to want to bunch up at the openings (yellow arrow). I have a thread here which will help. Your ab/kidney connections are fine, but there are slight gaps on the sides, so we highly suggest adding some ABS tabs on the sides. There are several versions (2 are below) depending on how adventurous you want to get. Details on this one here. In the first pic below it looks like the belt you are using to support your thighs has slipped considerably and is showing. We suggest raising it (see example) so that the connection sits under your canvas belt. Last up, when you submit your Centurion photos have your photographer check the drop boxes so they don't get caught on your thigh. Centurion Requirements: In this section we prepare you for our highest tier of approval. Because Centurion photos must show more detail than EIB, items pertaining to Level 3 might be seen there and not here and additional photos may be required. We try to point out all that we can from what we are able to clearly see, but the final accuracy is the responsibility of the trooper. Not too much to see here, sir, but as you know Level 3 is all about those small details.... the "ideal" TK. As seen below, your right bicep protrudes farther down than the left one and they should sit at the same height. This is pretty easy to remedy by making the right shoulder bell to bicep strap a bit shorter. I'm thinking an inch or so. Reference images As per the CRL, the ABS belt should sit at or just above the bottom of the ab button plates. Since it has to be raised, we recommend above as seen in the reference images. Reference images Last up is the simplest fix ever! The CRL for Level 3 states that the "Corners of the .. ammo belt shall be trimmed at a 45 degree angle that meets the outer edge of the cloth belt". I know it's a tiny detail, but that's what Centurion is all about! 10 seconds with some tin snips or Lexan scissors and you are good! Reference image And that's it! Nothing too major, and since you have done this before I have every confidence that you can jump on these issues and that we will be seeing your photos for Centurion soon. If you need any assistance with any of the issues (or have questions) always feel welcome to contact any of us on the D.O. staff. Now it's time to get out there and make the CCG proud with this new armor!!1 point
-
Ladies, gentlemen, anyone in between, Big Brown Box Day has arrived! Do you think the FedEx driver knew they were carrying precious imperial cargo? Likely not. Regardless, this MTK kit is absolutely phenomenal, and I can’t wait to get started! Smaller than my Anovos kit, but slightly larger than my WTF kit. Mike was gracious enough to include two sets of ears in his kits (which I will undoubtedly be utilizing both) , as well as gloves, decals, and all the necessary helmet hardware required. My next step will be properly sorting the shins, biceps, and forearms. I’ll be purchasing rubber hand guards soon, as I’m aiming for centurion, so any help in that area will be greatly appreciated. With all that out of the way, any recommendations on what piece I should start with? I have an audition later on this evening, but once I get back, I’m all in on this kit! Sent from my iPhone using Tapatalk1 point
-
I would be tempted to take a vet rag or paper and try to dab out the brushstrokes a little to make it look more natural. Around the rim of the helmet is just fine though as that was how they did for the movie1 point
-
Almost there. The shins are still a problem and need to finish and add sniper plate.1 point
-
Heya Glen!! Yes thanks... i read all this after my post. And it's certainly been a while! Was glad to get the Big Shiny Gal out over the weekend FINALLY after almost 3 years trooping and 2 since Pass the Patch. She still rocks.1 point
-
Hi Renae long time, some info for you, to remain active you must sign in a least once a year to the forum, normally updates are automatic before legion elections, thread with info below1 point
-
Awesome. Very exciting. Make sure to get a picture of it on the porch and lots of unboxing pics.1 point
-
Exciting times, looking forward to seeing those BBB photos1 point
-
BBB is looking like its arriving tomorrow!1 point
-
In an ideal world I would build it myself but I have no skills in that area and no local help so it would just end up sitting unfinished in a box somewhere. I have about another 2 months to wait for the AP ready to wear commission to arrive. I realize I will need to do some adjusting for the final fit and have reached out to the nearest 501st member to me to help with that. He's 2.5 hours away but none closer are interested in even letting me see their armor so this is the alternative plan. Bart1 point
-
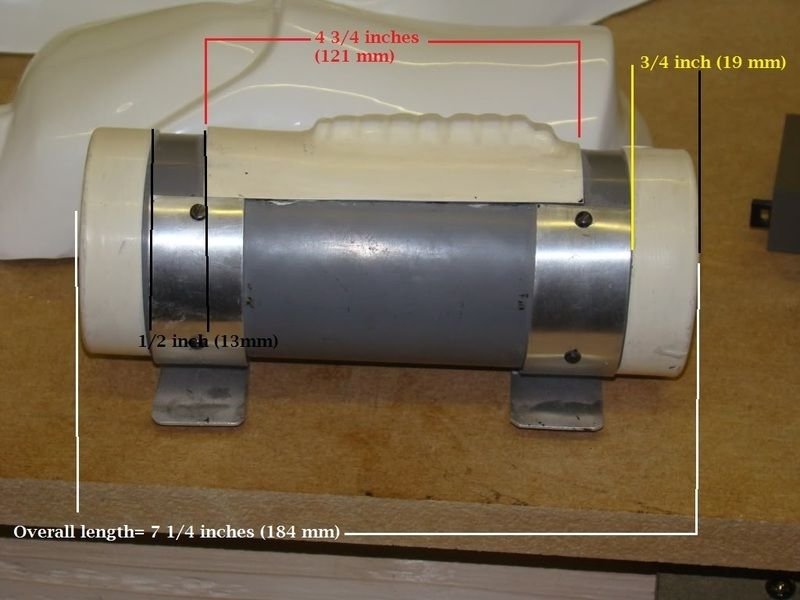
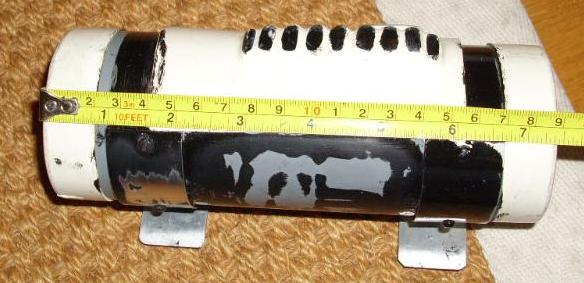
Modified BS lid I added the rear groove by cutting a 1.5 piece of styrene at the height needed from the black section. Stuck that on with double sided tape. Then VERY CAREFULLY went round with a needle file and kept going until the desired depth After painting I added black vinyl in the recess running round the bottom Pauldron from Trooper Bay with added vinyl1 point
-
First post changed.1 point
-
This is as close up as I can get on a screen used asset for you. The pill holes on the biceps were 100% stickers where the chest plate pills were cut through. These look like the same tape used on the biceps and shins. You can see the small air bubbles under then.1 point
-
Pretty much done! Accidentally broke off part of the Rubie’s blaster while suiting up1 point
-
I added white paint to the edges of the armor to give the effect that the mud was scraped off. I also dry brushed white around here and there for a little bit of a worn look close up1 point